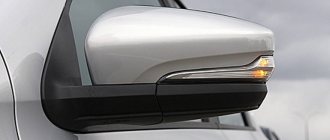
Heated exterior rear-view mirrors have become a mandatory element of a large number of cars, regardless of class, configuration and body type. This system is especially indispensable for machines operated in harsh climates.
The main task of heating is to ensure safety on the road. The driver always has clean mirrors at his disposal, in which what is happening behind is clearly visible.
There are cars, and mostly these are old models, where such systems are not provided standardly. But this does not prevent you from installing a defroster on the mirrors yourself.
The device may malfunction. Then the primary task will be to determine the cause of the malfunction and try to fix it on your own or by contacting a car service center.
Design and equipment
Mirrors equipped with heating can be divided into 3 categories:
- Regular ones. Installed from the factory and included with the vehicle. Increasingly, heating is already installed in the basic version of equipment.
- Model. Sold separately and suitable for specific make and model vehicles. Such mirrors can be installed instead of standard ones, where there is no heating.
- Universal. Similar designs of mirrors, which include heating, are designed for a wide range of cars of different brands and models. When selected correctly, they look no worse than standard or model ones.
Heated mirrors can be divided according to their shape, dimensions, and the type of heater used.
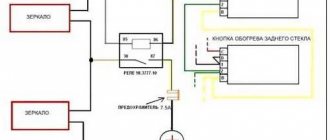
In short, heated rear mirrors include 3 main components:
- switch;
- heating element;
- fuse;
- wiring.
The unit is connected to the on-board electrical network, where a voltage of 12 V is normally provided. When the corresponding button is pressed, current is supplied to the heating element and heating begins.
Heating elements are usually heated by current to 50-70 degrees Celsius.
This is quite enough for the mirror itself to heat up and the adhering snow or ice that has formed to melt.
As for the heating elements themselves, they can be presented in the form:
- an ordinary incandescent light bulb;
- tungsten filaments;
- special boards;
- films with built-in elements to which current is supplied.
Each system has its own characteristics, advantages and disadvantages. But they can all fail at some point.
Procedure
Now you can begin installing the heater. First, remove the holder with the mirror from the case. On most cars, it is enough to pry it with a screwdriver or something flat from below and pull it towards you.
Based on the characteristics of the holder, we choose the method of fastening the wire. If the inner surface of the holder is smooth (as in the photo), then stick double-sided tape on it.
Then we lay a piece of wire on this surface. This can be done arbitrarily, for example, in a zigzag or something else. The main thing is to place it so that the thread covers as much of the surface of the holder as possible. In this case, the wire should not intersect anywhere. Scotch tape will hold the nichrome thread well.
If the inner surface of the holder has any protrusions or fastening elements, then it will not be possible to stick the tape. In this case, a soldering iron will help to secure the wire. Everything is simple here - we apply a nichrome thread to the surface and press it with a heated soldering iron. The plastic will begin to melt and the wire will sink into it. Once cooled, the plastic will become hard and will hold the thread. But here it is important not to overdo it with heating the plastic, so as not to “push” it to the mirror. It is enough just to “drown” the wire in it a little and that’s it.
We recommend: How to drain antifreeze completely: from the engine block, radiator + photo instructions
In this way, we fasten the wire along the accessible surface of the holder without touching the fasteners.
When laying the wire, its ends should be placed towards the side of the holder that is closer to the door, and so that they do not touch each other. To these ends we solder terminals for connecting to the wiring or simply the ends of prepared wires. Then the resulting connections need to be insulated.
All that remains is to provide insulation. If the wire was secured with tape, then to insulate it you can simply stick several more layers of regular adhesive tape on top. This will provide thermal insulation and prevent the wire from peeling off and shorting.
As for the holder where the wire is secured with a soldering iron, you can simply fill the entire surface where the thread passes with sealant and wait until it dries. In this case, the fastening elements will not be affected, which will ensure ease of fastening, and the wire itself will be insulated.
Before installing the holder in place, we pull the wiring through the mirror body into the door, the wiring for powering the heaters. Only after this we assemble the mirror.
Causes of malfunctions
It happens that when the weather gets cold, the driver turns on the heated mirrors, but it refuses to work. It is difficult to say exactly when it stopped functioning, since during warm seasons the defroster is rarely turned on and tested. At this time, the side element is usually clean and no ice appears on it.
The only fact is that the rear view is now difficult due to the sticking snow and ice forming. Only the right heater, the left one separately, or both at once can fail. In some cases, there is heating, but it is poor, its temperature is not enough to cope with bad weather.
The driver's primary task is to determine why this happened and try to solve the problem.
You can prepare in advance:
- set of standard tools;
- multimeter;
- car light bulb;
- soldering iron;
- fuse;
- electrical tape, etc.
What you need depends on the type of fault.
Potentially, each of the main heating elements can fail. Namely:
- Power button. With its help, heating is started and turned off.
- Wiring. Transfers voltage from the on-board network to the heating elements.
- Fuse. Included in the power transmission circuit, it protects against overvoltage.
- Heating elements. Components responsible for heating the mirror itself.
Each element has its own recommendations for eliminating them.
Fuse
Quite often, the entire repair of the rear view mirror heating system comes down to a simple check and replacement of a blown fuse.
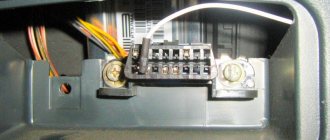
This is the simplest option, so you need to start with it. In the owner's manual you can find out which fuse in a particular car is responsible for heating. Next, you should find the fuse box, find the required fuse element and test it.
The fastest way would be to install a similar new fuse instead of the old one. If the system works, the source of the problem has been found.
A multimeter turned on to check the resistance will also help here:
- the probes are connected to the fuse terminals;
- if there is 0 Ohm on the screen, this is good, that is, the element is intact;
- if the display shows different values, it is burnt out;
- replacement is in progress.
By pulling out the fuse and checking it against the light, you can find out whether the filament is intact. If a failure occurs, the fuse burns out, then the thread becomes deformed. But it is better to confirm the test result with a multimeter and a control fuse that is known to be good.
On many cars, the heated side mirrors and rear window are connected to one fuse. If both systems do not work, then the problem is definitely in him.
But the reason does not always lie in this fusible protective element.
Wiring and activation button
To repair heated side exterior mirrors, sometimes you have to interfere with the design of the button and check the condition of the wiring.
Having ruled out the fuse as a suspect, proceed to checking the button. They are often illuminated by a diode. If the button does not light up, it is probably faulty. You can check this by connecting a multimeter to the output contacts of the button. The voltage test mode is activated.
On some vehicles, the heated rear window and side mirrors are activated by pressing a single button. But there are also separate activation keys.
If there are no problems with the button, wiring is next. To check it and assess its condition, you will first need to dismantle the mirror and get to the wires. For each car, the manual contains specific instructions for removing this element. And the check is performed identically:
- using a multimeter, set the voltage test mode;
- The heating button turns on;
- in this case, the device should show 12-14 V;
- an alternative is to check with a control, that is, with a light bulb;
- the wiring from the light bulb is connected to the leads from the button to the mirror;
- When the heating is turned on, a working heater should light the control.
If this does not happen, there is some kind of break in the circuit. That is, the wire is damaged. Usually it frays, bends, breaks due to initially incorrect installation or imperfection of the factory design.
Problems with wiring are registered if the multimeter shows zero or too low voltage or the control does not light up.
The weak point of the wiring is the contacts. They break off, oxidize and their integrity is compromised.
Damaged wiring can be replaced or loose contacts can be soldered.
Heating elements
When all previous faults have been eliminated, only one option remains. These are heating elements used to defrost the side mirrors. Whether they can be repaired or not depends on the specific mirror.
A multimeter set in resistance test mode will help here:
- if the tester shows a resistance of 10-30 ohms, this is a good indicator;
- if the indicators are overestimated, this is bad;
- Likewise, low parameters are considered a bad sign.
The wires of the control lamp can be connected in series to the disconnected circuit. If it does not light up, the heating element has failed or burned out.
Typically, the filament in heaters fails, contacts break off, and components are damaged as a result of oxidation and corrosion processes. You will have to replace the element.
Installation of finished components
The installation is clear even to a car driver who has recently driven the car.
Procedure:
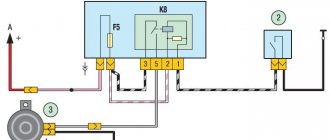
- Find a device to close and open the circuit (relay). Open the hood of the vehicle, find the black box and relay. There are indications on the box which relay is for what. You need to find one for the mirrors and remove it. Next, replace the relay with the mirror element, connect the wire, and close the hood.
- Remove old mirrors. Open the doors, unscrew the screws. Find mounting locations for rearview mirrors. Remove old components and disconnect wires.
- Supply purchased components.
We recommend: Replacing the clutch cable of Lada 2109i (VAZ 2109i)
Replacing the mirror heater
If the device is completely out of order, there is no point in repairing or restoring it. It won't help. It is necessary to replace the problematic device.
To replace the heating element, you must:
- install a mirror;
- remove the plastic protection by heating it with a hairdryer or hot water;
- gradually remove protection;
- get to the coating on which the filaments are located;
- to remove this coating, you can simply heat it well;
- take a new element of the required size;
- stick on the inner surface of the mirror;
- remove air bubbles;
- make additional holes for new contacts;
- remove the protection and stick on a plastic frame with suitable holes;
- Reassemble the assembly in reverse order.
If you used a circuit board in your mirror heater, it must be replaced completely assembled. Sometimes right away with wires.
There are homemade heating systems based on an incandescent light bulb. Here you should check the serviceability of the socket and the lamp itself. If the cartridge fails, it is replaced with a similar new one. There are no problems with replacing the light bulb - I just unscrew it from the socket and screw in a new one.
Heated side mirrors are a useful and sometimes necessary addition for any car. Therefore, it is extremely important to monitor the condition of this system, identify faults in a timely manner and try to quickly eliminate them. It is better to do this before the cold weather arrives.