14 February 2018 Lada.Online 80 601 10
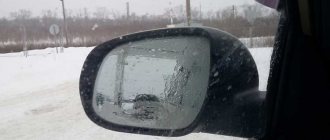
AVTOVAZ first began installing side mirrors of the new SE model (with heating, electric drive and turn signal indicators) on the Lada Granta liftback. Then they began to be equipped with Luxe trim levels of the sedan. The following describes how to install and connect standard liftback mirrors with your own hands to simpler versions of the Lada Granta sedan, as well as to the Lada Kalina station wagon and hatchback.
Installation and connection of heated rear view mirrors on Lada Granta
To work you need to have:
- Heated mirror kit. In my case, these are heating elements made by Salina;
- Copper wire 0.75-1 mm long 8-10 m;
- Small female terminal (2 pcs.);
- Terminal ring “ground for screw” (2 pcs.);
- Clamp terminal (1 pc.);
- Fuse holder (1 piece);
- Soldering iron, probe, several screwdrivers, needle file;
- Heat shrink, electrical tape.
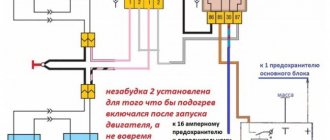
Note: The above components may differ depending on the connection scheme you choose. In my case, the connection will be made by connecting the heated mirrors to the heated rear window. Below I will provide three alternative connection methods that can also be used.
To enlarge the image click on it!
Lada Kalina Hatchback › Logbook › Installation of heated mirrors
I had been thinking about writing about this for a long time, then I was lazy, then I didn’t have time. Anyway. I installed heated mirrors in December, during a slight thaw, because... I did everything on the street.
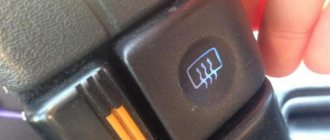
First, one Saturday he took off his beard
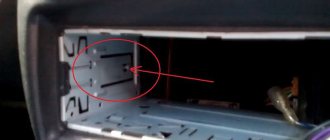
I unscrewed the 4 bolts holding the ashtray, then 2 more bolts under the buttons. He carefully removed it. I immediately replaced the iron clips with plastic ones KJ-841. And connected the backlighting of the buttons from the heated rear window. Next, I removed the fuse box and installed a separate 5A fuse and a 10A relay. Unfortunately there is no photo, but if anyone needs it I can add it later.
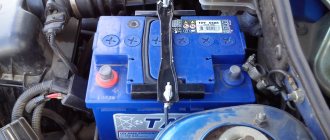
The minus and plus, as in the connection diagram, were taken from the heated rear window. I removed the insulation without cutting the wire and soldered it, and wrapped it with electrical tape. I ran the relay control wire to the button.
I don’t know yet whether it will warm up like this or not, but as soon as it gets warmer I’ll open it and see if I can solder everything. Let's see. And prepared the wires for the door connectors. Well, all this probably took about 2 hours without rushing at all. I thought everything would wake up faster, but I did everything alone, and in some places it was not very convenient. I decided that it was time to go to lunch, but then a setup awaited me. I decided to remove the side mirrors and soak them at home. At the same time, clean and insert new ones. The driver's side unscrewed quickly, but the passenger's side didn't want to come off. As a result, one bolt was broken. He spat, screwed everything back into place and went home. I didn’t go near the car that day. The next morning, armed with large wire cutters, pliers and a hacksaw, I went to unscrew the bolt. I couldn't get it to work with pliers, so I ended up using a hacksaw to cut a hole for a flat screwdriver and it seemed to work. The bolt gave way. I took the mirrors home, washed them, and dried them. Carefully removed the mirror elements with a long screwdriver and an awl (the main thing is patience and not to be nervous, then everything will work out). I connected the wires to the new mirror elements and filled the connection point with red sealant. I installed the new mirror elements in place :). The only thing that didn’t work out was that the mirrors folded. It looks like it has rusted very well, no matter what I tried, the result was zero. I think the previous owner put them out and never touched them again. In the evening I went and put the mirrors back in place. I replaced all the bolts with new ones and lubricated them with graphite grease. The next couple of days I connected the connectors in the door during lunch. I didn’t want to drill through holes, so I modified regular connectors. In the end it worked out more or less, but in the future I plan to buy normal ones and replace them. In the door, I soldered the minus to the minus from the connector, and put the plus on the connector. In the end it turned out like this:
Installation and connection of heated rear view mirrors on Lada Granta
To work you need to have:
- Heated mirror kit. In my case, these are heating elements made by Salina;
- Copper wire 0.75-1 mm long 8-10 m;
- Small female terminal (2 pcs.);
- Terminal ring “ground for screw” (2 pcs.);
- Clamp terminal (1 pc.);
- Fuse holder (1 piece);
- Soldering iron, probe, several screwdrivers, needle file;
- Heat shrink, electrical tape.
Note: The above components may differ depending on the connection scheme you choose. In my case, the connection will be made by connecting the heated mirrors to the heated rear window. Below I will provide three alternative connection methods that can also be used.
To enlarge the image click on it!
Required
| Name | vendor code | Price, r |
| Heated, electrically adjustable exterior mirrors with turn signals (LED) | 4 500 | |
| Joystick/control unit from Lada Kalina (with central locking) | 11180-3709810 | 850 |
| Connector – electric mirror block (female) | CB-00090291 | 150 |
| Block for power window control unit 1118 | CB-00039007 | 50 |
| Connection block to power window button | CB-00033485 | 50 |
| 10 PIN connector with contacts for mirror control | 170 | |
| Wing turn signal plug | 21700-8212104 | 150 |
| Door card blank | 83191 3K030 | 30 |
Do-it-yourself heated mirrors: an alternative option for lazy people
Hello, dear friends! I think many of you drivers are familiar with the problem of fogging and freezing of side mirrors. Therefore, today it would be logical to talk about heating mirrors with your own hands.
This is not just an additional option, but sometimes an extreme necessity. It allows you to constantly be aware of what is happening behind you due to a clear picture without distortion from moisture, condensation and stuck snow.
At the same time, heating for a mirror can be implemented in different ways. Before you take the first step in this rule, I suggest exploring several possible options. I’ll briefly tell you what they look like, what they are and how to connect them without turning to specialists for help, who will obviously demand an impressive amount of money to complete the work.
Varieties
There are several options for organizing heated exterior rear-view mirrors, which are conventionally divided into electrically dependent and independent of the on-board power supply at 12 V or 24 V.
The implementation of heating depends on the specific material you will use.
The following varieties are distinguished:
- Film heaters. Very easy to use, easy to install and at the same time quite effective. An option for the lazy, if you will;
- Heating from light bulbs. Initially, all motorists who did not have standard heating, but wanted to get it, used light bulbs. Today the technology is outdated, but still relevant;
- Conductor elements. It uses a special board that has heating elements. There is nothing difficult to install, and the range is extensive;
- Wire. A special wire is used as heating. It can also be implemented if you follow some rules.
To provide some clarity, I propose to now consider each option separately.
Based on the information received, you can decide what suits you and which idea is better to abandon.
You can organize homemade heating on any mirror. It all depends on your wishes, skills and financial capabilities.
Judging by publications on Drive2, homemade heating systems are most often found:
- for VAZ 2110;
- Daewoo Nexia;
- Daewoo Lanos;
- VAZ classic;
- Lada Kalina;
- Renault Logan;
- on Gazelle trucks;
- VAZ 2109;
- Renault Sandero;
- Chevrolet Aveo, etc.
If you want something similar for yourself, I suggest you get acquainted with short excursions into the issues of creating heating using one method or another.
Using light bulbs
This is the oldest method among all existing ones. But there is absolutely nothing surprising about the fact that incandescent lamps are used for heating.
In fact, such light bulbs are heating devices. They spend about 90% of electricity on heat, and only 10% goes to light emissions. To create a heating system, it is best to take a pair of low-power 10-watt light bulbs, or 1 double-filament light bulb, which will allow each spiral to be connected separately. Usually their size fits perfectly into the mirror body. It is only important to place the lamp so that it does not touch the internal surfaces of the mirror and the body itself.
The process of installing the heater itself is quite labor-intensive. But many cope on their own.
If you are interested in the details of the process, it can be divided into several stages. Think carefully before using lamps. However, the method is outdated and there are a number of alternative solutions.
But I will still describe the process step by step. It looks something like this:
- the mirror housing is removed;
- the body is disassembled;
- the front wall is treated with heat-resistant material;
- a layer of foil is applied on top of the insulation to reflect heat;
- the light bulb is fixed with wires using a socket or clamps;
- everything is carefully isolated;
- connect to power;
- display button;
- assemble everything in reverse order;
- check functionality;
- start heating.
Usually there is a separate button to activate heating. When using 2 10-watt lamps, the mirror can warm up and get rid of ice in about 2-5 minutes.
DIY tuning | Topic Author: Avishalom
Angel Eyes in detail at the link https:// yandex.ru/clck/jsredir? from=yandex.ru;search%2F;web;;..
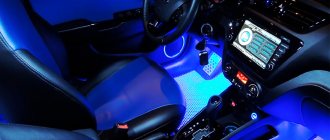
Repair (Abhivadana) Installation of floor (leg) lighting in Kalina Getting into the Kalina salon will be much more convenient if additional lighting is implemented. Let's dwell on interior tuning, and in particular, how to install lighting for the feet of front and rear passengers in the Lada Kalina. Installing driver and passenger footwell lighting
You will need: LED strip (total length 3 meters). Price 600 rub. wires (several meters). tricks (2 pieces). Driver's floor lighting. We fix the LED strip with double-sided tape, or use a plastic cable channel that is secured with self-tapping screws. The mounting location is the steering column casing and the bottom of the dashboard. Illumination of the floor of the driver of the viburnumIllumination of the floor of the driver of the viburnum
Front passenger floor lighting. By analogy, we attach the LED strip under the glove compartment. Illumination of the floor of the front passenger of the viburnumIllumination of the floor of the front passenger of the viburnum
By the way, for illumination you can also use the glove box lighting, which is most conveniently installed on the side trim of the dashboard. To make the lighting bright, install an LED light bulb instead of a regular one. Installation of floor (leg) lighting in KalinaInstallation of floor (leg) lighting in KalinaInstallation of floor (leg) lighting in Kalina
Rear passenger footwell lighting. Here it is most convenient to glue the light source to the corners, which in turn are fixed to the air ducts. Note that it is not at all necessary to remove the seats for this; it is enough to simply move them forward as much as possible. Foot lighting for rear passengers in Kalina Foot lighting for rear passengers in Kalina Foot lighting for rear passengers in Kalina Connecting floor lighting in Kalina
Ground connection (select the one you need): From any nearest point on the body, if you want the backlight to turn on manually, through a toggle switch. To the door switches, if you want the backlight to turn on when the door opens. In order not to pull the wire out of the door (as we did when installing heated mirrors), you can hook it to the blue and white wire under the threshold of the left door. And under the threshold of the right door - red-brown.
Connection +12V (select the one you need): Plus from the dimensions (+12V appears after turning on the interior lighting). You can take it from the radio block, connector A6. Or from the cigarette lighter (white wire), but for this you will have to remove the central tunnel of the Kalina. Constant plus (+12V) from the red wire of the ignition switch or ceiling lamp. Plus, after turning on the ignition from the ignition switch, there is a thick blue wire with a black stripe (near the wire it says “15”). It is better to run the wires under the carpet. If you lay them on top, then make sure that they do not get in the way of your feet and are not torn when the seats move.
We recommend connecting Kalina's floor lighting to the interior lamp. We stretch the wires along the windshield pillar and solder the wires directly to the contacts on which the light bulb itself sits, otherwise operation in three modes will not work. ground to the green wire. +12V to red.
Installation
Remove the door trims and dismantle the old exterior mirrors (by removing the mounting screws). Mirrors of the new SE model are installed in place of the old ones without modifications.
To install the joystick, make a hole in the door trim using a file or a utility knife. Sample:
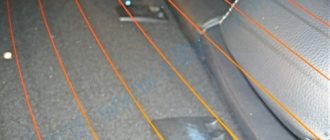
To stretch the wires from the interior to the doors (see connection below), you will need to drill a hole in the door rosette with a drill (or find a suitable female-male connector).