A function such as heated rear window is by no means new on domestic VAZs. This option is available on all modern Volga-made cars, including “tens” and “nines”. Heated rear window is useful not only in winter, but also in summer (in particular, when it rains heavily). Clean glass is the key to your safety. After all, the visibility of the car thanks to the interior mirror increases by a third. Sometimes this system fails. The VAZ-2110 is no exception. Rear window heating not working? What to do and what are the reasons? You will find out the answers to these questions in our article today.
Device
First, let's get acquainted with the structure of this system.
- The thread that provides heating.
- Wiring (positive and negative).
- System switch. Equipped with a warning light inside.
- Heating relay.
- Fuse.
- Control buttons.
This system works very simply. There is a conductive thread on the rear window. It warms up when power is applied. This way the glass is heated and condensation is removed from the inside.
Why does the rear window heating not work on a VAZ-2110 car? The reasons may be trivial. After all, the device has no mechanical parts. Therefore, all you need for diagnostics is a multimeter and a test lamp. This is the only way to find out why the heated rear window of the VAZ-2110 does not work. There is a photo of the diagram in our article.
The most common reason why the rear window heating does not work on a VAZ-2110 car is the relay. Over time, it burns out and stops passing current normally. How to check this element for serviceability? You will need a multimeter. But first we check whether the relay is emitting signs of life. We turn on the heating button and listen to its operation. A working relay should make a characteristic click. If it is not there, we continue to search for the problem deeper. We pull the relay out of the mounting location and apply the probe of the device to one of the contacts. The second wire goes to ground (that is, to a bare area of the body). If the device shows “zero”, most likely the element needs to be replaced. It is because of the relay that the rear window heating does not work well. The VAZ-2110 is equipped with an element of the “K6” brand. It can be bought at any car store for a price of no more than two hundred rubles.
Causes of malfunctions and their identification
The heated rear window works as soon as the ignition is turned on, and the glass should clear within a couple of minutes. But sometimes it happens like this:
- The power-on signal does not light up, although the button is pressed, the glass does not defrost (remains foggy);
- The heating does not work, but the control light is on;
- The glass thaws in stripes;
- Heating is insufficient. This phenomenon occurs if the glass is heavily frozen. In this case, simply clear it of ice mechanically.
Rear window defogger time relay
The root cause of other phenomena should be sought:
- in relay control;
- check the condition of the fuse in the box;
- Check to see if the connectors on both sides of the rear window are secure. They may need to be cleaned;
- also check for breaks in the supply wires in the switch itself;
- if everything is in order here, you should check the conductive thread. With the engine running, you need to check the voltage approximately in the middle of each section (strip) of the thread. If the meter shows about 6 volts, everything is fine. If the readings are about ten, or, conversely, about zero, it means there is a break. A technique will help to determine exactly where the break is: the device has a pointed electrode, wrapped in a wide foil strip, and is led along a “suspicious” conductive strip. Where there is a voltage surge, there is a break;
- but often you can literally see the break - the thread has come apart in some area.
Fuse
If your rear window heating does not work, your VAZ-2110 should be checked for a blown fuse. In the mounting block, check the elements in connector F8 (usually they are rated at 20 amperes). If the fuse looks like the one in the photo below, it needs to be replaced.
What is the reason for this phenomenon? Most often this happens due to a short circuit. At one point, the voltage on the on-board network increased above normal. To prevent the contacts from melting, the system is simply turned off by breaking the connecting elements. In this case, this is +12 V power and conductive elements on the rear window.
How to repair the conductive layer? Method No. 1
You can do this yourself. To do this, you do not need to dismantle the glass. All you need is to purchase a special conductive paste (available in auto stores or on the market) and apply it to the damaged area. It is important to prepare it carefully. To do this, carefully clean the varnish from the surface and degrease the area with alcohol (use a piece of soft rag). Next, we clean the ends of the damaged threads. We apply adhesive tape or electrical tape to its upper and lower parts so that there is a small gap (no wider than the thread itself). We apply a special adhesive into it. After a day, the composition will completely dry out. Next, you can remove the remaining tape and check the system for functionality. If the heating works only partially, it means that the break occurred in several places. Find the second place where the thread is damaged and treat it with a conductive compound using a similar principle. That's all. We will also consider the old-fashioned method of repairing threads.
Methods for repairing threads of heating elements
There are several ways to restore the heating filament at home.
Use of conductive pastes and adhesives
The simplest and most effective. with dedicated repair kits such as DONE DEAL DD6590, designed to repair rear window defroster threads and contacts by both hobbyists and professionals. The good thing about this method is that it does not require tools or materials. Simply apply a small amount of conductive paste according to the included instructions to the broken thread using a syringe and wait until the paste hardens and the repair is complete. But such a set costs more than 15.
The second method is similar to the previous one. But instead of a branded set, electrically conductive adhesives are purchased, for example, from the Moscow manufacturer Elekont. Glue is applied to the area where the thread breaks, overlapping the entire part of the thread by a centimeter on each side. A tape or tape stencil is used to get a neat look. For reliability, glue is applied twice. It is advisable to place a piece of tinned copper wire with a diameter of 0.3-0.5 mm between the layers of conductive glue.
It is believed that conductive paste or glue for repairing glass heating filaments can be made independently by mixing paint or glue with brass fillers relative to each other. The resulting composition is applied through a stencil in a thin layer to the place where the thread breaks into several layers. But the reliability of this technology has not been proven in practice.
Copper plating
Another method is electroplating copper. The heating filament repair method seems attractive. But from personal experience I can say that the reliability of such coatings at home is low. Therefore, I did not dare to use this technology.
Using soft soldering
The mechanical method of restoring the integrity of the rear window defroster filaments using soft soldering has been widely used. The reliability of this method was tested by me when repairing the rear window heating threads in my car. The following step-by-step instructions, based on my experience, will allow you to easily repair your heater threads in minutes, at virtually no cost.
On the advice of theorists on the Internet, I made a big mistake and tried to cover the thread with sandpaper. As a result, instead of a gap of a thread 1 mm wide, a gap of more than 1 cm was obtained. The thread of the tape is very thin, has only a few tens of microns, it can even be erased instantly with fine-grained sandpaper. The heater filaments are no longer covered, and a humidifier soaked in alcohol or acetone is sufficient to degrease the soldering area.
If the filament gap width is less than 1 mm, you can do without soldering an additional conductor. In my case, the gap width was large, and I had to prepare a piece of copper wire for the jumper in advance. A current of about 1 A flows through one heater current. Based on this, we select from the wire cross-section table a wire with a cross-section of 0.17 mm 2, corresponding to a diameter of 0.45 mm. The length of the copper jumper should be equal to the width of the thread break plus 2 cm. Before soldering, the jumper should be covered with a thick layer of POS-61 tin-lead solder. The heating filament does not need to be peeled off.
To ensure that the soldering iron fits tightly to the heating filament, before soldering the jumpers, it is necessary to lubricate the filament in the soldering area with a brush with a thin layer of zinc chloride flux.
Next, the jumper is pressed against the heating filament and heated for one second using a 12 W soldering iron. The hand is moved to the side. The jumper should be on the thread. Trying to pull it out to check the quality of the solder is unacceptable; it will fall off and another piece of the heating filament will come off. Unfortunately, this has been verified empirically. As a result of experiments, I finally had to solder a 5 cm long jumper.
After soldering one end of the jumper, the other is pressed tightly against the thread and is also heated with a soldering iron. After soldering, the glass is thoroughly washed with water to remove acid residues.
To top it off, although not required, I coated the top of the solder jumper with Moment's clear cyanoacrylate adhesive, which has a heat resistance of about 70°C. The heater does not get hotter than this temperature.
As a result, the repair time for a homemade thread, taking into account all the preparatory work, was no more than ten minutes. The refurbished themes have been in use for over three years.
Source
On a VAZ 2110 car, the rear window heating does not work: reasons
A function such as heated rear window is by no means new on domestic VAZs. This option is available on all modern Volga-made cars, including “tens” and “nines”. Heated rear window is useful not only in winter, but also in summer (in particular, when it rains heavily). Clean glass is the key to your safety. After all, the visibility of the car thanks to the interior mirror increases by a third. Sometimes this system fails. The VAZ-2110 is no exception. Rear window heating not working? What to do and what are the reasons? You will find out the answers to these questions in our article today.
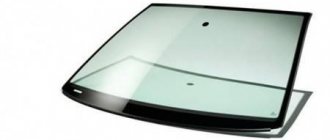
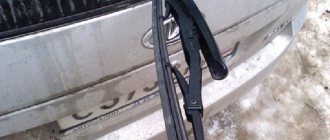
Car windshield
The problem of windshield icing has been known for a long time, and it is especially relevant in cold countries. Icing on the windshield reduces the driver's visibility, making the trip not only comfortable, but also dangerous. This problem is especially common in older cars that lack proper airflow and heated windshields.
heated windshield
A heated windshield is many times more effective at de-icing than the best standard heater. Thanks to the heated windshield, the car warms up better and becomes suitable for use faster in the cold season.
In addition, the driver receives a better view thanks to the fully heated windshield. In addition, there is no need to clean the windshield with a brush, scraper, etc., as a result of which various scratches do not appear. Which in turn also impair the driver’s visibility and give the car a nondescript appearance.
As you know, in VAZ 2107 cars the manufacturer did not provide such a function as heating
windshield. There is only its air flow, which allows you to remove the “foggy glass” effect. If you want to improve your car, you can become the owner of a heated windshield. This athermal glass is easily delivered on its own as all the necessary components are attached to it.
This type of glass is ideal for the VAZ 2107, so a snowy, frosty morning can no longer ruin your mood. Of course, heated glass is quite expensive compared to its simple counterpart. But you probably won't regret this windshield upgrade.
On VAZ cars, as on most foreign cars, the rear window is equipped with a heating function. This is very useful and is designed to maintain visibility through the glass in bad weather.
Heating
It helps equally in rain and fog, when condensation forms on the glass, and in winter, when it is covered with a layer of frost.
But sometimes it happens that heating
rear window 2114 does not work. There may be several reasons for this. we'll look at them below, but first we need to understand. On what principle does the heating system itself work?
Device
First, let's get acquainted with the structure of this system. It includes the following elements:
- The thread that provides heating.
- Wiring (positive and negative).
- System switch. Equipped with a warning light inside.
- Heating relay.
- Fuse.
- Control buttons.
This system works very simply. There is a conductive thread on the rear window. It warms up when power is applied. This way the glass is heated and condensation is removed from the inside.
Why does the rear window heating not work on a VAZ-2110 car? The reasons may be trivial. After all, the device has no mechanical parts. Therefore, all you need for diagnostics is a multimeter and a test lamp. This is the only way to find out why the heated rear window of the VAZ-2110 does not work. There is a photo of the diagram in our article. Below we will look at the main elements to check.
The most common reason why the rear window heating does not work on a VAZ-2110 car is the relay. Over time, it burns out and stops passing current normally. How to check this element for serviceability? You will need a multimeter. But first we check whether the relay is emitting signs of life. We turn on the heating button and listen to its operation. A working relay should make a characteristic click. If it is not there, we continue to search for the problem deeper. We pull the relay out of the mounting location and apply the probe of the device to one of the contacts. The second wire goes to ground (that is, to a bare area of the body). If the device shows “zero”, most likely the element needs to be replaced. It is because of the relay that the rear window heating does not work well. The VAZ-2110 is equipped with an element of the “K6” brand. It can be bought at any car store for a price of no more than two hundred rubles. If you don't have a multimeter, you can use a test lamp. It is important that it is 12 volts. We connect one wire to the “plus” of the relay. The second one is connected to ground. If the lamp does not light, then the relay is faulty. But contacts can also burn out, due to which the voltage will not be fully supplied. The light bulb will not be able to determine this. For more accurate diagnostics, experts recommend using a multimeter.
Heating system design, typical malfunctions
The glass heater in the car is quite simple. Typically, threads are applied to the glass surface, which can heat up when current passes. Other components that ensure startup, proper operation and power supply of the circuit are a button, wiring, relay, fuse, battery.
Frequent problems:
- The heating is ineffective and streaks of fog appear. The defect indicates damage to the threads. To identify the problem, you need to inspect the stripes; the place of damage is easy to detect - it will be foggy.
- Heating and sweating occur very slowly, which means poor contact and possible problems with voltage. It is necessary to check the indicators at the input and storage.
- If the heating does not work at all, but the light on the button lights up, the fuse may have failed or the problem lies in the power connectors.
- If the system does not work and the control light does not light up, you need to pay attention to the heating relay. The button, voltage and ground are checked.
- With a working system, defrosting does not occur. This happens when winter comes and the ambient temperature drops significantly, the glass freezes up. The heater power is not enough to thaw the ice. It is recommended to clean the glass by hand so that the threads can work normally.
Complete failure of the heating system is rare. The integrity of the threads is often compromised. If problems occur with the device, you can carry out repairs yourself.
Fuse
If your rear window heating does not work, your VAZ-2110 should be checked for a blown fuse. In the mounting block, check the elements in connector F8 (usually they are rated at 20 amperes). If the fuse looks like the one in the photo below, it needs to be replaced. For the future, experienced car owners advise carrying a spare set in the glove compartment. After all, if the fuse for the fuel pump burns out (especially while on the road), then the car will not be able to start at all.
What is the reason for this phenomenon? Most often this happens due to a short circuit. At one point, the voltage on the on-board network increased above normal. To prevent the contacts from melting, the system is simply turned off by breaking the connecting elements. In this case, this is +12 V power and conductive elements on the rear window.
Damage to the heating filament
For what other reasons does the rear window heating not work? VAZ-2110 is equipped with special threads. A break can happen here too. The threads are a small layer of conductive substance.
It is easily damaged by the slightest mechanical impact (even with such harmless actions as removing tint). You can determine the location of the damage using a magnifying glass. It is advisable to carry out diagnostics during daylight hours. Damage to the threads is one of the obvious reasons why the rear window heating partially does not work on the VAZ-2110.
The procedure for repairing a faulty OZS system
Having determined the reason why the rear window heating does not work, you can begin to repair this system.
- If the fuses or relays of the OSZ system are faulty, then the faulty parts must be removed. Replacing them with new, functional ones is not difficult. The main thing is that they are installed as indicated by the on-board electrical system diagram.
- In the case where the culprit of the damage in the OZS system is the terminal connection, restoring the heated rear window is also not difficult. It is enough to clean the contacts in the terminals. The terminal box may need to be replaced, but this will not take much time either.
- If the glue that was used to attach the contact on the rear window turned out to be of poor quality and peeling occurred, then in this case you need to buy a new high-quality conductive glue. Remove the layer of old glue from the peeled contact using a napkin with an alcohol solution. Then apply a layer of new connector and glue the contact in place.
- If a wire is torn off on one of the buses, it is necessary to solder this wire to the old place using the connection diagram. The procedure is as follows:
- remove the remnants of old solder from the wire, stripping the end; in addition, you need to clean the connection point on the bus;
- Using a brush, apply rosin paste as a flux to the cleaned surfaces of the bus and wire;
- Apply solder containing three percent silver to the cleaned and rosin-coated wire core;
- solder the wire to the bus, while avoiding overheating of the surfaces.
How to repair the conductive layer? Method No. 1
You can do this yourself. To do this, you do not need to dismantle the glass. All you need is to purchase a special conductive paste (available in auto stores or on the market) and apply it to the damaged area. It is important to prepare it carefully. To do this, carefully clean the varnish from the surface and degrease the area with alcohol (use a piece of soft rag). Next, we clean the ends of the damaged threads. We apply adhesive tape or electrical tape to its upper and lower parts so that there is a small gap (no wider than the thread itself). We apply a special adhesive into it. After a day, the composition will completely dry out. Next, you can remove the remaining tape and check the system for functionality. If the heating works only partially, it means that the break occurred in several places. Find the second place where the thread is damaged and treat it with a conductive compound using a similar principle. That's all. We will also consider the old-fashioned method of repairing threads.
Method number 2
This method involves the use of non-ferrous metal shavings as a conductive element. Also, to repair the thread, we will need a transparent varnish (it is advisable to use a thick one, like for nails).
Mix the shavings with a brush and apply to a strip previously sealed with tape, as in the previous case. After an hour, the varnish will completely dry. The method is quite old. It is not always possible to connect damaged contacts as needed. Therefore, if it is possible to buy conductive glue, it is better to use the first method. It will be much faster, easier and more reliable. The cost of a 10-gram tube with this composition is 78 rubles. This volume is more than enough to repair several damaged heating threads.
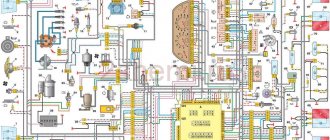
Rear window heating diagram for VAZ 2110, 2111 and 2112
1 – mounting block;
2 – ignition switch; 3 – rear window heating switch; 4 – control lamp for turning on the heating; 5 – rear window heating element; K6 – additional relay; K7 – relay for turning on the heated rear window; A – to power supplies The rear window heating is activated using the auxiliary relay K7 (type 904.3747-10). When the heating is turned on, the orange lamp 4, which is located next to the button, lights up. The heated rear window only works when the ignition is on, since voltage is supplied to the button through an additional relay K6, which is activated when the ignition is turned on. Power is supplied to the heating threads through the contacts of relay K7 from fuse F7, which is directly connected to the power sources.
Checking and replacing the heating relay
Typical VAZ glass heating relay
Problems that arise over time with heating the rear window are often associated with circuit problems, a blown fuse, as well as a heating relay:
- In VAZ model cars, the rear window heating relay is used to turn on the heating for a certain time within fifteen minutes
- This system operates thanks to a built-in timer.
- For vehicles in which a relay was installed, such a system can be located in the standard relay block or in the fuse box
- And in place of the standard relay, a new one is simply inserted and the heating is turned on with a standard button
- It is very important here that the winding of this relay is constantly connected to ground.
- The purpose of the relay is to turn off the heating when the motor is not running. The most important thing is that heating does not drain the battery
Relay replacement
If the glass heating does not work due to a broken relay, then the instructions dictate the following actions:
- First you need to disconnect the battery from ground
- Then remove the heating switch from the dashboard and disconnect its connector
- Next, you should check the condition of the circuit between the ends (terminals) of the 1st and 3rd connectors located on the relay side
- Be sure to check the status of the heater timer
- The control (test) light of the switch lights up when turned on and goes out after 12 minutes
- When the switch does not function, then it needs to be replaced
- Then the condition of the circuit from the side going to the switch connector is checked
- When the ignition key is in the off position, there will be no voltage
- We connect pins 4 and 6
- Then we check the operation of the heater
- If something does not work, then you will have to replace the switch
- The heating relay should be located in the fuse box, which is located in the passenger compartment
- It turns on only when you turn the ignition key in the lock and continues to work when the engine is running
- We turn on the heating by pressing the power button, after twenty minutes of operation the heating automatically turns off
- This heating function is very convenient and even necessary.
- You can install the relay in the rear window heating system yourself, or at a service station if you are satisfied with their price
Troubleshooting procedure
- Check fuses F8 (20A) and F8 (20A) (mounting block).
- We check the serviceability of the rear window heating button. Is there a “plus” on pin No. 10 of the switch button and after turning on the button on pin No. 9 (a test lamp or multimeter will be useful).
- We check +12V at the Ш5-2 output and at the connector near the rear window.
- We check the wires and their connections.
- We check the rear window heating relay - K7.
- We check the integrity of the glass heating filaments.
Shendys › Blog › Mounting block 2110
It doesn’t matter how the relays and fuses are located, the connections are the same (except for relay K8)
Thirdly, there are both those without generator excitation resistors (and the legs at the rear Ш4/9) which are needed if you have an old device (otherwise the generator will not give a charge until you rev it up).
Fourthly, A: there are blocks without legs on the K1 lamp serviceability relay, B: with legs but connected by tracks on the board itself (you can disassemble the block, cut them and install a relay), C: with legs under the relay. In this case, there is a relay or plug-in jumpers instead. Well, it doesn't matter.
The VAZ-2123 uses the same block (392.3722), only its lower mount is longer. And on the UAZ-3160 (43.3722) the rear fog light circuit is also connected differently.
Maybe they differ in some other way, but that’s all we’ve been able to find out so far.
Block diagram 2110 (with resistors and without relay K8)
Circuit diagram and pinout of block 3160
Block contacts using the example of 2110
Relay: K1 – relay for monitoring the health of the lamps (or not); K2 – windshield wiper relay; K3 – relay-interrupter for direction indicators and hazard warning lights; K4 – headlight low beam relay; K5 – headlight high beam relay; K6 – additional relay (ignition); K7 – relay for turning on the heated rear window; K8 – backup relay (or fog lights).
And an addition: I found instructions 2110 on the Internet, where they write “In the niche of the instrument panel behind the mounting block there is a fog lamp fuse installed.”
Apparently these are one of the first 2110s. I did not find any electrical diagrams with this separate fuse, nor with Sh4/9 connected, although some pinouts of the unit have it (there is a brown-white wire, the same as for the generator light bulb).
TOTAL:
When replacing the block, we look at: - the lower mount, - whether we need the K8 relay, - whether the wire goes to Ш4/9, - whether we need a leg on the new block or not.
52 likes Subscribe
Comments 6
Participate in the discussion can only registered users.
Helped a lot, thanks! At least I understood the wiring a little)
great recording. The stops stopped working, I discovered that the problem was in the mounting block, I took everything apart and looked and couldn’t figure out what was wrong. There was such a block 2110-3722010-08. I found this 2110-3722010-12 and installed it with the cigarette lighter and speedometer and tachometer not working! In the end I was able to revive mine.
Are injection units and carb units different?
thank you, useful post. I was just about to install a 2110 relay block on the old G-Class 85, otherwise there is not a single relay except for the turn signal and the wiper, only fuses and the entire load on the buttons, ignition switch and light switches.
Almost all VAZ models have heated rear windows, which makes driving the car much easier in special conditions. Most often, heating is needed in bad, cloudy weather, when the rear window fogs up from the condensation that forms, as well as in winter, when the glass becomes covered with ice.
The operating principle of the heater is quite simple:
- a conductive thread of a certain resistance is applied to the rear window, which heats up when current passes through it;
- supply voltage is provided by the following components: wiring, relay, fuse and power button;
This scheme is used on all VAZ cars (as well as on most foreign cars), from the “classics” to the latest models.
How to find where the glass heating filament breaks
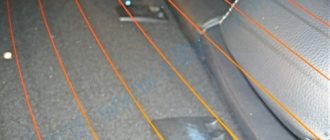
It is not difficult to determine which heater thread is in the break, since in the area where it passes, the mists do not disappear when the heater is operating. Therefore, in order to simplify the search for a faulty thread during repair, it is advisable to count the threads from top to bottom and remember what number is in the stone, and then visually inspect to find the location of its damage. But the thread break is so small that it cannot be found visually. Then a DC voltmeter, ohmmeter or voltage indicator will help in your search. To quickly find the location of damage in the heating element, you need to imagine how it works and works.
Heating element for glass heating system
A logical question: why does it happen that only one or a few flows in the heater are not working, while the rest are working? To get the answer to this question, you need to read the design of the heating element.
The heating element of the rear window of the car is located as follows. Two conductive busbars 1 and 2 are placed on the sides of the rear window. Threads of high tenacity material are connected with these tires. Each thread has a resistance of about 10 ohms. The number of threads depends on the height of the glass. Thus, each thread is a separate heating element, the operation of which does not depend on the others. A parallel connection scheme for heating elements is used. This circuit design ensures high operational reliability of the heater, since the rupture of one or more threads does not lead to a complete cessation of its operation.
READ How to Calibrate the Speedometer of a VAZ 2106
Look for a broken filament heater with a voltmeter
To work, you will need any DC voltmeter with a measurement limit of 15 V. Any pointer or digital multimeter is suitable as a voltmeter. The heater must be turned on before starting work.
Since one of the heating element busbars is connected to the car body, the negative terminal of the voltmeter can be connected to the car body, any screw or bolt is screwed directly into the car body. The easiest way to attach the bracket is to secure the trunk lid using an alligator clip.
Since it is difficult to visually see from clear glass whether the heater is getting hot, touching the positive probe of the voltmeter to bus 1 and then to bus 2 will tell you right away. Bus 1 should be at 12V and bus 2 should be at 0V. It is possible that the left bus in your car will be connected to ground and power will be supplied to the right bus. If the busbars are not accessible, the measurement can be taken by touching the probe to any of the threads at the busbar connection points, i.e. At the outlet of the rubber seal. In the photo these are points 1 and 5.
Using a voltmeter it is easy to determine which part of the heating system is faulty. If the heater is turned on, the power indicator on the button is on and on bus 1. 12V, but there is no heating, this means that the wiring to bus 1 is working. If there is no voltage on bus 1, then there is a poor contact at the power supply terminal on bus 1 or a faulty relay. If 12 V is present not only on bus 1, but also on bus 2, you need to find a bad contact in the terminal for connecting the wire to bus 2 or a diagram for connecting the wire to the ground of the machine.
Find the thread break point
After checking the supply voltage to the heater, you can begin to locate the break in the heating filament. The filament has a strip resistance of about 10 ohms and therefore the voltage values at different points have different values. Therefore, at point 1 the voltage will be 12 V, at point 3-6 V and at point 5-0 V. Therefore, even without knowing which of the threads is in the rock, it can be easily found by measuring the voltage at the middle of the length of all strands. The voltage on the hanging threads will be 12 or 0 V. If the voltage is 12 V, the breaking point is on the left, and if 0 V, then on the right.
Now it is enough to slowly bring the probe to the rock; there will be a gap at the place of the sharp change in voltage. For example, in the photo this is a piece of thread from 6 to 7 points.
Find the thread break point using an ohmmeter
Use a multimeter or set the tester to "name="How to measure resistance">Resistance measurements can also successfully find the location of the broken thread. You don't need to turn on the heater when looking for an ohmmeter, but it won't work to check the supply voltage for the heater except for checking the ground circuit.
If the broken filament is not known, then one end of the ohmmeter probe should be connected to the ground outlet, and the other should alternately touch the middle of the heater filaments. The threads on which the ohmmeter resists are twice as large and will be broken. For reference, the resistance of the entire thread relative to bus 1 or 2 should be 2-3 ohms. If the thread breaks, the ohmmeter will show 4-6 ohms.
If a damaged thread is found, move the tip of the probe away from the center in any direction. If the resistance increases as the probe moves towards bus 1, the gap is in the gap between bus 1 and the contact point of the probe. For example, in the place indicated at points 1 and 2. As soon as the probe passes the rock, the resistance will sharply decrease several times. If the resistance decreases, then the place where the thread breaks is between the feeler gauge and tire 2. For example, at the point indicated in steps 3 and 4. Then you need to move the feeler gauge in the direction of tire 2, and when the resistance drops sharply, that point will break.
Find the thread break point using a car tester
Finding a place for a broken thread using a measuring probe is not much different from searching with a voltmeter. In this case, the indicator will not be an arrow or numbers, but the glow of an LED.
Before you start searching for a damaged thread using a probe, you must apply voltage to the heater. First, the presence of voltage on bus 1 is checked, the LED should be lit, if the LED is not lit, there is a malfunction in the supply voltage circuit. Next, check the voltage on bus 2, the LED should not light up, if it is on, this means that there is a contact failure in the place where the wire is connected to the bus or the car body.
READ Replacement of Priora rear brake cylinder with ABS
To find the place where the heating filament breaks, you need to slowly, lightly touch the conductive filament along it with the tip of the probe. There is a gap in the flow where the LED goes out or comes on. For example, at point 6 the tester LED will light up, but at point 7 it will not. In my case, the thread breaks were large and the tester was only useful for checking the quality of the repair.