Why do we need such headlights and how to choose them
The main role of “angel eyes” is aesthetic. A car with upgraded headlights attracts attention, especially at night. There is also a practical component: your car will become more visible to other road users.
According to the type of design, there are two types of “eyes”:
- LED or light-emitting diodes - work normally at sub-zero temperatures, have a long service life and, if connected correctly, rarely fail. Ready-made kits are expensive, but you can make them yourself and save several times. You can create “eyes” using plexiglass, LED strip or individual LEDs. The first option is the most accessible and least labor-intensive. We will look at this in our guide;
- CCFL or neon - they shine more evenly (there is heated gas inside the tube), but less brightly. They do not like frost and reach maximum brightness only after 2–3 minutes. To work, you need ignition units, which are fragility. The main advantage is the low price of ready-made kits.
The installation of “angel eyes” literally transformed the Lada Priora
SMD technology
SMD (Surface-mount LED). In this version, the LEDs are installed in a circle on a round board. They provide very high light output. There are many styles of these rings, depending on the number and size of LEDs. SMD LEDs are mounted in a circle and create a glow in individual points. Many people like this particular look, while others want the luminous rings to be more uniform and continuous. This is done using a diffusion housing that is placed on top of the LED ring. However, this creates additional heat build-up, which reduces the lifespan of the LEDs.
“Angel eyes” SMD without diffuser and with diffuser.
SMD LED angel eyes can be with resistors or adjustable. The most common method for making SMD LED angel eyes is to mount resistors directly on the ring to control the power that goes to the LEDs. This method is quite reliable, but under certain conditions the resistors on the ring itself may become subject to excessive heat. Additionally, voltage surges can occur in a car circuit, also adding voltage to the resistors. Over time, with constant voltage, resistors may fail or operate intermittently.
To completely eliminate the problem, LED rings have been developed that do not use resistors on the rings. There are only LEDs there. To provide constant current, a regulator unit is used, which is less susceptible to voltage and temperature changes. It is attached along the line between the power supply and the LED ring. This technology allows you to install more LEDs on each ring of angel eyes, which gives a more uniform glow. It is more convenient to mount such rings, since the reverse side does not contain resistors and fits well to any surface.
Can I use red lenses?
Technically, the backlight can be any color, but don't choose blue and red. Traffic police officers regard the use of such colors in optics as an imitation of “flashing lights”, and will definitely want to talk to you about this. In extreme cases, they may even take the car to the impound lot. They react calmly to white, yellow or orange “angel eyes” (in most cases). Multi-colored lights are often considered by traffic police officers as a challenge and immediately cause an appropriate reaction.
What are the penalties for violation?
For those who like to argue, here are excerpts from the traffic rules.
clause 12.4 part 1 Installation on the front of the vehicle of lighting devices with red lights or red reflective devices, as well as lighting devices, the color of the lights and the operating mode of which do not comply with the requirements of the Basic provisions for the admission of a vehicle to operation and the duties of officials to ensure BJJ.
https://www.drive2.ru/c/1296154/
For those who are slow-witted, sanctions are provided in the form of fines:
- for citizens - 2.5 thousand rubles;
- for officials - from 15 to 20 thousand rubles;
- for legal entities - from 400 to 500 thousand rubles.
In addition, unauthorized devices and devices are confiscated. The violator also faces a ban on the operation of the vehicle with the removal of the seal.
Traffic police inspectors will probably issue a fine for such tuning.
Will angel eyes replace daytime running lights?
The question of whether it is possible to drive with “angel eyes” instead of DRLs was actively discussed several years ago on all thematic forums. Opinions varied, but most drivers were inclined to believe that “eyes” do not replace running lights. Although in practice, traffic police inspectors almost never pay attention to cars tuned in this way.
I drive with PTF, but I only tried it with “eyes” and dimensions - no one stops, they don’t ask anything, it’s probably rolling. I’m thinking about separately powering the “eyes” and generally only driving with them, because it kills the fog lights to change (you can’t get close) and the evening light in the cabin is always on.
winnehr
https://forums.drom.ru/toyota-harrier-highlander-kluger-lexus-rx/t1151572717-p8.html
Legality of using "glow rings" instead of DRLs
The answer is also mixed regarding the use of “glow rings” instead of daytime running lights. DRLs must be a separate device, so you cannot use dimensions instead of them (clause 19.5 of the traffic rules). “Angel eyes” are located inside the headlight and act as dimensions. In practice, if the brightness of the modernized dimensions is good, then the police will not fine you for them, but it depends on your luck.
Are Angel Eyes Daytime Running Lights? Traffic police inspectors are sure that no
How to make good “eyes” with your own hands: tools and materials
Tools required for work:
- an industrial hair dryer - you can also cope without it, but it will be much more difficult;
- pliers;
- flat screwdriver;
- soldering iron - you can use twisted ones, but such a connection will be unreliable;
- electric drill;
- thin metal file;
- gloves;
- tin can or other round shape.
- 4 LEDs at 3.5 volts;
- 4 resistances (resistors) at 220 Ohms;
- insulating tape;
- 2 plastic plexiglass tubes;
- sealant for fastening the headlight glass;
- two-component epoxy adhesive.
Transparent option
To make Angel Eyes from a transparent tube, you should get an iron blank, which will help make the ring absolutely round if you plan to use rotary handles for blinds.
Plastic of the required diameter can be turned on a lathe from plexiglass with a thickness of 7-8 mm. Both options are suitable, but in the latter you will need to additionally drill holes for the LEDs and grind the corners, making the workpiece round.
Before bending the material, make cuts several millimeters deep in a circle at a distance of at least 1 mm. To do this, use a hacksaw. Then heat the tube with a heat gun and shape it into a round shape so that the ring touches the reflector inside the headlight in several places, since you will have to mount it later.
Step-by-step instructions for making “angel eyes” for cars
First of all, you need to remove the headlight and dismantle the glass. To do this, heat the edge of the headlight glass with an industrial hair dryer to warm up the factory sealant. As an alternative method, you can put the headlight in the oven for 10–15 minutes at a temperature of 60–80 degrees. Then carefully pry the glass along the seam with a flat-head screwdriver until it begins to separate from the headlight. Most likely, you will have to make some efforts, but without “fanaticism” (the glass may break off or burst).
Preheat the sealant and be careful - the glass may break off when removed from the headlight.
After disassembling the headlight, be sure to keep it clean. Use gloves and avoid getting any sealant or adhesive on the glass or reflector.
The next step is to measure the exact diameter of the required ring and select the appropriate shape. A tin can, bottle, cup or other round object is suitable for this. Just keep in mind that the plastic will have to be very hot for it to begin to bend, so use items that are resistant to high temperatures.
Use pliers and gloves to avoid heat burns
Heat the plastic with a heat gun or in the oven. Please note that the melting point of organic glass is 160 degrees, do not exceed it. Then use pliers to wrap it around the can. Do not let go for 2-3 minutes so that the plastic cools and takes shape.
Now cut off the excess ends and drill holes according to the size of the LED along the ends of the tube.
Drill a hole in each end of the tube
It's time to prepare the LEDs themselves. Connect their positive legs to resistors. As a last resort, you can do without a soldering iron by simply twisting the parts together and clamping them with pliers. But over time, the wire will become disconnected due to constant vibration, and then you will have to disassemble the headlight again.
Connect resistors to the positive terminal of the LED
Connect the negative legs together and further extend them with a two-core wire. Calculate the length so that you can connect to the contacts of the dimensions.
Solder together two negatives and an extension wire
Connect the two negative terminals to the extension wire. Watch the insulation so that the “plus” and “minus” do not connect. It's time to check the functionality of the design. The easiest way to do this is with a 9-volt battery. This can be done simply by connecting the “positive” and “negative” wires to the corresponding battery contacts. If everything is in order, then you can proceed to assembly.
Make sure all connections are secure
Finally insulate all contacts with electrical tape and insert the LEDs into the previously prepared holes at the ends of the tubes. Secure them in place with glue.
Insulate all contacts and connect the LEDs to the ring
Installation of angel eyes
After making or purchasing a set of glowing eyes, they need to be installed in the headlights. The installation process itself does not depend on the make of the car and on what kind of eyes are available: homemade LED or purchased CCFL tubes. The main thing is to be able to carefully disassemble and reassemble the headlights. To carry out the work you will need:
- construction hair dryer;
- transparent two-component glue;
- a set of screwdrivers and other tools.
The first step is to dismantle the headlights. There are no general rules in this matter, since each machine has design features and requires an individual approach. After dismantling, you should carefully inspect the headlight for the presence of latches at the junction of the two parts. Then it is placed on the table and for several minutes the seam area around the entire perimeter is heated with a hairdryer to warm up the sealant there. Only after this they start unpacking. It is better to do this work together, when one person holds the body and heats the seam with a hairdryer, and the second person gradually divides it into two parts.
You need to wear gloves when working with a disassembled headlight to avoid leaving fingerprints on the reflector.
Having separated the inner mask with the reflector from the glass, you can begin installing the first luminous eye. To do this, apply it to the mask and determine the location of the wires. Apply glue to the degreased surface of the ring, press it against the reflector and leave until completely dry. Glue the second ring in the same way. The headlight is assembled in the reverse order, heating the seam with a hairdryer and pressing the glass tightly against the body.
Please note that these instructions are general and only suitable for some types of headlights. Therefore, in each specific case, it is necessary to take into account the design features of the car.
How to connect a voltage stabilizer (optional)
In the electrical on-board network of the car, the voltage “walks” from 12 to 16 volts. And LEDs do not tolerate such changes well. We soldered a resistor to each LED to regulate the voltage. But for more reliable protection you need a special stabilizer. It’s easier to buy a ready-made version and arrange it into a connection between the “angel eyes” and the on-board network of the car.
Factory version of the voltage stabilizer
If you are an “advanced” electrician, you can solder a simple stabilizer yourself. The L7812CV chip is used as a basis. See the photo below for the connection procedure.
The connection diagram is quite simple
According to this scheme, you need to connect the negative contact of the LED to the ground of the car, and the positive contact to the output of the stabilizer.
Video: connecting a voltage stabilizer for LEDs
The procedure for making and installing “angel eyes” is not easy. Before starting work, evaluate your abilities and capabilities to avoid possible additional costs. Consider whether your actions are legal and what consequences they may lead to. Neatness and cleanliness are required for successful completion of optics tuning. But everyone will notice your efforts.
Today, many people like to tune their vehicles, regardless of whether they are imported or domestic. The most popular and easiest to implement are “angel eyes”.
Eyes on the car
This type of headlight tuning can be done by anyone for any car. This article will tell you how to make angel eyes with your own hands and what they are.
How to illuminate a car from the inside
Do-it-yourself interior lighting tuning of a car can be done in two ways: with a strip of LEDs and neon lamps.
Neon salon
You will need:
- Nylon clamps.
- Aluminum corner.
- Neon lamps.
- Self-tapping screws.
It is more correct to start tuning by installing neon lights at the bottom of the cabin.
Most often, neon lamps are manufactured with a cigarette lighter connector; it must be cut off and then the ends must be stripped. Then we saw off a corner corresponding to the size of the lamp and screw it under the dashboard in the cabin. We fix the lamp on the corner with nylon clamps. The same is done in other places in the cabin, except for the rear seats, where the corner is attached with the edge up to protect the lamp from damage.
We stretch the ends of the wires under the rugs to the dashboard near the driver's seat and insulate them at the connection points. Then we connect them to the door sensor, interior light switch and battery
It is also important not to forget to connect one of the wires to the throttle sensor, so that in the future it will notify about the available lighting when flashing the ECU, this is necessary so that the neon lamps do not burn out
The result will be a triggered light when the doors open, which will amaze with its unusualness not only you, but also those passing by.
LED salon
Connecting the backlight using LEDs is similar to neon, the only thing is to position the tape correctly (you may have to cut off individual pieces), and then clean the ends and solder them to each other; for safety reasons, bushings are put on the connections and heated with a hairdryer.
Decoration Features
Today, the simplest and most effective way to modify the exterior of a car is the so-called. "angel eyes" This tuning consists of luminous rings installed on the headlights. These rings are installed on the front optics of the car. For the first time, such a unique solution appeared on BMW products. After some time, luminous rings for headlights began to be sold as a separate vehicle upgrade. Note! Today, “Angel Eyes” can be either purchased in a store or made with your own hands. At the same time, their production is quite simple and many car enthusiasts prefer the second option for their car.
"Angelic" car tuning
It is worth noting that purchased angel eyes for a car are made from special neon tubes. They are bent and installed on the headlights. The installation also uses an ignition unit. After installing this optical system on the headlights, the light turns out more pleasant and bright. Separately, it is worth noting that some drivers use such tuning as daytime running lights or dimensions. Today, such car decoration is very popular and is very common. This is due to the fact that they can be installed on the headlights of a wide variety of car models (both domestic and foreign). For different car models, this type of tuning may differ in basic parameters:
If everything is done right, you will get an exclusive car.
Making your own eyelashes
There is a category of motorists who prefer to do many things themselves. For them, there is no problem in making eyelashes for headlights with their own hands. The procedure is not the most complicated, but it requires attention, accuracy and consistency in the actions performed. If you are also interested in how you can make eyelashes on the headlights of your vehicle, listen to a few recommendations and follow step by step.
First you need to determine what shapes and contours the tuning element will have. To do this, you can take a regular marker and draw the expected eyelash on the body. If you are not satisfied with something, you can erase and reapply the lines
It is extremely important that the result satisfies the car enthusiast. To transfer the line you like to the second headlight to get identical lines, you can use a template pattern. Simply take masking tape, stick it along the contour of the drawn lines, and then transfer it to the second block
Try to match the template as accurately as possible with the contours of the wings and radiator grille. Now draw a line again on the second headlight. There is no need to dismantle the optics. You can install the eyelashes directly on the headlight assembly. But first it is recommended to cover all areas of the body around with protective material. This can be polyethylene or the same masking tape. Based on the template, you should make markings on the fiberglass from which the eyelash itself will be made. It is important to draw straight lines and make a cut along them. Fiberglass is not difficult to process, so you can easily handle this material with your own hands. The work uses polyester resin. The adhesive tape applied to the headlight is treated with resin, then glass mat 300 is applied. It should also be impregnated with resin. While the resin has not hardened, apply another mat of the same type and go over the resin again. The last layer is applied to the previous ones. Try to collect all excess polyester resin. To do this, use a brush or other convenient tool. Once the fiberglass has hardened, it will be easy to remove from the tape. All that remains is to saw off the material along the line that you applied as a marking. Next comes the decorative stage. It is necessary to process the resulting overlays with fine-grained sandpaper, achieve perfectly smooth edges, and also apply a layer of paint and varnish. The driver chooses the decor option himself. You can apply it yourself, or entrust the work to a professional painter. If you decide to paint it yourself, first apply universal putty to the workpiece, sand it and lubricate it with putty. The treated surface should be perfectly flat and smooth. Therefore, always keep sandpaper at hand. And use only sanding blocks. If you work with your fingers, you are more likely to wear off the leather than be able to work the fiberglass properly. When the putty has dried, a layer of primer is applied on top. This will allow you to further use layers of the selected paint material, or apply some patterns. Having made the eyelashes, they should be installed on the head optics of your vehicle. You will need fairly thin, but definitely double-sided tape. It is applied along the entire length of the headlight. Next, remove the second protective layer and carefully place the eyelash on top. Press firmly and hold for 15-20 seconds. Once the glue sets, the tape will not let go of the overlay just like that.
The main difficulty lies in precise adjustment of size and shape. Do not forget that sometimes the hood lid can interfere, which will rest against the eyelash or prevent its normal placement. Try to accurately take all measurements in advance, draw neat lines and provide for the thickness of the finished product, taking into account the thickness of the fastening double-sided tape.
Installation option
As already mentioned, today this kind of tuning can be obtained as follows:
- buy in the store. But for domestic cars this is not the best solution, and it is not always possible to select rings of the required diameter;
Note! You can buy “eyes” both with and without optics. The second option involves purchasing a luminous ring and then installing it on the headlights yourself.
- make homemade angel eyes. This option is more preferable in terms of saving money and time that will have to be spent searching for rings for headlights of the required diameter.
To the question “how to make angel eyes?” There are two answers that are not very different in terms of implementation:
- assembly of an optical system from a ring (LED strip);
- making a lighting system using a transparent tube.
Once you have decided on such tuning, you should find out what such an optical system will be made of. But remember that you will definitely need an ignition unit through which you can connect a homemade lighting device.
First option
Often, when motorists want to make homemade angel eyes, LEDs are used. They perfectly complement the main beam headlights, and their installation does not cause much difficulty.
As for the set of materials and tools, here you will need to take:
Self-service car service: how to use it, profitable savings
- 5 mm white LEDs;
- a resistor of approximately 330 Ohms and 0.25 W;
- wires for connection;
- plastic rod;
- or a plexiglass rod (diameter from 8 to 10 mm);
- jar or lid (1-3 liters);
- drill with adjustable speed;
- soldering iron;
- silicone glue;
- construction type hairdryer.
Take a rod of suitable length to make a ring out of it. You will need to make holes on the end sides for installing LEDs.
To avoid damaging the rod, it is recommended to wrap it in polyethylene or fabric and then fix it in the machine. This will ensure immobility and the ability to carefully make indentations without scratches.
Typically the holes are made with a diameter of about 6 millimeters. The depth depends on the design of the tube itself. But it is better not to exceed the value of 10 millimeters. To make the body take the shape of an optical device, you can take a jar or a lid from it. By bending around the jar, you will get a perfectly even ring
It is important that the diameter matches the internal diameter of the headlight itself on your car. Using a hair dryer, the body heats up and bends around the jar or its lid
There is no need to completely connect the ends of the tube to each other.
At the next stage, diodes are installed. Here you need to solder a wire of a suitable length to the terminals, which is enough to connect to the power wires outside the car headlight housing. A resistor is soldered onto one wire. As a result, you need to assemble an electrical circuit of LEDs with a serial connection and the resistor itself.
Now insert the diodes into the holes of your tube and secure with glue. The number of LEDs is determined individually.
In this case, you should not count on a bright glow and the ability to replace DRLs. The option is rather decorative.
What we are preparing material
The most important question that arises in the mind of a car enthusiast is what kind of relatively expensive type of tuning for a car can be made from. Today, LED angel eyes are in favor, so in this article we will look at this particular option, especially since connecting them using an ignition unit can be as easy as purchasing products. So, to make angel eyes with your own hands, you will need:
- plastic transparent sticks. Here you can use a curtain leash for blinds;
Note! The transparent stick should not be hollow.
- LEDs or LED strip;
- resistors;
- ignition unit;
- jar. Its diameter should correspond to the dimensions of the car headlights;
- 9 volt battery.
In addition to the above materials, in order to make such a backlight and connect it correctly using the ignition unit, you also need the following tools:
- file;
- drill with disk attachment and 5 mm drill or needle file;
- pliers;
- construction hairdryer It can be replaced with a conventional oven.
Once you have made sure that you have everything you need for the job, you can begin assembly.
Installation of LED and cluster angel eyes, what is the difference and which is better
You can have different attitudes towards tuning, some don’t need it under any circumstances, while others can’t live without it, you definitely need to hang or glue something on the car. But we can agree on one thing with those who like to decorate their car - the more visible it is on the road, the less likely it is to have an accident. And optics tuning plays an important role in this process. Thanks to its accessibility, for example, anyone can make the same angel eyes with their own hands.
- A few general notes
- Making angel eyes using an LED ring
- Making angel eyes using a light guide
- What's better?
We work, we are not lazy
In order to install it on the headlights of your car, the backlight must be mounted according to the following scheme:
- First you need to give the transparent stick the shape of a ring. To do this, the rod should be heated until its plasticity increases until it deforms;
- You can heat the sticks in the oven or using a hair dryer. It is considered more correct to use a hair dryer;
Note! Do not allow the stick to overheat, otherwise bubbles will appear in it, which will have a bad effect on the glow of the homemade product.
- Next, we wrap the heated rod around the can using pliers. We start bending the can from the middle of the rod, bringing its ends towards each other;
- let the rod harden and saw off its ends;
- Next, we assemble the LEDs with a resistor;
- You can check the quality of the assembly using a battery;
- then we isolate and grind the contacts being processed;
- carefully and smoothly grind the ends of the stick;
- after that we apply serifs to the rod. We take the pitch for them within 2-2.5 mm. At the same time, do not forget to retreat 1-1.5 cm from the edges;
Notch on a stick
- for evenness, you can use a plastic clamp;
- After this, the rod must be connected to the LEDs to check the glow. An ignition unit must be used for these purposes. This will allow you to see how the homemade device will glow in the final result;
- to avoid a drop in the brightness of the glow towards the middle, the notches should gradually deepen towards the middle of the rod;
- solder the LEDs in series. This will balance the current flowing through them;
- after that, at the ends of the resulting ring we drill a hole up to 7 mm long and 5 mm in diameter. We insert LEDs into it;
- We wrap the ends of the transparent stick with foil.
Making angel eyes using this pattern is quite simple and easy. After this, all you have to do is install everything correctly on the headlights by connecting the homemade product through the ignition unit.
We attach to the headlights
Installing angel eyes is no less important than assembling them. Here you need to do the following manipulations:
- we disassemble the headlight housing and take out the glass from it;
Note! It is necessary to disassemble the headlight very carefully in order to subsequently use the removed glass to cover the installed optical system.
- We clean the reflector from dirt. Use cotton swabs and cleaning chemicals for this;
- during processing, avoid touching the surface of the reflector with your hands;
- We apply sealant to the glass and install a homemade luminous ring on it, with the notches facing outward;
- after that we lay the wires;
- Apply silicone between the headlight itself and the protective glass, carefully filling all the pores;
- It takes at least half an hour for the silicone to dry.
What it is
To understand the reason for the popularity of tuning optics of this format, you need to know the history of the phenomenon. In 2001, the German automaker BMW demonstrated a new approach to the designation of side lights. The BMW E39 5 Series featured an unusual headlight design in the form of luminous rings along the outer diameter of the reflector. The developers called this design “angel eyes”. Since then, designers and engineers have been tirelessly working on new options to make them shine brighter, more powerful, and more attractive.
Angel Eyes on BMW
Today, BMW specialists have developed xenon “angel eyes” that shine with bright white light.
Varieties of angel eyes
The popularity of this type of tuning is facilitated by the variety of types for self-installation. Each type has its pros and cons, each method of unique lighting has its fans and admirers. This section will talk about the possibility of making and installing some types yourself.
Video: Comparison of CCFL vs COB & Dual COB
The main differences between all types are:
- in design features and installation method;
- in the configuration and method of igniting light sources;
- in size and given configuration of the outline shape.
The geometry of angel eyes always follows the contour of the headlight or taillight reflector. That is, the shape can be rectangular, oval, teardrop-shaped or other. All varieties can be grouped into several types:
- gas-discharge CCFL is a neon single-color glow of gas-filled tubes;
- diode SMD (LED) - this is a single-color glow of diode lamps;
- cluster LED COB is a single-color glow of LEDs coated with a special layer;
- diode multicolor RGB - a glow consisting of many glows of different solid colors, switchable using the control panel;
Let's look at a brief description of each type.
Gas discharge CCFL
CCFL angel eyes kit for FORD MONDEO
These are the most popular, practical, factory-made models - quite bright, with a uniform glow, consisting of a neon lamp with a cold cathode. But self-assembly kits, mostly made in China, are inferior in brightness compared to other types of lights. The set consists of a thin glass tube, the inner side of which is coated with a glow-enhancing composition - a phosphor, a light diffuser and an aluminum foil substrate with a reflector. The tube is filled with a mixture of an inert gas with a small admixture of mercury vapor. This mixture begins to glow when a high voltage current passes through it. To convert standard 12 volt voltage into high voltage of 500 volts and above, a special device is used - an ignition unit. One block is enough to light the paired headlight angel eyes.
When the BMW concern installed this look on its cars, they created a real sensation. But it soon became clear that in terms of glow power, neon angel eyes were inferior to the standard side lighting of competitors, and engineers began to look for ways to increase the brightness of the luminous rings. Basically, the composition of the gases filling the tube changes. The advantages of neon round lamps: a uniform bright glow in the form of a circle, which is wider than the tube itself; cheapness; durability and operability of the design, the tube practically does not heat up when turned on for a long time. There are more disadvantages. Slight delay in flashing when turned on; difficulty in self-installation (they are placed inside the headlights, so you need to remove the glass), frequent burnout of the ignition unit. There are still ready-made sets of tubes in the form of circles of different sizes on sale, and they are popular. Modern technologies, instead of fragile glass with a complex composition of luminous gas, have proposed using optical fiber, which shines almost worse than a neon tube.
Video: Angel eyes inserts, gas-filled CCFL lamps
LED SMD
This type is the brightest of all existing types. The design is a dielectric base in the form of a ring - textolite is most often used. Many SMD crystal LEDs are mounted on this board using soldering at close range. This technology involves individually coating each diode with a phosphor. The glow turns out to be bright and discrete, that is, not continuous. The dot glow consists of a large number of simultaneously lit and clearly visible miniature light sources. These models are directly connected to the vehicle's on-board network. No additional devices are required. This design is also installed inside the optics. Therefore, its main disadvantage is to repeatedly remove the glass and disassemble the headlight in order to eliminate the malfunction. If at least one of the diodes burns out or deteriorates, its functionality can only be restored by replacement. It is quite difficult to do this in artisanal conditions, but it is possible. When the diode goes out, a black gap appears in the glow of the angel's eye, which looks bad. Another problem is strong heating during operation. Therefore, you need to think about cooling. To do this, the board must be inserted into a case made of a material that dissipates heat well. For example, made of aluminum. The following advantages of diode angel eyes compared to gas-discharge lamps can be noted:
- longer service life;
- consume less energy;
- high-quality diodes shine brighter and more intensely;
- if all diodes are in good condition, the light is distributed evenly across the entire width of the ring;
- are insensitive to fluctuations in atmospheric temperature outside, as they demonstrate stable operation in the temperature range from minus 40 to plus 100 degrees Celsius;
- point glow, directional;
- It is possible to use a light diffuser.
Video: Angel Eyes LSB & SMD
Cluster LED COB
The most uniform glow for angel eyes is provided by diodes mounted using SOV technology. The essence of this innovation is that very small diode crystals are glued with a special, complex adhesive to the dielectric base of a solid LED. They do not have ceramic housings or substrates, so there are much more of them per unit area compared to SMD technology. Accordingly, they are located at a much smaller distance from each other.
On top, all diodes are covered with a common layer of phosphor, which makes the glow uniform and rich, hiding the gaps between the diodes. The failure of even a few crystals will not be noticeable. This technology is very difficult to implement, since the diodes are glued to a layer of glue several microns in size. Moreover, the glue must be applied evenly and in several layers. So far, no one has reproduced this technology at home. This structure cannot be repaired and must be replaced entirely. Cluster types require a stabilizer that is built into their power supply circuit.
LED multicolor RGB
Those who like to play around with light should pay attention to three-color RGB SMD LEDs, designed in the form of an LED strip. Each socket contains three crystals of blue, green and red. Using a special light controller, you can mix colors in different proportions and get any color. Such models are controlled using a standard RGB controller included in the LED strip kit. This remote control, in addition to the constant white color, has a program for controlling color changes according to a built-in algorithm. By turning it on, you can enjoy the shimmer of different colors, including the blinking of rings with changing brightness.
Connecting Angel Eyes
Angel eyes are an additional lighting device for a vehicle (vehicle) and inherently fall within the requirements for daytime running lights (DRLs). In accordance with clause 6.19.7 of GOST R 41.48-2004, running lights must turn on when the engine starts and turn off when it stops. In addition, turning on the headlights should lead to the DRLs turning off, so connecting the angel eyes must be done in accordance with a specific DRL connection diagram. It follows that the connection of angel eyes according to all the rules can be realized through a five-pin relay or through the DRL control unit.
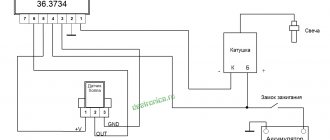
To implement the first option, you will need female terminals (4 pcs.) and a 5-pin relay, the connection diagram of which is shown in the figure.
As can be seen from the diagram, the negative wire from the angel eyes is connected to the car body, and the positive terminal is soldered and connected to contact No. 30 of the relay. Then, under the hood, they find a wire connecting the side lights to the switch and run another wire with a terminal parallel to it, putting it on contact No. 85. Another long wire will run from the “Ignition + 12V” terminal block to contact No. 87a. The last one to connect contact No. 86 to the car body. During the connection process, all terminals, including unused terminal No. 87, are insulated using heat shrink tubing.
If an ignition unit (current stabilizer with LED rings) is supplied complete with CCFL rings, then it should be connected between the 30th pin of the relay and the eyes. In general, any LED DRLs must be operated together with a current or voltage stabilizer (for LED strips) to avoid the influence of voltage surges in the 12 V on-board network.
The second option involves connecting angel eyes through a DRL control unit (DRL controller), which can be purchased at any auto store. In this case, assembly is carried out in accordance with the diagram given in the instructions for the product. The use of industrially produced DRL control units is the best option for connecting angel eyes, as it is easy to assemble, provides overload protection and guarantees long-term, safe operation.
Why are owners of cars with such tuning fined?
Owners of cars in which such tuning is legally included in the vehicle package should not be afraid of claims from law enforcement agencies. Everything here is legal, correct, fair. But when installing it yourself, you need to be guided by legal acts regulating the lighting of the front and rear of the car. In traffic rules, codes of offenses, government regulations and GOSTs regulating safety requirements for technical condition, angel eyes are not directly mentioned anywhere.
But there is a legal requirement according to which white lights can be used on the front of the car (dimensions and headlights), as well as orange lights for turning lights. Eyes of other colors are not allowed and will result in a fine.
Blue color is outlawed
Therefore, there is no need to install yellow, red, green, purple and other colors in the headlights. We can advise all drivers CAUTION: you need to install angel eyes CORRECTLY, although even this advice does not guarantee problems when passing a technical inspection.
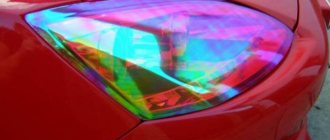
Headlight Coverings: When is Covering Appropriate?
To be honest, tinting is an absolutely useless procedure from a practical point of view. The coating hardly protects the vehicle element in any way, but simply gives it aesthetic beauty. For example, a covered headlight harmonizes perfectly with the color of the car or, conversely, contrasts perfectly against its background. Most drivers tint their headlights not because they need to, but because they look beautiful.
Conclusion: tinting can significantly reduce the lighting function of the headlights, and this greatly affects driving safety.