For attaching windshield wiper blades
Currently, various types of fastenings are used.
This is usually due to the desire of manufacturers to make extra money on spare parts, although some mounting options are significantly smaller than others, which improves the aerodynamic resistance of the brushes and improves appearance. Until 1999, most automakers produced cars with standard “hook” wiper mounts
. This type of fastening is currently the most common. In 1999, Ford equipped its Taurus with a new mount, and then almost all automakers began equipping their cars with various “tricky” mounts. Until recently, Japanese manufacturers refrained from such steps, although the first cases have already occurred - for example, Nissan Quashqai, Honda Civic and Mazda 3.
Car windshield wipers, commonly referred to as “windshield wipers,” are one of the consumable parts of all cars. They serve to remove water and dirt from the surface of the windshield, and sometimes also the rear window, that interfere with visibility. Since blades from different cars are not fundamentally different from each other, replacing windshield wipers is done the same way for all cars. Let's look at how to change them with your own hands.
How to remove the rear wiper on Lada Kalina 1 and 2
A characteristic feature of hatchback and station wagon bodies is the poor protection of the rear window from road dirt, which is the responsibility of the rear wiper. The vast majority of automakers use such a rational solution as a rear window wiper. The developers of AvtoVAZ are not lagging behind in this matter, they also install rear wipers on the specified body modifications of the popular small car Lada Kalina station wagon.
The principle of operation of the rear wiper
To enable the windshield wiper to function, the manufacturer equipped this mechanism with an electric drive, which is protected by a traditional fuse. The designated components have a direct impact on the performance of the wipers. If, for example, the fuse link burns out, the brush will no longer be able to work and the rear wiper, which has become unusable, will need to be replaced. And here it is important to know how to remove it.
What to look for when choosing?
It is no secret that the level of visibility to the rear depends on the efficiency of the brush, which is especially important when maneuvering in cramped conditions and in bad weather. When choosing, you should lean toward high-quality branded products that will not subsequently emit an annoying squeak when rubbing against the glass and do not have to think about how to remove and replace the wiper. You should also inspect the integrity of the working element of the brush, which initially should not have cracks or breaks. An important role is played by the force with which the rear wiper is pressed to the surface of the glass, as well as the material from which the product is made.
Types of wipers on Lada Kalina
Today the market can offer its buyer two types of rear brushes for the Lada Kalina station wagon. These are products that have a frame and their analogues that do not have such a component element, also called frameless.
Advantages and weaknesses of wipers
Each type of brush has certain advantages, and at the same time, both product options are not without disadvantages. Frameless versions have great durability, because for their production manufacturers use high-quality rubber and weather-resistant plastic. Over time, although the rear brush wears out, this process is not intensive.
Pump for Granta 8 valves
Lada Granta operating instructions
In operation, frameless brushes for the Lada Kalina station wagon do not emit unpleasant squeaks and do not greatly rub the surface of the rear window. Also, the products adequately withstand the onslaught of temperature changes.
Now the disadvantages. There is only one point here - it is overpriced.
In addition to the metal base, frame brushes have plastic structural components that are integrated into the frame itself. Cleaners are low-cost and widely distributed in the retail chain.
Among the disadvantages of frame options, one can highlight their small resource. After a couple of years of use, the working elements of such a brush become unusable and require inevitable replacement. A constant companion to the work of the wiper is an annoying squeak.
Rear wiper dimensions
The brushes used to clean the rear window of the Lada Kalina station wagon or hatchback have a length that varies from 360 mm (14″) to 406 mm (16″). In such a situation, it is possible to experiment with the length and choose the most effective option that will clean the required area of glass. Some owners resort to the option of installing a rear brush, similar to that used on the front passenger side. By the way, its length is also 406 mm. Next, we will consider the question of how to change the wiper.
Replacing the rear wiper on Kalina
So, how to change it yourself? The replacement process is very simple.
- Withdrawal. To do this, remove the holder and remove the brush. Here you will need to pull the cleaner itself and at the same time press the latch.
- Installation. This manipulation is much easier than dismantling the wiper on a LADA Kalina station wagon. We insert the brush into the mounting location, and then press it with manual force, thus achieving fixation in the holder, which will be indicated by a characteristic click. Replacement is complete. Now you know how to change the rear wiper on a car.
Possible malfunctions and how to eliminate them?
Intermittent operation of the rear wiper mechanism is a very common situation faced by owners of the Lada Kalina station wagon. The solution is simple - you need to replace the fuse. It is located in the mounting block, which in turn is located under the panel to the left of the steering column. Sometimes a replacement requires a relay, which can be found in the same mounting module.
When the rear windshield wiper completely refuses to function after activating the button, then diagnostics of the electric drive of the LADA Kalina station wagon will be needed. The wiring goes to the electric motor itself. Here you need to make sure that the contact at the ground terminal is reliable. In most cases, the problem is eliminated by simply cleaning the contacts from oxides. If such manipulations do not give the desired result, disassembling the mechanism and probably replacing the motor will be required. Sometimes the culprit for the lack of purifier functionality is the steering column switch.
Let's sum it up
The article provides basic recommendations on how to choose the right one, as well as how to remove and install a rear windshield wiper for LADA Kalina station wagon. Situations with partial or complete loss of functionality of the mechanism, and what to do if these problems arise, are also discussed.
We recommend choosing a high-quality rear windshield wiper, which will not only effectively clean the surface of the stern glass, but will also last much longer.
Detailed description of replacement
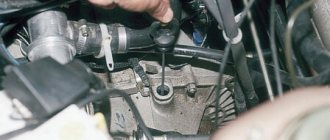
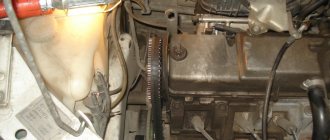
First, you need to disconnect the negative terminal of the battery to prevent a short circuit. After this, remove the protective plastic cover by slightly pressing the three latches on it, as shown in the photo:
Then you need to pry up the small power plug with a screwdriver and pull it up with the force necessary to remove it. Personally, in my case, the wire was very tight on the contact, so I had to try hard before removing it. It is better to do everything carefully so as not to tear the solder off the voltage regulator.
After this, you can unscrew two small bolts, as shown in the photo:
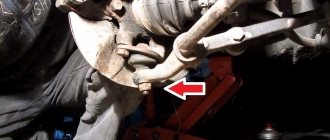
And the last one will be a large bolt, which does not need to be turned out completely, you can just loosen it slightly:
And freely remove the voltage regulator along with the brushes, as clearly shown below:
If a part needs to be replaced, buy a new one and install it in the reverse order of removal. The price for a voltage regulator along with alternator brushes for a Lada Kalina will be about 350 rubles.
Source
Replacing the rear wiper with a frameless one — Lada Kalina Universal, 1.6 l., 2013 on DRIVE2
The front wipers were replaced with frameless Alka almost a year ago, last winter. It was necessary to immediately replace the rear one, but everyone didn’t get around to it. That’s how he is a factory wiper.
Do you still have one like this?
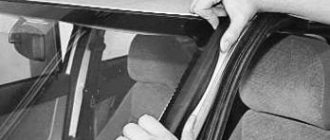
He rubs the glass with a C grade. Leaves streaks behind. I could also experiment with the elastic band, but I solved the problem radically. Replacement with a frameless Alka. The length of the rear wiper on the Kalina station wagon is 35 cm. To replace it, you need to remove the factory wiper and, as it turns out, you also need to remove the factory wiper adapter. And if there are no special problems with removing the factory brush (it just snaps off if you pull it hard), then there were problems with removing the adapter. I couldn't get it off the first time. At times it seemed to me that it was easier to break it than to remove it. I had to arm myself with the Internet and wait for slightly warmer weather.
Below I attach a photo of how you can remove the factory rear brush adapter.
Main photo)))
The mitten on the index finger has worn off due to hard work on the wiper)))
Finally, the adapter is removed and you can install the adapter from the new frameless wiper.
Hooray. Victory.
The new wiper is already in place.
The finished result
The new one rubs the glass better than the old one. I will test how much better it is.
Price: 175 ₽ Mileage: 19,700 km
How to remove the windshield wiper
First of all, we need to lift up the protective metal cap, under which there is a fastening nut.
After that, take a 10mm wrench and use it to unscrew the nut. Please note that there is a small washer under it to prevent it from being dropped. Moving the wiper a little, we pull it towards ourselves and it can be removed without much difficulty.
If the rear wiper of the Lada Kalina 2 does not clean well (the reason is the leash, not the brush)
07 April 2021 LadaOnline 39 286
Hatchback and station wagon cars are considered more practical, but sometimes they can have their own specific disadvantages. For example, on the new Kalina, the rear wiper does not press as hard as on the first generation models, which is why the wiper blade does not clean the rear window well, leaving uncleaned areas. Let's look at several ways to solve this problem.
Installation of wiper arms from Lada Kalina 1
The difference between the rear wiper arms is the length of the spring. On the new Kalina, the spring is short and is not able to press the blade firmly enough against the rear window. The design allows you to install on Kalina 2 a wiper arm from Kalina 1, catalog numbers:
- Rear windshield wiper arm Kalina station wagon - 1117-6313150;
- Rear wiper arm Kalina hatchback - 1119-6313150.
To change the leashes, first remove the old one by unscrewing the nut, and then install the new one, that’s it!
Modernization of wiper arms for Lada Kalina 2
It is not always possible to buy a wiper arm for the first Kalina; in this case, the design can be modified. It is necessary to remove the leash and tension spring. Then drill a new hole in the metal bar of the lever closer to the brush. We install the spring using a screwdriver, clinging it to the new hole. Now the tension will be stronger, which will allow the rear wiper to clean the glass better.
Result on video:
By the way, another way to solve the problem of poor cleaning of the rear window is to install a frameless wiper. Let us remind you that the front wiper blades can be installed in larger sizes.
Photo: logbook iosif-waitberg and c0de
Keywords: Lada Kalina windshield wipers | Lada Kalina accessories
1 0
Found an error? Select it and press Ctrl+Enter..
Similar materials
- What size of wipers (windshield wipers) is better to choose for Lada Priora
- Removing the rear light and replacing lamps Lada Kalina 2
- What size to choose for Lada Granta, Kalina 2 wipers
What is it for?
Some car owners mistakenly believe that it is advisable to change the cleaning elements on the car’s windshield wipers only when they are completely worn out. In fact, the serviceability of the wipers is not a trifle, but an important factor in the serviceability of the car, on which driving safety also depends.
Here are signs that indicate that the cleaning elements need to be updated urgently.
Presence of stripes on the surface of the windshield
Due to streaks on the windshield, you will not be able to closely monitor the condition of the road. You can extend the service life of car brushes by turning on the wipers only when the windows are clean.
Important! Of course, wear and tear is inevitable sooner or later, but if you keep your windows cleaned, your cleaning devices will last longer.
Dirty, uncleaned areas
The cause of this problem is the deformation of elements due to contamination or temperature changes. If the deformation occurs due to contamination, then replacement is not necessary. It is enough to wash the cleaning elements in water at room temperature using a mild detergent.
The wipers are tired — Lada Kalina Universal, 1.6 l., 2014 on DRIVE2
I apologize for such a title, but there’s no other way to say it, but that’s putting it mildly. Like many owners of the second Viburnum, I’m not satisfied with the quality of cleaning the windshield; I’m generally keeping quiet about the rear one for now. Not only do standard brushes creak, but they also don’t clean them, leaving behind streaks and stains. Believe me, I’m not being picky, on the first Kalina everything was just super. Well, I think the problem will be solved by purchasing frameless brushes. How wrong I was... I bought it, installed it and... returned it, because... on the passenger side there was an uncleaned area right in the middle. Damn. I went online to see if anyone has the same problems. It turned out I'm not alone))).
My next attempt was to buy leashes from Kalina-1. Externally, the brush holders are not very different, but the length of the spring on the Russian leash is twice as long.
No comments necessary
I have already prepared a camera to share my happiness with dvukalinovodami. But another bummer came out: the leash on the driver’s side began to touch the plastic trim near the windshield with a metal wire and lift up the rubber seal. I started looking for differences, it turned out that the angle of the Russian leash was different, I decided to return it, not without problems, but they accepted it back at the store. Therefore, my advice is to check the brush holders without leaving the cash register. Maybe, of course, I came across a bad option, but I think that they are not suitable for LK2 without modification. Today I solved the problem by purchasing Bosch FRAME brushes... and lo and behold, I’m happy with everything. Nothing creaks, nothing remains on the glass.
bosch brushes
And don’t tell me after this that frameless ones clean better. Fact, not always and not on all machines. Apparently the windshields of LK2 have some kind of fantastic convexity that they do not lend themselves to frameless ones. IMHO
PS I managed to find a leash from K1 and take a photo of it in comparison.
On top is a leash from K1 at the bottom of K2. The height is different from the base. Result - the bracket touches the seal
Price: 280 ₽ Mileage: 1300 km
How to properly install windshield wiper blades? Preparation and replacement
Replacing a cleaning device is a simple but important step. Preparation for work includes the following steps:
- Study the device of the wipers. They consist of a holder, lower arm and brush. Only the brushes can be replaced.
- Measure the size of the brushes using a regular ruler or tape measure. This must be done in order to purchase replacement parts in advance. You can do it another way: dismantle the wipers and take them to an automotive supply store before installing the windshield wiper blades.
- Provide clear access to the windshield wipers to easily remove the windshield wipers.
Installation of new cleaning devices is carried out according to the following algorithm:
- Lift the lower arm from the windshield. You need to lift the lever all the way so that it does not return to its original position and damage the windshield.
Important! To prevent the lower arm from hitting the windshield during operation, it is advisable to protect it with a towel or soft cloth.
Rear wiper — Lada Kalina Station wagon, 1.6 l., 2014 on DRIVE2
I almost never use the rear wiper, but from the first days of owning the car I was haunted by the realization that the rear wiper, due to its flawed design, is, in principle, incapable of wiping anything off the glass. The first attempt to fix this was made a year ago and consisted of replacing the standard brush with a frameless one (even in my deep youth, someone gave me a pair for my penny, but they didn’t suit her terribly, so they have been lying in the garage ever since). This did not change the situation with pressing the brush to the glass and I somehow cooled down, it lies there motionless in its place behind and let it lie. But the other day I once again came across someone’s post about replacing the standard leash with a leash from 2111 and decided to change it too. I ordered on existential “VAZ2111 rear windshield wiper arm” 63.5205800 for 243₽, I found in the garage an adapter from the same blade for a small hook, to replace it you simply unscrew the nut on the cap, the old arm is removed from the axle with a little force, the new one is put in its place and tightened the same nut. The 2111 leash itself is slightly shorter than the standard one, so the cleaning zone has shifted by 3 cm to the axis of the windshield wiper, the pressure of the rubber band to the glass has increased significantly, the glass cleaning is excellent.
Upd: by the way, for those who want a more modern look, there is a good option from Kia/Hyundai, part number 98810-07001, it is a little shorter of course, but not critical and costs about 500 RUR complete with a brush.
Price: 243 ₽ Mileage: 63850 km
What are wipers and when should they be changed?
Windshield wipers are a device in which a metal arm is connected to a rubber wiper surface . The wiper blade is secured to the lever with a special holder with a plastic plug. They come in two varieties: framed and frameless.
Frame brushes have moving parts called rocker arms. They hold the cleaning surface on the windshield. The fundamental disadvantage of such “wipers” is the presence of hinged joints, which are vulnerable to the ingress of snow and ice, which disables the wipers. In addition, the rubber brush often does not adhere tightly to the glass, which makes its work ineffective.
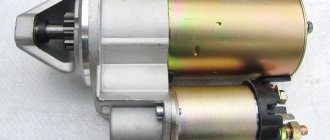
How to replace the voltage regulator and check its serviceability on a VAZ 1117-VAZ 1119?
Checking the voltage regulator for serviceability:
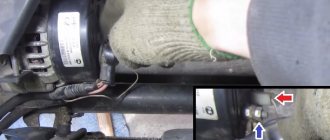
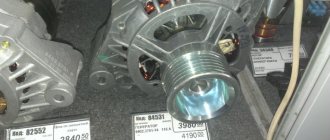
1) At the beginning of the operation, you will need to find where the generator itself is located and after you find it, move your hand to the side with the rubber cover indicated by the red arrow, this cover covers the “B+” terminal; in simpler words, this is the positive terminal and it comes from the generator to this terminal (By the way, it is also indicated by a blue arrow) you will need to connect the positive wire of the voltmeter and after connecting it, throw another wire (Minus wire) coming from the same voltmeter to ground (The places where you need to connect the wire , indicated by a green arrow), after the operation has been completed, a DC voltmeter will show you the voltage in the vehicle’s on-board network.
2) After everything is connected, start the engine of the car and turn on the headlights, when the engine is started, let it run for a while (About 15 minutes) and after this time has passed, at medium speed engine, measure the voltage in the on-board network, which you should have in the range of 14.4-15.1 V.
Note! If this voltage is either more or less, then replace the voltage regulator with a new one!
3) Now, as for the capacitor, to check whether it works or not, you just need to use a megohmmeter to connect the leads that go from it to the contact of the capacitor; when connecting, your resistance should initially decrease and then become infinite (What kind of infinity do you have on the device? it’s very easy to understand, for this, without connecting anything, first look at the numbers that the megohmmeter shows, for example, if it shows 0, then this will be infinity), if this is what happened, then in this case the capacitor is fully operational and does not require replacement, otherwise, replace the capacitor with a new one.
Note! Capacitor - it is built into the voltage regulator itself, and as such it serves as a filter for current, thanks to it the voltage in the network is equalized; for example, it can pass high-frequency currents through itself well, but will delay low-frequency currents!
Replacing a voltage regulator with a built-in capacitor:
Removal: 1) At the beginning of the operation, you will need to remove the minus terminal from the battery, you can read about how to do this “here”, and then you will need to press the latch to disconnect the wire block from the generator, for clarity it is also indicated in red arrow.
Note! When the block with wires is disconnected, take a wrench in your hands and use it to unscrew the nut that secures the terminals of the two wires to the stud; after unscrewing the nut, remove these terminals from the stud! (Before unscrewing this nut, first move the rubber cover that covers it from dirt to the side)
2) Then take a screwdriver in your hands and use it to pry up the three latches, thanks to which the protective cover is held on the generator, and when the latches are released, remove the cover from the generator and put it aside so that it does not interfere.
3) Next, grab the wire that is connected to the terminal of the diode bridge with your hand (the wire is indicated by a red arrow, and the terminal is blue) and then disconnect it from this terminal.
4) Next, you will need to use two wrenches to unscrew the bushing from the “B+” terminal bolt; to do this, with one of the keys, tighten the nut so that it does not turn, and with the other, unscrew the bushing completely and then the bushing, as well as the two washers that it is located, remove it from the bolt as shown in the photo number 2.
5) And finally, use a screwdriver to unscrew the two screws that secure the voltage regulator in the central part (see photo 1), and after unscrewing, remove it from the car generator.
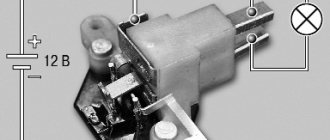
Installation: The new regulator is installed in the reverse order of removal in its place, but when installing a new one, do a small check with it (It is possible that a defect may occur), to check, first, use a ruler or something else to measure the brushes that protrude from the regulator, these brushes should be no less than 5 mm (see photo 1), otherwise replace the regulator with a new one, secondly, press on these brushes and make sure that they move easily without delay, otherwise replace the regulator with a new one, well and for the last check you will need to stock up on a 12 V light bulb, you will need to connect this lamp to the regulator brushes, and apply a voltage of about 12 V to the regulator terminals, that is, the terminal will be a plus and the minus will be the mass of the brush holder, if connected correctly you will have a lamp should be on, see the photo number 2 for a more detailed wiring diagram.
Replacing the wiper motor for the rear door window of a VAZ (Lada) Kalina 1117 2004-2013
Tool:
- Straight box spanner 10 mm
Parts and consumables:
Removal
1. Lift the protective cover of the windshield wiper arm mounting nut.
2. Using a 10 mm spanner, unscrew the nut securing the windshield wiper arm.
3. Remove the lever from the gear motor shaft.
4. Remove the tailgate trim.
5. Disconnect the wiring harness block 1 from the gear motor. Using a 10 mm socket wrench, unscrew the three nuts 2 securing the gear motor.
6. We remove the gear motor, carefully removing its shaft from the hole in the tailgate.
7. If necessary, remove the spacer washer and rubber seal from the outside of the door (shown by the arrow).
8. We remove the shaft guide bushing from the door hole.
Installation
Installation of the windshield wiper motor is carried out in the reverse order. Before installing the lever, briefly turn on the windshield wiper. After waiting until the windshield wiper has completed a full cycle, we attach the lever to the shaft of the gear motor so that the brush is positioned horizontally on the left side of the glass.
The article is missing:
- Photo of the instrument
- Photos of parts and consumables
- High-quality photos of repairs
Source
conclusions
Replacing the generator regulator relay on a Lada Kalina is quite easy and simple, since no special knowledge or skills are required. The choice should be taken carefully, since the market already consists of 50% fakes. When purchasing, you should check for quality certificates and holograms.
Replacement of brushes occurs in the following order.
2. To do this, you will need to unsolder the wires.
3. It would also be a good idea to clean the contacts and check the elasticity of the springs.
After you have completed the dismantling and preparatory work, proceed directly to replacing the generator brushes.
2. Slowly, carefully install the regulator into place. Be careful, the part is very fragile, so try to proceed with extreme caution.
That's all, the brushes have been replaced!
Replacing brushes is not a complicated procedure; it is only important to understand the principle of operation of the device, as well as to have some skills. I hope this article will help you understand all this.