Cars admin26.02.2020
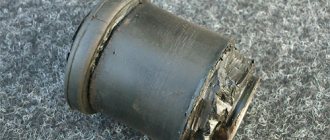
A very painful question for me, it was no longer possible to drive, there was a strong knock on the right side, it was immediately clear that the support had come to an end, and the racks as a whole were no longer working, since the car was shaking in the pits, they rocked the car, they rocked, and they realized that everything the struts are breathing well, in the cabin there is a feeling that a wheel is about to fall off, from the post below you can see I changed the rear struts Demfi from the comfort series (oil), on the front I decided to put Demfi too, since these struts pleased me, I still took GAZO oil Demfi ( comfort) also decided not to disassemble the racks, and decided to reassemble them, bought: 1) Racks - 5000 rub.
2) welding bolts 100 rubles 3) Balokovo supports assembled with bearings 1400 rubles
4) springs with lowering -70 1200 rubles In order to lower the front since it is very noticeable that the front is higher than the ass. 5) well, on request, I took vibration isolators SS 20 - they are not very expensive: 350 rubles
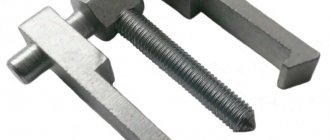
6) polyurethane bumpers 7) silicone oil seals Assembling the racks was not difficult, it took 4 days to pull them out, since the welding and lower bolt in the photo were clearly stuck, the only smart idea was to cut off half of the bolt with a grinder, and take a drill with a drill bit, I took the drill bit 6, and drilled out more than half and then the bolt came out of place
Who will change the struts themselves, I will warn you so as not to pull the drive out from the grenade, but it can be pulled out, believe me, leave the welding bolt and pull out the second one, as soon as you have pulled out the bottom bolt, only then unscrew the welding bolt, otherwise there will be problems in one place on the beret. 4 days since I have no experience and there were difficulties, they pulled the drive out of the grenade, so you can change it all in a day, preferably do it with a friend, I’ll describe everything in detail now.
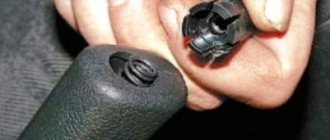
1) remove the wheel 2) unscrew BUT NOT completely, the 3 bolts that hold the upper support. 3) next, drill out the bolt below the support one that holds the rack, since this is the easiest and fastest option, if you can, unscrew it, if not, don’t waste the can of spray, it won’t turn anyway. 4).
The front struts of the Lada Priora need to be replaced if they are out of order. Signs of their malfunction are dull knocks, creaks, clicks that occur when the car is driven on an uneven road. However, these problems can be the result of broken ball joints or silent blocks. Therefore, it is necessary to diagnose suspensions, steering rods, ball joints and ends.
Installation of new front struts on Lada Priora
- Remove the mounting bolts from the wheel. Install the jack on the side where the repair will be carried out.
- Unscrew the bolts and remove the wheel.
- Disconnect the brake hoses. Remove them from the holder on the stand.
- Use pliers to unscrew the locking pin of the steering tip pin. Remove the nut using a “17” wrench.
- Install the puller onto the steering end. Press it out of the socket.
- Expand the support. Unscrew the steering knuckle mounting nuts.
- If necessary, you can use a hammer. It is important to avoid damage to the threads.
- The upper eccentric bolt is designed to adjust the camber. It has a washer on it that often sticks to the post. Do not throw away this bolt, as it will be reinstalled a little later. There is no point in remembering how the eccentric is located along the axis, since it will still be necessary to carry out wheel alignment.
- Using a “13” key, unscrew the fastening nuts securing the front pillar to the body. They are under the hood.
Rear shock absorbers on Priora
The rear wheels of the Lada Priora factory also come with non-separable shock absorbers. Their characteristics are similar to the front ones. As many drivers note, these shock absorbers are very soft and do not hold the road well at high speeds.
| vendor code | Rod diameter, mm | Case diameter, mm |
| 21702915004 | 11 | 46 |
Analogs of Priora front shock absorbers
Replacements for shock absorbers on the rear wheels of Priors are slightly less popular than those on the front wheels. Often, many drivers install analogues on the front wheels, and leave original spare parts on the rear wheels. Nevertheless, the most popular analogues of rear shock absorbers are presented below.
| Manufacturer | vendor code | price, rub. |
| SS20 | SS20144 | 5200 (set, 2 pcs.) |
| Fenox | A12288C3 | 1200 |
| Kraft | KT 073542 | 1200 |
SS20144
Fenox A12288C3
Kraft KT 073542
Which shock absorber struts for Priora are better? For moderate driving, and at a low price, it is better to take the original SAAZ. Also, shock absorbers from the Russian company SS20 deserve special attention. They produce high-quality and technologically advanced products at a relatively low price. The range is represented by several lines of shock absorbers (differing in level of rigidity). But the most popular for the VAZ 2170 is the “Comfort” series. They are a little stiffer than the factory ones, which is especially noticeable at speeds up to 50 km/h. But after this mark they perfectly reveal their full potential on uneven roads. When entering the pit, the sound is practically inaudible, and most of the vibrational energy is absorbed.
Also of particular interest are shock absorber struts from the Japanese Kayaba (KYB), the big advantage of which is their versatility. They perform well both on smooth highways and off-road. The company has developed gas-oil shock absorbers labeled Exel-G, especially for Priora. But, due to the novelty of these spare parts, they are now quite rare on sale.
How to disassemble an existing structure
- At this stage, you will need pre-prepared spring ties. They need to be installed on the second coil of the spring. The second tie is installed in exactly the same way, only on the other side.
- Reduce the spring by twisting the coupling bolts of the first tie. This must be done until the moment when the second tie begins to move freely on the coils. Repeat all these steps on the second screed.
NOW LET'S START DISASSEMBLING THE EXISTING STRUCTURE
1. This is where you will need the previously prepared spring ties. Install them on the second coil (top and bottom) of the spring, as indicated in the picture. We install the second screed in the same way, only on the other side.
2. Now start bringing the spring together; to do this (if anyone doesn’t understand) you need to twist the tie bolts of the first tie. This is done until the second tie begins to move freely on the turns; repeat all of the above in relation to the second tie.
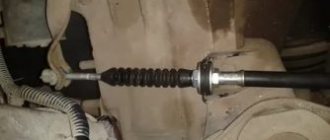
3. Using a 22″ socket and hexagon, unscrew the nut securing the strut rod to the support.
4. Next, remove the bump stop (limiter), as well as the support bearing, compression limiter and support.
5. We replace the old rebound limiter washers with new ones that came with the struts, be careful, they are different - the top one is slightly larger than the bottom one.
6. Remove the spring cup along with the rubber damper, as well as the spring, compression buffer and boot.
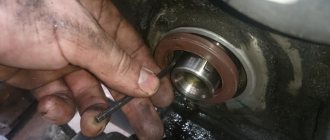
Now let's carefully examine the rack.
The cause of the malfunction was discovered almost immediately, after checking the play, I raised the rod to the top point, then simply released it, after which the piston sharply went down without the slightest resistance and “slammed” into the upper part of the cylinder. Here, as they say, no comments... Now it’s clear where the dull knocks were coming from.
Before replacing the front drain, it must be bled.
To bleed the rack do the following:
Bring the stand to a vertical position, then pull the rod to its highest point and slowly return it to its place.
Repeat these movements 3-4 times. There should be no dips, falls or jamming of the stem. Once bleeding is complete, the posts must be in an upright position before being reinstalled. Bleeding the racks will bring them into working condition.
After this, assemble a new shock absorber, for this you need:
- Set the rack rod to the upper position.
- Put on the boot and compression buffer.
- Install the spring, cup and damper.
- Place the smaller washer first, then the larger washer from the kit. After this, you can install the support with the bearing.
- Install the nut that secures the rod.
- Tighten the nut with a hexagon to “6” while holding the rod. The final tightening should be done after the front strut has been installed in the car.
- Remove the zip ties.
- Turn the support with the pointer forward and slightly inward of the car body.
- Install a new strut into the car.
- Tighten the upper support bolts and place the strut on the steering knuckle. An eccentric bolt with a washer must be secured in the upper hole, a regular bolt in the lower hole. After that, “stretch” everything.
- Pin the finger.
- Place the brake hoses in the holder bracket on the rack.
This completes the replacement of the front strut. You just need to put the wheel back in place and remove the jack. As soon as the car is on the ground, you should tighten all the nuts with a wrench until they stop.
Repeat all steps on the other side. This usually does not cause any difficulties.
After replacing the front struts of your Lada Priora, you need to go to a service station and get a wheel alignment done. If you do not do this, problems may arise: the car will sway from side to side.
Assembling a new shock absorber
1. Set the rack rod to the upper position.
2. Place the boot and compression buffer on the new front strut.
3. Install the spring, spring cup and damper. Pay attention to the lower shank, it should fall into place.
4. Install the small washer from the new Acomi kit, the large washer and the support with the bearing installed.
5. Install the rod mounting nut.
6. The nut is tightened using a hexagon to “6”, hold the rod with it. It is better to do the final tightening after installing the front struts in place.
7. Remove the spring clamps.
8. Turn the support so that the indicator on it looks forward and slightly inside the car body.
9. After this, install the rack assembly in its place of further service.
10. Tighten the support bolts from above, then put the stand on the steering knuckle, install the eccentric bolt with a washer in the upper hole, and a simple bolt down and tighten.
11. Install the steering tip pin into the rod on the rack and tighten the nut.
12. After this, pin the finger, spreading the antennae.
13. Thread the brake hoses into the holder bracket on the rack.
Done, now we can say that the front strut has been replaced. Install the wheel and lower the jack. When the car is on wheels, go through all the fastenings and tighten them. It would be a good idea to rock the body on the side where the strut was changed for additional pumping.
Now all that remains is to repeat the same thing on the left side. The second time things will be “more fun”, since you will already know what’s what and why.
After replacing the front struts, be sure to do a wheel alignment; don’t rush on the way to the service station - the wheels are not adjusted and the car will “drive” a little on the road, so be vigilant and careful.
The result of the work done:
After several weeks of using the new racks, I can note the following:
- The knocking has disappeared;
- The suspension has become more elastic;
- The laxity and swaying have disappeared;
- The car began to take turns better, the roll decreased;
- It has become more comfortable to drive off-road;
- The steering wheel began to return noticeably faster after a turn - the result of increased castor;
- Improved handling at high speeds;
- Speed bumps are less painful to overcome.
In short, I am very pleased, the impressions are only positive, if I had known that such a result would be achieved, I would have changed the front struts even before they failed, immediately after the purchase.