The process of replacing silent blocks
To replace the silent blocks of the lower control arms on VAZ classic cars, you need to drive the car into a garage or pit box, or use a lift.
The fastening points of the parts are pre-treated with WD-40 lubricant, which must be left for a while to facilitate the removal of these parts. When processing, you need to make sure that the lubricant gets into the attachment points of the unit, this will make dismantling easier. During operation, the silent block may sour, and if it is not treated in advance, it will be difficult to remove it using a pry bar and a sledgehammer. If the car is parked in a pit, it is jacked up under the beam to relieve the load from the wheels, supports are placed under the levers, and a safety block is installed under the jack to avoid injury in the event of the car falling off the supports under the levers. Using a 22 wrench, unscrew the nut holding the silent block in the lower arm. If the nut is soured, you can use a piece of pipe as an additional lever by placing it on the wrench. It is better not to throw away the original nuts, since new ones are often of poor quality and the threads break off, so sometimes it is better to install old ones. The same can be said about old washers, which are made of thick, durable metal, while the washers that come with new silent blocks are thinner and can be significantly deformed when tightened, which is unacceptable.
To dismantle the front silent block, the mount must be positioned so as to rest against the bolt of the beam and press forward towards the rear of the car. Since the pressing force on the mount will be small, it is necessary to periodically hit the lever near the silent block with a hammer, while pushing against it to create tension. After the silent block comes out of the socket, remove it, pushing it with a pry bar. In case of severe souring, the procedure will have to be done by two people: one person pulls the lever with a pry bar, the second knocks the silent block out of its socket.
Next, the silent block of the front beam is replaced; for this, the axle is lubricated with nigrol and a new part is put on it. Using a pry bar, the lever is raised so that the silent block can be guided into the socket. After this, an extension made of a thick-walled pipe of suitable size is put on it, which must be carefully hit with a hammer until the silent block sits in place. We hold the mount by the mounting bolt and press the lever, continuing to hit the mount with a sledgehammer until the part sits in the socket all the way to the stops.
We change the lower silent blocks from the reverse side, for which you first need to knock the short rod end off the steering column so that it does not interfere with work. Using a pry bar, pressing it against the nut, we move the lever in the same way to release the silent block. Similarly, we hit the lever with a hammer, pulling it with a pry bar until the silent block comes out of its socket, then push it with a pry bar until it is completely removed. Installation of a new silent block is carried out in the same way as in the front part of the lever, using an attachment made from a tube and a hammer, the axle and seat are pre-lubricated with nigrol.
Washers are placed on both silent blocks; if the old ones are in good condition and not deformed, it is better to install them, since the new ones are of very poor quality, they bend when the nuts are tightened, reducing the service life of the parts. After the nuts are tightened on both sides, the car is lowered from the jacks and needs to be rocked to check how the suspension works. In this case, the creaking and knocking should stop, and the suspension operation should return to normal.
When tightening the silent block nuts, it is better to load the front of the car, first on one side and then on the other, for which you will again need a partner. If it is not there, you can tighten it like that, but then the nuts will need to be tightened again. The nuts are tightened as tightly as possible; if necessary, a pipe is put on the wrench to develop maximum force. At the same time, the threads on low-quality nuts can be stripped. At the end of the work, you need to reinstall the previously removed steering rod.
Video: How to replace the silent blocks of the lower arms of a VAZ without a puller.
This method is quite labor-intensive, but does not require special tools such as a puller, or additional knowledge and skills. You can make the replacement yourself in your garage if it has a hole. In this case, you can use a simple tool that every driver has. The quality of work will be in no way inferior to replacement using a specialized puller. The shock absorber silent block and other similar parts are replaced using similar principles. This technique is suitable for VAZ classic series 2101-2107.
Pressing out the silent block
To press out the old silent block, you need to cut off the rubber side on one side. You can cut the rubber with a simple knife, or you can cut it down with a hacksaw. Then, through any suitable iron spacer, we simply knock the silent block out of the lever. You need to hit it hard, preferably with a sledgehammer, don’t be afraid, you won’t break anything. In the picture below there is already a knocked out silent block with a cut off side.
Instead of a sledgehammer, you can use a heavy-duty vice if you have one. You can burn the rubber with a blowtorch or gas torch. You can drill several holes in the rubber and then knock out the weakened silent block. All options are working, choose the one that is more convenient for you. But, as a rule, just knocking it out is faster and easier (necessarily with a cut side).
Next, we clean the hole for the silent block from rust using a round file or sandpaper and lubricate it with soapy water or silicone grease. I strongly do not recommend using anything else as a lubricant, such as lithol, solid oil, fiol, CV joint, etc. Since such lubricants negatively affect the condition of rubber products. Therefore, only silicone or soap solution.
How difficult is the job?
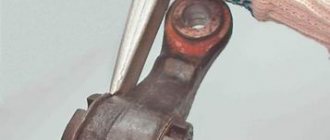
Any novice craftsman can cope with such repairs; the silent block of the grant will be shown in the photo; it is not difficult at all. It is worth doing the work in the following sequence. You need to hold the stretcher with one key, and use the second to unscrew the nut. Now you need to unscrew the 3 bolts that secure the crab, after which replacing the silent blocks of the fret grant involves removing the brace.
The attractive price for the grant silent block will allow you to purchase parts without extra costs. When you try to remove the stretcher, the rubber part may fall out towards you
Please note that the part also has metal clips; you will also have to deal with them. To do this, you can use a screwdriver and a hammer, or take a drift; the work can be seen on replacing silent blocks on the video grant
Installing rear independent suspension on a car
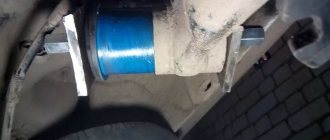
When operating a vehicle on which a standard rear suspension is installed, the vehicle beam shifts towards the arch when cornering by approximately 1 cm. If the vehicle is equipped with a rear independent suspension, then such a beam displacement is not observed under similar operating conditions. The rear independent suspension is attached rigidly to the body, without using silent blocks in mounting the rear suspension on the Priora, which avoids lateral displacement of the beam.
Silent blocks, which are part of the design of the rear and front suspensions, perform the function of damping all torques and bending moments that may occur during movement, thereby ensuring a stable position of the vehicle on uneven road surfaces and when turning.
Silent blocks are mounted on a car as an element of the chassis and suspension, since this structural element is one of the most reliable and economical ways to prevent the influence of various types of deformations and loads that can occur during the operation of the car on the car body. Installation and replacement of silent blocks on Priora is provided for in some vehicle suspension components:
Set of parts for mounting the air suspension of Lada Priora
The independent suspension on the Priora is installed on the car yourself, and the installation process is simple. Therefore, every car enthusiast can install air suspension on a Priora if you follow certain tips and recommendations from experts.
- air spring;
- compressor;
- fasteners and braces;
- pneumatic valves;
- pressure gauge;
- start button;
- air supply line;
- air pressure sensor;
- start relay.
In the process of pumping compressed air into the airbag, the ground clearance of the Lada Priora changes. When the pressure in the air bag decreases, the ground clearance of the vehicle decreases. Adjusting the ride height is the main function of the Priora suspension airbag.
An independent suspension is mounted on the Priora using special fasteners and braces. Using these elements, the Lada Priora air suspension is attached to the car body. If you have some skills in working with metal, you can make these parts yourself, but it is best to order these fastening components for the Priora suspension and make them from a specialist. In this case, there will be a guarantee of high-quality manufacturing of components.
To install it in the suspension system on a Priora, you can use the same pressure gauge that is used in pneumatic systems operating at a pressure of a certain range. The start button is designed to adjust the state of the air suspension directly from the interior of the Lada Priora.
Selection of parts and necessary tools
Before you start directly replacing silent blocks, it is important to properly prepare for it. There are few specific recommendations for choosing new parts. The auto parts market is simply filled with silent blocks from different manufacturers, basically they are all quite good
The only thing you can do to make a better choice of new parts is to consult with auto mechanics in your area. The main thing is that the new vibration isolators fully fit
The auto parts market is simply filled with silent blocks from different manufacturers, mostly they are all quite good. The only thing you can do to make a better choice of new parts is to consult with auto mechanics in your area. The main thing is that the new vibration isolators fit completely.
For repair work you will need the following things:
Set of new silent blocks
Replacing suspension silent blocks with your own hands
The suspension silent blocks on the VAZ-2112 are located in the arms of both the rear beam and the front one. It is advisable to replace them comprehensively. The replacement process is approximately the same on both the rear and front parts of the suspension. Below are instructions for both cases.
Front control arms
Replacing front control arm silent blocks on a VAZ-2112 is the following process:
- First of all, the car must be placed above the inspection hole or use a lift. Then remove the engine compartment protection represented by the casing.
Removing the engine protection
Unscrew the nut of the stabilizer bar mounting bolt.
Unscrew the nut on the extension
Unscrew the nut of the bolt securing the lever to the body
A long bolt, a couple of washers and a nut are all sold in hardware stores and can be used to make a puller
“Let’s spritz”, it’s better to heat it up some more. Next, we use our puller to press out the silent block.
We clean the socket from rust and dirt, lubricate
We press new silent blocks into the mounting groove
New silent block installed
Replacing silent blocks in the rear beam
Replacing the rear silent blocks is done as follows:
- Again, the car must be driven into a viewing hole or raised on a lift.
- Then, taking a 19mm wrench, you need to disconnect the rear beam from the bracket by unscrewing the nuts securing it.
Unscrew the nut of the bolt securing the lever to the bracket
Press the silent block towards the car threshold
Press in the silent block using a puller
Selecting New Items
Polyurethane
To replace and ensure reliable operation of the car, you need to purchase good silent blocks. Choosing them is not difficult if you know some nuances:
- For the VAZ 2110 model, elements with catalog number 2110 2914054 are suitable. They have the required outer diameter corresponding to this specific VAZ model;
- Do not try to purchase a silent block from a nine and install it on your ten. Nothing will come of such events, no matter what anyone says;
- Make sure of the quality of the products. Low-grade silent blocks have flooded the market, but their service life leaves much to be desired. Good parts are made from high quality materials that can withstand extreme loads and temperatures.
When is it necessary to replace silent blocks?
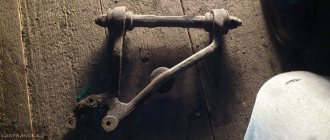
If you hear a distinct knocking sound in the suspension while driving, you may need to replace the silent blocks of the front control arms on VAZ classic models. Upon inspection, they may be deformed, the rubber is torn or covered with deep cracks, and the lever moves from its original position. Silent blocks are not repaired; if they fail, they must be replaced, fortunately they are not expensive.
Damage to the silent blocks makes the ride less comfortable, reduces the level of safety due to deterioration in handling, as play appears on the arms, the suspension becomes looser and the wear of the front tires sharply increases, and this is another signal that the silent blocks of the front suspension will need to be replaced.
How many silent blocks are there in the rear suspension?
The suspension in a car is needed to ensure a movable connection between the wheels and the body. At the same time, it must absorb as much as possible the unevenness of the road and the vibrations of the car that occur when driving on a bad road. The suspension is part of the chassis of the car. Not only the driver’s feeling of driving on the road depends on the condition of the suspension, but also safety, i.e. vehicle stability when driving at high speed. The suspension can be front or rear, and include many different elements depending on the model of a particular car. One of the most important connecting links in a car’s suspension is the silent block. This is what we will talk about in today’s article.
Chassis elements
A car suspension is a complex system of many elements. Generally speaking, they can be divided into three groups:
· Guides;
· Elastic;
· Extinguishing.
The former ensure that the suspension is attached to the body and forces are transferred to the car body. The guide elements are also responsible for the movement of the wheels relative to the vehicle body when it moves. A variety of levers are used as guides: longitudinal, transverse, and so on.
An elastic suspension element absorbs loads from road unevenness, accumulates the resulting energy, and transmits vibrations to the body. In modern cars they are presented in the form of springs, leaf springs, and torsion bars. The last part, called the shock absorber, is designed to reduce the amplitude of vibrations of the car body. The operation of shock absorbers is based on the resistance that occurs when fluid flows between the two cavities of the shock absorber cylinder.
What is a silent block?
Upon closer examination of this element, it becomes clear that the silent block is a rubber-metal hinge that has one or more metal bushings surrounded by rubber. It is necessary to connect the suspension parts together, while the rubber silent block is necessary to dampen vibrations between the units that it fastens. Silent blocks are used both in the front suspension, in particular for attaching arms to the body, anti-roll bar, and in the rear suspension. Often used for fastening gearboxes and other machine components and mechanisms.
How to check silent blocks
As a rule, good quality original spare parts can last more than 100 thousand kilometers. However, taking into account the peculiarities of our climate and roads, control inspections should be carried out somewhat more often, once every 50 thousand kilometers. In addition, you can also understand that the silent block has worn out by your own feelings, control deteriorates, and knocking appears in the chassis when driving.
However, the best way to determine the failure of silent blocks is visually. To do this, you need to drive into a pit, or lift the car on a lift. There should be no cracks or tears in the rubber part of this chassis element, and the bushing should be level and not skewed. Failure of silent blocks primarily affects wheel alignment/camber, because when they break, the levers take the wrong position.
How many silent blocks are there in the rear suspension?
When planning chassis repairs, each car owner calculates what spare parts he will need. At the same time, replacing silent blocks is a procedure that cannot be avoided, so they must be purchased in advance. Here the car enthusiast is faced with the question of how many silent blocks are in the rear suspension of a Lancer 9, Mazda 6, VAZ 2109, Opel Vectra S, Ford Focus or any other car he owns? Let's take the above options as an example
Automobile
| Number of silent blocks in the rear suspension | |
| Mitsubishi Lancer 9 | 14 |
| Geely CK | 12 |
| Mazda 6 | 14 |
| Opel Vectra C | 14 |
| VAZ 2109 | 4 |
| Ford Focus 2 | 14 |
bibioil.com
Basic faults
A beam can fail for two reasons:
- displacement from place;
- mechanical damage (most often a crack).
When a crack occurs in the lever, the torsional rigidity of the body decreases. This parameter determines the degree of safety, as well as the position of the parts. The fact is that with normal body rigidity, which is laid down during design and obtained after the final stage of car assembly, absolutely all components and assemblies (down to the bolts) are in place, they have a maximum permissible vibration amplitude. For example, the suspension “swallows” potholes - the parts actively move, and people in the cabin may not even notice the rolling.
If you increase the torsional rigidity of the body by adding lateral and longitudinal stability beams to the car, nothing bad will happen - the amplitude of vibrations will decrease, a pleasant plus will be the fact that the vehicle will become quieter, there will be less rattling. When the torsional rigidity of the body decreases, there may not even be any talk about comfort.
In addition to the fact that you will most likely have to get used to unpleasant sounds, there will be increased wear and tear on small parts. When a lever cracks, everything that is attached to it begins to move with greater amplitude. The problem is temporarily solved by welding, but this only postpones the solution to the problem for some time. Craftsmen recommend changing the beam.
Mechanical damage manifests itself in the connection of metal with rubber in the Priora levers - when wear reaches its climax, the rubber cracks and peels off. Because of this, a knock occurs in the front and rear suspension, and the car wobbles along the road.
How to press out a silent block at home?
Replacing silent blocks is not difficult; for example, I personally became convinced of this when I replaced the silent blocks and shock absorbers on the rear suspension with my own hands. It is for this reason that you can often meet those who decide to independently replace silent blocks at home.
Method 1
First, let's talk about how this should ideally happen. The lever in which it is necessary to replace the silent block is taken, installed under the press on a special stand into which the old silent will be squeezed out, after which a special spacer is installed on top, which will squeeze out the old bushing. This method is used by service stations that have the necessary set of spacers and a powerful press of 10-20 tons.
Method 2
Most motorists, of course, do not have a powerful press, but many have a good vice or jack in the garage. Using a powerful vice, you can successfully squeeze out old bushings using a similar principle - a spacer into which the bushing will go and a spacer that will press on the bushing.
Jack. It would seem, how can a silent block be squeezed out with a jack? Everything is very simple, you need to weld a rectangular frame from some channel or corner at a height slightly higher than your jack and lever. The principle is as follows: we install the jack in the frame, after which we install the lever eye and the two spacers mentioned above on top of the rod. We create the necessary pressure, and the bushing is squeezed out of the seat. It should be noted that in most cases, a 3-5 ton jack is simply not able to cope with such work, so it is better to use 10-15 ton jacks.
Method 3
If you don’t have a jack or a press, and you have an insatiable desire to replace the silent blocks yourself, you can use the third method - using a simple press puller (a pin or a bolt with a nut). The principle is to create pressure by gradually tightening the nut on the stud; this method can be considered analogous to a vice. A pin with a washer of the required diameter is inserted into the eye through the silent block, then a spacer with a washer is put on the other side and the nut is tightened. Rotating along the thread, the nut creates the necessary pressure and forces the silent block to be squeezed into the “receiving” spacer. This “method” requires a strong, hardened stud with the same nut. If the nut or stud is soft, you won't succeed. For example, my pin began to bend due to pressure, after which the thread on the nut was torn off. However, there are thousands of those who managed to replace silent blocks using this particular method. The advantage of this method is its cost-effectiveness and convenience from the point of view of “mobility”, that is, you do not need, for example, to completely remove the entire hub or lever, you just need to have such a primitive press puller.
How to press out/press in a silent block using a press puller video
Method 4
This method can be classified as drastic or extreme measures. It consists in using all known methods and devices to extract the silent block from the mounting socket. The principle is to knock out the old silent block using a powerful screwdriver or a thick wedge-shaped piece of reinforcement. The task is to drive a screwdriver or something similar between the bushing and the silent block, thereby deforming the wall of the bushing inward. After the sleeve is crushed and fed inward, knocking it out is not difficult. Before you start knocking out the silent block, you need to burn out or squeeze out the inner bushing of the silent block and, if possible, any remaining rubber.
How to knock out a silent block using a screwdriver and drill
Method 5
The next method of removing a silent block cannot be called pressing out, since it, like the previous one, does not require the presence of a press; all that is needed is a metal blade, a screwdriver and a hammer. The principle is simple, but not safe. We remove the inner sleeve, then take the blade and start cutting the outer sleeve. We are trying to cut through the old silent block as much as possible without damaging the lever itself or the eye. It is advisable to make two cuts, after which using a flat screwdriver, the silent block is easily deformed and knocked out.
If none of the above methods helped you press out the silent blocks, there is only one way out - entrust this procedure to specialists. To do this, we take the part and take it to a service station, where specialists, using special tools, will press out and press in your silent blocks “in the blink of an eye.”
Press-fitting instructions
At the initial stage, it is necessary to visually assess whether the new silent block is suitable for a particular case. This condition must not be neglected, so that later it will not be too late. There are often cases when the outer part fits perfectly, but the inner part does not, and vice versa. Once you determine that the parts will fit exactly, you can proceed to the next step. To do this, you should use a vice to help press it correctly. This method is safer and more accurate.
You can also use hammers and sledgehammers, but you need to be more careful and carefully monitor the accuracy of the process.
Thus, you will need to land several hits. If after this the broken silent block is firmly held in the hole, you need to knock it out. For this work, special mandrels are used for pressing silent blocks or two pieces of pipe. The diameter of one of these parts must correspond to the parameters of the outer joint bushing. When knocking out a part, you do not need to worry about damaging it, since it is faulty. This process is carried out with a regular hammer.
After knocking out is completed, the eyelet in which the hinge was located must be cleaned of dust, dirt, and so on. The seat for the new part must be perfectly smooth and even. There should be no mechanical damage or various scratches on it. In addition, there should also be no sharp edges.
After cleaning the seat, its surface must be treated with lubricant. If this is not available, you can use a regular soap solution. A device such as a metal polyurethane bushing must also be lubricated. Having completed the lubrication of the seat, you can begin to clamp the lever in a vice. In this case, it will be necessary to install a silent block perpendicular to it. This work is done as smoothly as possible. The further normal functioning of your machine depends on this.
Next, you will need to choose how to press in the silent block - press it in or drive it in with a sledgehammer. To reproduce this process, you will need metal tubes or mandrels for pressing silent blocks, one of which will need to hold the lever. And the other tube must be leaned against the side to avoid damage to the hinge when working with a vice or hammer.
The main difficulty with this work may be the difficulty of pressing the hinges into their original place. To perform this procedure, I recommend using a special press to press them in and out with the levers, as well as a mandrel for pressing in the silent blocks. You can also use improvised means, such as pieces of pipe and a sledgehammer, but you should be very vigilant and attentive, since this process requires high precision and dexterity so that the result is a whole polyurethane insert.
You can press in silent blocks with your own hands only on the front and rear parts of the suspension. If you need to replace rubber-metal joints in engine or gearbox components, you should contact a specialist. This is necessary precisely because replacing parts in such units is a labor-intensive process. To implement it correctly, you must have repair experience and a good knowledge of the main components of the car's structure. If you lack experience and knowledge, it is better not to test your luck and entrust your car to specialists. Because, in addition to the time spent, you will spend a lot on replacing silent blocks.
VAZ 2170 | Replacement of silent blocks of rear suspension arms
With some skill, silent blocks can be replaced directly on the car by unscrewing the bolts securing the beam to the body brackets and removing the beam eyes from the brackets, but it is more convenient to perform this work on the removed rear suspension beam (see “Replacing the rear suspension beam”).
It is very convenient to replace silent blocks with a special device (puller), but the work can be done with improvised means.
You will need: a silent block remover or a mandrel.
When using a puller, perform the following operations.
1. Before pressing out, heat the lever eye with hot air to a temperature of 50–75 °C, having previously cut out two cutouts B with a hacksaw (Fig. 7.6) on the outer bushing of the silent block to align the protrusions of the mounting sleeve 15. Press out in the following order: install on the lever eye with from the outside of the body of fixture 4, place a mounting sleeve 5 with protrusions on bolt 6, insert the bolt into the hole in the silent block, put washer 3 on it from the back side of the lever eye, press it against the body of fixture 4 and tighten nut 2 until the silent block is pressed out.
Ways to press in silent blocks
There are several options for pressing silent blocks.
Option with a vice
Before pressing the component, it is necessary to clean the seats from rust and burrs with sandpaper. Then lubricate the eyes with Litol lubricant or liquid soap. Place the part on top of the lever, place a special mandrel on it, and use a vice to press the component into the socket.
Pressing using a press
The silent blocks can be pressed in using the press puller that was used to remove the part. You need to select the necessary attachment for pressing, lubricate the eye, install the part correctly and press it, periodically checking so that the component does not go awry.
Press-out device
To make sure that components need to be replaced, you need to do a visual inspection of the rubber parts. They must be intact, without deformation. There should be no play when the car is rocking. When the car is moving, wear will be revealed by the knocking of the suspension, swaying of the body and unstable movement of the car.
To get a silent block at home, you need to:
- Place the lever under the press on the stand where the silent block will go. Place a spacer on top to press out the bushing and press out the part.
- Using a vice instead of a press, you can squeeze out silent blocks using the same method.
- You can use a hydraulic jack. To do this, you will first need to weld a frame from a corner or channel in the form of a rectangle, which is larger in height than the jack. Insert the two spacers listed above and raise the jack until the silent block is pressed into the mandrel. You need to choose a more powerful jack - 10-15 tons, because lifts with 3-5 tons may not help.
- In the absence of special devices, a homemade or factory press puller is used, which squeezes out the part using a bolt, washers, nut and two extensions. All these components must be durable and reliable. Using such a device, you can press out without dismantling the hub and lever.
Using brute force
If you don’t have any of the above devices at hand, you can use an ordinary hammer and screwdriver or some thick sharpened pin to press out the silent blocks. It must be driven between the bushing and the silent block. As a result, the bushing of the part is deformed inward, after which it will be possible to pull out the rubber band and knock out the silent block.
You can press out the part using a metal blade, a screwdriver and a hammer. To do this, you need to remove the inner sleeve and carefully saw through the silent block with a blade so as not to damage the lever. Then use a screwdriver to pull out the part.
To press a silent block using brute force, you need to insert the part into the eye, and hammer it into its seat with a sharp and strong blow of a hammer.
Disadvantages of this method:
- The silent fits crookedly into the eyelet;
- bites the rubber parts of the part;
- The impact may damage the lever or silent block.
After using this method, the component is often damaged and will need to be repressed.
Pressing with the weight of the car
Many motorists press in silent bands with the weight of their own car.
To do this you need:
- Install a screw or hydraulic jack under the vehicle.
- Remove the wheel.
- Install the lever with silent block under the car hub.
- Align the parts well and slowly lower the jack.
Lada Priora Sedan › Logbook › Replacing front suspension silent blocks
When inspecting the car, I noticed cracks on the rubber bushings of the front suspension; the condition was unsatisfactory. The mileage of the car is relatively considerable, so I decided to replace all the rubber joints and bushings in the suspension. And then came the agony of choice, as you always want to do better. The suspension on the Priora, in general, without significant changes, migrated from the VAZ 2108, which weighed noticeably less and had an engine 1.5 times weaker. I wanted to install stiffer bushings. In addition to the original ones, there are a huge number of silent blocks made of polyurethane from different manufacturers. Reviews about them are not always positive, and the price is much higher than rubber ones. In addition, I have the opportunity to compare the operation of identical mechanisms using rubber and polyurethane. Recently, roller bearings with polyurethane tires instead of rubber tires have been used in skip and cage hoisting of mines. As practice has shown, there is no significant increase in the service life of tires, sometimes the polyurethane simply crumbles into pieces. As a result, I did not want to experiment with my own money and bought all the tires produced by Balakovorezinotekhnik.
I don't know about originality. Some of the rubber bands were in boxes with a hologram and the casting looks neater, the rest were simply sold in bulk.
Next I removed the entire suspension.
The daisies on the right lever turned out to be completely broken, the lever was simply hanging on a stretcher, so the car was noticeably thrown into a rut. The balls are in satisfactory condition, they have not been replaced.
Next I started replacing. The easiest way to change is daisies. I first drilled the bushings for attaching the levers to the body and took them out in parts. But pressing the new bushings into place turned out to be a problem. The side of the bushing turns under and the rubber breaks when pressed. I ruined 2 rubber bands like this, I would be very upset if it was polyurethane SS 20 for 500 rubles each. For the future, it is better to make a conical mandrel, on one side with a diameter like the side of the bushing, on the other, like the diameter of the lever hole. As a result, we get the following result.
To press the hinges out of the beam and press in new ones, I made an improvised puller from a piece of pipe, a plate and a long bolt. Everything went well, I didn’t take a photo. I smeared the beam hinges and the attachment of the lever to the body with soap before pressing.
While driving, I saw how a person’s eyes for attaching guy wires to a beam were torn off. I had intact ones, but decided to further strengthen them.
I welded the plates to form a box-shaped profile.
As a result, we have this result.
Also, to increase the caster angle, I removed 2 washers from the left and right braces (2 more remained), according to the repair manual, one washer adds approximately 19′, approximately 38′ of the caster angle was added. There were no problems with replacing the bushings and stabilizer struts. We finally tighten the suspension mounts when the car is installed on the ground and the springs are compressed. The tightening torque of the saber fastening nuts is about 20 kgf*m.
In the end, everything works well, the suspension is assembled, and the car does not roll. The feeling from the increased caster is positive, the car is better stabilized in a straight line and it is easier to control the steering angle. Now I want to remove the rest of the washers, the caster should be about 2°30′, approximately like that of foreign cars. With the power booster, the force on the steering wheel did not increase much.
Changing the front beam
For work, prepare two keys 17, 19, 24, WD-40 lubricant, and a ball joint remover. Removing and installing the front suspension arm in the following order:
- Place the car over the inspection hole. You can install the front of the car on stable supports.
- Secure the car with the handbrake.
- Remove the wheels. To do this, moving in a circle, gradually loosen the bolts, and then smoothly pull the wheel towards you, accepting it.
- Coat the threaded connections of the lever with WD-40.
- While holding the bolt securing the stabilizer bar to the lever, do not allow it to turn. Smoothly unscrew the fastening nut and remove the bolt.
- Holding the extension from turning with a wrench, unscrew the nut securing it to the beam.
- Remove the washer gasket.
- Unscrew the ball joint bolt and press the ball joint pin out of the beam.
- While holding the spring washer bolt from turning with a wrench, remove the nut that secures the washer to the lever.
- Smoothly remove the end of the lever from the body bracket.
- Remove the beam from the brace.
- Remove several washers from the guy and mark them so that when installing, put them in the same order.
- Inspect the part for damage: as it wears, the rubber will bulge, crack, and possibly peel off from the metal.
- If it is necessary to replace the silent blocks of the front beam of the Priora, unscrew the bolt securing the front silent block with a 18mm socket. The rear mounting bolts are unscrewed with a 15mm socket.
- Remove the silent block, noting its seating depth. Place the new part in place of the old one in strict accordance with the marked depth.
- Install a new lever. Place the washers in the marked order, with the same side in relation to the center of the part with which they were installed previously. Please note that the final tightening of the connections is carried out after the car is lowered to the ground.
Replacement methods
We will tell you about two main ways to replace silent blocks on the rear beam of the “tens”, which can easily be used in a garage.
Which method to choose is up to you to decide. But before that, familiarize yourself with them in more detail.
First way
The method is not particularly difficult if you strictly follow the instructions. To begin with, we note that the silent block is located at the bottom of the car. Therefore, you will need a jack or inspection hole.
- Raise the car with a jack or drive it into a viewing hole. The second option is more convenient, since this way the view of the bottom will be better. And it’s much more convenient to work standing up than lying under a car.
- It is not necessary to completely remove the rear beam. When dismantling it, you will need to remove additional brake hoses, which takes a lot of time.
- It is better to disconnect the sorcerer so as not to damage it during the repair process. But shoot carefully.
- Now remove the nut with a 19mm wrench. You will have to make a serious effort, which is why some car owners call their comrades for help. If there are no assistants, pre-treat the thread with the almighty WD40 or plain water. This will allow the fastener to oxidize. Then clean it with a wire brush, which will make it easier to remove the element.
- Using a crowbar, lower the beam down a little, but do not remove it completely.
- There is an elastic band on the beam that should be cut off, otherwise it will interfere with the work process. Just keep in mind that if the rubber band is old, feel free to remove it. It is better to dismantle a good product by drilling a small hole.
- Now the silent block is removed.
- The new part is generously lubricated and pressed into its rightful place. Just do not use grease for lubrication, as this substance corrodes the part. The best lubrication option is regular soap or any available detergent.
- Return the sorcerer to its place and tighten the beam.
https://youtube.com/watch?v=nM2tgU95DGo
Second way
The second option for replacing the silent block is even simpler. But he also has his tricks.
- Raise the car on a jack or drive it into a viewing hole.
- Using the same 19 mm wrench, remove the fastening nuts on the rear beam. This will allow you to detach the beam from the bracket.
- Remove the unscrewed bolt and move the rear beam eye down slightly.
- To make work easier, insert a wooden beam between the beam and the body, approximately the same size as a regular building brick.
- Remove the silent block by hitting it with a hammer.
- Lubricate the new block with something slippery, which will allow the element to do its job better.
- Press the silent block into its place.
- Remove the inserted beam and return the beam to its original position, securing it with fasteners.
At this point, the procedure for replacing the silent block of the rear beam of your domestic “ten” produced by AvtoVAZ can be considered complete.
https://youtube.com/watch?v=Xu2_Vq7X7SI
Both methods allow you to independently, without unnecessary problems, resolve the issue of a failed silent block. Just in case, don’t forget to call a friend in the garage who will help you at the most difficult stages.
Do-it-yourself silent block remover
The VAZ 2107 hinge puller can be purchased ready-made or made by yourself. If you have the right equipment and materials, every car enthusiast can make the tool. It is also worth considering that the quality of purchased devices today leaves much to be desired. You can replace the rubber-metal hinge without special tools, but this will require much more time and effort.
Sequencing
To make a homemade puller you will need the following:
- a piece of water pipe 3 cm long with an internal diameter of 40 mm and an external diameter of 50 mm;
- washer with an outer diameter of at least 50 mm;
- M12 bolt 7 cm long with washers;
- two pieces of pipe 10 cm long and 40 mm in diameter;
- vice;
- hammer;
- lubricant
The puller manufacturing process consists of several stages.
- By striking with a hammer, they ensure that a 40 mm pipe section has an internal diameter of 45 mm, i.e., they try to rivet it. This will allow the lower arm joint to pass freely through the pipe.
In order to drive your car confidently and without accidents, you need to periodically inspect and repair the chassis. Wear of silent blocks affects driving safety, as well as tire wear. To replace damaged hinges, you will need to prepare the necessary tools and perform repairs in accordance with step-by-step instructions.
Pressing in the silent block
To press in the new silent block, we need the old wheel bearing, namely its inner race. It consists of two separate parts that have a large chamfer, with the help of which we will tuck the side of the silent block into the lever. This is what one inner half of the wheel bearing looks like.
Using a bolt with a nut, washers and the internal parts of the wheel bearing, we assemble such a sandwich.
We generously lubricate everything with silicone grease, coat the threads of the bolt and washer with lithol or something similar and begin tightening the nut (pressing in the silent block). We tighten it until the silent block is completely installed in its place, disassemble everything, and rejoice. If everything is done correctly, then replacement does not take much time and effort.
Source