We will show you how to correctly and quickly replace the front brake pads on VAZ 2114, VAZ 2115, VAZ 2113 cars in the field.
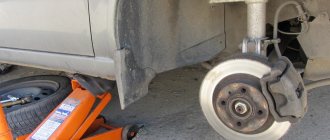
We tear off the wheel bolts, lift one side of the car on a jack, unscrew the bolts and remove the wheel.
We put wheel chocks under the rear wheels; if they are missing, ordinary bricks will do. So that the old pads can be easily pulled out, you need to use a strong screwdriver or other suitable object to loosen them, pressing the cylinder:
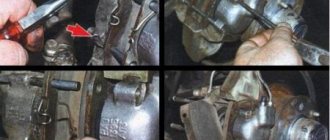
We bend the washer, loosen the lower bolt a little, unscrew the upper one completely, using a 13mm wrench:
We move the caliper a little to the side and take out the old brake pads. We thoroughly clean the seats from accumulated dirt, shavings, etc. For these purposes, we used a screwdriver and sandpaper, but a metal brush works best:
We check the operation of the guides; they should move smoothly. In any case, every time you replace the pads, it is better to take them out, clean them and re-lubricate them; this will not take much time and effort, but you will be confident in their operation. Do not use lithol as a lubricant; you need a special high-temperature lubricant for calipers and guides; some manufacturers put a small bag along with a set of new pads.
It is convenient to tighten the boots with a screwdriver, at the same time check their integrity so that there are no even small holes, change them if necessary, they cost a penny. Now we need to completely press the brake cylinder inward, we do everything in the field with our own hands, so we use a wheel wrench for this purpose, but it is much more convenient to do this with a regular clamp.
We put the new pads in place and lower the caliper. We assemble in reverse order. I recommend lubricating the threads of the bolts with copper grease so that they do not stick during operation and can always be easily unscrewed.
Before you start driving, press the brake pedal all the way down several times.
Video of replacing front brake pads in VAZ 2115, VAZ 2114, VAZ 2113:
Backup video on how to replace front brake pads in VAZ 2115, 2114, 2113:
When is it necessary to change front brake pads? There is no exact number of kilometers traveled for the pads; a lot depends on the manufacturer, the driver’s driving style, the general condition of the brake system, etc. The most important rule that must be followed is that the thickness of the lining should not be less than 1.5 mm. If you drive on worn linings, in addition to increasing the risk of getting into an accident, your caliper may also jam, and replacing it is expensive and time-consuming.
Every car has a spare part that is most susceptible to wear; in the VAZ 2114, these are brake pads. Any signs that they are worn out should not be ignored, as they are a component of the braking system that is responsible for the safe movement of the vehicle.
It is important to know that if in a VAZ 2114 the car’s braking system is configured correctly, then the pads wear out evenly and they need to be changed on average after 10-12 thousand kilometers.
Reasons for replacing pads
- Their thickness is below acceptable.
- The presence of cracks, chips of various origins, and tubercles on them.
- Visible wear of the disk, there is its deformation, misalignment (when replacing disks, the linings are also changed at the same time).
This process, as you know, consists of two operations: the front pads are replaced separately and the rear pads are replaced separately. There are some differences here. Of course, the driver can do the work himself, but some skill in mechanical car repairs and a trivial set of automotive tools will be required.
If something went wrong
Difficulties often arise in the process of replacing front and rear pads. The most common problems and ways to solve them are below.
Brake drum won't come off
- It is necessary to loosen the handbrake cable;
- WD-40 is used;
- If both of the above methods do not help, you need to carefully hit the wooden lining with a hammer several times.
The fluid level in the brake reservoir has dropped
- The required amount is added;
- The brakes are being pumped;
- Brake fluid is added again.
The brake drum does not fit
The handbrake cable needs to be loosened.
Timely replacement of worn brake pads is the key to the safety of the driver and passengers. Jamming or other problems associated with these vehicle parts can lead to an accident or even rollover. All replacement work must be carried out in accordance with the regulations.
Didn't find the information you are looking for? on our forum.
We recommend reading:
VAZ 21074 injector does not start reasons
Adjusting the VAZ 2131 alternator belt
VAZ 2114 signs of internal CV joint failure, diagnostic methods
Front suspension diagram for VAZ 2108
Which is better: copper or aluminum heater radiator for VAZ 2114
Similar articles
How to change the radiator of a VAZ 2114 (2115) stove with your own hands
What kind of oil to pour into the VAZ 2115 engine
Choosing oil for VAZ 2110
VAZ color chart, codes, names, description
How to change pads on a VAZ 2115 Link to main publication
Instructions for replacing front pads
The first thing to do is to secure the rear wheels in the car with special stops. Using a jack, you need to lift the car, and then follow a strict sequence of processes:
- Remove the wheel and rubber rings that are attached to the brake hose.
- Using a regular screwdriver, press the caliper piston into the cylinder.
- Bend the lock washers away from the guide pin mounting.
- Unscrew the fastening bolt on the guide pin, simultaneously fixing the hexagon.
- Remove the front pads by lifting up the stupor bracket.
Before installing the linings on the VAZ 2114, it is recommended to thoroughly clean the seats from corrosive deposits.
The next stage of repair is to inspect the clamping springs, which should be placed in a parallel plane relative to the top of the part being replaced. Do not forget about the state of the stupor finger. If necessary, clean and lubricate it.
How to replace the front brake pads on a VAZ 2113-VAZ 2115?
Note! Always remember a few things, firstly, try to always replace the pads on your car on both front wheels at once, even if it is expensive but it is still necessary, because if you replace the pads only on one side and not on the other, then this will lead to uneven braking of the car, that is, one wheel will slow down much more strongly than the other. Because of this, during sudden emergency braking, the car can very easily drift in any direction but not in a straight path, and in connection with this you will create other people an emergency situation that can lead to different outcomes!
And secondly, after replacing the pads with new ones, always remember that the first 100 km of the car will need to be driven moderately, because at the very beginning the new brake pads will first have to get used to the worn brake disc and until they get used to, you will have the car braking is bad, so after replacing, try to drive carefully, and as smoothly as possible press the brake pedal until the car comes to a complete stop, thereby you will reduce the mileage it takes for the new pads to wear in, and thus literally after 50 km, the car will brake as it should !
Removal: 1) Before you begin replacement, be sure to remove the wheel from the car. (For information on how to remove a wheel, see the article: “Replacing a wheel on a VAZ”)
2) Next, when the wheel is removed from the car, take a wrench in your hands and use it to completely unscrew the upper bolt that secures the caliper bracket.
Note! You won’t be able to just take and unscrew this bolt, and all this is because it is secured against turning off when driving, with a counter-key, so if in order to unscrew this bolt, you will first need to bend the tip of this same counter-key and After that, start unscrewing this bolt!
3) After the top bolt is completely unscrewed, move to the bottom one and use a wrench to loosen it slightly, while bending the same counter key.
4) Then find the hose that is attached to the shock absorber strut, and after finding it, pull it slightly and thereby remove it from the bracket to which it is attached. (Just under no circumstances disconnect this hose from anything, just remove it from the bracket and that’s it)
Note! When the hose is removed, the following situation may occur: the reservoir in which you have brake fluid is filled (If it is full), then some of this fluid may go out through the cap and some will pour out of the reservoir, so to prevent this from happening in the first place open the reservoir containing the brake fluid (shown in the photo below) and use a rubber bulb to suck out some of it, and after everything has been replaced, pour the fluid back in! (In general, in fact, it is best to pour new fluid into the reservoir, because the old one may already contain air particles, so it is better to generally try to take a little from the reservoir or do not take anything from there at all, but just carefully watch how the brake fluid level rises if too high, then insert the hose into place and collect a little fluid from the brake reservoir)
Never take all the fluid from the tank, empty it only halfway, and if all the fluid is drained from the tank, then bleed the brakes on the car! (For information on how to bleed the brakes, see the article: “Bleeding the brakes on a VAZ car”)
5) Next, grab the metal bracket with your hand and then pull it up and thereby fold it away.
6) When the caliper is folded back, remove both brake pads by hand and replace them with new ones.
Installation: Installation of new brake pads occurs in the reverse order of removal.
Note! When you put the new pads in place, make sure that they fit tightly and that there are no stones or other debris that will interfere with braking!
Additional video clip: For more information on how to replace the pads with new ones, see the video clip located just below:
Instructions for replacing rear pads
Here we recommend following the following algorithm:
Removing the braking system element
- Remove the wheel and unscrew the guide bolts.
- Remove the brake drum. If the drum is jammed and there is no way to manually remove it, then use a hammer, tapping it lightly. Removed spare parts from the VAZ 2114 must be lubricated.
- Use pliers to remove the tension spring, and then proceed to removing the guide - it holds the block that needs to be replaced on the shield. Many car enthusiasts use a wear sensor for spare car parts, which makes the process of diagnosing breakdowns much easier.
Installation of new braking elements
- Transfer the drive lever from the worn element to the new one;
- Install and tension the springs. The brake linings must fit strictly into the grooves of the mechanism cylinder, and the handbrake bar must be installed exactly in the slots on the pads.
- Hook the end of the handbrake cable onto the drive lever;
- Align the pistons of the rear cylinder, put on the drum and reinstall the wheel.
Checking the correct installation of new pads
At this stage, you need to press the brake pedal several times. Then you should adjust the handbrake cable and tighten the nut on the handbrake equalizer, checking the tension. After lifting the parking brake handle, count the clicks. If there are more than eight, then the nut needs to be tightened a little more and checked again. The optimal number of clicks is from 2 to 7. Remember that the wheels must be locked if you have the parking brake up. When the parking brake handle is lowered, the wheel rotates freely and there should be no rubbing of the pads.
If the wheel can be turned by hand when the handbrake is raised, or vice versa, when the handbrake is lowered the wheel does not rotate freely, then the handbrake needs to be adjusted again.
If this process seems complicated to you, then it is better to contact specialists at a car service center.
In previous articles we have already learned how often you need to change brake pads, when to replace them, and how to check wear:
In this article we will move directly to replacing the front brake pads.
So, for work we need:
- spray can;
- wd-40 - we use it wherever it is impossible to unscrew the fasteners;
- wrenches, spanners set to “13”;
- new set of brake pads;
- car jack;
- flat screwdriver.
Before starting work, be sure to place your car on a flat surface, put it in first gear, and put the handbrake on. Place “shoes” (halves of bricks) under the rear wheels on both sides.
How to remove front brake pads?
- The very first thing to do is to loosen the wheel bolts on both sides, note: just LOOSEN!
- Place the jack under the car and lift the front wheel (place the jack on a flat surface).
- Completely unscrew the front wheel mount and remove the wheel.
- For convenience, we turn the steering wheel completely towards the disassembled wheel: if the left wheel has been removed, then we turn the steering wheel completely to the left side.
- Pay attention to the picture: take a 13mm wrench and unscrew this bolt, having first bent (straightened) the counter key. Do not lose the bolts, because... you will have to install it back (It is worth noting that some brake pad manufacturers put new fasteners in the box).
- We open the brake fluid barrel, use a syringe to pour some fluid into the jar in order to leave a reserve in case the fluid rises up in level. If the liquid is at the min level, which is very dangerous, then there is no need to drain anything.
- We move the caliper (under number 1 in the diagram) and gain access to the pads.
- Next we need to push the brake piston back into the cylinder. Because As the pads wear, the piston is forced further and further out of the cylinder. To do this, we find an inspection hole (indicated by the number “A” in the diagram). Next, take a flat-head screwdriver and thread it into the inspection hole between the pad and the brake piston. And we begin to push the piston back into the cylinder. Do not apply too much force; the piston needs to move evenly and over time.
- We remove the brake hose fasteners so that it does not interfere.
- We move the caliper.
- Remove the brake pads.
How to install front brake pads?
- We take new brake pads and place them tightly in the grooves to the brake disc: we rest the pads with their antennae against the stops and press them against the disc (look at the picture).
- Close the caliper.
- We tighten our bolt and do not forget to bend the control washer.
- We put the brake hose in place.
- We put the wheel on and tighten the mounts crosswise.
- Add brake fluid to the barrel and close it.
Personally, I installed FENOX brake pads for certain reasons. Read my review about them in the article: Review of FENOX brake pads.
The brake system of the VAZ 2114 includes front disc and rear drum pads. During operation, friction linings wear out, so consumables require periodic replacement. It’s easy to do it yourself, and if difficulties arise, it is recommended to watch a thematic video.
Original brake pads for VAZ 2114 have article number 21103501080. Their cost ranges from 360 to 500 rubles. The manufacturer does not standardize the service life of branded consumables.
It is recommended to check the size of the friction lining at intervals of 15 thousand km. When the measured thickness becomes less than 1.5 mm, the pads must be replaced. According to reviews from car owners, the average lifespan of front consumables ranges from 15 to 45 thousand km. It depends on your driving style and operating conditions of the car.
The procedure for carrying out work when replacing the rear brake pads of a VAZ in the AShDM service
Replacing the rear brake pads of VAZ 2110, VAZ 2114 and other cars of this manufacturer are services that are often in demand by customers for service. Since these cars have a similar design of the rear wheel brake mechanisms, you can consider the process of replacing the rear pads in relation to all models at once. In our car service, the process occurs according to the following technological scheme:
- dismantling the rear wheels;
- removing the brake drums of the rear wheels;
- removing the brake pads of the rear wheels;
- cleaning the brake mechanisms and assessing the condition of the brake actuator cylinders;
- assessment of the condition of the parking brake cables and fastenings;
- measuring the internal diameter of the brake drums of the rear wheels and replacing them if the maximum permissible size is exceeded;
- installation of new brake pads;
- installation, if necessary, of new parking brake tension cables and their adjustment;
- installation of brake drums;
- checking the initial installation gaps and adjusting them if necessary, checking the free rotation of the drums on the hub;
- bleeding the brake system;
- checking the performance of the rear brakes;
- wheel installation;
- checking the brakes while driving.
Article number and cost of good front brake pads for VAZ 2114 from third-party manufacturers
The quality of the original front pads is rated below average by car owners. They often rattle and squeak. Therefore, it is better to give preference to analogues of the original products, which are shown in the table below.
Table - Good analogues of the original front pads
| Manufacturer | vendor code | Approximate cost, ruble |
| Delphi | P551 | 1600-2000 |
| ABS | 36576 | 1200-1800 |
| RoadHouse | 222102 | 1400-1600 |
| TRW | GDB469M | 750-900 |
| Ferodo | TAR527B | 450-670 |
Article number and approximate cost for original rear pads of VAZ 2114
The original rear drum pads have catalog number 210103502090. Their price ranges from 1000 to 1500 rubles. At the same time, there are more resources, since:
- when stopping the car, less force is applied to the rear axle brakes;
- the drum covers the pads and abrasive particles do not fall on their surface, as happens in disc brakes.
The manufacturer does not standardize the service life of drum pads. The rear brakes should be checked every 30 thousand km. According to reviews from owners, on many cars, pad replacement is not required until 80-100 thousand km.
Article number and cost of good analogs of original rear brake pads for VAZ 2114
Rear drum brake pads have less impact on braking performance. When purchasing them, a more important criterion is the absence of creaking and other extraneous sounds when the car is stopped. According to owner reviews, the analogues of the original pads, which are shown in the table below, are most suitable for the rear axle.
Table - Recommended analogues
| Pad manufacturer | vendor code | Approximate price, ruble |
| Bosch | 0986487893 | 900-1100 |
| TRW | GS8222 | 1600-1800 |
| Ferodo | FSB59 | 1300-1500 |
| Brembo | S41501 | 900-1300 |
| ATE | 03013702322 | 680-900 |
Brake drums
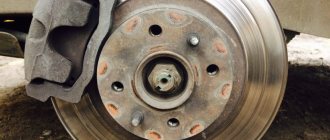
This is one of the main components that comes into contact with the friction linings of the pads during operation. The car stops due to the fact that a friction force arises between the inside of the drum and the friction lining of the shoe. Before removing the brake pads on a VAZ-2114, it is necessary to conduct a thorough diagnosis of all elements.
Outdated drum brakes have very little efficiency, but their service life is significantly longer than that of disc brakes. Despite this, most motorists install disc brakes on the rear axle. Wheels from model nine cars fit perfectly on the VAZ-2114.
Step-by-step replacement of rear pads on a VAZ 2114
Replacement of rear drum brake pads is carried out according to the algorithm below.
- Engage forward gear.
- Jack up the car and place it on stands.
- Remove the rear wheel.
It goes without saying that the front brake pads on the VAZ 2114-2115 wear out much faster than the rear ones. This is due to the fact that more force is transmitted to the front, and the front wheels begin to lock earlier. Of course, many owners know how to perform this procedure, but there are also many who will be doing it for the first time. It is for them that this guide will be written.
First of all, it is worth noting that to carry out this maintenance item on the VAZ 2114-2115, you will need a small list of tools, which are given in the list below:
- flat blade screwdriver
- head for 13
- ratchet or wrench
- open-end or socket wrench 13
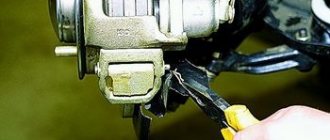
So, first you need to remove the front wheel, after lifting the car with a jack. After this, you need to use a screwdriver to bend the locking plates (washers) from the inside of the caliper in order to further unscrew the bolts:
Now you can easily unscrew the top bolt with a 13mm wrench:
Also, you should immediately move the brake hose to the side, removing it from its engagement with the strut:
Now you can try to lift the caliper bracket up to gain access to the front brake pads. If you can’t do this by hand, you can first pry it all off with a thick screwdriver:
Then everything should be quite easy and the bracket will rise up without any problems:
As you can see, the pads become completely accessible and can now be removed without any problems:
Next, you can install new pads. You can buy them at a price from 300 to 700 rubles per set for VAZ 2114-2115, depending on the manufacturer. Of course, cheap ones are unlikely to please you with their efficiency, and the durability is not the same as that of higher quality imported ones. For example, companies such as Ferodo or ATE have proven themselves well. Installation is in the reverse order.
There is one more point worth mentioning. It is possible that after replacing the pads, the caliper bracket will not fit into place on top, as the brake cylinder will get in the way. To do this, you then need to press the piston of the cylinder with the handle of a hammer or other improvised device.
Then we repeat the procedure and now everything should work out without any difficulties.
Replacing brake pads is a periodic necessity, which is carried out every 20-30 thousand kilometers. It should be noted that each owner of this car can independently carry out such work on a VAZ 2114.
The note! If you have never replaced brake parts before, contact a service station where they can help you with this procedure.
Choosing new pads
When purchasing new front brake pads, it is important to pay attention to a few key points.
- Quality. Examine the part visually, check the assembly level. Some details even outwardly indicate that they are not worth buying.
- Certificates and packaging. Packaging can often say much more than the part itself. Study it to see if it matches the original. Nowadays, it’s not difficult to find manufacturers’ websites online and study how their products are packaged and certified. Never be afraid to ask sellers for documents for a particular spare part.
- Price. Good pads cannot be cheap.
- Manufacturer.
Brake lining kit
As for manufacturers, a certain group of leaders has now formed who produce high-quality brake pads that are suitable just for the VAZ 2114.
| Manufacturer | Main advantages |
| Fenox | Friction linings remain effective even when heated to more than 400 degrees |
| Best |
|
| Allian Nippon |
|
When is it time to change the pads on your car?
Wear of parts depends on the following factors:
- driving style;
- quality of material;
- technical condition of the car.
Thus, without the help of specialists, it is almost impossible to determine exactly when it is worth changing system parts. That is why it is periodically necessary to contact service station specialists, where they will help diagnose and replace any parts. If such operations at a service station are beyond your means, you can learn how to determine their wear yourself!
Front brake pads
Signs of an imminent replacement:
- 1. Residual thickness less than 1.5 mm;
- 2. Presence of scratches and chips;
- 3. Characteristic sound (creaking) when braking;
- 4. Curvature of the discs and a decrease in their thickness;
- 5. Presence of oil on the surface of the pad and disc;
- 6. Lack of contact between the pads and the base.
In order to find out about all the defects, first we remove the wheels and carry out an inspection.
The note! Replacement and maintenance of the brake system is necessary: every 10-15 thousand km - for the front pair of wheels and 50-70 thousand km - for the rear pair. That is why, if you hear a squeak, do not rush to buy new brake pads; perhaps you just need to clean the discs from any remaining debris.
When to change pads
VAZ 2114 brake pads must be changed as they wear out. Most often, good brake pads can last about 30-40 thousand kilometers, but “Chinese” fakes may not even last 10 thousand kilometers.
You should also pay attention to the condition of the pads themselves; the wear of the rubbing part of the pad should not be less than 2mm. Some pads are equipped with a special indicator strip, which can be used to easily determine pad wear.
Stages of replacing brake pads on a VAZ 2114 car
Replacing rear and front pads is done differently. In order to learn this procedure, you need to understand all the intricacies.
Replacing front pads on a VAZ 2114:
- 1. Loosen the bolts on the wheel.
The note! You need to start unscrewing the bolts from the lock washer. It is necessary to loosen this washer gradually, so you can prevent possible damage to it.
- 2. Using a jack, lift the wheel on which the replacement will be made;
- 3. Remove the wheel and turn the car’s steering wheel in the direction on which you are replacing;
- 4. Find a bolt with a counter key, bend it and remove the bolt;
- 5. Next, check the brake fluid level in the reservoir.
To replace the caliper piston must be pushed in
The note! If the fluid level remains low, there are leaks in the system.
- 1. Push the caliper piston deep into the cylinder, remove the fasteners from the brake hose.;
- 2. Remove the caliper, brackets and pads;
- 3. Install the new pads tightly into the grooves.
The note! Before installing new parts on the VAZ 2114, it is necessary to clean the guides from dirt and reaction products. This can be done using regular sandpaper or a metal brush.
- 4. Install the caliper in place.
- 5. Return all parts back to their place.
Advice! If you drained the brake fluid, be sure to add it back.
The note! There are many ways to replace parts. It is worth noting that to install or remove the pads it is not necessary to completely unscrew the bolts. Sometimes it is enough to make just a few turns of the bolt, then pull out the brake hose and pads. Of course, this method is perfect for owners of VAZ 2114 cars who have already changed them several times.
Replacing rear pads:
- 1. Remove the wheel;
- 2. Near the cable tensioner there is a nut that secures it. Loosen this nut. To do this, it is recommended to use key number 13;
- 3. Having loosened the rear wheel mounting bolts, lift it using a jack;
- 4. Remove the wheel and unscrew the bolts on the brake drum;
- 5. Remove the drum;
- 6. After this, you must first remove the spring, and then the remaining parts along with the lever;
- 7. Start cleaning the grooves where the old pads stood;
- 8. Finally, install new pads and reassemble the entire structure in reverse order.
It is worth remembering that if you have not performed this procedure yourself before, enlist the help of experienced mechanics or contact a service station!
It goes without saying that the front brake pads on the VAZ 2114-2115 wear out much faster than the rear ones. This is due to the fact that more force is transmitted to the front, and the front wheels begin to lock earlier. Of course, many owners know how to perform this procedure, but there are also many who will be doing it for the first time. It is for them that this guide will be written.
First of all, it is worth noting that to carry out this maintenance item on the VAZ 2114-2115, you will need a small list of tools, which are given in the list below:
- flat blade screwdriver
- head for 13
- ratchet or wrench
- open-end or socket wrench 13
So, first you need to remove the front wheel, after lifting the car with a jack. After this, you need to use a screwdriver to bend the locking plates (washers) from the inside of the caliper in order to further unscrew the bolts:
Now you can easily unscrew the top bolt with a 13mm wrench:
Also, you should immediately move the brake hose to the side, removing it from its engagement with the strut:
Now you can try to lift the caliper bracket up to gain access to the front brake pads. If you can’t do this by hand, you can first pry it all off with a thick screwdriver:
Then everything should be quite easy and the bracket will rise up without any problems:
As you can see, the pads become completely accessible and can now be removed without any problems:
Next, you can install new pads. You can buy them at a price from 300 to 700 rubles per set for VAZ 2114-2115, depending on the manufacturer. Of course, cheap ones are unlikely to please you with their efficiency, and the durability is not the same as that of higher quality imported ones. For example, companies such as Ferodo or ATE have proven themselves well. Installation is in the reverse order.
There is one more point worth mentioning. It is possible that after replacing the pads, the caliper bracket will not fit into place on top, as the brake cylinder will get in the way. To do this, you then need to press the piston of the cylinder with the handle of a hammer or other improvised device.
Then we repeat the procedure and now everything should work out without any difficulties.
High-quality video lesson on replacing brake pads on a VAZ 2114 car.
First, I’ll tell you what tools you’ll need:
- wheel wrench
- two keys - thirteen and seventeen
- support post
- jack
- WD-40
- flat screwdriver
- new pads
- brush
- We park the car on a flat surface and place supports under the rear wheels. We also tighten the handbrake.
- Loosen the wheel mounting bolts, jack up the wheel and install the support stand. After installing the support stand, remove the wheel.
- Use a brush to clean the dirt from the brake mechanism.
- We release the brake hose from the holder, which is attached to the shock absorber strut.
- Look under the hood and check the brake fluid level; if the level is at maximum, pump out the fluid a little.
- Using a flathead screwdriver, remove the pads from the disc. This can be done through the viewing window on the caliper.
- At the back of the caliper, on the bolt that is located below, bend the plate and unscrew the bolt with a thirteen key. When unscrewing the bolt by thirteen, you need to hold the pin from turning by the hex head.
- Now lift the caliper up and secure it, for example, with wire.
- Remove old pads.
- Before installing the pads, measure the thickness of the brake disc. If the thickness is less than 10.8 mm, the disk needs to be replaced. Also clean the pad seats from dirt to avoid distortion.
- Screw in the brake piston.
- Install new pads and reassemble.
Do not forget that if you change the pads on one wheel, you must also change them on the other. That is, the pads need to be changed on one axis.
I would like to recommend quality pad manufacturers:
If you have any questions, I advise you to watch the video lesson.
The brake system of the VAZ 2114 includes front disc and rear drum pads. During operation, friction linings wear out, so consumables require periodic replacement. It’s easy to do it yourself, and if difficulties arise, it is recommended to watch a thematic video.
Original brake pads for VAZ 2114 have article number 21103501080. Their cost ranges from 360 to 500 rubles. The manufacturer does not standardize the service life of branded consumables.
It is recommended to check the size of the friction lining at intervals of 15 thousand km. When the measured thickness becomes less than 1.5 mm, the pads must be replaced. According to reviews from car owners, the average lifespan of front consumables ranges from 15 to 45 thousand km. It depends on your driving style and operating conditions of the car.
WHICH TO CHOOSE
Manufacturers offer consumers dozens of options to choose from. But why then is the choice always so difficult to make? Yes, because everyone is well aware of the presence of low quality auto parts on the market. Therefore, before changing any part, we have the task of purchasing it. Experienced car enthusiasts know how to understand that the pads are of poor quality, when the average amateur has no idea about it. The main symptoms are porosity and uneven distribution of friction material.
Drivers who have quite a lot of experience and have tried a dozen different options mostly recommend Fenox brake pads. The thing is that it is the Phenox that is closest in its characteristics to the original ones. They do not lose their properties at high temperatures, protect the disc from friction materials and clean it, and have wear sensors.
Installing Fenox pads is not difficult; the process is no different from conventional ones, except for connecting the wear sensor. Their cost is also pleasing - about 500-600 rubles per set. When buying front brake pads for a VAZ 2114 price, this is the first thing people look at. Although this is incorrect, from a quality point of view, it is, however, accepted.
There are several types of materials from which brake elements are made. All of them are designed for different degrees of load. Here the choice will depend on individual requests and intensity of use. Replacing brake pads on a VAZ requires a special approach, since worn-out elements lead to damage to the system. It is best to take cleaning models, they are much more reliable and extend the life of the disk.
Pads (front) Fenox
Which brake pads for the VAZ 2114 are better is up to you to decide, however, you should not neglect the advice of professionals.
Article number and cost of good front brake pads for VAZ 2114 from third-party manufacturers
The quality of the original front pads is rated below average by car owners. They often rattle and squeak. Therefore, it is better to give preference to analogues of the original products, which are shown in the table below.
Table - Good analogues of the original front pads
| Manufacturer | vendor code | Approximate cost, ruble |
| Delphi | P551 | 1600-2000 |
| ABS | 36576 | 1200-1800 |
| RoadHouse | 222102 | 1400-1600 |
| TRW | GDB469M | 750-900 |
| Ferodo | TAR527B | 450-670 |
Article number and approximate cost for original rear pads of VAZ 2114
The original rear drum pads have catalog number 210103502090. Their price ranges from 1000 to 1500 rubles. At the same time, there are more resources, since:
- when stopping the car, less force is applied to the rear axle brakes;
- the drum covers the pads and abrasive particles do not fall on their surface, as happens in disc brakes.
The manufacturer does not standardize the service life of drum pads. The rear brakes should be checked every 30 thousand km. According to reviews from owners, on many cars, pad replacement is not required until 80-100 thousand km.
Article number and cost of good analogs of original rear brake pads for VAZ 2114
Rear drum brake pads have less impact on braking performance. When purchasing them, a more important criterion is the absence of creaking and other extraneous sounds when the car is stopped. According to owner reviews, the analogues of the original pads, which are shown in the table below, are most suitable for the rear axle.
Table - Recommended analogues
| Pad manufacturer | vendor code | Approximate price, ruble |
| Bosch | 0986487893 | 900-1100 |
| TRW | GS8222 | 1600-1800 |
| Ferodo | FSB59 | 1300-1500 |
| Brembo | S41501 | 900-1300 |
| ATE | 03013702322 | 680-900 |
Replacing front pads on a VAZ 2114
Replacing the front pads is carried out according to the instructions below.
- Remove the protective cap.
- Jack up the car and remove the wheel.
- Clean the caliper from dirt.
- Using a wrench, unscrew the upper fastening of the caliper bracket.
- Loosen the lower caliper bracket. It is not required to completely unscrew it.
- Remove the brake hose from the bracket.
- Pull the caliper bracket to the side.
- Move the bracket to the side for free access to the pads.
- Remove old pads.
- Replace the wear sensor on the new pads if it is not included in the new set of consumables.
- Press the brake piston into the cylinder. Before doing this, you need to check the brake fluid level. If it is close to the maximum, then the slurry should be pumped out to prevent its overflow.
- Pressing the piston into the cylinder
- Install new pads and reassemble in reverse order.
Also check out
- Installation of new front struts on Lada Priora cars
- Installation of the upper support of the VAZ 2115 strut
- Instructions for replacing the VAZ 2115 wheel bearing at home
- Use a flat-head screwdriver to remove the columns from the brake disc.
How to replace front brake pads on a VAZ 2115 at home
- Bend back the locking plate of the pin that serves as a caliper guide on the lower bolt. Unscrew the bolt, while holding the pin by the hexagonal part to avoid turning it.
Self-replacement of brake pads on a VAZ 2115
Self-replacement of brake pads on a VAZ 2115
- Raise the brake caliper and secure it.
Correct replacement of VAZ 2115 brake pads on your own
- Remove old pads. Before installing new ones, use a caliper to measure the thickness of the brake disc at 4 opposite points. The minimum thickness, as mentioned earlier, is 10.8 millimeters. If necessary, replace the brake disc.
- Clean all mechanisms and parts of the brake mechanism, especially carefully inspect the seats of the brake pads. The accumulation of dirt in them can lead to misalignment and subsequent jamming of the pads, their uneven wear. If the removed pin is faulty, it is important to apply graphite lubricant to its surface before installing a new one.
- Sometimes it is necessary for the piston to be pressed into the caliper, since when the pads are worn heavily, it will come out, making it difficult to install new brake pads . You need to be careful with the boot and piston seals. After this, check the brake fluid level. If it is high, when the piston is pressed in, liquid will flow out of the expansion tank of the GTZ. You can solve the problem using a syringe; to do this, unscrew the cap and pull out several cubes of TJ with the syringe. At the end of the process, pour it back.
- Proceed with installing new brake pads. When installing them, you need to be careful about the location of the pressure springs. Their position is correct if they are parallel to the top edge of the pads.
Correct replacement of VAZ 2115 brake pads on your own
- Reinstall the brake caliper bracket.
Replacing brake pads on a VAZ 2115 instructions
- Install the guide pin bolt and tighten it. It is better to use a torque wrench for this (tighten with a torque of 30–40 N*m).
- Use a screwdriver to bend the locking plate. This will prevent the bolt from turning spontaneously.
- Return the wheel to its place and tighten the mounting bolts.
Perform similar steps on the other side of the car.
Before driving, depress the brake pedal several times to bring the brake pistons into the working position. It is also important to top up the brake fluid.
At first, squeaking may occur due to the grinding of the pads to the brake disc. After some time, these sounds will disappear.