The VAZ-2115 sedan became the first representative of the family, called “Samara-2”, being at the same time a restyled version of the VAZ-21099. The car is characterized by many changes and improvements, one of which is the presence of a cabin filter - a unit that was absent in all predecessors, from the “kopek” to the “nine”. And although this improvement can hardly be considered a major one, for many adherents of a healthy lifestyle, the ability to drive in a car free of dust is an important factor.
How to independently replace the cabin filter in a VAZ-2115.
Lifetime of cabin filter VAZ-2115
Most drivers understand the importance of performing routine operations to replace consumables, but this mainly concerns consumables that are directly related to the power unit and transmission. The cabin filter is a relatively “fresh” innovation that became widespread in the 90s, and it appeared on domestic cars about a dozen years later. Therefore, Russian car enthusiasts are not too familiar with this part, which allows for high-quality purification of the air entering the cabin from the outside. And since air can be called a virtual substance that cannot be touched, or the number of dust particles can be counted by eye, the presence of a filter element on a new car may go unnoticed. But only for the time being - as soon as the filter becomes clogged, it will immediately affect the condition of the car’s ventilation system.
But how can you determine when it’s time to change the VAZ-2115 cabin filter to a new one? The manufacturer recommends performing this operation every 15 thousand km. If we compare this indicator with the service life of analogues on foreign cars, it will be much less. Perhaps the VAZ team took into account the peculiarities of our roads, the condition of which, to put it mildly, is far from ideal. And yet, under certain circumstances, this indicator must be significantly reduced. For example, if the car is operated in conditions where it spends a lot of time in dense city traffic, constantly “inhaling” exhaust and microparticles of rubber from the treads. Or if he often drives on dirt roads, which also does not contribute to the longevity of the cabin filter.
Many experts recommend changing the SF twice a year, on the eve of the beginning of spring and autumn, periods of crossroads. And yet, one should navigate based on more objective indicators, which are the following symptoms:
- the appearance of persistent foreign odors in the cabin, which intensify when the ventilation system operates;
- frequent fogging of windows;
- a noticeable decrease in the strength of the air flow from the deflectors, accompanied by a decrease in the efficiency of the air conditioning system or stove;
- the appearance of a greasy layer of dust on the dashboard even with frequent cleaning of the panel.
Functionality and appearance
Cabin filter VAZ 2114
The structure of the VAZ 2114 cabin filter is very simple. This is a plastic frame with a special material inside.
Interesting fact: to enhance the cleaning effect, many experienced car owners install an additional, homemade fabric barrier into an existing one.
- Purifies the air entering the car interior from the street.
- It traps debris, dust, and harmful fumes from car exhausts.
- Provides clean and fresh air into the cabin.
Where is the cabin filter located on the VAZ-2115
If everything is clear with the question of whether the VAZ-2115 has a cabin filter, then with its installation location everything is not so obvious. Most owners of foreign cars are accustomed to the fact that it is located behind the glove compartment, in the area where the heater (or rather, the heater fan) is located. VAZ designers decided that it is better to access the SF not from the passenger compartment, but from the engine compartment - in this case, the person making the replacement will have more freedom to perform the required manipulations. This decision can hardly be called absolutely correct, at least in relation to cars of the entire 211 family.
In particular, the decision to place the cabin filter in a special niche under the frill (a plastic decorative panel above the hood) was sharply criticized due to the fact that when it rains, or when the car is driven to a car wash, water easily penetrates through the air intake holes into this niche, entering and on the filter itself. As a result, the humidity in the cabin immediately rises and the windows quickly begin to fog up, which significantly complicates driving, directly affecting road safety.
From the point of view of ease of access, the advantages of this method also turned out to be very controversial, since it is necessary to remove the frill and unscrew many bolts and screws. Of course, in many cases, the cabin location of the filter is also far from convenient, but there are models in which to access the filter element you only need to snap off the cover (for example, on the second generation Nissan Qashqai).
What models are there?
The list of functions may vary significantly depending on the modification of the device. The most primitive ones only retain dust and dirt. More expensive and high-quality ones are equipped with activated carbon sorbent. They prevent dangerous bacteria and microorganisms from entering the cabin air.
Filters of both domestic and foreign production are suitable for the VAZ 2114. Of course, each model has its own consumer properties and service life. The average cost in the store is about two hundred rubles. Experienced car owners recommend asking the store if there is a cabin filter for the VAZ 2114 VF-014. This model is preferred.
Replacing the cabin filter VAZ-2115
The procedure for removing a used filter element and installing a new one is simple even for those car owners who prefer to fix any malfunction, even the most minor one, by involving professionals - service station workers or service centers. This operation requires a minimum of tools and a few simple sequences of actions. So, here are instructions on how to change the cabin filter on a VAZ-2115:
- open the hood and begin dismantling the frill;
- To do this, we need to unscrew several bolts and remove the decorative caps, under which the fastenings of the hood trim are hidden;
- after unscrewing, lift the frill and move it to the side;
- from the side of the stove we see a niche in which the cabin filter is located, but in order to get to it, you need to dismantle the protective mesh attached with self-tapping screws;
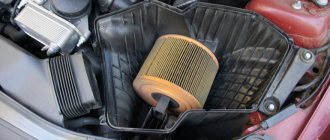
- Now you can remove the filter element itself. Anyone who is doing this for the first time and does not know what the cabin filter of the VAZ-2115 looks like - it is a plastic frame with a paper filter in the middle;
- We install a new product (preferably original). This must be done carefully, since the plastic is quite fragile - by applying excessive force, we can easily damage its integrity, which is equivalent to buying a new filter;
- We assemble all body elements in the reverse order.
How to change it yourself?
If the cleaning device cannot effectively filter the air flow entering the interior of a car with an injector engine, it is necessary to change the device. You can replace the filter yourself or with the help of specialists. Since this procedure is simple, below we will tell you how to do it yourself.
User Alexey Romanov provided a video that shows the process of dismantling the filter device on the Four.
https://youtube.com/watch?v=BwnZeXQ1Y9M
Tools and materials
What to prepare:
- new cleaning device;
- a Phillips head screwdriver;
- clean rags;
- sealed glue.
Algorithm of actions
How to remove and install a new filter:
- Stop the engine and open the hood of the car. Find the installation location of the filter device. Remove the rubber seal along with the fasteners.
- Using a Phillips-head screwdriver, unscrew the screws securing the casing located in the area of the center of the windshield. Self-tapping screws are secured with nuts.
- Remove the plastic plugs from the seats.
- Remove the plastic casing of the heating system. Remove the mesh located inside. This will give you access to the cleaning element. Remove it and install a new filter. To install the device, first the product itself is mounted, after which the frill is installed and the filter element is pressed against it. Before installation, lubricate the joints of the casing with the vehicle body, use sealant for this. This will allow the frill to fit most tightly to the filter.
- Screw the screws back in. The procedure for replacing and installing a new filter is completed.
Is it possible to install a filter on a VAZ-215 from another car?
This question is by no means idle, since the quality of even the original SF for this model is frankly unimportant. We can please sedan owners: this option exists, and you can install any modern filter, including carbon, which can protect the interior from dust, foreign odors, and carbon dioxide. How to do this if the product you like differs significantly in size? The cabin filter adapter for the VAZ-2115 comes to the rescue - a device that is essentially an adapter between attaching the frame to the heater and the filter element itself.
If properly executed, it will provide excellent cleaning of air coming from outside with a noticeable improvement in the filter throughput (it is frankly lame in the original one). Essentially, the adapter is a slightly modernized housing of the standard ventilation system, in which an element has been added for attaching a filter of the required geometric dimensions. To ensure that the housing and mount are airtight, they are connected with the installation of rubber gaskets
In principle, you can find an adapter for sale for a large number of filters from a wide variety of brands and models of cars, but experts recommend installing an adapter for the SF from the VAZ-2110: firstly, it is relatively cheap, and secondly, it is much easier to find or make , and thirdly, the cabin filter itself has a whole range of advantages, from a budget cost to excellent performance.
If you choose the option of purchasing a finished product, you can be sure of its high quality, but many car owners prefer to make such adapters themselves, fortunately, you do not need to purchase a specialized and expensive tool for this. The fact is that purchasing a cabin filter via the Internet is associated with certain risks, and some citizens, having made an unsuccessful purchase once, no longer want to repeat the mistake.
Video “How to correctly change the filter product on a VAZ 2114”
User Alexander Chkalov provided a video that shows in detail the procedure for replacing the air purification device in the cabin of the Four.
Clean air in the cabin is pleasant and useful for every car owner. And the usual road dust, gas pollution and small debris can seriously spoil the ride quality. To ensure that such “troubles” continue to remain behind the glass, the cabin filter on the VAZ 2114 will help.
This is a special air purification device, the second name of which is VAZ 2114 stove filter. The equipment purifies air masses that enter through special openings located above the hood.
Some numbers: about two hundred thousand liters of air mass is filtered inside the car in just one hour of operation.
How to make an adapter in a garage
The money saved on purchasing and shipping an adapter ordered online will be useful for other purposes - for example, for purchasing a high-quality modern carbon filter (in our case, from a VAZ-2110). Of course, to make an adapter you need to acquire the appropriate drawing or diagram - there are a lot of them on the Internet. You just need to make sure that a particular circuit is designed for a pair of 2110-2115.
The first thing to do is to make a paper mock-up of the adapter, preferably with exact geometric dimensions. A similar technique is actively used in modern design bureaus, allowing one to visualize the sequence in which a real part will need to be assembled.
To make a case, you need to acquire sheet steel (galvanized or stainless steel - whichever is more affordable). We will not exclude the option of making the case from plastic, but we will make a reservation that working with this material is much more difficult, especially when it comes to parts that need to be bent. In our case there will be many such details. Bending sheet metal is much easier - all you need is a vice and a mallet (and, of course, the skills to perform such operations).
The parts can be connected to each other either using bolts or rivets. The latter method is preferable because it does not require drilling holes, but the operation itself requires skill and accuracy so as not to damage the thin-walled material with an inaccurate blow. Let us immediately note that welding is not suitable here - the sheet is too thin to make a high-quality weld without damaging the metal.
The disadvantage of many self-made structures installed on a car is their ability to vibrate when driving on bumpy roads or when the car is moving at high speeds. To avoid rattling, which is inevitable in such cases, it is advisable to treat all joints of parts with sealant, which is an excellent noise-insulating material. If you have, as they say in such cases, “not crooked hands,” it will take about 5-7 hours to make the adapter, not counting the time spent searching for drawings and studying them.
Why is the cabin filter adapter useful?
If the cabin filter does not cope with its task on its own, and the air in the cabin is still dirty, you should resort to using a special adapter.
Its capabilities and functions:
- Allows you to install a more modern filter in your car.
- Extends its service life.
- Makes the air in the cabin clean and fresh.
- Eliminates dangerous deposits of dirt inside the cabin.
You can buy such an adapter online or make it yourself using stainless steel drawings. If you are not a jack of all trades, but you like the drawings, look for craftsmen who have already mastered this craft and sell adapters online.
When replacing the filter, you should not rely on the car’s operating instructions and wait until the due date. Check its cleanliness as often as possible.
In any case, it is worth seriously fighting for clean air in the cabin. After all, we spend a good half of our lives in the car.
The cabin filter protects your interior from debris from the street. It purifies the air entering through special openings next to the windshield.
Cabin filter location
The standard cabin filter is located in the engine compartment behind the engine. Its location is shown in the photo below.
Instead of a standard filter, an adapter is often installed. It is located in the same place as the original filter element.
Location
Where is the cabin filter located on the VAZ 2114? Let's start with the fact that it may not be in the car at all. The fact is that not all previous VAZ models entered the production line with ready-made, installed filters. We are talking about VAZ 2114, 2113, 2115.
Here is the cabin filter on the VAZ 2114
However, its presence in the car can be easily determined independently; you just need to press down the heater casing with force. If, when pressing under the stove, a free cavity is felt, it means there is no filter, and if the space is occupied, then, to the joy of the owner, it is already installed. As you probably understand, the filter is located directly under the hood of the car. In more detail, under the frill, or under the casing of the car heater.
Removing and installing the air filter housing on VAZ 2113, 2114 and 2115
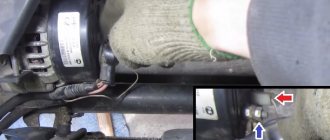
So, the first step is to unscrew the two bolts securing the mass air flow sensor to the filter housing from the rear. You can even move the mass air flow sensor to the side completely so that it does not interfere in the future.
In the front part, the housing is attached to the radiator frame using two bolts, which you will need to unscrew:
In one more place you will have to release the rubber cushion from its attachment to the battery platform. In this case, this last mount was not on the car, but the photo below will show its location.
And now you can easily remove the housing from the engine compartment, since nothing else prevents its removal.
Installation occurs in the reverse order of removal. The price of a new air filter housing for VAZ 2113, 2114 and 2115 is about 600 rubles, although the cheapest analogues can be purchased somewhat cheaper.
The air filter housing on the VAZ 2113, 2114 and 2115 is a part that is practically not subject to wear, even with time of use. But there are cases when, in a frontal impact, with damage to optics, bumpers and radiator, it even reaches the air filter housing.
If for one reason or another it was necessary to change this part, then for this repair you will need a minimum of tools, namely:
- 8 mm head
- 10 mm head
- ratchet handle or crank
Removing and installing the air filter housing on VAZ 2113, 2114 and 2115
So, the first step is to unscrew the two bolts securing the mass air flow sensor to the filter housing from the rear. You can even move the mass air flow sensor to the side completely so that it does not interfere in the future.
In the front part, the housing is attached to the radiator frame using two bolts, which you will need to unscrew:
In one more place you will have to release the rubber cushion from its attachment to the battery platform. In this case, this last mount was not on the car, but the photo below will show its location.