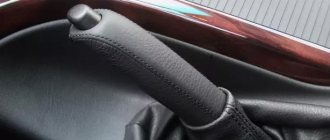
Adjusting the hand brake VAZ 2107
Locking the wheels when parking a car is the task of the parking or hand brake. It is more often used on bumpy road sections.
A well-adjusted handbrake should lock the car in one place when tightened by 4-6 teeth with a surface slope of 25%. If this does not happen, the parking brake needs to be adjusted or repaired.
The breakdown of the handbrake is a common occurrence, since it is enough to just start the car without removing it from the handbrake. In this case, the pads will wear off and will no longer reach the brake drum.
Reasons for failure of the VAZ 2107 handbrake
Most likely, the cause of the breakdown lies in a stretched or unadjusted handbrake cable. A tightening should be performed if the car does not lock even after 5-7 clicks. This procedure on a VAZ 2107 can be done no more than 4 times, after which the brake pads will need to be replaced.
Another source of handbrake malfunction may be cable looping due to moisture, rust, or dirt that gets on the cable while moving. This can be eliminated by cleaning the cable and lubricating it. If after some time the breakdown occurs again, the handbrake cable 2107 needs to be replaced .
Parking brake cable: replacement
To change the handbrake cable on a VAZ-2107, you first need to dismantle the brake drums of the rear tires. After completing this procedure, pay attention to how the rear brake pads and working cylinders look. The presence of traces of fluid leakage indicates a probable repair of the mechanisms.
When it’s time to replace the handbrake cable, each owner of the “Seven” decides for himself. The degree of wear of the cable matters here. The process of replacing the handbrake can be divided into 3 stages:
- Dismantling.
- Installation of the mechanism.
- Tension regulation.
Also check out
In addition, to correct the breakdown, it is necessary to remove the jamming defect of the handbrake lever, and perhaps also the ratchet mechanism of the ratchet.
Therefore, before repairing the handbrake, you should make sure that it is adjusted correctly and that the cause of the problem is not in the cable. At the same time, the technical condition of the rear brakes, cable, and handbrake drive must be good.
Required tools:
- 2 keys for “13”;
- pliers;
- jack.
How to tighten the handbrake of a VAZ 2107 yourself
- Place the car on a viewing hole or lift.
- Jack up the rear of the car, hang the rear wheels (they should rotate freely).
- Tighten the handbrake to the locking position (5-7 clicks).
- Remove dirt from the adjusting bolt and handbrake nuts.
- Using keys “13”, tighten (or loosen) the nut that adjusts the tension of the handbrake. It is worth pulling until the free rotation of the wheels stops (at this time you can make sure that there is no play or friction).
- After tightening the adjusting nut and locking the wheels, you need to tighten the adjusting nut completely. This will reduce the free play of the handbrake.
- Make sure the wheels brake, then tighten the locknut.
- Lubricate the threaded holes (optionally, “Litolom” lubricant).
- Make sure that the protective sheath of the hand rope is not damaged.
This the tightening of the VAZ 2107 handbrake . All that remains is to lower the car from the jack and check the handbrake in action.
Adjusting the handbrake yourself
If you promptly ask yourself the question of how to tighten the handbrake on a VAZ-2107, and do all the work correctly, you will be able to avoid a number of unpleasant situations. Securely locked wheels will prevent the car from rolling away while parked. In addition, a properly functioning hand brake system makes it much easier to move the car away if you are on a steep road. Therefore, if the handbrake on a VAZ does not work effectively enough, read the instructions for adjusting it.
Timely tightening of the handbrake on the VAZ-2107 will allow you to avoid unpleasant situations
Before pulling the handbrake on the VAZ-2107, make sure that the brake pads of the rear wheels are in good technical condition. And also check the condition of the cable itself - perhaps it is too stretched or worn out and a regular tightening will not solve the problem. And also check the operation of the handbrake drive.
- The VAZ-2107 hand brake is adjusted under the bottom of the car, so it must be installed above the inspection hole or the rear of the car must be raised using a jack.
- Set the parking brake lever to the applied position by tightening it 5–6 clicks.
- After this, while under the car, remove all dirt from the adjusting rod and nuts. After cleaning, hold the adjusting nut with one wrench and loosen the lock nut.
- Next, by tightening the adjusting nut, you need to tighten the handbrake cable until the rear wheels lock. During the process, the adjusting rod should be held with pliers so that it does not rotate.
- After the required degree of cable tension has been set, tighten the nut a few more turns - this is necessary to reduce the free play of the lever.
- Now check if the wheels actually brake, and if everything is fine, you can tighten the lock nut.
If the tension of the handbrake is adjusted correctly, then the brake pads will hold the car on a slope of 25%.
After completing the work, it will be useful to lubricate the threaded connections, for example, with lithol - this will make the adjustment process easier the next time. So, now you have learned how to tighten the handbrake on a VAZ-2107 car, but you still need to check the system in action. To do this, find a road section with a 25% slope (or a suitable overpass) and after stopping, pull the handbrake lever 2-4 clicks. If the tension is adjusted correctly, the brake pads will hold the car in place.
Work on adjusting the hand brake on a VAZ 2107 takes place in several stages:
- To begin, jack up the rear of the car and hang the wheels so that they can be freely turned by hand. By the way, at this time you can check how well the wheels rotate, check the situation for the absence of friction or wheel play. After this, tighten the handbrake to the locking position (5-7 teeth). The handbrake nut and adjusting bolt need to be thoroughly cleaned. For this purpose you will have to go under the car. After thoroughly cleaning the nut and bolt from dirt, use two 13mm wrenches to tighten the adjusting nut. Tighten until the wheels can no longer be turned by hand.
By the way, it is better to lubricate all threaded connections with some good lubricant in order to maintain their durability and reliable service.
You should also make sure that the protective sheath of the handbrake cable is intact. You can lower the car from the jack and try the handbrake directly in the “field conditions”.
Source
Replacing the handbrake and front cable on a VAZ 2101-VAZ 2107
Removal
Remove the guide from the tip of our cable, for more details see the article: “Replacing the rear cable”, points 3-4.
Take a wrench and remove the bolt securing the roller to the bracket (the bracket is indicated by the blue arrow). Carefully remove the roller by rolling the roller towards the tip of the front cable, as shown in the figure, and remove it from the car.
Note! Be careful: inside the roller there is a bushing (number 3 in the photo below) and a fastening bolt (number 1). Don't let the parts fall and get lost.
We recommend using Litol-24 or LSC-15 lubricant, lubricating the contacting surfaces of the bushing itself (the surface is indicated by the letter B) and the surface of the roller (the letter A). To do this, remove the bushing from the socket.
Now pull the cable to the bottom and remove the cable from the bracket and the intermediate support of the cardan drive (indicated by the blue arrow).
Get out from under the bottom of the car and move into the interior. While inside the car, remove the two screws securing the handbrake trim, remove it and set it aside.
You will see four handbrake mounting bolts. By unscrewing them, you will remove the handbrake from the car along with the attached cable (front).
Note! If necessary, disconnect the cable from the handbrake: using pliers, remove the small cotter pin (looks like a small twisted wire inserted into the hole; a washer is placed under it, holding the parts in place) that goes into the hole indicated by the red arrow. Unfortunately, the hole is hard to see in the photo, but it is present in the so-called finger, where the cable tip is installed. Remove the cotter pin securing the end of the cable and remove the washer with the cable as shown in the figure below.
Parking brake lever VAZ (classic), causes of failure
If the parking brake does not lock the vehicle in place, it means it is faulty. There may be two reasons for this. The first reason is broken or stretched cables. The second reason is worn out handbrake pads or brake pads. If the handbrake lever is released and the instrument panel light is still on, the brake fluid level is likely below the minimum level.
A common cause of handbrake failure is cable jamming due to mechanical damage, moisture, dirt, and rust. In addition, it is worth noting that for the handbrake to fail, it is enough to drive several kilometers with the handbrake pulled. The design of the parking brake in the drum allows only 1/4 of the pads to be pressed against the braking surface. When driving, this part of the pads quickly wears out and no longer reaches the drum. In this case, you can try adjusting the handbrake cable. After driving with a tense handbrake, as a rule, it can be tightened approximately 3-4 times. After this, the pads are completely worn out and to restore the functionality of the handbrake, they need to be replaced.
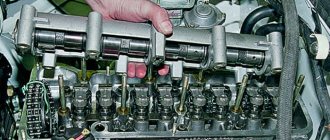
Features of the braking system
One of the features of the VAZ-2107 brake circuit is the presence of a dual-circuit system. The essence of a dual-circuit system is that the working drive is divided into two parts, each of which supplies fluid to only two mechanisms, while the circuits do not interact with each other.
The presence of two circuits ensures the operability of the brakes of at least two wheels in the event of depressurization of one of the circuits. That is, even if the pipelines of one circuit are punctured, the second will remain fully operational, which will ensure the functioning of the brakes.
In the VAZ-2107, the circuits are divided in such a way that the drive of the front axle mechanisms is separated from the drive of the rear mechanisms. This allows you not only to maintain the functionality of the system when one of the circuits fails, but also to pump each circuit separately. That is, if one of the circuits is airy, then it needs to be pumped, but it is not necessary to service the second one.
This is only general information about how the VAZ-2107 brake system works, and does not include all the details on its maintenance and repair. In general, the brakes of this car work quite well, although some elements of it cause complaints from car owners.
The design of the VAZ 2107 brake system: main mechanisms
The 7's braking system contains many small parts. Each of them serves the sole purpose of protecting the driver and people in the cabin while braking or parking the car. The main mechanisms on which the quality and efficiency of braking depends are:
- master cylinder;
- amplifier;
- regulator;
- pads;
- disks;
- drums;
- pedal;
- highways.
Master cylinder
The master cylinder body works in direct connection with the amplifier. Structurally, this element is a cylindrical mechanism to which the brake fluid supply and return hoses are connected. Also, three pipelines leading to the wheels extend from the surface of the master cylinder.
Inside the master cylinder are piston mechanisms. It is the pistons that are pushed out under the pressure of the fluid and create braking.
The use of brake fluid in the VAZ 2107 system is explained simply: there is no need for complex drive units and the path of the fluid to the pads is simplified as much as possible.
The cylinder is one of the most important elements in the braking system, since it is it that creates the pressure
Vacuum booster
When the driver presses the brakes, the initial boost goes directly to the booster device. The VAZ 2107 is equipped with a vacuum booster, which looks like a container with two chambers.
Between the chambers there is a very sensitive layer - a membrane. It is the initial force—pressing the pedal by the driver—that causes the membrane to vibrate and create a vacuum and pressurize the brake fluid in the reservoir.
The design of the amplifier also contains a valve mechanism, which performs the main function of the device: it opens and closes the cavities of the chambers, creating the necessary pressure in the system.
A two-chamber diaphragm device enhances the action of the master cylinder
Brake force regulator
The pressure (or brake force) regulator is mounted on the rear wheel drive. Its main task is to evenly distribute brake fluid to the components and prevent the car from skidding. The regulator functions by reducing the existing fluid pressure.
The drive part of the regulator is connected to the rod, with one end of the cable fixed on the rear axle of the car, and the other directly on the body. As soon as the load on the rear axle increases, the body begins to change position relative to the axle (skid), so the control rod cable immediately puts pressure on the piston. This is how the braking forces and the course of the car are adjusted.
Thanks to this device, the load on the body during braking is significantly reduced.
Brake pads
There are two types of pads for the VAZ 2107:
- for front axle wheels with disc brakes;
- for rear axle wheels with drum brakes.
Read about ways to replace front brake pads: https://bumper.guru/klassicheskie-modeli-vaz/tormoza/zamena-perednih-tormoznyh-kolodok-na-vaz-2107.html
The pads are made of high-strength steel; a friction lining is attached to the base of the frame. Modern pads for the “seven” can also be purchased in a ceramic version.
Domestic pads have the same quality as imported ones
The pad is attached to the disc or drum using special hot-melt adhesive, since when braking, the surfaces of the mechanisms can heat up to a temperature of 300 degrees Celsius.
More powerful pads are installed on the rear wheels
Front axle disc brakes
The principle of operation of disc brakes on the VAZ 2107 comes down to the fact that pads with special linings, when you press the brake pedal, fix the brake disc in one position - that is, they stop it. Disc brakes have a number of advantages when compared with drum brakes:
- braking efficiency is not reduced due to overheating;
- high resistance to braking on snow, ice and water;
- unpretentiousness in maintenance;
- large friction area.
The disc is made of cast iron, so it weighs quite a lot, although it is very durable. The pressure on the disc is exerted through the disc brake working cylinder.
The front wheels of the VAZ 2107 have disc brakes
Rear axle drum brakes
The operation of a drum brake is identical to that of a disc brake, the only difference being that the drum with pads is installed on the wheel hub. When you press the brake pedal, the pads clamp the rotating drum very tightly, which, in turn, stops the rear wheels. The piston of the drum brake wheel cylinder also functions by using brake fluid pressure.
More durable cast-iron drums are installed on the rear wheels of the “Seven” for braking.
More information about replacing the brake drum: https://bumper.guru/klassicheskie-modeli-vaz/tormoza/kak-snyat-tormoznoy-baraban-na-vaz-2107.html
Brake pedal on VAZ 2107
The brake pedal is located in the lower part of the cabin. Strictly speaking, a pedal can only have one state, as provided by the manufacturer. This is its main position at the same level as the gas pedal.
When pressing the part, the driver should not feel jerks or dips, because the pedal is the first mechanism in a series of several units for braking efficiency. Pressing the pedal should not cause any effort.
The pedal is only an external element of the system, visible to the driver
Brake lines
Due to the use of special fluid in the brakes, all elements of the braking system must be tightly connected to each other. Even microscopic gaps or holes can cause the brakes to fail.
To connect all elements of the system, pipelines and rubber hoses are used. And for the reliability of their fixation to the mechanism bodies, fasteners made of copper washers are provided. In those places where the movement of components is provided, rubber hoses are installed to ensure the mobility of all parts. And in places where there is no movement of nodes relative to each other, rigid tubes are installed.
A set of rigid brake pipes for the VAZ 2107 is used in hard-to-reach places in the system
Why the handbrake does not work on the VAZ 2107
Like any other part or mechanism, the handbrake cable tends to wear out and become unusable. The parking brake on the VAZ 2107 is activated using a lever located in the middle part of the car between the driver and passenger seats.
We recommend: Why doesn’t the heater on a Niva Chevrolet blow at your feet?
Periodically, the handbrake cable should be tightened, as it becomes weakened, which leads to a decrease in the efficiency of the device. The reasons why the handbrake on the “seven” may not function are due to the following factors:
- Excessive cable stretch.
- Damage to the cable.
- Malfunction of the brake mechanism in the rear wheel drums.
During prolonged use of the car, when the handbrake is constantly used, owners are faced with the need to periodically restore the cable tension. Over time, the device in question stretches, and there is nowhere to tighten it. The only way out of the situation is to exchange the product for a new one. It is recommended to carry out work on replacing the handbrake cable in an inspection hole, but you can do without it.
Changing the handbrake cable
Replacing the handbrake cable on a VAZ 2107 car begins with the fact that it is first necessary to dismantle the brake drums of the rear wheels. After dismantling the brake drums, you should pay attention to the condition of the rear brake pads and working cylinders. The presence of traces of fluid leakage will indicate that the mechanisms also need repair.
Each owner of his car decides individually when it is necessary to change the handbrake cable. It all depends on the degree of wear of the cable. The procedure for replacing the parking brake cable is divided into 2 stages: dismantling and installation, as well as adjusting the tension.
The replacement algorithm is as follows:
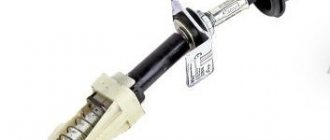
- After the rear wheels and brake drums are removed, you need to go down into the inspection hole and find the tension adjusting rod. This rod is equipped with a spring, which must be removed using a screwdriver.
- Both nuts are unscrewed, after which the adjustment bar is removed. Next, the rear and front handbrake cables are dismantled.
- Using a wrench, you need to unscrew the two nuts securing the two brackets. These brackets prevent the cable from falling. There are screws under the nuts that prevent them from unscrewing on their own.
- After this, you should remove the rear brake drums and remove the springs that secure the brake pads. The pads can also be replaced if they show excessive wear.
- Next, you need to pull the cable to disengage it from the bracket against which it rests.
Using a 10mm wrench, you need to unscrew the front cable mounting brackets. After unscrewing the bolt, carefully remove the roller. To remove the roller, you need to roll it forward in the direction of the tip. - To remove the front part of the device, you need to pull on the product to remove it from the bracket and intermediate support structure.
- After this, you need to get out of the hole and go into the car interior. When performing work, the handbrake must be in its lowest position. Inside, unscrew the two screws securing the handle trim.
- There are 4 bolts under the cladding that need to be unscrewed. After unscrewing them, you will need to remove the handle along with the front cable.
- To disconnect the cable mount from the handle, you will need to use pliers to remove the small cotter pin that secures the device to the handbrake handle.
- After this, the device can be completely removed from the car and a new cable installed in its place. The installation process of both products is carried out in the reverse order of removal. After this, you should secure them and begin the tension adjustment procedure.
- pliers;
- two keys for 13;
- a can of WD-40 lubricant.
It is important to know! When installing the rear cable, it is important to know the following: this element has right and left sides. On the right side there is a rubber tube, which acts as additional insulation of the braid from the nearby hot resonator pipe.
Adjusting the hand brake VAZ 2107
Adjustment of the handbrake should be performed not only periodically when the parking brake is lost, but also after replacing the cable. In order to adjust the cable tension, you will need to take the following tools:
Replacing the handbrake lever VAZ 2101 - 2107
This may probably surprise some, but over the years, or rather even over decades, the parking brake lever on a VAZ classic can bend and even break off. At first glance, this seems strange, because this part is metal, and steel things are usually considered strong. But sometimes, this can happen after just half a year, after installing a low-quality spare part.
Perhaps this is a consequence of metal fatigue. But be that as it may, I personally don’t feel very comfortable driving with the handbrake not working. Not that it was necessary, but this feeling of a not quite working car has never seemed pleasant to me.
On my parent’s Kopeyka, over the 20 years of owning this car, this lever has already changed once. Apparently I came across a part of good quality, which is why it lasted more than 10 years. In my case, the lever did not break off, but gradually bent towards the driver. But it had already bent so much that it became obvious to me; - it needs to be changed. Although at the beginning I couldn’t even believe my eyes, I didn’t believe that the lever could bend like that. I even began to think that this was probably the case, but I just didn’t pay enough attention to it. But then it bent even more and I realized that it certainly shouldn’t be like this).
In general, if you have already decided that you really need to replace the handbrake lever on a VAZ 2101 - 2107, now I will describe how to do it. And first you need to disconnect the short parking brake cable. This is not difficult to do, but the presence of a hole would be desirable. Means; - to release the short handbrake cable from the long one - which already goes to the wheels. You need to remove the spring from the short cable stud and completely unscrew the nut (it's 13 there) that regulates the parking brake tension from the stud. When the nut is unscrewed, the pin can be removed from the metal “braid” connecting the long and short handbrake cable. And bring the pin closer to the roller through which the short parking brake cable rises into the cabin, to the lever itself.
Now you need to go into the interior and remove the lever itself. The parking brake lever on the VAZ classic is secured with four 10-point bolts. But if you do not remove the chairs themselves, then you will hardly be able to get to them with an ordinary open-end wrench. Here you will need 10-point heads.
Another complication is that two of the four above-mentioned bolts are covered with a plastic casing, which is attached to the lever with a small screw for a Phillips screwdriver. Some people remove the driver's seat to unscrew this screw, but it is quite possible to insert a screwdriver under the seat and unscrew the small screw without removing the seat.
Now you can unscrew the lever itself. As a rule, it is removed extremely rarely, so a liquid like WD40 can be useful here. Select a tool with a 10-point head, where there will be a fairly long “leg of the head”, and there will also be sufficient leverage, because even though there are small 10-point bolts, it may not be so easy to unscrew them with a screwdriver.
Now that the lever is removed, notice how it is connected to the cable. The cable here is secured to the lever with a cotter pin, through a washer. To disconnect the cable, you will need to pull out the cable, remove the washer and then you can disconnect the handbrake cable.
Everything is assembled in the reverse order, but I would like to draw your attention to the fact that the old cable may not fit very well on the new lever. In order for everything to fit well, you just need to take a sandpaper and clean off the paint at the junction of the cable and the lever. So you put the cable on the handbrake, throw on the washer and insert the cotter pin. Now you can screw the new handbrake lever into place and flatten it under the car.
In general, provided that everything unscrews normally, there is nothing difficult in replacing the handbrake on a VAZ classic. I think you understand that with a ratchet with a large lever you should not tighten small bolts 10 times as hard as you can; - only with feeling. It’s better to tighten it with a screwdriver with the head on it. It depends on what tool you have available.
Successful repair, the main thing is not to worry or worry. If you are a young guy who has no experience in car repair, don’t be afraid, everything is simple, you can handle it).
How to independently restore the effectiveness of the handbrake
Driving a car with faulty brake system components is prohibited by traffic regulations. By riding with a non-working parking brake, you not only violate the relevant rule, but also endanger yourself and those around you. Let's not drag our feet and start repairing the handbrake.
The parking brake “does not hold” for the following reasons: — the drive cable has stretched; — breakdown of drive mechanism parts inside the wheel drums; — the cable braid or the cable itself is torn. If everything is in order with the rear brake pads and drums, and breakdowns of these parts occur infrequently, work to return the “grip” to the parking brake comes down to replacing the cable and adjusting its tension.
Parking brake VAZ-2107
Replacing the handbrake cable
The VAZ cable must also be replaced on an overpass or inspection pit. First of all, you need to screw the adjusting nut and locknut onto the tip so that the place where the spring hooks to the tip is visible.
Then use pliers to unhook the spring. Next, holding the tip from turning, unscrew and remove both nuts and the cone bushing from it. The cable end is now free.
We completely unscrew the bolt securing the roller through which the handbrake cable passes, remove the roller from the holder and pull out the cable. The work under the bottom is completed, you can move into the interior.
Replacing the hand brake cable of a VAZ 2107
The operation of replacing the cable is carried out on a lift or inspection pit.
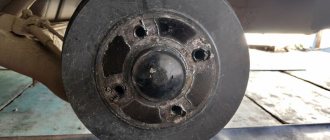
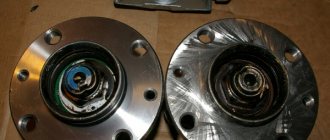
To replace the handbrake cable, it is necessary to remove the brake drums of the rear wheels. When removing them, it is possible to check the condition of the brake pads and parts of the brake mechanism, especially the working cylinders. The latter should not have any traces of brake fluid leakage, and the rubber boots should not have cracks or damage.
Removing brake drums is a rather complicated procedure. The work is made difficult by the wear of the brake drum, which, as a result of wear, may have a “side” that clings to the pads when removed. Another problem is corrosion, which is best combated with WD-40.
How to change a torn or stretched parking brake cable on a VAZ classic
All work must be done in the same way as during adjustment, placing the car above the inspection ditch, or lifting it using a lift. There are also some pitfalls. The brake drums, which will have to be removed, are tightly “stuck” to the axle shaft flanges. Beating the drums themselves is more expensive, they are fragile and break easily. Therefore, we will do this: – by hanging the wheels, we will reliably strengthen the car from rolling in a way suitable for your conditions; – fourth gear, release the clutch, “accelerate” and sharply “hit” the brakes; – we repeat this “procedure” until the inertia tears the drums away from the flange; – we clean off the rust from the hub flange with a file - it interferes with pulling out the drum; – rocking from side to side, using wooden drifts, remove the drum. A protrusion on its inner side, formed over years of wear, can also prevent successful removal of the drum. Now, inspect what is inside - the pads and cylinders. Severe wear on the linings is a reason to replace the pads. The cylinders should not leak brake fluid, the boots should be intact without breaks. The cable sheath is bolted to the brake shield. You need to unscrew them very carefully, generously watering them with “Vedashka”, otherwise you will twist the “head” and will have to drill it out. Have you turned away? Wonderful! All that remains is to pull out the old cable and lay a new one in its place. We put everything else back together, and then, having installed the drums and wheels in place, we adjust the parking brake, as described above. Everything is ready, we have successfully replaced the parking brake cable of a VAZ classic. Video on this topic
Read this, it might come in handy: Replacing the rear axle gearbox, changing the shank seal, installing a self-block
And one more thing
Types of maintenance work
Despite the fact that the system is not so complicated structurally, it requires periodic maintenance, including:
- Checking the fluid level in the system;
- Checking the degree of wear of friction clutches, pads, discs, drums;
- Bleeding the system to remove air;
- Checking the condition of the handbrake cables;
- Adjustment of cable tension;
- Adjusting the rear brake adjuster;
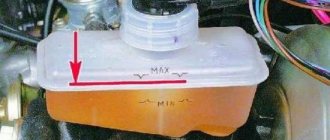
Before each trip, you must always check how much brake fluid is in the VAZ-2107 system. An insufficient amount of it can lead to the fact that the efficiency of the system can be significantly reduced due to air getting inside the pipelines. In addition, a decrease in level may indicate damage to pipelines and fluid leakage.
The elements of the mechanism should be checked every few months, this is especially true for the pads, since they wear out quite intensively. If necessary, worn elements are replaced.
If air gets inside the drive of the working system, pumping is performed, as a result of which the air is expelled from the system.
Loosening the tension of the parking brake cables can lead to its failure, so you need to periodically monitor it and, if necessary, restore the tension.
How to tighten the handbrake of a VAZ 2107. Adjusting the handbrake
The parking or handbrake (handbrake) is designed to lock the wheels while the car is parked, and is most often used on uneven sections of the road (downhill slopes).
A properly adjusted handbrake should hold the car in place when tightened by 4-6 teeth, on an area with a slope level of 25%. If the handbrake does not hold, it needs adjustment or repair of the parking brake.
In order to disable the handbrake, you don’t need much, just drive once and forget to take the car off the handbrake. While driving, the pads will quickly wear out and simply will not reach the brake drum when you tighten it.
Why does the VAZ 2107 handbrake fail?
The most common cause is jamming of the cable, this is facilitated by moisture, rust, as well as various dirt that gets on the cable while moving. This can be treated by cleaning or washing the cable, as well as its subsequent lubrication. If the problem recurs over time, the VAZ 2107 hand brake cable needs to be replaced.
Often the cause of the malfunction is jamming of the handbrake lever or the ratchet mechanism of the ratchet.
In order to repair the handbrake, you should make sure that it is adjusted correctly and that the problem is not in the cable.
Note! First of all, you need to understand that adjusting the parking brake and its cable makes sense provided that the rear brakes, as well as the cable itself and the handbrake drive are in normal technical condition.
To work you will need:
- Two “13” wrenches and pliers.
- Jack.