When to replace a Chevrolet Niva radiator
Replacing the cooling system or its individual components is usually required due to wear or mechanical damage. Among the most common complaints when contacting a service station, the following points stand out.
- Using low-quality antifreeze or pouring water into the system. The main property of coolants is the protection of metal parts from corrosion and rust formation. When water is used in a radiator, strong carbon deposits or oxides form inside the lines, which can clog thin tubes. In case of mild damage, repair is limited to sealing one part of the system.
- Mechanical damage. The main radiator is located at the front of the car and is covered with a thin grille. Due to poor protection when traveling off-road or on country roads, the element can be damaged by a stray stone or foreign objects entering the radiator grille. At the same time, a small force is enough to cause serious damage - the thinnest plates are easily crushed, which leads to loss of heat transfer and overheating of the system.
- Natural wear and tear. During active use, the radiator is subject to constant temperature changes, which affects the condition of the metals. Additionally, the presence of increased pressure inside the lines after starting the machine is harmful. Such vibrations lead to cracking of tubes, fasteners or cooling plates.
The above cases apply not only to the main radiator; problems also arise with the elements of the stove and air conditioner.
The radiator itself
After removing both hoses from the power steering radiator, it is necessary to remove the radiator itself. To do this you will need a 10mm socket, a small ratchet and an extension. There are five bolts, and the fifth holds the end of the radiator through a specially curved bracket. Please note that there is also liquid in the radiator - about 200 ml. If the radiator cannot be removed without disassembling the bracket, then use a 8-mm socket and disassemble the bracket. Now disconnect the electrical terminals from the fan unit - there are two of them and the terminal from the horn. Remove the horn using a 13mm socket with a ratchet.
Disconnect the pipe coming from the thermostat to the radiator, first loosening the clamp by 7 with the head.
Remove the upper half of the air trap in front of the radiator, which is held on by 4 bolts. You need a small ratchet, extension, 8mm socket. All 4 bolts.
Then unscrew the upper fastenings of the engine cooling radiator using a ratchet with the head on. Remove these fastenings and move the upper part of the radiator along with the fan unit slightly forward. This will allow you to remove two hoses, having first loosened both clamps going to the upper corner of the radiator on the passenger side using a ratchet with a size 7 head.
Now we separate the fan block and radiator. There are six connection points. Five of which are more or less accessible, but the sixth is well hidden. You need a small ratchet with a 10 mm socket and an extension. Unscrew the four nuts. The fifth is visible but not immediately accessible. It is necessary to bend the hose going to the bottom of the radiator down under the spar. Then we will calmly unscrew the fifth nut. The sixth nut is located at the bottom of the fan block exactly in the middle. It is hidden (tear off the hands of the designers) behind a special plate resembling two letters Y, connected by legs to each other. Before we get the sixth nut, we need a ratchet with a 13-mm head to unscrew the two bolts holding the bar from below. By unscrewing the sixth nut, we separate the fan block and the radiator.
Unfortunately, it is not yet possible to remove the radiator. It is held by a hose going to the bottom of the radiator and the lower half of the water trap. For both things, the designers’ hands need to be torn off again, because it’s inconvenient and it’s not clear why exactly this is happening?
It is not difficult to unscrew the lower part of the air trap. A small ratchet with an extension and a 10mm socket, and only two bolts and two nuts at the bottom inside the bumper. However, this part still needs to be removed, and the bumper interferes with the action. Fortunately, you won't have to remove it. The air trap is made of thin metal and bends well. We simply fold its sides into the center and get a flat part that does not interfere with removing the radiator.
Do-it-yourself replacement of a Niva Chevrolet radiator with and without air conditioning
If you need to replace units, you can contact a service station or a qualified technician for help. Other users prefer to perform all procedures themselves. This is possible due to the fact that replacing a Chevrolet Niva radiator pipe or the cooler itself does not require specialized tools or deep knowledge of mechanics.
Chevrolet Niva heater radiator replacement: necessary tool
To completely replace the device, you will need to prepare the necessary tools in advance.
- A set of open-end and ring wrenches, possibly heads with a knob.
- A canister of coolant of the type that was previously used in the machine system. The standard system uses 5 liters of antifreeze with a class of at least G12.
- One liter canister of power steering fluid.
- 5-6 metal clamps of the appropriate diameter, you can use plastic ones.
- A set of containers where the old antifreeze will be drained, and a funnel to make it easier to fill in the new coolant.
- Silicone sealant is resistant to high temperatures.
- Set of screwdrivers of different sizes.
- Several clean rags and gloves.
After preparing everything you need, you can begin repairing the car.
Replacing a Niva Chevrolet radiator without air conditioning: sequence of actions
The sequence of actions for cars with and without air conditioning is slightly different. Further instructions are relevant for the more common modification, which uses a conventional stove.
- Drive the car onto an overpass or inspection hole. After this, wait the certain time necessary for the engine to cool completely. This is required because the antifreeze gets very hot during operation and performing a hot repair procedure can lead to serious burns or damage to vehicle components.
- Place wheel chocks under the wheels, raise the handbrake lever and engage the gear. During manipulations, the car will constantly twitch - unnecessary movements will not bring anything good.
- Open the hood and disconnect the terminals from the battery - the need is caused by tampering with the electrical part of the car.
- If necessary, remove the crankcase protection and outer plastic (if any) - this will facilitate access to the required fasteners and components.
- Treat all bolted connections with a liquid wrench or similar means to facilitate their unscrewing. In this case, you should not use a hammer or chisel - an entrenching tool can only cause harm - only keys will be used here.
- The next stage is disassembling the decorative radiator grille. The body part is removed using a Phillips screwdriver and a No. 10 socket.
- Next, two mudguards under the engine are removed. Dismantling can also be done with keys or a screwdriver.
- After opening access to all systems, the antifreeze is drained. To do this, you will need to fully open the valve of the stove and auxiliary devices where the coolant flows. After identifying the tap, you should wear protective gloves and goggles - the formula in the radiator is toxic and can cause severe poisoning if it gets into the stomach or eyes. Next, you will need to unscrew the top cap of the expansion tank to facilitate fluid drainage. The next step is to crawl under the car and find the drain valve on the left side of the radiator and open it. You will first need to place a canister or container under the used product (the capacity must be at least 5 liters). After this, the used antifreeze is disposed of appropriately.
- Wait until the refrigerant has completely drained and tighten the valve until it stops.
- Then, to replace the Niva Chevrolet cooling radiator, you should again rise above the car and remove the air filter box. The fasteners are made in the form of 4 bolts with No. 10 heads.
- Next, unscrew the pipes entering and exiting the radiator. The lines are secured with metal clamps and loosened with a Phillips screwdriver.
- Next, remove the top cover of the power steering expansion tank.
- Disconnect the pipes coming from the power steering to the cooling system, first placing an empty container under the connections for testing.
- Similarly, disconnect the lower hoses using one sequence of actions.
- The next step is to disconnect the radiator itself. The part is secured with 5 bolts, one of which is screwed in through a special bracket; it can also be disassembled.
- Drain the remaining antifreeze from the radiator (there will be about one liter).
- Next, you need to disconnect the contact groups of the horn and radiator fans. If this is not done, the wiring will interfere with dismantling.
- Remove the horn using screwdrivers and wrenches.
- After this, you need to disconnect the line on the thermostat, leaving the latter on the tube along with the engine.
- Repairs are ongoing by removing the fly catcher and small stones. The part is placed directly in front of the radiator and secured with 4 bolts and nuts.
- Next, remove the part holders and move the upper part of the radiator forward in the direction of travel of the car.
- Next, unscrew and tighten the pressure line hoses, this is also done carefully; there may be some antifreeze residue inside.
- To continue dismantling, you need to separate the radiator body from the fan module. To do this, unscrew 6 screws. The first 4 are located in the upper part, the lower two require a special approach and are located at the bottom of the unit.
- After all the manipulations, the modules are separated and the coolers are lifted up.
- Next, the lower pipe is removed and the air trap is bent. The last element is covered by a bumper, so it will also need to be unscrewed.
- After completing all the steps, the old radiator is completely removed from the engine compartment along with the support rubber bands and pads (they may come in handy).
- Reassembly is performed in the reverse order, adding antifreeze. After complete installation of the system, the motor warms up and the coolant is added if necessary.
- Replacement of the Niva Chevrolet cooling radiator without air conditioning has been completed.
Replacement on a car without air conditioning
The work is carried out in an inspection ditch. Before starting repairs, you need to prepare a new air conditioner, 10 liters of antifreeze and the following tools:
- Container for draining coolant.
- Spanners.
- Crosshead screwdriver.
- Jack.
- Wheel chocks.
- Balloon wrench.
The radiator is dismantled after the car is installed on the inspection ditch and the antifreeze has been drained from the cooling system. The work is carried out as follows:
- Remove the bumper and radiator grill (you will need to unscrew the screws and bolts).
- Jack up and remove the front wheels.
- Remove the air filter pipe.
- Remove the casing that guides the air.
- Unscrew the power steering oil cooling mount.
- Remove the headlights so that they do not interfere with the oil cooling pipes.
- Remove the crossbar that partially blocks access to the bolts holding the cooling fans in place.
- Disconnect the terminal from the electric fan unit.
- Unscrew the nuts and bolts holding the fan mount and carefully remove it down.
- Unscrew the screws securing the condenser tubes to the car body.
- Move the pipes and power steering oil cooling system forward.
- Loosen the clamps and remove the pipes.
- Remove the radiator.
Replacing the Chevrolet Niva heater radiator
The specified sequence of actions is relevant for car models without an air conditioning system.
- Completely dismantle the glove box along with its lighting and brackets. To do this, you will also need to disconnect the side trim elements of the interior.
- Drain the antifreeze from the car's cooling system.
- Loosen the connections of the pipes and tighten them. In this case, antifreeze will flow from the channels - you need to substitute a piece of plastic bottle or a tray in advance.
- Next, unscrew the heat exchanger screws and pull the part towards you until it stops.
- Interfering structural elements can be removed or, for plastic elements, bitten off with tongs.
- After which the part will freely leave the seat.
Installation of a new device is carried out in the reverse order, fully observing the instructions and sequence of actions.
Preparatory work for replacement
Before replacing the cooling radiator on a Chevrolet Niva, you need to make sure that this particular element is leaking. After all, antifreeze leaks often occur at the junctions of the pipes. If there are no obvious signs of a heat exchanger leak, then a detailed inspection will be required, for which you should remove it from the car and wash it.
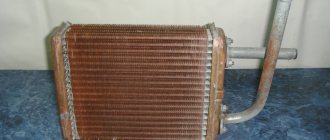
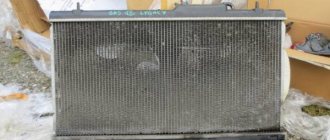
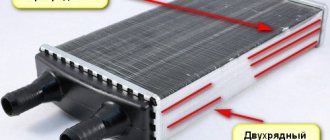
On Chevrolet Niva cars with air conditioning, two heat exchangers are installed. The main radiator of the engine cooling system is located closer to the engine and is larger than the air conditioner heat exchanger. The device in question on Niva Chevrolet cars consists of two plastic tanks connected to each other using aluminum tubes with cooling fins. The connections have rubber gaskets, which are responsible for preventing liquid from leaking from the device.
The radiator is cooled by the flow of the oncoming wind. When this flow is not enough, fans (2 pieces) come in to help, which are turned on by the temperature sensor and relay. To remove and then inspect or replace the device, you will need to first drain the antifreeze. To do this, prepare a container with a volume of at least 5 liters. If the antifreeze is brown with rust, then it is advisable to replace it.
The procedure for replacing a radiator on a Chevrolet Niva is labor-intensive and requires many steps to disassemble and reassemble the car. Therefore, if this scares you, it is better to contact a service station. Before removing the Niva Chevrolet 2123 radiator, you should prepare the necessary tools and materials.
Procedure for removing a radiator on a Chevrolet Niva
You can start working after purchasing a new heat exchanger. The article number for the heat exchanger on the Chevrolet Niva is 2123-1301012. The complexity of the work process requires a considerable amount of time, so it is better to carry out the work in the garage. First, let's consider the option of removing the radiator on a car without air conditioning and without the need to remove the bumper.
We move the power steering tube
- The car is located on a level area.
- The negative terminal is removed from the battery.
- The radiator grille is dismantled and the location of the leak is inspected. Perhaps the leak did not form in the heat exchanger, but due to damage to the pipes.
- Having made sure that the heat exchanger on the Chevrolet Niva needs to be replaced, we continue dismantling work.
- We drain the antifreeze from the system by unscrewing the tap at the bottom of the radiator itself (on the driver’s side), first placing a container of a suitable size under the car and opening the expansion tank cap.
- It is impossible to drain all the coolant from the system, and its capacity is about 8 liters. When unscrewing the plug, it is possible to drain approximately 5 liters of fluid, and the rest remains in the engine.
- To be able to move it away, it is necessary to remove the air filter housing, under which there are hoses leading to the power steering cooling pipe. This tube is installed in front of all heat exchangers and will interfere with their removal.
- Next, this power steering oil cooler is dismantled and moved to the side, which is done in order to increase the space for work. After loosening the clamps, you need to disconnect the pipes. You don’t have to remove it, but in this case it will be very difficult to install the new heat exchanger in place.
All that remains is to unscrew the pipe and fans
After this, you can begin checking, repairing or replacing the radiator. As practice shows, if the heat exchanger leaks, then the best solution is to replace it. The repair will not help for long, and soon the labor-intensive replacement process will have to be repeated.
You can remove the radiator towards the engine. But to do this, you will need to make a removable bar for attaching the hood lock (later it will have to be secured with bolts). It is welded to the body, so it needs to be drilled out. But this will allow you to reach the radiator through the gap between the front cross member of the body and the engines. In this case, you do not need to remove the grille, bumper and headlight.
Radiator installation
The installation process is no more difficult than dismantling the engine cooling radiator on a Chevrolet Niva. Assembly is performed in reverse order.
Installation in reverse order
After installing the new heat exchanger in place, you need to connect the lower pipe first by tightening the clamp. After this, the remaining pipes are connected (if you doubt their good condition, it is better to immediately install new ones), and are fixed with clamps. Then we put the power steering oil cooler in place. If you disconnected the pipes from it, you may need to add fluid and bleed the power steering system.
Replacement radiator Niva Chevrolet price
The cost of such car repairs in different regions can vary significantly. For example, in Moscow, replacing a radiator will cost at least 5,000-8,000 rubles. At the same time, in the Rostov region, the procedure can be performed for 3-4 thousand rubles. At the same time, the cost of repairs may also vary among different specialists located in the same city.
Also, the cost of replacing a Niva Chevrolet radiator greatly depends on the vehicle’s equipment and additional factors such as the abundance of rust or dirt under the hood. For example, the difference between the simplest and most sophisticated versions can reach 1,500 rubles.
Only the master performing the operation can give the exact price tag.
Comparison of manufacturers
In stores you can find spare parts produced by several companies. Products differ in two parameters: price and workmanship. Let's look at a few of the most popular brands.
Hola is a trademark of the Dutch company H{amp}amp;H Group. 15 European factories produce radiators, belts, shock absorbers and other auto parts. Inexpensive products of this brand are of good quality. According to customer reviews, spare parts of this brand at a comparable price are superior in quality to Chinese products. Price - 2000 rubles.
DAAZ - Dmitrov Automotive Assembly Plant, part of the United Automotive Technologies concern, was founded back in 1967. In addition to radiators, the company produces filters, brake pads and other spare parts for Russian and foreign cars. The products of this brand are used in cars that come off the AvtoVAZ assembly line. Price - 2500 rubles.
Luzar is a Russian company that was founded in 2003 on the basis of the Lugansk Radiator Plant. Products of this brand comply with GOST-R and the manufacturer gives them a 2-year warranty. Price - from 2100 rubles.
Bautler is a British company that produces, among other things, spare parts for the Chevrolet Niva. Price - from 2200 rubles.
Reviews from car owners vary. Some consider DAAZ radiators to be the most reliable, others consider Bautler, Hola or Luzar.
Taking into account the fact that replacing a part takes a lot of time and effort, it is worth taking the sports version of Luzar. It is designed to withstand heavy loads and is therefore more reliable.
Also interesting: How to reduce Niva fuel consumption
Hola products are distinguished by the fact that each tube has its own rubber seal, rather than being fixed with a single seal. In Luzar-Sport, the honeycomb is soldered to a base that is attached to the tanks.
What is a radiator and what is its role?
A radiator is a device that removes heat from the liquid located in the engine cooling system. Simply put, this is a so-called filter, the function of which is to pass a huge amount of air through itself, while removing excess heat into the atmosphere. A large reduction in heat is also unacceptable. In an excessively cooled engine, power decreases, lubricant viscosity increases, friction occurs, and subsequently increased wear of parts may occur. The cooling system of the Chevrolet Niva is not much different from the VA Z-2121. The base gave in to minor restyling and modifications.
What is a cooling radiator
The structure of the spare part is quite simple: two tanks located at the top and bottom, as well as tubes connecting them. A very important part is the valve cover. As a rule, it requires replacement once a year. If you do not forget about this, a high-quality radiator will serve the owner for at least 10 years.
Required materials and tools
1 liter of power steering fluid 5 liters of cooling system fluid (Antifreeze or Antifreeze, depending on what was used initially) the radiator itself a couple of clamps in reserve of different diameters from 25 mm-60mm silicone sealant a funnel with a flexible spout
two ratchet heads for 17, 13, 10, 8, 7 large flat screwdriver small and large Phillips screwdriver hammer chisel open-end and ring wrenches for 8, 10, 13, 17 extensions for ratchets carrying with a light bulb WD40 liquid container for draining engine cooling system fluid about 5 liters (it is not advisable to use this fluid a second time, since the place where it is supposed to be drained is not very clean due to an unfortunate location) container for draining the power steering system fluid about 1 liter (this fluid can be used a second time, but only if the container is tightly closed during repairs, since the liquid itself is very hygroscopic).