Replacement instructions
The procedure for replacing the coolant is not complicated, so even a novice car enthusiast can perform it.
How much to pour?
Antifreeze in a car, according to the manufacturer’s recommendations, should be changed after 40 thousand kilometers or after two years of operation. In this case, it is necessary to constantly monitor the condition of the coolant and check its level. If it has darkened or become cinnamon in color, then it needs to be changed. If the level is below the required level, add water or antifreeze. Replacement may be required if the coolant poured into the car does not meet the density.
The required volume of liquid to be filled is 10 liters. It is advisable to fill with coolant specified in the owner's manual.
Coolant
What will you need?
To carry out the replacement, you will need an inspection hole, a lift or an overpass. The machine must be installed horizontally and secured so that it cannot roll during work. The front of the machine should be installed higher than the rear. The procedure is carried out only on a cold engine. To carry it out you need to prepare the following tools and materials:
- spanner set to “10”;
- pliers;
- screwdriver;
- funnel;
- container for draining waste liquid;
- new antifreeze;
- clean rag.
A watering can can be made from a plastic bottle by cutting it in half. A canister or plastic water bottle is suitable as a container.
Stages
Having installed the car on the inspection hole, they begin to replace the coolant.
- First, open and secure the hood.
- The next step is to unscrew the cap on the expansion tank. It is advisable to perform the procedure on a cold machine.
Expansion tank Niva Chevrolet
If this is not possible, then the coolant temperature should be no higher than 90 degrees. To avoid getting burned by steam or hot liquid, place a rag on the engine and around the neck of the expansion tank. The lid should be unscrewed carefully. First you need to unscrew it a little so that hot air comes out and release the tank from pressure, and then unscrew it completely. - Now unscrew the plug on the drain hole and drain all the liquid. When the used antifreeze has drained, screw the plug back into place.
- To prevent the formation of air plugs in the cooling system, you need to disconnect the hose from the throttle body fitting. To do this, use a screwdriver or pliers to loosen the fastening on the clamp and move it back. Then disconnect the hose from the throttle assembly fitting.
- Before adding coolant, it should be prepared. There are ready-to-use liquids, mainly antifreeze. There are antifreezes that require dilution with distilled water; usually the proportion is 50/50, unless otherwise indicated in the instructions.
- Next, you can proceed to filling the cooling system.
Coolant is poured into the expansion tank. As soon as it begins to flow out of the throttle body nozzle, put the hose on the nozzle and tighten the hose clamp. Next, continue to fill the antifreeze solution to the maximum mark in the expansion tank.
- When pouring antifreeze solution, tighten the radiator hoses to prevent air pockets from forming.
- After the cooling system is filled, tighten the cap on the expansion tank.
- Next, you need to start the engine and wait for the electric fan to turn on. If this does not happen, you need to check what kind of air is coming from the heater. If it is warm, then the fan is faulty, if it is cold, the reason is the presence of air pockets formed in the system. To get rid of them, you need to open the cap on the radiator, start the engine, and after 5 minutes of operation, turn off the engine. Now close the radiator cap.
Removing the radiator cap - When the second cooling circle opens, the coolant level will drop significantly.
- You must wait until the engine cools down. Next, check the fluid level again. On a cold engine it should be between maximum and minimum, on a hot engine it should be at maximum. If necessary, add to the required volume.
The number of these elements in each vehicle may vary. In addition, it is important to have a clear understanding of the location, types, engine and transmission oil used, types of lubricants and fluids.
After all, they must be filled out taking into account the plant’s recommendations so that all systems can fully operate.
This is interesting: How to properly change the oil in a variator
The procedure for draining antifreeze on a Niva VAZ 2121
- The first step is to cool the engine if you have recently turned it off, that is, wait until it cools down to the outside temperature.
- Then unscrew the radiator filler neck.
- And disconnect the hose that goes to the engine block, thereby draining the antifreeze from the block:
- And we substitute some kind of container, you can make it from an old 10-liter plastic canister by cutting off its upper part.
- Next, you need to drain the antifreeze from the Niva’s radiator. To do this, use a 13mm head to unscrew the plug, which is located at the very bottom of the radiator on the left side. You can see everything clearly in the photo below:
- And again we substitute a container to drain the old coolant. After there is no antifreeze left in the cooling system, you can begin to pour fresh coolant through the expansion tank in a thin stream to avoid the formation of an air lock. We pour until the required level is reached - approximately in the middle of the expansion tank. And then we do the same procedure with the radiator until its upper tubes are hidden. Don't forget to first attach the hose to the outlet of the engine block.
- Antifreeze or other coolant should be poured through the expansion tank until the level in it reaches the maximum level.
To refuel and service a domestic VAZ SUV, you need to know the filling capacities of the VAZ 21213 Niva and its modifications, the VAZ 21214. Some numbers need to be known by heart, for example, the capacity of the tank and engine crankcase. The rest should be written down in a notepad, which is stored in the glove compartment of the cabin. And it doesn’t matter that you are not going to do the maintenance of the car yourself, the specialists at the service station may also not know the refueling volumes of your car.
Niva Chevrolet: cooling system
Engine operation at normal temperature conditions is ensured by the functioning of the components included in its composition . This is a closed-type pipeline with forced ventilation.
List of elements providing heat exchange:
- Pump for pumping water.
- Thermostat.
- Fans.
- Radiator.
- Expansion tank.
The pump operates under the influence of centrifugal force . As the blades rotate, coolant is pumped, creating a pressure difference, so the antifreeze moves along the line.
For the efficient functioning of the heat exchanger, which includes a radiator, a thermostat is provided to open and close the movement of coolant in a circle. The latter is necessary to maintain balance in the system and has factory settings - it opens at a temperature range from 75 to 80°C.
The radiator contains two tanks connected horizontally by aluminum channels:
- one receives coolant;
- from the other - coolant comes out.
Heat exchange is provided over the radiator area.
When heated, a liquid tends to expand. To avoid the creation of excess pressure, an expansion tank is designed to receive it . The latter is equipped with a cover with a bypass valve to increase the pressure in the system. By switching to a closed type, it was possible to increase the boiling point and eliminate losses due to leakage from the tank.
Airflow of the heat exchanger is provided by fans operating in two modes:
- at 90°C;
- at 102°C.
Glass washing and special fluids
| Liquid brand | Manufacturer | Regulatory document |
| GLASS WASHING LIQUIDS | ||
| LLC "ASD", Tolyatti | TU 2421-001-55894651 | |
| LLC "Multipharma-Samara", Samara | TU 2384-170-00151727 | |
| NPP "Makromer", Vladimir | TU 2451-007-10488057 | |
| CJSC "JSC ASPECT", Moscow | TU 2384-011-41974889 | |
| SPECIAL LIQUIDS | ||
| MOPZ VNII NP, Moscow | ||
| LUKOIL AJ | LLC "Lukoil VNP", Volgograd | TU 0253-025-00148599 |
| f. "VARYA", Nizhny Novgorod | TU 0253-048-05767924 | |
| Pentosin Hydraulic Fluid CHS 11S | f. Pentosin, Germany | TTM 1.97.0964 |
Replacing Chevrolet Niva coolant
Tools:
- Ratchet wrench
- Extension
- 8 mm head
- 10 mm head
- 13 mm head
- Narrow nose pliers
- Torque wrench
- Knife
- Funnel
Parts and consumables:
- Coolant 8 l (10 l with reserve)
- Technical capacity
- Radiator Cap O-ring (if required)
- Plastic bottle
- Rags
Notes:
According to the Chevrolet Niva maintenance regulations, the coolant should be replaced after two years of operation or after 60 thousand kilometers, whichever comes first. In addition, if the coolant changes color to a reddish color, replace it immediately, as such a change indicates that inhibitory additives have developed and the liquid has become aggressive towards the parts of the cooling system.
Replace coolant only when the engine is cold.
1. Place the car on a ditch and open the hood.
2. Remove the oil pan guard and engine splash guard as described here.
Note:
The crankcase protection and mudguard may not be removed, but in this case you will have to use some kind of device to collect the drained liquid, otherwise it will inevitably spill across the area under the car.
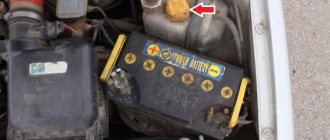
3. Relieve excess pressure in the cooling system by unscrewing the expansion tank cap.
4. Place a wide container with a volume of at least 8.5 liters under the drain hole located at the bottom of the left radiator tank. To reduce the intensity of liquid drainage at the initial moment, the cap of the expansion tank should be tightly screwed on.
5. Unscrew the radiator drain plug by hand and drain the coolant from the radiator into a nearby container.
Notes:
Coolant is toxic and lethal to all living things, so be careful when working with it. To avoid polluting the environment, drain the radiator through a funnel (such as one made from a plastic soda bottle).
The drain plug is sealed with a rubber ring. Replace a ring that is torn, cracked or has lost elasticity.
6. Unscrew the cap of the expansion tank.
7. To drain the coolant from the engine cooling jacket, place a container under the drain hole located on the left side of the cylinder block next to the ignition module, and unscrew the drain plug with a 13 mm socket and extension.
8. The connection between the plug and the cylinder block uses a conical thread that does not require additional sealing. Close the radiator and cylinder block drain plugs. Tighten the drain plug of the cylinder block to a torque of 25-30 N∙m.
9. Before filling the cooling system with liquid, remove the engine screen (if any), use narrow-nose pliers to loosen the clamp securing the coolant supply hose to the throttle body and remove the hose from the pipe.
10. Pour coolant into the engine cooling system through the expansion tank until coolant flows out of the coolant supply hose to the throttle body. After this, install the hose in place and secure it with a clamp.
Note:
Use coolants recommended by the manufacturer.
11. Close the cap of the expansion tank.
Note:
Screw the expansion tank cap tightly. The expansion tank is under pressure when the engine is running, and therefore, if the plug is loosely tightened, coolant may leak from under it.
12. Start the engine. When the engine warms up, the outlet (lower) radiator hose should be cold for some time, and then quickly heat up, which will indicate the beginning of fluid circulation in a large circle. After waiting for the cooling fan to turn on, stop the engine.
Note:
When starting the engine, the expansion tank cap must be closed.
With the engine running, monitor the coolant temperature according to the gauge. If the arrow reaches the red zone and the fan does not turn on, turn on the heater and check what kind of air flows through it. If the heater supplies heated air, it means that the fan is most likely faulty, and if it is cold, it means that an air lock has formed in the engine cooling system. But there shouldn’t be a plug, since the cooling system was depressurized before adding liquid (see point 9).
13. After the engine has cooled, check the coolant level in the tank and bring it to normal (it should be between the MIN and MAX marks).
14. After a few days of using the car after replacing the coolant, check its level. If necessary, add coolant.
Note:
If, after a very short time, fresh antifreeze changes color from blue to brown, it means that you filled it with a fake, to which the manufacturers “forgot” to add corrosion inhibitors. In addition, one of the signs of a fake is the sudden complete discoloration of antifreeze. The dye of high-quality antifreeze is very stable and only darkens over time. Antifreeze tinted with linen blue becomes discolored. This “antifreeze” needs to be replaced quickly.
The article is missing:
- Photo of the instrument
- Photos of parts and consumables
Chevrolet Niva - replacing brake fluid - Behind the wheel magazine
Such things - I began to notice that the clutch on my Niva Chevrolet behaves very unstable - several times already the pedal fell almost to the floor and it was very difficult to drive. The first, second, third were turned on, but the rear one was no longer there, it was grinding, bless you. However, somehow miraculously the clutch was restored and everything worked again. However, this time it did not recover and after waiting a couple of days, I decided to crawl under the hood and look for something there)) And what did I see there? The clutch brake fluid reservoir burst. That's how it is, brother.
There was no brake fluid inside at all, it turns out that those millimeters that I could press on the pedal were maintained only by the fluid in the clutch system itself - in the cylinders.
Main elements of the system
The largest and most basic element is the fuel tank, but the total number reaches sixteen. Their volumes vary greatly. Features of containers for refilling liquids in the Chevrolet Niva:
- they are necessarily included in the engine cooling and lubrication systems;
- Axle housings and gearboxes are also extremely important for safety during travel;
- Niva Chevrolet filling tanks include power steering systems and hydraulic brake lines, front and rear shock absorbers;
- An integral part are reservoirs for windshield washer and air conditioning.
Almost all tanks are made of plastic and stainless steel, capable of withstanding an aggressive hydrocarbon environment for a long time.
Transmission
The Niva 4x4 transmission system has the following filling volumes:
- transfer case - 0.79 l;
- gearbox - 1.6 l;
- rear axle - gearbox - 1.3 l;
- front axle - crankcase - 1.15 l;
- steering column - crankcase - 0.18-0.2 l.
As with the operation of a power unit, under different temperature conditions, transmission units and assemblies are filled with oils of different viscosities, which is reflected in the table:
As stated in the operating instructions, transmission lubricants need to be changed once every 30 thousand km. mileage At the same time, replacement is not provided for in the steering mechanism housing, only an addition through the top plug. The “native” oil for Zhiguli transmission units is considered to be TAD17I.
Transmission oils have good penetrating ability. Therefore, poorly clamped plugs and worn gaskets of units begin to gradually leak lubricant. In such situations, it is allowed to add oil of the same viscosity class and, preferably, the same manufacturer. If you do not top up during a leak, the lubricant level in the unit will decrease, which will lead to accelerated wear of expensive mechanisms.
Fuel tank characteristics
The fuel tank of this model has almost sixty liters, or more precisely 58. On average, per hundred kilometers you have to spend 8-9 liters of AI-95, Premium-95 or AI-92 gasoline. Features of the fuel container:
- the tank is located directly under the rear seat;
- in the upper part there is a small hatch under which the fuel pump is installed;
- The sensor will help determine the level of fuel fluid and the amount of gasoline.
There are other Chevrolet Niva filling tanks , many of which are included in various systems.
This is interesting: What is the volume of oil in a T 40 engine
Flushing fluids for the engine lubrication system
Table 10
Liquid brand Manufacturer Regulatory document AUTO WASHING OIL Lukoil-Nizhegorodnefteorgsintez, Kstovo, LLC Lukoil-Permnefteorgsintez, Perm STO 00044434-0122 WASHING OIL Novo-Ufa Oil Refinery OJSC, Ufa TU 0253-019-05766528 R OSNEFT EXPRESS OAO « Angarsk Petrochemical Company, Angarsk TU 0253-392-05742746 MP SYNTHETIC MP CLASSIC OJSC Omsk Oil Refinery, Omsk STO 84035624-005Note. Flushing fluids are used during maintenance in accordance with the service book when replacing the working engine oil with fresh one.
Replacement frequency - what antifreeze to fill
Coolant gradually loses its properties as it constantly circulates inside the car system. Thermal conductivity is lost, the level of inhibitors decreases and foaming begins.
If the antifreeze is not replaced in a timely manner, this may cause metal corrosion and engine overheating.
Replacement times depend on:
- Product quality.
- Vehicle operating conditions.
The procedure is carried out on average once every 2-3 years . According to the established regulations, antifreeze is replaced every five years or after a mileage of 250,000 km per year.
But in some cases this period is reduced for the following reasons :
- Presence of sediment or cloudiness in the expansion tank.
- A deposit of a jelly-like mass has formed on the inside of the tank, near the neck. Even if this is noticeable at subzero temperatures, there is a need for replacement.
Attention! If the antifreeze has turned brown or rusty in color, then it must be replaced urgently, as the metal has begun to actively rust.
The volume of coolant poured depends on the engine volume and is 6.3-10 liters.
How much to fill
The volume of fluid poured into the Chevrolet Niva gearbox is 1.6 liters. This is how much oil will fit after completely cleaning the gearbox from old substances and various deposits. A complete transmission flush is necessary for high mileage. The procedure is performed at a dealership or at home. The most important thing here is the flushing stage, during which a special substance is circulated throughout the entire transmission with the engine running. Then the flushing liquid is drained from the box, and then new oil is introduced in the specified volume of 1.6 liters. The liquid level is adjusted to normal using a dipstick.
Fluid for refilling the hydraulic steering system
Table 12
List of products containing precious metals in LADA 4x4 cars
| Product number | product name | Location of precious metals | Weight in grams | ||
| gold | silver | palladium | |||
| 2115-3801010 | Instrument cluster | In semiconductors | 0,000263 | 0,016414 | |
| 2105-3747010-03 | Turn signal and hazard warning light switch | 0,0180561 | 0,0208012 | 0,103 | |
| 2105-3709310/-01 | Three lever switch | Coating | 0,1664 | ||
| 2101-3704010-11 | Ignition switch | In contacts | 0,14078 | ||
| 2105-3710010-03/-04 | Hazard switch | In contacts | 0,107 | ||
| 21213-3709607 | Heated rear window switch | In contacts | 0,11517 | ||
| 2113-3709609-10 | Rear fog lamp switch | In contacts | 0,115169 | ||
| 2104-3709612 | Rear window wiper and washer switch | In contacts | 0,403093 | ||
| 2107-3709608-01 | Heater switch | In contacts | 0,265997 | ||
| 21045-3709280 | Fuel heating switch | In contacts | 0,170288 | ||
| 2108-3720010-10/-11/-12 | Brake light switch | In contacts | 0,1681 | ||
| Generator voltage regulator | In semiconductors | 0,0534 | |||
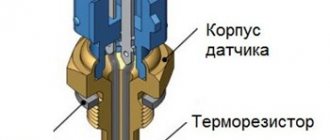
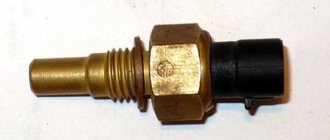
| 2106-3828110 | Water temperature indicator sensor | In contacts | 0,0161637 | ||
| 2105-3747010-02/03 | Relay-breaker for direction indicators and hazard warning lights | Gold in semiconductors, silver in contacts | 0,00021 | 0,0731 | |
| 2105-3747210-12 | High beam relay | In contacts | 0,055 | ||
| 2105-37470-1010-12 | Low beam relay | In contacts | 0,055 | ||
| 2105-3747210-02 | Headlight wiper relay | In contacts | 0,137 | ||
| 2114-3747610 | Rear fog light relay | Gold in semiconductors, silver in contacts | 0,000998 | 0,034935 | |