How to connect PTF on a Chevrolet Niva
By bending the lower part of the fender liner, you can, of course, remove the fender liner altogether by unscrewing everything else, but this will not make a significant difference.
We unscrew the 3 screws of the plug with a Phillips screwdriver, and immediately screw the PTF in its place with the same screws. Next we pull the wires.
I pulled them through the corrugation, made cuts to bring out the “-“ wires. By the way, the “-” wires seemed to be short from the standard kit, it was a shame that I had to increase the missing 10cm.
I didn’t cut it, I just rolled it up and hid it behind the fuse box. We bend the fender liner. Purchased at Delfo for R apiece. Maybe tomorrow I’ll start editing a board for my main idea - PTF. If some of the connections for the Chevrolet Niva fog lights have gone badly, you can tint them with any permanent marker. It's a pity.
PTF on Chevrolet Niva
Such devices on Chevrolets are most often installed by drivers themselves. PTF - fog lights with special lamps that do not shine as brightly as standard devices, but improve visibility when it is raining, foggy, or blizzard outside. They are not included in the basic configuration. Before work, you need to study where the headlight unit and relay are located, where to start disassembling the car, what equipment is needed, how to remove, install and connect the device.
Required tools and materials
The block headlight is used to provide light signals for attention, and a special glass element allows you to illuminate the track in poor visibility. To install fog lights on a Chevrolet Niva, you need to prepare a set of tools, related materials and study the PTF connection diagram. Inventory list:
- Screwdriver Set;
- head at 10;
- key to 20;
- pliers;
- insulating tape;
- knife.
Despite the fact that multifunctional lighting devices are installed in the new generation Niva, replacing headlights with an anti-fog version is relevant.
Connection diagram
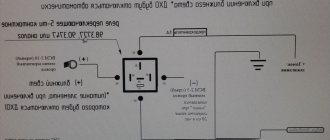
Installation of fog lights consists of several stages. We will look further at how to disassemble, change, and connect the PTF. In the diagram, you need to use adapters to connect the heating keys to the block, where:
- black – mass;
- blue – backlight;
- orange – ignition.
Fuses are marked F4 and F14. White and blue wires are connected.
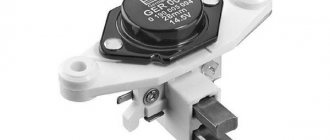
Where is the fog light relay located?
To understand how to disassemble the structure and get to the fog lamp, it is important to know where the relay is located. The relay wiring has a red cable with an adapter. The fragment is located next to the torpedo. Access requires removing the instrument panel.
Rear PTF
Removing and installing the rear light is similar to the previous instructions, but there are some nuances, especially at the beginning of the process. Algorithm:
- The fasteners at the bottom of the bumper and inside the wing arch are removed.
- Unscrew two nuts to remove the mudguard.
- To remove the headlight, you need to press the two clamps of the wire block away from the lamp.
The light bulb is unscrewed counterclockwise. If, in addition to the lamp, it is necessary to dismantle the housing, use a Phillips screwdriver to remove the three bolts that connect the headlight to the bumper.
Possible problems and ways to solve them
Even if the installation was carried out strictly according to the instructions, while driving, the driver may find that the headlights do not illuminate the road correctly. After repair work, it is important to adjust the lighting. To solve the problem, you will need a set of optical instruments or a flat area with a special screen.
The headlight is adjusted by rotating the bolt. It rotates the optical element in a horizontal plane. It is important to achieve a reading of 625 cd in the direction 3º up from the position of the cut-off line. The reference axis must be at least 0.5% in the vertical direction from the angle value of 69. Additionally, after adjustment, the intensity of the light illumination can be measured.
If it is necessary to replace the headlight glass, then after detaching the element from the body, the transparent sheet is squeezed out of the rubber bands of the seal. For convenience, you can use a knife that can easily pry off the edge of the headlight glass.
What are PTFs?
On Shniva, this optics is a rectangular shape with 35W halogen lamps mounted inside. They are placed according to a standard layout below the main headlights, which is necessary to reduce the glare of oncoming drivers and the penetration of light through fog. If the main light is intended to illuminate the road surface, then the PTFs have the main purpose of highlighting a car on the highway with reduced visibility at a long distance and illuminating the road in fog.
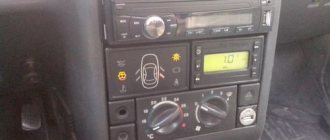
Power comes from a 12V DC vehicle network. The power button is located in the Shnivy's interior and looks like a headlight with arrows pointing down. Even those models that are not equipped with PTF as standard have a connector for mounting a power button. Also, according to operational safety, the network supplying this optics consists of a relay and a fuse designed to protect the wiring from overheating. If these elements are not available, then they must be purchased if the installation of PTF is being calculated.
Inside, the design is based on lens optics, which allows it to cope 100% with the function of illuminating the road surface in fog. The lighting lamp has an H4 type base, which allows the installation of xenon lighting. The outside of the optics is covered with protective glass, which prevents fogging and does not reduce the quality of lighting.
How to install fog lights on a Chevrolet Niva
So, if you need restyling or retrofitting of a Niva Chevrolet car, namely the installation of a PTF, then everything is very simple. Even if Shniva is not equipped with this type of optics, absolutely all models are equipped with training. The preparation includes ready-made wiring, places for installing relays, buttons and a place on the bumper. Therefore, you must first purchase all the listed material and get down to business:
- The car is de-energized. The instrument panel is removed to provide access to the button connection.
- Under the panel there is a free chip wrapped with electrical tape. This is exactly what we need.
- We install the button in the panel and connect the chip.
- Next we move to the control unit where the relays are located. We find a free block, which is located second on the left, and install a new relay into it.
- Now let's proceed directly to the connection. The wiring with a chip is brought out for connection through the underwing holes of the body to the front bumper.
- So, the connection diagram is laid out. Now the last thing left is to install the PTF in the front bumper.
- The Niva Chevrolet has already prepared holes for installing standard type PTFs. You just need to install them using fasteners and you're done.
- All that remains is to connect the fog lights and check that they are working properly.
Connection diagram
Most motorists have a question related to connecting PTF. Therefore, in this section we will consider the wiring connection sequence. The connection diagram is as follows, presented below.
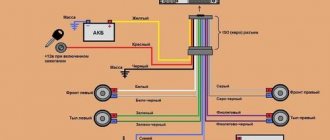
PTF connection diagram
The diagram shows the location of the main elements for connecting the PTF. The numbers 1 indicate the fog lights themselves with the working elements inside (lamps). The black wire is ground, which is connected to the car body. The yellow and yellow-black wires are led out to the control unit through connecting chips. Position 2 shows the connection order on the mounting block via fuses F4 and F14. The relay responsible for turning on the PTF is powered from the control unit. The relay has two wires connected to the closing contacts of the power button. When pressed, power is supplied to the relay coil, which in turn closes contact 30 (on the relay), supplying power to the lamps. The entire circuit is powered by a 12V battery, which is shown by contact pairs A and B. The connection circuit is simple and primitive, which even a beginner can handle. But this same primitive circuit is the basis for the operation of an optical device. By numbering the contacts in the diagram, you can carry out repairs in case of malfunctions of the fog lights.
Lamp for PTF
An important issue is the installation of lamps in fog lights for the Chevrolet Niva. The standard configuration of the fog lamp is equipped with a halogen incandescent lamp with a power of 35W. But such a lamp cannot produce a strong luminous flux due to the nature of low power, so many drivers seek to install other types of lamps, such as xenon or LED, in the PTF. Xenon ones are very popular, but they require the installation of an additional starting unit. The lamp produces luminous flux due to an inert gas and a special filament, which is many times superior to the good old halogens. The light from a xenon lamp pierces even thick fog due to the intensity of the flow.
Important! A high-power lamp overloads the electronics and battery, so it is not recommended to equip a car with more than four 55W lamps, especially installing cheap Chinese xenons.
The LED lamp does not have such a powerful flux, but it consumes little power compared to halogen and xenon lamps. The cost of xenon lamps remains maximum due to the additional ballast control unit and maximum performance.
PTF for Chevrolet Niva Bertone
Since 2009, Shniva has received an update from the Western brand Bertone. Now the basic package includes fog lights that are not rectangular in shape, but round. The round shape makes it more compact and individual. There was also a change in the density of glass, which is now resistant to small crushed stone and minor obstacles. The update from Bertone has significantly changed the external design of the Chevrolet Niva, which can only be recognized by the shape of the body and the front main headlights.
Product delivery options
Immediately with H11 lamps Installation kit. I bought it at the car market for r.
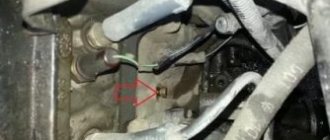
Chevrolet Niva is ticked. We hook the ground wire from the block to a point to the left of the electrical package block next to the cut.
30 Other products from the same category:
The last green wire left is the power wire from terminal 30 of the relay, which must be connected to the permanent positive from the battery. And this is where I got stuck. It seems that, according to the diagrams, it can be hooked up to any pink wire from the harness going from the engine compartment to the mounting block.
All pink ones should have a permanent plus on them. But, since there are a lot of pink wires there and they are of different cross-sections, it is very inconvenient to work closely with them and out of reluctance to get into the standard wiring, I doubted it and stretched another piece of cable with a cross-section of 4 square meters. A section of this cable from the battery to the plug was also hidden in a corrugation and secured with clamps. Inside, the second end of the new positive cable was crimped by the mother and put on a 15A fuse.
Fog light connection kit
I connected the mother to the second contact of the fuse, the green wire from the relay terminal was crimped by the manufacturer. The fuse was carefully wrapped with electrical tape and attached to one of the harnesses. A nuance - for the fuse you need to buy a better insulated block with wires in advance, with a cover, and also buy the fuse itself in advance.
I hung the block with the relay on the mounting block from below in a free slot, hooked up the ground to the battery, started it, checked it, and assembled everything. PTFs are turned on and off by a button regardless of the low beam and dimensions when the ignition is on.
The instrument panel is removed to provide access to the button connection. Under the panel there is a free chip wrapped with electrical tape. This is exactly what we need. We install the button in the panel and connect the chip.
Installation
If you decide to install it on your car, then special preparation is provided in it specifically for these purposes in the form of ready-made wiring, a special place for them, as well as a place for a relay. When you have everything necessary for installation prepared, you can proceed with the installation:
- First of all, disconnect the terminals from the battery, then you need to access the button by removing the dashboard
- Under the dashboard you need to find a free chip
- In the control unit we install the relay in the free block
- Wiring is routed to the bumper
- Using special fasteners, additional headlights are installed
- We connect and check the functionality of the fog lights
Connection diagram
If suddenly the installation of fog lights on a Chevrolet Niva raises any questions or doubts in your mind, then especially for this purpose, below is a diagram of the correct installation.
If fog lights are installed on your car and they need to be replaced and removed for any work, you need to prepare a standard set of tools and do the following:
- We de-energize the car by removing the terminal from the battery
- At the wheel arch liner, remove the front part by unscrewing the screws
- Disconnect the block with wires from the headlight
- From the bumper we unscrew the screws that secure the headlights to it.
- Dismantling the headlight
- We carry out all the necessary actions and install them all in place in the reverse order
These light elements are the key to your safety in poor visibility conditions. If for some reason they are not on your car, you can always install them yourself.
Chevrolet Niva Feng Shui fogs
Installation of fog lights PTF Chevrolet Niva installation
How to quickly and correctly install fog lights on a Chevrolet Niva.
Chevrolet Niva is definitely a foreign car 2 How to install fog lights. repair results.
Connecting fog lights. Result of PTF Niva Chevrolet
Autolight. Chevrolet Niva
DRL on Chevrolet Niva and VAZ
Installation kit for connecting PTF
LED lamps in Chevrolet Niva foglights
Button + relay + fuse for connecting PTF and other car devices
Brief characteristics of fog lights on a Chevrolet Niva
We install the button in the panel and connect the chip. Next we move to the control unit where the relays are located.
We find a free block, which is located second on the left, and install a new relay into it. Now let's proceed directly to the connection. The wiring with a chip is brought out for connection through the underwing holes of the body to the front bumper. So, the connection diagram is laid out. The power button is located in the Shnivy's interior and looks like a headlight with arrows pointing down.
Even those models that are not equipped with PTF as standard have a connector for mounting a power button. Also, according to operational safety, the network supplying this optics consists of a relay and a fuse designed to protect the wiring from overheating.
DRL in Chevrolet Niva
If these elements are not available, then they must be purchased if the installation of PTF is being calculated. The lighting lamp has an H4 type base, which allows the installation of xenon lighting.
The outside of the optics is covered with protective glass, which prevents fogging and does not reduce the quality of lighting. How to install fog lights on a Chevrolet Niva So, if restyling or retrofitting of a Chevrolet Niva car is necessary, namely the installation of a PTF, then everything is very simple.
Even if Shniva is not equipped with this type of optics, absolutely all models are equipped with training.
A useful option for security
The preparation includes ready-made wiring, places for installing relays, buttons and a place on the bumper. My very first board came out like a pancake.
I couldn't find a suitable transfer film. Now I'm trying all sorts of Chinese ones. Today I was in town and visited some knowledgeable people. I assembled it, it didn’t work, today I brought it up to working condition, but without ignition, it still won’t plow.
How to install fog lights correctly
If you need to restyling, or retrofit a Niva Chevrolet car with this equipment, this SUV has all the preparations for this, namely: ready-made wiring, a place on the bumper, a place where the relay is installed. When everything you need has been purchased, you can proceed to installation:
We de-energize the car, remove the instrument panel to gain access to the button
- Under the panel itself we find a free chip, which is wrapped with electrical tape
- We take the button, connect it to the chip and install it in the panel
- We install the relay in a free block, in the control unit itself
- We bring out and connect the wiring with the chip to the front bumper
- We install the PTF in the bumper using special fasteners
- We connect the fog lights and check their functionality
How to make a replacement
If the elements are already installed and you only need to replace the fog lamp, for example the right one, then you should remove the shield that protects from dirt from the front bumper, we will look at how to do this point by point using the example of a car manufactured after 2009.
- Using a special key from the bottom of the bumper, unscrew the two screws
- Unscrew 4 screws inside the wheel arch
- Take a ten-point head and tighten the nuts that secure the shield
- Removing the shield
- Two clamps are pressed onto the wire blocks
- The lamp is disconnected from the wire block
- We unscrew the lamp, turning it counterclockwise and change it to a new H11 bulb
For a car produced before 2009, the replacement process is slightly different:
Installation Requirements
Installing or replacing old PTFs with new ones is often done with your own hands. If you wisely managed to choose a device and find a PTF part number that suits your car, then the right and left headlights can be supplemented with a neighbor in the form of foglights.
They are usually placed in the bumper, although for some the radiator grille is a more attractive option. A lot depends on the characteristics of your car. You cannot focus strictly on your own taste or how the PTF will look more beautiful.
The law does not prohibit installing additional lighting equipment yourself. Another question is whether you can make a mount and correctly adjust the front and rear fog lights. There are certain norms and rules. If you do everything strictly according to them, then there will be no complaints against you.
But I warn you right away. Failure to meet standards may result in problems during inspection. They simply won't approve of it. There have also been situations when, due to violations of the rules for installing PTFs, drivers were deprived of their rights and were not allowed to continue operating the car until the errors were corrected. This is more than serious, so treat the issue accordingly.
As for the installation rules, be guided by the following principles:
- the height of the PTF relative to the road surface is at least 250 millimeters;
- the fastening must be clearly symmetrical, that is, even the slightest deviation is considered a violation;
- the distance to the dimensions should not be more than 400 mm;
- the installed lamps are used in accordance with the markings on the housing (you cannot install an LED lamp if the headlight itself has halogen markings, for example);
- fog lights are used strictly in combination with dimensions.
If you use universal PTFs, which are marked with the letter H, then only LEDs or halogens are used here. By installing xenon, you are grossly breaking the law. Straight to the rhyme.
Errors when connecting fog lights
When installing a PTF for the first time, it is easy to make a mistake. It is better to familiarize yourself with them in advance so as not to allow them to happen by your own example.
The main problem is connecting the side lighting lamps to the wiring. The switch, like the wires used in this system, are not rated for the current drawn by the equipment. As a result, the wiring overheats and the protective insulation melts from the high temperature. Yes, the PTF will be activated when the side lighting is turned on at the same time. But the problem is that the equipment will not last long.
The second problem is the discrepancy between the installation parameters and those specified in the traffic rules. Traffic police officers have the right to check on site that the fog lights are working correctly. If the parameters are not met, the driver will have to pay a fine.