Oil removable caps on Niva are parts of the gas distribution mechanism of a car engine, the task of which is to prevent lubricant from entering the combustion chamber. Made of metal and special rubber, these elements fit tightly to the valves, but over time they wear out and break down. Their rubber part becomes less elastic and may separate from the base. Oil begins to pass through, and the consumption of lubricants by the engine increases. This means that it is necessary to replace the oil of the Niva removable caps - a complex process, but it can be done on your own if you familiarize yourself with the stages of the work and prepare the appropriate tools.
Reasons for replacement
On average, on domestic cars, such as the VAZ 21214 and other models, they are replaced approximately every 80,000 km. For modern imported cars, the interval approximately doubles or triples. Signs of the need to install new caps on the Niva may include:
- High oil consumption
- The appearance of blue smoke when the engine accelerates sharply or, conversely, when braking using the engine;
- Unreasonable increase in gasoline consumption (when covering the same sections of the route and similar driving conditions).
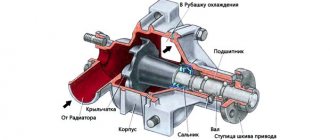
Purpose and design of oil-deflecting valve seals
Rubber valve seals are an integral part of any internal combustion engine. They perform two main tasks:
Ensuring adequate lubrication of the valve stems is especially important when exposed to hot exhaust gases. Prevents excess lubricant from entering the combustion chamber.
The operational parameters of the engine largely depend on the quality and reliability of the oil seals of the timing valves. Their timely change is important and is almost the same for both Lada Samara and BMW.
Design
The current version of the oil seal is a rubber product with a reinforced bushing and a spring that presses the edge of the sealing lip to the valve stem. Motorists interested in how much it costs to replace valve stem seals should also take into account the cost of the consumables themselves, which depends on the brand. For example, over the last ten years, Goetze products have been popular, structurally consisting of the following elements:
The seals are made of elastomers, mainly FP-7510 rubber compound based on fluorine rubber. The service life of parts is on average 160-180 thousand kilometers or 5-6 years. Elring products have a similar design, which is made from a mixture of FPM-8003. But their resource is slightly less - 120-140 thousand km.
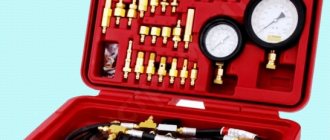
Preparing the tool for work:
- Screwdrivers and wrenches;
- Desiccant;
- Torque wrench;
- Tweezers;
- Inertial removable device;
- Rod (d = 8 mm) made of tin.
During preparation, the battery is disconnected and the spark plugs are removed. It is also necessary to dismantle other parts in turn - from the bearing housing and camshaft to the drive levers, springs and valves. When dismantling the shaft, set the pistons of cylinders No. 1 and 4 to TDC (the conventional position of zero degrees of crank rotation), preventing the loosened valves from falling inward.
Repair and maintenance of Chevrolet Niva
The Ladya-AVTO car dealership, being an official dealer of Chevrolet NIVA, offers comprehensive maintenance and repair of Chevrolet NIVA vehicles in Ufa on the basis of our (authorized) service center.
Completion of scheduled and post-warranty service (TO):
- replacement of motor oils in internal combustion engines, gearboxes, gearboxes
- replacing filters (fuel, air, cabin, etc.)
- replacement of technical fluids (coolant, power steering, clutch, brake, etc.)
- diagnostics and replacement of spark plugs
- replacement of timing belts, alternator, power steering
- replacement of brake discs, pads, hoses, etc.
- replacement of steering racks, rods and ends
- replacing stabilizer struts and bushings
- Diagnostics and replacement of wheel bearings
- replacing suspension shock absorbers
- refilling the car air conditioner
Engine diagnostics and repair:
- engine diagnostics
- repair and replacement of cylinder head, cylinder head gaskets
- replacement of timing belts, alternator, power steering
- replacing valve stem seals
- repair and replacement of piston and piston rings
- Coolant replacement
- fuel system repair
- washing nozzles and injector systems
- firmware of electronic control units
- repair of engine cooling systems
- engine overhaul
- ignition system repair
- exhaust system repair, gasket replacement
Transmission diagnostics and repair:
- manual transmission repair
- Clutch diagnostics and replacement
- transfer case diagnostics and repair
- diagnostics and repair of gearboxes (drives)
- Changing the oil in the transmission (drive, gearbox, transfer case)
Diagnostics and repair of vehicle chassis. Chevy Niva:
- diagnostics and inspection of chassis
- diagnostics and repair of car suspension elements
- steering diagnostics and repair
- diagnostics and repair of the brake system
- computer wheel alignment adjustment 3D
Body repair:
- polishing body scratches
- repair of bumpers and plastic body elements
- restoration of body geometry on a slipway
- painting body parts in a professional booth
- auto glass repair and replacement, tinting
- selection of car enamels
Auto electrician:
- replacement of electrical wiring
- repair of generators and starters
- window repair
- car alarm installation
- car audio and multimedia installation
You can make an appointment and undergo service and repair of the Chevy NIVA at the address: Ufa, st. Peterhofskaya, 5, phone: +7 347 229 40 10
- Last changes
- Options and prices
- Accessories and tuning
- State programs
- Photos and videos
Chevrolet-NIVA from the official dealer "Ladya-Auto"
High level of service
It doesn’t matter whether you came to buy a car, carry out maintenance, warranty service, or install an alarm or audio system. Experienced and friendly managers, as well as competent specialists who will solve your problem, are always waiting for you
Buying from a reliable company
The Ladya company has been successfully operating in the Ufa market for over 20 years in the field of selling auto parts and car servicing. Stable work and an honest approach ensured the trust of car owners in the city. Whatever happens, rest assured that we will fulfill our obligations 100%.
The Ladya company is not only an official dealer of Chevrolet Niva. This is a chain of auto parts stores with a stock of more than 50,000 items. We always have both auto parts for maintenance and spare parts for any urgent repairs, body repairs, as well as tuning of your car.
OJSC "LADIA-AVTO" - the official dealer of CJSC "Super-Auto", a manufacturer of special vehicles based on assembly kits of OJSC "AVTOVAZ", offers an increase in engine volume and power on cars of the Chevrolet NIVA family with a 2123 engine
Main stages
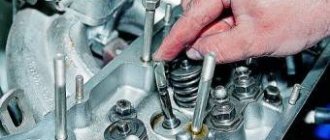
The next point of work is to install the rod in the spark plug hole. Thus, it is located between the piston plate and the valve.
This is followed by placing the pressure bracket of the desuction tool on the spring plate and securing the support bracket using a nut located on the mounting pin .
Now required:
- Compressing the valve spring with a depressurizer;
- Removing two crackers (using tweezers);
- Removing the desiccant;
- Removing the spring plate;
- Removing both springs, both lower and upper;
- Removing the support washer from the intravalve spring;
- Installing the collet of the removable device on the part being removed;
Using the upper striker of the puller, compress the collet (by hitting the lower striker with it) and compress the cap ( the blows are applied to the nut ).
To protect the replacement part from damage during pressing, a special installation sleeve must be located on the valve stem. Usually it comes with new consumables. Now, having applied lubricant to the inner surface of the cap, it is pressed down along the bushing (all the way).
After this, install the valve elements back and proceed to the next stage - removing the rod and installing the crackers in place (lightly hitting the end of the rod with a hammer). Now we need to replace the parts of the remaining valves, turn the shaft half a turn and install the pistons of the two remaining cylinders (No. 2 and 3) at TDC. In the same way, change all the caps, and then turn the shaft another one and a half turns.
Self-replacement of valve stem seals on a VAZ 2121
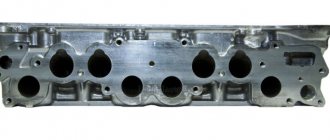
Valve seals for VAZ 2121
Replacing valve stem seals on a VAZ 2121 is a procedure that does not require specific knowledge or skills. It is quite feasible in a garage (or outdoors); you do not need either an inspection hole or an overpass. Our detailed instructions will help save your time and money.
How to identify a malfunction
Engine oil entering the engine combustion chamber causes blue (gray) smoke to appear, especially when using engine braking. There may be several reasons:
The first reason is less common and is caused by the use of a non-standard brand of gasoline, oil, violation of engine operating conditions, or the approaching period of major repairs. The second reason, the most common, and easy to fix with your own hands, is what we will consider
Set of tools
To replace the caps you will need the following tool:
VAZ 2121 replacement of valve stem seals
The replacement procedure is performed in the following sequence:
Note: When performing the following steps (immediately after removing the camshaft bearing housing), you should mark the position of all valve actuator arms
We insert an 8 mm rod through the hole for the spark plug between the valve and the piston
We install the desiccant, begin to compress the spring of the first valve
We take out the crackers with pliers (or tweezers), remove the desiccant and take out the spring plate
Tip: Collect the removed crackers immediately in a jar or box, they are small and tend to get lost easily
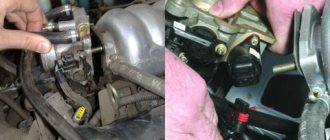
Install the collet of the inertial puller onto the oil reflecting cap
Move the cap down along the special installation sleeve to the end
Photo No. 7, removing the cap with screwdrivers and placing it in place using a mandrel
That's all, we have successfully replaced the valve stem seals on a VAZ 2121. There is nothing complicated about it if you have the appropriate tool. If our instructions are not enough for you, watch the video on this topic.