It should be recognized that classic models of domestic cars, which include the VAZ 2107, have certain design flaws. But this, in turn, provides their owners with a wide field of activity in terms of modifications in accordance with their needs. At the same time, something made by yourself is often more effective than a factory one.
Many owners are dissatisfied with the operation of the interior heater or stove. Indeed, VAZ 2107 cars have very low stove efficiency. But modifying the stove yourself can solve this problem. In this case, there is no need to use special skills or tools; improving the heater is done using improvised means.
As practice shows, the stove radiator gives off a sufficient amount of heat and its improvement is not required. This means that to increase the efficiency of the heater, it is necessary to improve the airflow system. First of all, care should be taken to seal all air ducts, especially at their connections. This requirement is especially true for VAZ 2105 - 2107 cars, due to the design features of the air ducts.
The simplest tuning, which does not require virtually any design changes, is replacing the standard fan motor with the one used in the VAZ 2108-2109. The motor used in these models differs from the seven in greater power and increased speed. To install it, you will need to slightly modify the stove body - due to its larger size, you will have to remove the comb designed to direct the air flow down to the feet.
You can leave the original impeller by first drilling a hole with a diameter of 7 mm in it for the shaft of the figure-eight motor. Performing this operation with your own hands is absolutely easy.
Such a stove modernization will also require replacing the resistor and switch. We take both parts from the same model as the motor. Please note that tuning will be effective if all of the above requirements are met. After all, the VAZ 2107 switch is designed for a lower current, and when used with a more powerful engine it can simply melt. But the native resistance of the VAZ 2107 will not allow using the engine at full power.
For car enthusiasts who are accustomed to not being afraid of difficulties, and for whom tuning a car with their own hands has become commonplace, there is a more effective, but also more complex way to improve the stove. It consists of installing a snail impeller instead of an engine used in VAZ 2108-2109 models. This tuning will significantly reduce noise and increase air flow.
Refinement begins with complete disassembly of the heater housing. After dismantling, almost everything is cut off from the bottom of the stove, except for the frame and fasteners. Next, you need to make a housing for the snail. For this purpose, you can use any material suitable for strength - plexiglass, polycarbonate, plastic, etc. All four walls of the future housing are cut out of it and screwed to the bottom of the stove.
After this, the middle part is put on the lower part, with the diffuser previously removed. The dimensions must be adjusted so that the snail fits exactly into the body and does not protrude beyond the radiator stops located on the middle part.
This stage of work requires special attention, since the body is too large and will not allow the stove to be installed in its normal place. After careful adjustment, making sure that the dimensions of the new body are correctly selected, all joints are coated with sealant.
All that remains is to tune the air ducts. For this purpose, you can use commercially available plumbing cuffs and hoses. Holes corresponding to the outer diameter of the cuffs are cut on both sides and in the bottom of the new stove body. Plumbing hoses are inserted into them - the side ones are connected, respectively, to the left and right air ducts, while the bottom ones are designed to remove warm air away from the feet, otherwise they will be excessively heated by the direct air flow.
To warm the feet of rear passengers, you can additionally install an additional pair of longer hoses. The power of the snail and the amount of heat given off by the stove radiator are quite enough for everything. The connection points between the hose and the side air ducts must also be carefully sealed to prevent leaks of warm air.
Such tuning, done by yourself, will increase its efficiency by 2-3 times, both in terms of heating the interior and in terms of the quality of glass blowing. After all, it is precisely the insufficient flow of warm air that does not prevent fogging of the windows of VAZ 2107 cars. At the same time, modernization does not require significant costs and is accessible to everyone.
It should be remembered that installing a snail, just like replacing an engine, requires replacing the switch. In addition, you need to make sure that the fuse installed in the stove circuit has a rated current sufficient for the operation of the modernized stove. Before the final installation of a do-it-yourself structure, it is recommended to turn on the electrical equipment of the stove directly to make sure it is working and connected correctly.
I decided to make the car warmer. I spent a long time studying the design of a standard stove. I came to the conclusion that there was nothing to catch here. Having removed the stove valve, it became clear that without a radical alteration of the stove, nothing worthwhile could be achieved from it.
Well, I remembered: once, having disassembled the stove, I, in addition to a bucket of dry leaves, found there a barely open damper, tightly rusted in a loop, and a cable torn from it. Having thought about it (yes, like Stirlitz when hit by an explosive bullet in the head), I removed this shutter. The air “by gravity” began to fly into the stove much better; at a speed of >60 km/h, you don’t have to turn on the fan, it blows quite strongly. But this is only enough for a little cold...
Independent production of an additional auto stove
For those who do not want or cannot purchase a “factory” heater for the cabin, we can recommend making the device themselves. To do this, you will need an old computer power supply, a couple of strips of ceramic tiles, powerful wiring, and nichrome springs for the heater.
Step 1. Select a working power supply
This device perfectly warms up the interior of a small car such as a Hyundai or Daewoo. The main thing is not to overdo it with the calculated power, because it is powered by a battery or generator.
Types of additional heating device
If the owner of a Russian vehicle is thinking about how to install an additional heater on a VAZ-2110, then, first of all, he should know that the practical majority of currently existing designs fit directly into the standard cooling system of the power unit. The heated air flow is distributed throughout the cabin by a built-in electric fan.
Additional stove purchased at the store
An additional stove for the interior of the VAZ-2110 can be purchased at the store, however, in order to save money, such a unit can be made with your own hands. In fact, car dealerships sell completely different types of additional heaters. Depending on the budget and preferences of the motorist, you can choose both small and fairly large designs. True, not all presented models can be placed in the top ten without compromising passenger comfort. There is not much free space in a domestically produced car, so when choosing a unit, you should first decide on the location of its future installation.
If the car owner decides to install an additional heater under the passenger seat, then the purchased device should not be wider than 33 cm, higher than 20 cm and have a depth not exceeding 25 cm.
If you choose the optimal location for an additional heater, you should stop in the area of the car located between the seats (the unit will take the place of the tunnel), or directly under the front passenger seat.
Installing a heater switch from Kalina in a VAZ classic
Today we will tell you about such an interesting and useful modification as installing a heater switch from the Lada Kalina on a VAZ-2107 and on any classic. To implement this modification, we will need the heater switch itself from Viburnum, wires with terminals, and a heater resistor from either a Niva-Chevrolet or a VAZ-2110, which is preferable, purely structurally it is better. This modification allows us to significantly expand the range of speed control on our classic stove, which will provide certain convenience in winter in terms of minimizing the noise of the stove motor when the desired temperature is reached in the car interior. This is what the switch from the viburnum actually looks like, see the photo below:
Here it is paired with a stove resistor:
We need to disassemble the stove on our VAZ, namely, remove its lower part; how to remove it is described using the example of the article “how to remove the stove motor on a VAZ-2107” - see the link. So, we carefully cut out a hole of the appropriate size so that the resistor goes inside the stove and does not fall through, and we still have the opportunity to “screw” it. We did this on the driver's side, the left side closer to the partition, which is next to the engine compartment. The main thing is that the resistance is cooled by the air flow from the stove fan, otherwise it will burn out.
We stretch the wires, ideally tie a mini harness and connect our Kalinovsky stove regulator according to the diagram below:
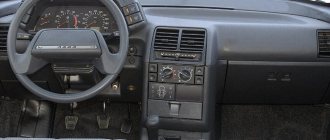
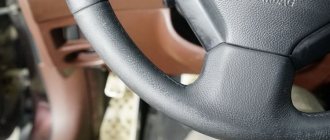
The regulator itself was built into the panel with the cigarette lighter and the clock instead of the unnecessary brightness control for the instrument illumination; on the classic, this control looks more like a mockery or subtle trolling:
In general, convenient and practical. On a classic original heater motor, this modification allows you to somewhat expand the smoothness of the heater speed control, but if you install a snail or a heater motor from a VAZ-2108-2109, then this modification is simply necessary and it is many times more interesting than the banal use of a knob and resistor from a VAZ-2108 . Good luck to everyone on the roads!
source
Preventing the operation of the stove in the cabin
In order for the car heater to work at full capacity and not let the driver down at the most crucial moment, you need to follow a few simple tips for its operation:
- The radiator must be kept clean. The procedure for cleaning light contaminants can be carried out using a vacuum cleaner, and blockages and deposits in the internal channels can be removed by flushing the engine cooling system.
- It is necessary to use good antifreeze, which is considered the key to high-quality and long-term operation of not only the stove, but also the car engine.
- You need to change the cabin air filter more often. If you do not change it in time and do not remove contaminants, it will create problems when warming up the interior, and, in addition, ventilation and air conditioning in the car interior will not work at full capacity. This procedure is especially recommended for drivers and passengers suffering from allergies.
Stove modernization
Very often, in parallel with the prevention of stove malfunctions and its settings, the driver modernizes the heating system for more efficient operation.
Most often, for these purposes, the standard fan and resistor are replaced with products from the figure eight. The new fan is larger in size, due to which a larger amount of warm air is supplied, and the vehicle interior warms up faster. The new fan fits into the standard seat with virtually no modifications. It is only necessary to cut off one of the aerodynamic ridges from the impeller. After such improvements, it will also be necessary to replace the standard fan button with a product from the figure eight.
Sometimes, for better airflow of the driver’s side windows, additional small fans are installed in the deflectors. Such improvements, combined with preventive maintenance, will ensure comfort and warmth in the cabin even in the coldest times.
Catalytic mini heater
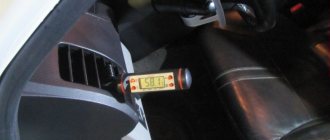
What other ways are there to keep warm inside a car? For example, there are very convenient mini-heaters that will help warm your hands. They are also produced by Kovea. They are very economical and safe and in such catalytic burners heating occurs without flame.
Video about how a catalytic mini-heater works:
The Zippo flameless hand warmer has also proven itself quite well. It is the size of a large lighter from the same company, but it heats well. Interestingly, it was also used by soldiers in the First World War to avoid freezing in the trenches.
from which car can you install a stove on a vaz 2107
A large number of owners of VAZ 2107 cars tried to improve the operation of the heater with their own hands, but they did not achieve great results.
turbo timer For example, you can independently seal the joints of air duct hoses with nozzles or redistribute air
how to remove the heater motor on a VAZ 2107
Kia Sorento thermostat replacement
A large number of owners of VAZ 2107 cars tried to improve the operation of the heater with their own hands, but did not achieve great results. For example, you can independently seal the joints of air duct hoses with nozzles or redistribute air flows, but in general the temperature in the cabin will remain at the same level
which racks are better for a vaz 2109
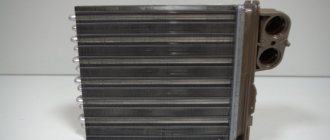
To make the car interior warm and cozy, you need to increase the amount of heat supplied using a radiator.
The problem is that the factory heater fan is too small and it will not create the required air flow, so it is better to install a slightly larger fan from the VAZ 2108.
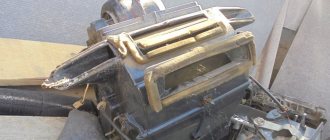
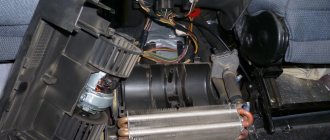
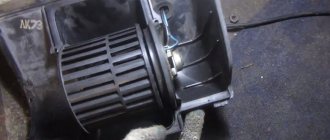
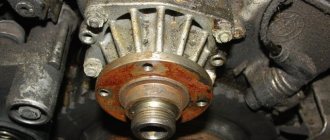
When you compare the fans with each other, you will see: the fan motor from the VAZ 2107 consumes a current of 4.5 A at a rotation speed of 3000 rpm, and on the VAZ 2108 - 14 A at 4100 rpm. Before starting this work, and before starting any work, you need to determine the scope of work for yourself. In the cabin we remove the lower part of the stove, this is a simple casing on which a regular electric fan is fixed on top
starter vaz 2109
stove vaz 2107
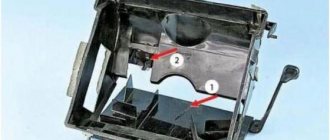
The standard electric fan needs to be completely removed, now we won't need it. The motor on the VAZ 2108 is much longer, so that it sits properly on the casing; one of their aerodynamic ridges, which supplies air to the legs of the driver and passenger, must be carefully cut off.
In this case, this helps the bottom cover to close quickly and securely. What to do with the impeller in this case? We have to remove it and assign the functions of a standard five-blade fan for the classics.
Its efficiency, when compared with the VAZ 2108, is much lower, because its engine is three times more powerful, but it is lighter, from an aerodynamic point of view, the rotor of the new engine will rotate much higher than 4100 rpm.
The hole in the impeller needs to be slightly enlarged in diameter and then carefully insert the new shaft into it. In this case, you need to carefully ensure that the entire new structure is securely in its new place and no problems should arise. Before installing a new fan on a VAZ 2107, you need to connect it directly and check its functionality, because it will be a pity when so much work has been done, but it turns out that the fan simply does not work.
Now you need to decide on the built-in resistor. Its main task is to ensure quiet operation of the fan, but in this case the new fan moves too much air and creates a very loud noise along with the noise. It is best to replace the standard resistor with the same resistor that is installed on VAZ 2108 cars
Solex carburetor 21083
The fan switch also needs to be installed from the same car.
The reason is that when the stove operates for a long time, a completely different current is supplied and in this case the standard power button will simply melt after a while
VAZ 2110 injector won't start
In winter, you will immediately be able to feel all the improvements of the new heater. Attention! One fact that needs to be clarified right away is that the air flow increases, so the noise will also increase.
But all the same, when it’s minus 30 degrees outside, then it’s simply very difficult to take such a disadvantage into account and everyone misses it.
turbine to mechanical injector
Audi A6 C4 gas petrol or diesel
VAZ 2114 arrow does not show engine temperature
Similar articles:
Useful tips → Winter driving rules
Helpful tips → How to properly drive over a speed bump
Useful tips → How to protect your car and property from theft?
Useful tips → Secret letters in your car
Useful tips → How to get out of a skid correctly
Installation locations, connection diagrams
You can purchase an additional stove for the VAZ-2107 or make it yourself. The design of such a heater includes a radiator, which is connected to the cooling system through pipes, and a fan that creates air flow.
If you decide to install an additional heater radiator, first of all decide on the installation location. There are three optimal locations for installing equipment:
- Under the front passenger seat
- Below the front panel under the glove compartment.
- On the center tunnel between the front seats
The location should be selected based on the overall dimensions of the stove.
The next important condition is the connection diagram. You install the additional radiator in series with the standard one (the drain pipe of the standard one acts as an inlet for the additional one). The disadvantage of this connection is the weak heat transfer from the other heat exchanger, since it will receive antifreeze, which has already given off some of the heat.
An additional stove can be connected in parallel to the standard heater (the supply and drain of the second radiator cut into the corresponding pipes on the main stove). The negative side here is the likelihood that the main flow of liquid will flow only to one radiator; in this case, the second one will heat poorly.
Heater device VAZ 2107
The design of the VAZ-2107 stove includes the following components:
- a housing with dampers installed in it;
- stove radiator;
- fan with electric motor;
- air ducts;
- damper control mechanism.
The interior heating system does not use electronic components or complex components, so the stove is reliable and easy to operate and maintain.
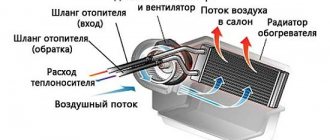
The source of heat in the heating system of the VAZ-2107 interior is the liquid from the power plant cooling system. Heat transfer is carried out thanks to a heat exchanger - a radiator, which is installed in the stove body under the front panel and connected to the cooling system. The design provides for shutting off the supply of heated antifreeze to the heater radiator by means of a special tap cut into the coolant supply pipe.
From the body, the air flow is distributed in several directions - to the windshield, to the center of the cabin, to the side windows and to the footwell area. To supply air flow to the windshield, there is an air duct with an outlet at the top of the front panel. Air is supplied to the side windows through air ducts running inside the panel. Deflectors with dampers are installed at their ends, which more effectively directs the air flow. The same deflectors are located on the front panel in the central part, through which air is supplied to the center of the cabin. Heated air enters the leg area directly from the body.
The VAZ-2107 stove provides for the forced creation of air flow. And it is done using a fan driven by an electric motor, located in the stove housing under the radiator. The electric motor operates in two modes - with different rotation speeds.
The heater is equipped with three dampers to distribute air flows. The first of them is the air supply damper. With its help, the air supply into the cabin from the environment is regulated. The second damper distributes the air flow along the necessary air ducts - either to the windshield area, or to the central and side deflectors. The third damper regulates the air supply to the leg area. The first two dampers are controlled using the sliders of the control mechanism, the third is controlled by a separate lever located on the side of the center console near the pedal assembly.
Air is supplied into the cabin from the street through air intakes on the hood. To prevent water from entering the cabin (when driving in the rain), the air flow that has passed through the air intakes first enters a special box where the water is separated. And only after that it goes to the air supply damper.
Types of additional heaters
The driver can choose the most suitable option from several types of heaters. They differ in installation method, energy consumption, cost and appearance.
Electrical devices
The simplest type of additional heating. It is plugged into the car's cigarette lighter and is most often mounted on the front panel. For its low cost, young motorists love it. More experienced drivers try to use it less often, and only as a hair dryer to warm up the glass.
Positive properties:
- low cost of the device;
- simple installation that does not require the involvement of third-party specialists from the station;
- power comes from a battery or generator, without wasting fuel;
- ready for use immediately after switching on;
- has neutral colors and discreet shapes, which makes it easy to fit into salons of any color;
- Available at almost any auto store.
Negative properties:
- there are a large number of low-quality cheap fakes that can be dangerous during operation;
- in high modes it consumes a lot of electricity, and with prolonged use of the battery it can quickly discharge it;
- negatively affects electrical wiring, so it is recommended to connect it directly with more powerful wires.
Autonomous heaters
Most often, such an additional stove in the cabin is installed on minivans, minibuses, residential vans or trucks. Its power comes from fuel. The stove is equipped with an independent combustion chamber and exhaust pipe. Because of this, it is mounted outside the passenger compartment in the engine compartment. The operation of the device does not depend on the motor and is therefore called autonomous.
Positive properties:
- the performance of the unit does not depend on the degree of heating of the power plant;
- there is the possibility of adjustment from the cabin;
- does not change the interior of the car;
- ready to work immediately after startup;
- high recoil power.
Negative properties:
- more complex installation is required than when installing an electric heater;
- additional fuel consumption occurs when the heater is operating;
- the cost is higher than that of an electric heater;
- additional noise appears from the operation of the device.
Additional radiator
Many people install another radiator in the rear of the cabin. It is connected as a serial device in the cooling circuit together with a standard stove. To do this, pipes are passed through the cabin, and then a radiator with a fan is attached.
Types of additional heaters
There are three types of additional heaters for the VAZ-2107, and each of them has its own characteristics. The interior of this car can be equipped with:
- electric heater;
- autonomous heater;
- additional stove radiator.
Which one to give preference is up to the car owner to decide, and here consider the positive and negative sides of each option. Electric heaters are a heater with a fan, adjusted to operate from a 12 V network. The main advantage is ease of installation, since they just need to be connected to the on-board network through the cigarette lighter or run the wiring directly to the battery.
The negative qualities of electric heaters include low power and heavy load on the on-board network. You should not expect a significant increase in the temperature in the cabin; it is suitable for intensive heating of glass, since it is not recommended to use it for a long time.
Self-contained stoves include an internal combustion engine and a fan installed in a housing. The essence of its work is that the internal combustion engine (ICE) heats up during operation, and the generated heat is supplied to the passenger compartment by a fan. And since the heating of the internal combustion engine is strong, such an additional stove is effective. The positive qualities of such a heater include autonomy; it works even when the car’s engine is turned off. The negative side of an autonomous stove is increased noise and additional fuel consumption.
One of the best options is to use an additional radiator installed inside the car, which is connected to the engine cooling system. Such an additional stove does not require fuel and creates a slight load on the on-board network, while installing another heat exchanger allows you to increase the temperature in the cabin. The disadvantage is the complexity of installation.
Installation of an additional stove in the interior of a VAZ-2110
Before installing a new heating element in the vehicle interior, you should decide on the sequence of actions to be performed. The installation process of an additional stove can be divided into several main steps:
- securing the heating unit under the front passenger seat;
- depressurization of the power unit cooling system;
- connecting the durite hoses of the installed device to the section of the engine cooling system (it is important to follow one rule: the hoses of the new stove should not come into contact with the muffler pipe and steering parts);
- drilling two small holes in the engine shield, about 19 mm in diameter (this is necessary for the pipes of the new heater);
- location of the heater pipes in the cabin under the floor covering;
- removal of pipes close to the seat frame for the passenger;
- installation of fasteners that help fix the pipes on the auxiliary heater;
- filling the expansion tank with about a couple of liters of antifreeze or antifreeze;
- removing the air lock from the engine cooling system;
- creating a button on the dashboard through which the car owner can remotely control the new heating element.
To install an additional heater VAZ-2110 it will take about 4 hours
If an additional pump is installed along with the new stove, this will help make the heater more productive, because the additional stove uses the flow of antifreeze, which is pumped only by the standard pump.
As a rule, it will take about four hours to install a purchased or homemade additional heater for a VAZ-2110.
Advantages of an additional stove
Experienced motorists note the fact that an additional heater installed in the cabin helps warm the space to a comfortable temperature 2 times faster. At the same time, the feet of passengers sitting behind will always be warm.
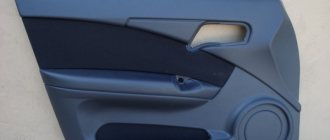
The additional heating device does not affect the beauty of the interior; the unit does not spoil the appearance or interfere with the passengers’ feet.
The additional heater does not interfere with passengers' feet
Disadvantages of a new heater
Although the updated heating makes the temperature inside the car higher than usual, it has some disadvantages. In particular, antifreeze or antifreeze begins to warm up more slowly, which occurs due to an increase in the heat capacity of the engine cooling system.
In addition, additional noise emitted by the new heater appears in the cabin, and dust on the floor rises up along with the flow of heated air.
In the summer, hot hoses located under the floor covering can be especially inconvenient, as they will begin to heat up the interior. True, the situation can be corrected by installing a small tap in the engine department, which should be carried out at the stage of “insertion” into the engine cooling system. It is worth noting that there is no such device (faucet) in the finished heater.
When installing a heater, additional noise appears in the cabin
If the speed of the additional heater is not adjusted, one part of the cabin will warm up more, due to which the passenger sitting in this place may feel discomfort.
Creating a homemade additional heater
You can make a homemade additional heater for a VAZ-2110 from an old heater radiator of any other car.
Climate control in seven
I present climate control in the seven based on the automatic control system of the VAZ-2110.
So, the system nodes:
-Heater tap 2108 ceramic. -SAUO controller VAZ 2110, five-position, old model (0-A-1-2-3). -Micromotor reducer (MMR) of the heater damper drive 2110. -Interior air temperature sensor. - Crane drive cable. The principle of operation of the system is in the original, on 2110, the system maintains a given temperature in the cabin by moving the heater damper, supplying an air flow through a constantly hot heater radiator, either bypassing, or mixing both directions. In my version, the system controls the heater tap.
Go:
I already had a stove faucet, made by ABVA, Ulyanovsk, so I just modified it a little by installing a cable mount.
The crane and the MMR are connected using a cable, the cable is passed through a hole in the engine shield. The MMR can also be installed in the engine compartment, but I don’t have space there, I had to install the MMR in the corner under the panel in the cabin.
We make it from a sheet of iron and install a plate to the MMR for attaching the cable.
The following MMR is also suitable for this controller
The MMR is installed on the bracket.
Now you need to install the temperature sensor (DT).
I installed it on the trim of the ceiling trim. To the possible question - why is it so close to the air flow from the glass blowing, since on the 2110 it is in the middle of the cabin? I will answer right away: 1 - there is nowhere else, 2 - look at the Priore. We remove the trim, mark the place, carefully cut it with a sharp knife, clean the internal hard padding, make a larger hole for the wires, about 1 cm in diameter, to ensure air circulation. A small fan is installed in the diesel engine, it drives air from the passenger compartment through a thermocouple. I have a lampshade in the middle, so DT settled next to it.
Now we need to install the controller.
The most logical place in my case was to install it instead of the heater control levers, I don’t need them anyway, I don’t have dampers, just a faucet.
There is not enough space there, so cutting and fitting took a lot of time, I tried to do everything tightly so that there were no gaps. The controller cannot be inserted from the outside, it will not hold, so the controller is inserted like this: the upper deflectors are removed, the instrument panel cover assembly is installed, all the instrument panel wires are connected, the speedometer cable (well, as usual) and then the controller is inserted from the back from the top, then the instrument panel cover is installed in the panel, and then the deflectors are inserted. A little tricky, but there’s no other way.
In general, we saw, cut, adjust.
To prevent the controller from sinking lower in its hole in the instrument panel trim, I glued a narrow strip of plastic (from sawn material from the trim) under it.
I also had to saw off part of the metal of the panel itself, which interferes with the controller during final installation.
The controller sits tightly, without any play.
The electrical part was completed according to the standard diagram. The only thing is that the controller has been modified a little; it has an automatic mode and three fan speeds. And I have a fan with 4 speeds, so one soldered wire and voila, the controller controls 4 heater speeds. Instead of mode “A” “-1 speed, instead of the “1 speed” mode - 2 speed, and so on.
Based on the results of tests around the city in different driving modes:
Outside minus 5-7 degrees. I started the car, the engine is cold, the temperature is set to 22 degrees, you can hear the MMR buzzing, the valve is set to the maximum opening, the first speed of the heater fan is set. We drive, the engine warms up, the MMR begins to close the tap. Yeah, it’s still 22 degrees. not enough, set it to 24 degrees. It's getting warmer. Wow, normal temperature, comfortable. We jostled through traffic jams, broke out onto a wide avenue, accelerated, it became cooler. Burn, a couple of seconds, burn again, burn for a couple more seconds, burn again, oh it’s getting warmer. Again the traffic jam - again LJ, LJ. There is a slight inertia of the system associated with a delay in operation while the heater radiator warms up/cools down. If the MMR is placed in the engine compartment, then it will not be heard at all. It can be heard at low speed, I did not turn on the Mayfun, in general the sound of the MMR is quiet and unobtrusive. Overall: I am completely satisfied. The system works as expected. Once I set the desired temperature, I forgot about the stove, now it works on its own.
The author of the development is Rustem.
Trouble-shooting
As practice shows, in most cases, a malfunction of a car’s heater is a consequence of problems with the thermostat, so drivers are advised to check it first and, if necessary, replace it with a new one. In other cases, if the stove is not working properly, you should do the following:
- Check the antifreeze level in the expansion tank and add it if necessary.
- Before driving, make sure there are no coolant leaks under the tank.
- Sometimes exhaust gas analysis can help determine the location of an antifreeze leak. If the gas has a whitish tint, the leak may be coming from the exhaust pipe.
- Check the operation of the fan with the engine running; if there is noise, have it inspected by a specialist.
- If there are unfamiliar odors in the interior, you should check for antifreeze leakage inside the car.
- You can also check the temperature of the radiator by touch; a cold radiator indicates that it is clogged.
- If there is a climate control function, computer diagnostics should be performed.
Method thirteen - well, this is absolutely for extreme sports enthusiasts!
If you often find yourself in situations where you have to fight the cold in the car (for example, you are a traveler), then you can take a regular wood stove with you on the road. If you don't believe me, look:
A real oven in the car
So how? Did you believe it? You can stock up on firewood or brushwood for free, for example, if your forced stop occurred in the forest or next to an old and dilapidated building with a lot of boards.
If your car stalls in winter, don’t despair. Armed with any of the heaters listed above and having studied all the tips described, you will not freeze and survive in harsh weather conditions. Even if you find yourself in a car at night, face to face with a cold and harsh winter, you can create all the conditions in the cabin that are similar to the comfort of home. So, don't worry, motorists!