How to install a clutch disc: step-by-step instructions
The main task of the clutch is to ensure smooth gear changes. The car starts moving as carefully as possible, the transmission and engine operate without significant loads, thanks to which they remain in working condition for a long time. Since the clutch is subject to great forces, replacement is carried out regularly: after 100 thousand km. Signs that it is time to change the clutch disc include these changes:
- slip;
- incomplete disengagement of the clutch;
- difficult gear shifting;
- tight clutch pedal (possible sagging);
- lack of traction in a vehicle, especially a truck.
It is not recommended to change the part yourself if the car enthusiast has little understanding of the car’s configuration and has never carried out the installation himself. A poorly mounted clutch disc will not work properly and the unit will have to be disassembled again.
How to install the clutch disc correctly
Most often, installing a new clutch basket is required, but sometimes just replacing the disc is enough. The process itself does not cause difficulties, but most car enthusiasts have a question: how to install the clutch disc? This task can be performed in 2 ways:
- with preliminary removal of the gearbox;
- without removing the gearbox.
The second option is the simplest and fastest, and if the car is equipped with rear-wheel drive, even an inexperienced driver can handle the task. With front-wheel drive the situation is more complicated, but replacement is still possible.
To install the clutch yourself, the car is placed in the garage on an overpass or pit. Before installation, stops are placed under the tires to prevent the car from moving.
Clutch disc: how to install correctly?
Replacement steps
The entire installation and dismantling of the clutch disc takes place in several stages:
- The cardan and working cylinder are detached from the gearbox. Then the limit switches of the electrical wiring of the reverse signal switch are turned off.
- Using a spanner, unscrew the bolts holding the KCP cushion. The pillow itself is dismantled.
- The PCP is moved a considerable distance from the motor, while the switch is tightly close to the bottom. This is necessary so that the transmission is located on the inlet pipe of the exhaust system. To do this, the gearbox is supported by a jack or a special support.
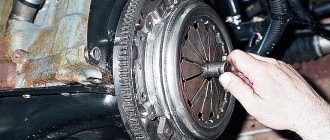
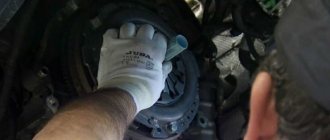
- The flywheel is dismantled and the 6 bolts holding the clutch basket are unscrewed. The crankshaft must be rotated regularly to ensure easy access to the bolts.
- The clutch basket is moved into the emerging shaft to make it easier to dismantle the part. To remove the basket, it must be moved towards the engine. After which the fork and release bearing are dismantled.
- To install the clutch, all the above steps are carried out in reverse order. The bearing hole of the gearbox input shaft is lubricated. The area with which the clamping part is in contact is wiped with a cloth.
What you need to know when replacing
During installation, the driven disk is centered relative to the axis of the crankshaft. The best rule is that the input shaft is splined. If the installation is carried out correctly, it is quickly and easily pulled out.
The bolts holding the casing are screwed in with equal load, otherwise it will move. On the side of the casing there are rectangular recesses into which 3 pressure plate hubs will fit. This structure will ensure maximum high-quality transmission of torque to the element. Also, it is better to move it relative to the axis when the clutch is disengaged.
18 springs are installed in pairs between the pressure plate and the casing. Each element has coils directed in different directions. This is necessary so that the structure always works smoothly. All springs belong to the same category so that the working disk does not warp under the required force.
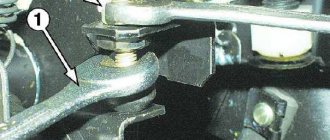
Section of a splined shaft and bushing with a straight-sided profile
Washers are installed to prevent the springs from overheating when the clutch slips. The washers are made of compressed asbestos, as it can withstand sudden temperature changes and has good thermal conductivity.
Also, cone-shaped springs and spherical nuts are installed on the ends of the tail forks. All this creates the effect of the mechanism rolling, which is required when leveling the distance between the axles and when retracting the clutch disc.
What's the result?
As you can see, if you have certain skills, the process of replacing the clutch disc is not difficult. The most time-consuming operation is gaining access to the clutch itself, especially on front-wheel drive vehicles.
As for replacing the disc itself and how to correctly install the clutch disc, as well as the frequent question of which side to place the driven clutch disc, you need to take into account that the disc is placed towards the basket with the part where the damper springs protrude.
Manual transmission gears (speeds) do not engage after replacing the clutch: main reasons, settings and adjustments. Diagnosis of problems, useful tips.
How to replace the clutch on a DSG/S-Tronic robotic gearbox. Signs of the need for replacement, removal and installation of the DSG clutch, calibration and adaptation.
Types of clutch drive. If the clutch pedal falls, the clutch has become soft, problems have arisen with the clutch: causes and repair of major faults.
Double clutch: device, purpose, operating principle and features. How a dual-clutch transmission works, reliability, service life, pros and cons.
DSG robotic gearbox: the main disadvantages and weaknesses of this transmission. Reliability of DSG (DSG 6 and DSG 7), warranty on the box, DSG service life.
How to change the oil in a DSG gearbox: changing the oil in a DSG gearbox. What to consider when replacing, selecting oil for DSG, tips and tricks.
Steering wheel beating or vibration after repair
Oddly enough, beating of the steering wheel or the entire car can occur immediately after a car service. If the problem is discovered after manipulations affecting the chassis, it is logical to look for the root cause in repairs.
Most often, the sudden appearance of vibrations when braking at high speed is preceded by the installation of new parts:
- brake rotor;
- hub assembly, including a new bearing.
In most cases, this is due to the use of defective spare parts; less often, the cause is poor-quality installation of parts.
If the steering wheel or the entire car begins to shake after repairing the chassis, you should contact the car service center where the work was carried out.
Steering wheel shakes when braking
The VAZ-2170 (like many other models) has front disc brakes. Therefore, it is worth considering possible problems in this case. When the steering wheel shakes when braking at speed, there are three reasons. These are crooked wheels, worn brake discs or wheel bearings. If the brake disc is curved, then the pad will follow the shape of this surface. Thus, due to the curvature, the wheel rotates unevenly. This happens due to great inertia. If you start to rock the wheel, it will resist. At speed this resistance is especially high. Therefore, vibrations are felt both on the steering wheel and on the pedals.
Clutch faults VAZ 2107
The main signs of a faulty VAZ 2107 clutch are:
- it is difficult to change gears;
- the driven disk slips;
- vibration appears;
- The pressure bearing whistles;
- the clutch is hard to disengage;
- The pedal does not return from the lower position.
Destruction of the pressure plate and basket casing can lead to very serious consequences
Almost any malfunction is accompanied by extraneous sounds - noise, knocking, whistling, etc.
Gears won't shift
If the gears are difficult to shift, an experienced driver will immediately tell that the clutch is moving. In other words, the clutch does not disengage completely. As a result, when starting from a stop, it is difficult to engage first gear, and when the pedal is pressed, the car moves slowly. The reasons for this situation may be:
- Increased distance between the thrust bearing support surface and the heel of the basket. It must be set within 4–5 mm, changing the length of the working cylinder rod.
- The spring sectors of the driven disk are warped. The disk needs to be replaced with a new one.
- The thickness of the driven disk has increased due to the stretching of the rivets securing the friction linings. The disk needs to be replaced with a new one.
- Jamming of the driven disk on the splines of the gearbox drive shaft. Both parts are defective and, if necessary, replaced with new ones.
- Lack of brake fluid in the master cylinder reservoir or accumulation of air bubbles in the hydraulic drive system. The working fluid is added to the required level, and the clutch hydraulics are pumped.
The clutch is slipping
The clutch may start to slip for the following reasons:
- there is no gap between the pressure bearing and the fifth basket;
- the clutch drive is not adjusted;
- oil got on the rubbing surfaces;
- the bypass channel in the main cylinder body is clogged;
- The clutch pedal does not return to its original position.
Such malfunctions are eliminated by adjusting the drive, replacing oil seals, cleaning the channel with wire, and identifying and correcting the causes of pedal sticking.
Clutch is jerky
If the clutch starts to jerk, it may be caused by the following:
- the driven disk is jammed on the splines of the gearbox drive shaft;
- oily areas have formed on the friction linings;
- the clutch hydraulic drive is not adjusted;
- the steel disk of the basket is warped, some friction springs have lost their elasticity;
- The driven disk is faulty.
In such situations, a complete clutch replacement is most often required.
Noise when engaging clutch
The appearance of grinding and rattling noises when releasing the clutch pedal may be due to the following:
- the pressure bearing is jammed due to lack of lubrication;
- The gearbox drive shaft bearing is jammed in the flywheel.
In both cases, the problem is solved by replacing the bearing.
Noise when disengaging the clutch
When you press the clutch pedal, you hear a knocking, clanging, rattling sound, and you can feel vibration on the gear lever. The reasons may be the following:
- the damper part of the driven disk (springs, sockets) is faulty;
- The splined connection of the driven disk and the gearbox drive shaft is badly worn;
- the return spring of the clutch fork has become detached, lost its elasticity or broken.
In all cases, worn elements should be replaced with new ones.
The pedal returns but the clutch does not work
Sometimes it happens that the clutch does not work, but the pedal returns to its original position. This may be due to the following situations:
- air entering the hydraulic drive system;
- wear of the sealing rings of the main and working cylinders;
- lack of working fluid in the tank.
In these cases, you should bleed the hydraulic drive, replace the rubber rings with new ones and add working fluid to the reservoir.
Tight grip
The softness of the clutch is determined by the force of pressure on the heel of the basket to retract the pressure plate. The magnitude of the force depends on the elasticity of the damper springs. Baskets from many manufacturers, including foreign ones, are suitable for the VAZ 2107 clutch. A tight pedal signals to the driver that the basket's life is coming to an end.
The pedal disengages the clutch at the beginning/end of its stroke
When you press the pedal, the clutch may disengage at the very beginning or, conversely, at the very end. In such situations, adjustment of the free and working travel of the pedal will be required. The free stroke is regulated by changing the length of the pedal limit screw, and the working stroke is regulated by changing the length of the working cylinder rod. In addition, increased free play may be a consequence of wear on the driven disk linings.
Gazelle clutch: which one to choose
Today you can find products from various manufacturers on sale. However, some clutch kits are soft and smooth, but may have a shorter service life, while others operate more harshly, but handle loads better and last longer.
Different manufacturers independently determine the number of springs. The material used to make the friction linings may also differ, there may be unique manufacturing features for the release bearing, etc.
If we talk about the clutch manufacturers themselves, SACHS, LUK and VALEO are considered to be the market leaders. The Sachs clutch is traditionally considered reliable and durable, but some complain about being too stiff.
The LUK company is famous for its high-quality baskets, which allows full transmission of torque and ensures sufficient softness of the mechanism. The VALEO clutch is soft, the comfort is high, but the service life is somewhat reduced.
Let us also add that when designing a clutch assembly, the world's leading manufacturers separately take into account the power of the internal combustion engine, the operating features of the gearbox, the drive axle gearbox, etc. At the same time, cheaper analogues from unknown manufacturers may be of significantly worse quality or manufactured without taking into account certain characteristics and indicators.
For this reason, it is better to choose clutches from well-known brands, even taking into account the high cost. Otherwise, the mechanism may fail, for example, after 15-20 thousand km, and not after 80-90 thousand.
Which side to place the clutch disc towards the engine? How to do it correctly?
Which side should the clutch disc be placed towards the engine? Which is correct?
I have my own sad experience of incorrectly installing the flywheel disc, when I assembled everything and at the first start there was no clutch at all, and even grinding sounds were heard. I had to remove the box again and change the disk side. Technically, this is what happened:
The disc hub rested against the flywheel support bearing, and the damper springs rested against the flywheel mounting bolts. Because of this, a gap of several millimeters has formed between the disc and the flywheel (that’s right - the working part of the clutch disc should fit snugly against the working surface of the flywheel)
The basket pressed on the disk from the reverse side, which led to the disk being pinched between the basket and the flywheel. Even when the clutch was depressed, the release bearing did not do its job, and the clutch disc remained clamped, but torque was transmitted from the engine through the clamped hub and the damper spring housing.
What should you do to avoid mistakes when installing the clutch disc? There are three ways:
1) Some manufacturers mark the sides of the disk, which side should face, with inscriptions on the damper spring housing. Depending on the country of destination or production, the words will be in different languages.
The gearbox side is marked with the following words - GEARBOX SIDE, PP, Getriebeseite, GB SIDE, TRANS SIDE, T/M SIDE
The internal combustion engine side is marked with the following words - COTE VOLANT, FLYWHEEL SIDE, ENGINE SIDE, MOTOR SIDE, FW SIDE, SCHWUNGRAD-SEITE
2) Empirically, i.e. Apply the disk with different sides to the flywheel and see which side will lie better over the entire surface and will not cling to anything. But this option can lead down the wrong path, since some clutch discs have almost the same hub offset and, regardless of the side of contact, will not cling.
3) The best way to determine the side when there is no marking is to inspect the clutch disc itself, it is best to use a measuring tool (caliper - Columbian)
Here is the side from the gearbox side, it should lie tightly on the basket, as you can see, on this side the hub sticks out.
And in the basket there is a special opening for the housing of the damper springs, and the springs themselves are 75 percent placed towards the basket (gearbox)
But on the internal combustion engine side, the springs protrude less, by 25 percent, the body is seated almost flush with the working part (feredo), the hub practically does not protrude.
By the way, here is the inscription “FLYWHEEL SIDE”, meaning that the side is directed towards the flywheel (engine)
Features of clutch disc installation
Installing the clutch disc has several features.
Disc alignment
The clutch disc must be strictly aligned with the axis of the flywheel and input shaft. Even small deviations are unacceptable. When installing the gearbox, the input shaft must simultaneously enter the clutch disc splines. And into the crankshaft support bearing. To do this, the disk is aligned along the axis of rotation. For this, a guide shaft is used. The diameter of the shaft corresponds to the diameter of the clutch disc splines. And at the end it has a seat with the diameter of the crankshaft bearing. After the shaft aligns the splined part and the bearing of the shaft knees along the axis of rotation. The clutch basket is tightened. If you don't do this. Then when installing the gearbox. Once the input shaft gets into the splines, it will not be able to get into the bearing of the shaft knees.
There are clutch mechanisms with two discs. In this case, the centering shaft must have a splined part like the gearbox input shaft. Because it is necessary to center the two disks relative to the support bearing of the shaft knees. Therefore, a used gearbox input shaft of the same model is used as a guide shaft. Correct alignment of the discs greatly simplifies the installation of the gearbox.
Disc direction during installation.
The disc must be installed correctly towards the gearbox and engine flywheel. Installation is possible in both directions. He presses the clutch basket. And until the car starts moving, you may not even be aware of the error.
By design, the disk has a mechanism consisting of springs. Springs soften the effect of angular loads on the disk. This mechanism has a protrusion from the plane of the disk. The larger one is in one direction. Different designs of clutch mechanisms suggest that this protrusion faces either the flywheel or the clutch basket. On passenger cars, the protrusion faces the clutch basket and fits into it. If the disk is turned the other way, it will rest against the flywheel mounting bolts.
When moving away, the disc will simply crumble.
On a car with two clutch discs. The disks are either identical or facing different directions from each other. Or there is disk No. 1 and disk No. 2. You can determine which side the clutch disc is installed on using the drawing or instructions.
Modern spare parts indicate the direction of the disk location. Therefore, it is necessary to carefully inspect the disk. And read the inscription on it how to install the clutch disc. Usually it is in English. For example, on a Mercedes car the direction is indicated flywheel side. What does flywheel side mean?
Quick clutch replacement on a VAZ 2115
When is it necessary to replace the clutch on domestic cars? This should be done when the clutch begins to slip while pressing the pedal and after extraneous sounds or squeaks appear. To replace the clutch on a car, you will need an alignment mandrel. It is necessary to change two disks at once: driven and pressure, and you also need to immediately replace the release bearing. To carry out this work, it is necessary to remove the gearbox. Don't forget about the marks; the position of the basket will need to be marked in the flywheel. Take a 8mm wrench and unscrew the 6 bolts securing the basket to the flywheel.
The flywheel will most likely turn on a VAZ 2115, 2114, 2113, so it will need to be held with an assembly. The bolts are completely removed, all that remains is to remove the basket and driven disk.
You need to look at the protrusion of the release bearing clutch, there is a small spring there that needs to be removed, this needs to be done using a regular screwdriver. Now there is a good opportunity to pull out the release bearing along with the clutch; you need to remove the structure and spring. The condition of the clutch release fork must be carefully inspected and at the same time inspect the condition of the adjacent bushing. If they are worn out, then all parts must be replaced with new ones.
Do not forget that the plug is located inside a rubber cover, which performs a protective function. When replacing the VAZ 2115, 2114, 2113 clutch, you need to carefully remove the plastic fork bushing from the crankcase hole, move the lever axis and move the lower end from its place, so the clutch release fork can be easily pulled out.
All parts must be thoroughly washed in a special container with kerosene; after washing, their condition must be inspected. You cannot replace damaged parts, because after some time they will completely fail and thus other structural parts may break, and this will entail expensive repairs of many clutch parts. We carefully remove the old grease, the gearbox shaft needs to be cleaned and washed, at the same time this can be done with the bearing bushing. You need to buy a special lubricant called CV joint-4 and apply it in a thin layer.
Now everything needs to be put back together: we fix the clutch spring on the crankcase, press in the release bearing and fork, everything needs to be done in the reverse order of removal. New lubricant must be applied to the surface. A centering mandrel must be inserted into the end of the crankshaft. On top of the mandrel you need to insert the driven disc of the VAZ 2115, 2114, 2113 clutch.
The disc must be installed so that the side on which the hub protrudes the most is directed towards the gearbox
After this, you need to install the basket in its original place; at this stage, the robot needs to pay attention to the marks, which should coincide with the marks on the flywheel. Now we take an 8 wrench and tighten 6 fastening bolts and this work must be done evenly, the tightening torque is from 2 to 3 kgf/m. The support must be removed and the gearbox must be installed in place.
When the assembly is completely completed, you need to check the functionality of the clutch
The support must be removed and the gearbox must be installed in place. When the assembly is completely completed, you need to check the functionality of the clutch.
We are replacing
Tools
The initial stage of repair work to replace the DS is to prepare all the tools that will be needed in the process. This is about:
- a set of wrenches - you will need both socket and cap wrenches;
- new DS for VAZ 2109;
- chisel;
- jack;
- several bricks;
- tape measure or ruler.
It should be noted here that in total, replacing an element takes on average about 4 hours if all actions are performed correctly. So please be patient. For a more detailed description, we have also prepared a video for you, which you can watch at the end of the article.
Set of socket and box wrenches
New DS in packaging along with bearing
Chisel in case the wrench fails to unscrew the nut
Jack for work
Bricks will be needed as supports
Tape measure for measuring pedal free play
Step-by-step instruction
- When you drive onto a pit or overpass, put your car on the parking brake.
- Open the hood and disconnect the battery.
- Next, you need to remove the engine splash guard on the left side.
- Take a wrench and remove the hub screws from both front wheels. Use a chisel if necessary.
- Now you need to jack up the front wheels and unscrew them, using bricks as supports.
- Next, unscrew the two upper gearbox mounting screws.
- After this, it is necessary to dismantle the starter. Take a wrench and unscrew the three corresponding nuts.
- When the starter is removed, you need to place a jack under the power unit, which includes the motor, clutch and gearbox, and unscrew the side support of the motor.
- Using wrenches, unscrew the gear shift link and the rear unit support.
- Now you need to remove the clutch protective cover using a wrench.
- When the cover is removed, you can unscrew the front gearbox mounting bolt. Also unscrew the rear nut.
- Once the bolts are unscrewed, you can remove the gearbox using the top bolts until they stop.
- The box will hang on the wires, and its limit switch will rest on the lever extension. This will create a gap through which you need to remove the clutch mechanism.
- Lubricate the guide with engine oil and install the release bearing.
- Then remove the old DS and install a new one in its place.
- The gearbox can be placed on the guides, and then the two lower screws can be tightened. Next, while rotating the crankshaft, tighten all the clutch basket bolts evenly.
1. Two gearbox mounting bolts - they need to be unscrewed
2. Dismantling the VAZ 2109 starter
3. VAZ 2109 clutch cover - you need to unscrew the nuts that hold it in place
4. Front gearbox mounting bolt - unscrew using a wrench
5. Dismantling the mechanism through the gap formed as a result of shifting the gearbox
6. Release bearing at the installation site, lubricate the guide
7. This is what the driving and driven disks of the mechanism look like when disassembled
8. Installing the mechanism back with a new disk
9. Tightening the lower gearbox bolts
At this point, the process of replacing the DS can be considered complete. Reassemble everything in reverse order. After changing the element, it is necessary to adjust the clutch pedal.
- Press the pedal into the floor, placing a tape measure next to it, which also needs to be rested on the floor with one end. When the pedal is in its lowest position, it is necessary to record this value by noting the distance at the center of the pedal pad.
- Next, the pedal can be released, but you need to make another mark when it is in its highest position. Remember this distance.
- Now calculate the amount of free play - if it is more or less than a segment of 125 - 135 mm, and after replacing the DS this will be the case, then it needs to be adjusted. The regulation process itself involves changing the length of the cable sheath.
- Open the hood and locate the end of the pedal cable. It is clearly visible, so finding it will not take much time. Using a wrench, loosen the locking nut securing the cable to the lever, and tighten the second nut. Do this until the pedal free play is in the range of 125 to 135 mm.
Measuring the travel distance from the pedal to the floor with a ruler
Measuring the travel distance with the pedal depressed
Adjusting the clutch drive with wrenches under the hood
If you have any questions regarding the process, we invite you to watch the video.
Clutch is more than just smooth gear shifting
First, let's look at why a clutch is needed at all and what work it does. As a rule, all knowledgeable people will say the same thing. The clutch is needed to ensure smooth engagement of the gearbox speeds, and for this purpose it temporarily disconnects the engine from the gearbox. Thus, the car engine is not overloaded, and gear shifts occur smoothly. In addition, thanks to this mechanism, rapid wear of engine and gearbox parts is prevented. It is clear that the engine is not overloaded when changing gears, and there are also no overloads that arise due to the rotation of engine parts when the crankshaft speed suddenly slows down.
In addition, if the car’s clutch is working properly, then the car will always move off smoothly and unpleasant situations will not arise when starting under a traffic light, or indeed when changing gears
Well, this is very important to know: if you don’t treat the clutch properly, it can also be subject to premature wear. In particular, with a rather aggressive driving style, this vehicle mechanism receives loads that affect its wear.
The device should be handled with care to avoid frequent problems in the future.
What you need to know
The release bearing is not the weakest link in the clutch system, but for some reason it is the one that causes problems and troubles.
coupling
Some car owners have gotten used to the whistle and simply ignore it. But this cannot continue for long, since untimely solution to the problem can lead to even more complex and expensive repairs. If the situation gets worse, then a simple replacement will not be enough for you.
The clutch serves to act on the leaf spring of the clutch basket. It is also called diaphragm, so don't be confused if you hear this designation. Due to this impact, the driven disk is disconnected from the flywheel and the pressure plate of the basket. This disengages the clutch.
If the squeezer is faulty, this can lead to various consequences:
- The clutch fork will be damaged;
- The integrity of the clutch spring petals will be compromised;
- The guide bushings are deformed.
In order not to pay twice, or even three times, promptly react to the appearance of a whistle in the clutch and try to quickly take action.
Let's move on to replacement
Now let's move on to the most important thing in this article, that is, the replacement itself. Before you begin the process, you need to arm yourself with the necessary tools
In particular, you need to prepare:
- a pry bar or a long thick screwdriver;
- tenth size wrench or socket;
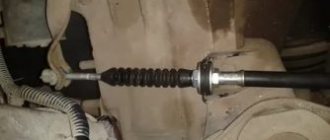
- a special mandrel that will help straighten the driven disk. By the way, such a mandrel is sold in a specialized store, or you can use the gearbox input shaft instead, removing the gears from it.
First of all, before installing the clutch disc, you need to dismantle the gearbox. But again, we must not forget that replacing a disk can be done in different ways. For example, replacing the clutch on front-wheel drive cars is much more difficult than on rear-wheel drive cars. And besides this, each make or model of car may have its own nuances when replacing this part.
Video on how to replace the clutch:
https://youtube.com/watch?v=jhpohw9qgJE
What does it mean? And the fact is that, before starting the replacement process, you should read the clutch replacement instructions provided by the manufacturer. You can also use special forums for information, where those who have independently changed the clutch disc of a car of a certain make or model give useful advice.
Replacement
{banner_content}Assembly of the unit is carried out in a mirror disassembly sequence. First, apply a special lubricant to the bearing hole of the gearbox input shaft, and clean the friction area and the pressure disk with a cloth. Installing the disk in its place is done with the protruding part facing the basket. Pre-applied marks on the housing and flywheel are aligned to prevent imbalance.
During the work, it is necessary to center the driven disk in relation to the crankshaft axis. For this procedure, a special rule is used (simulates the splined part of the input shaft), which should be easily removed after installation. The fastening bolts must be tightened alternately with even force to prevent the casing from moving.
Replacing the clutch and fork on a Gazelle car with your own hands
- Replacing the Gazelle clutch
- Replacing the clutch fork
- Replacement video
Replacing the clutch of a Gazelle car is required quite often, as it is a vulnerable point. The machine is mainly intended for business, the components and assemblies of which always operate under load. Therefore, the service life of the parts is limited; on average, the clutch requires replacement every 50–70 thousand kilometers. As a rule, it changes as a set (pressure disk, driven disk, release bearing).
Gazelle business clutch replacement
Replacing the clutch of Gazelle business model cars is not difficult to do. To do this, you just need the appropriate tool. Work must be performed on a car lift or in a pit.
You can replace the disk or the entire set yourself. For example, let's take a Gazelle with a ZMZ 40524 engine (it is from the ZMZ 406 engine family).
We put the car in the pit and first of all remove the gearshift lever. Before removing the lever, it must be set to the neutral position. Raise the rubber casing.
We find the cone nut, unscrew it and pull out the lever.
We make marks on the driveshaft and rear axle shank.
Marks are made in order to place the shaft in the same position during assembly. If the “cardan” is not placed according to the marks, vibration may occur.
Then unscrew the gearbox yoke (8 bolts along the edges) and pull out the shaft. Before removing the driveshaft, it is advisable to drain the gearbox oil.
- We disconnect the wires going to the gearbox;
- We disconnect the fastening of the gearbox bracket to the exhaust pipe of the muffler;
- We completely remove the gearbox traverse, do this carefully, since the engine and gearbox will go down;
- Then we unscrew the nuts securing the gearbox itself and dismantle it.
We unscrew the fastening of the clutch slave cylinder, move the cylinder to the side, and remove the fork. We dismantle the clutch housing (“bell”), first the lower aluminum housing amplifier, then the housing itself.
Unscrew the six bolts on the basket. Everything has been taken apart.
We take a new set - basket, disk, release bearing, and begin assembly. In order to install the gearbox without problems, the driven disk must be centered, and then the “basket” bolts must be tightened. The bolts need to be tightened evenly in a circle, and not immediately on one side. For alignment, you can use a special mandrel or any input shaft of the Gazelevskaya or Volgovskaya gearbox. The shaft will fit even a 4-speed gearbox.
Then we assemble everything further in reverse order. It is convenient to immediately put the release bearing on the flange of the input shaft of the box, having previously placed a sponge soaked in thick lubricant under it. The sponge can be soaked in transmission oil.
To fasten the gearbox yoke alone, you will need to jack up the gearbox; it is more convenient to do this operation together. After assembly, you should fill the gearbox with oil, checking the oil level using the control plug on the side. That's all - the clutch disc has been replaced.
Clutch disc installation: what to pay attention to
Let's start with the fact that thanks to the clutch, the car is able to move off smoothly, gears are switched smoothly, which contributes to the normal operation of all elements of the transmission and the internal combustion engine itself, preserving the life of components and assemblies.
Taking into account the fact that the load on the clutch is high, the service life of the clutch itself is, on average, about 100 thousand km. Its wear is indicated by loss of traction, slipping of the clutch, incomplete disengagement of the clutch, difficulties when shifting gears, the clutch pedal may become soft or, conversely, too tight, etc.
As a rule, replacing the disc is carried out together with replacing the clutch basket, but in some cases only the disc is replaced. Let's move on. For many cars, there are two ways to replace the clutch:
- replacing the clutch with removing the gearbox;
- replacing the clutch without removing the box;
It is not surprising that it is the second method that is more convenient. At the same time, for a car with rear-wheel drive, replacement is easier. It is more difficult to change the clutch on a front-wheel drive car, but it is also possible to do it yourself. Let's look at the main stages.
- To implement the task, you will need a lift, overpass or pit. Before removing the clutch, it is necessary to place wheel chocks under the vehicle wheels.
- First of all, you need to disconnect the cardan from the gearbox and the working cylinder. Next, you will need to disconnect the wiring ends of the reverse light switch;
- Then, using a spanner wrench, you will need to unscrew the mounting bolts that secure the gearbox cushion. Now the pillow needs to be removed;
- Next, you need to move the box away from the engine as far as possible (so that the switch rests on the bottom); The transmission will actually rest on the inlet pipe of the exhaust system. For this reason, the back of the box must be additionally supported with a support or jack;
- Next, retracting the flywheel, you will need to unscrew the 6 mounting bolts on the clutch basket. In order to gain access to the fixing elements, you need to periodically turn the crankshaft;
- Then the disc itself is removed into the groove that appears and by moving the clutch basket. To remove the basket, you need to slide it towards the engine. The last step will require removing the fork and release bearing;
- Replacing the clutch is done in the reverse order. In this case, a special lubricant is first applied to the bearing hole of the gearbox input shaft, and the friction and contact area of the pressure disk is wiped with a rag.
Also, during work, you need to center the driven disk relative to the axis of the crankshaft. To implement the task, you need to use a rule that is an imitation of the splined part of the input shaft. The rule should be easily removed after installation.
The indicated recesses fit tightly into the 3 pressure plate hubs. This design solution guarantees effective transmission of torque to the disc at the same time as the possibility of its displacement relative to the axis when the clutch is engaged.
Between the pressure plate and the casing there are 18 springs, which are arranged in pairs. The springs have coils that are made in different directions. This eliminates the risk of possible jamming. Also, so that the working disk does not warp and at the same time a suitable force is achieved, the installed springs must be from the same group.
The springs are protected from excessive heating during clutch slipping by washers made of pressed asbestos material, which is heat resistant and has the ability to dissipate heat.
Spare parts for trucks
Full model range: GAZ-3307, 53, GAZ-3309, GAZ-66, 3308, 33081, 33086, GAZ-33104
Car clutch GAZ-3309, GAZ-3308, GAZ-33081 Sadko for diesel engine
The clutch of the GAZ-3309, GAZ-3308, GAZ-33081 Sadko (diesel engine D-245) is permanently closed, single-disk, dry, with a central pressure diaphragm spring and a damper device on the driven disk. Pressure disk 19 (Fig. 1) is connected to casing 10 by three groups of plates.
The clutch and release mechanism of the GAZ-3309, GAZ-3308, GAZ-33081 Sadko are located in the clutch housing 21, which is attached to the rear sheet of the engine with ten nuts 16 studs and a bolt, under which conical spring washers 15 are installed with the convex side to the nuts and the bolt head.
Centering the clutch housing relative to the axis of the engine crankshaft is carried out using two pins 20 pressed into the clutch housing. On the clutch housing there are 6 brackets for the rear engine mounts, which are secured with 5 bolts.
Rice. 1. Clutch GAZ-3309, GAZ-3308, GAZ-33081 Sadko (diesel engine D-245)
1 flywheel; 2, 5 - bolts; 3 - fork; 4 — rear cushion; 6 — rear engine mount bracket; 7 — protective ring; 8 — clutch; 9 — rivet of the friction lining; 10 - casing; 11 — support ring; 12, 20 — pins; 13 - bearing; 14 — gearbox input shaft; 15 — washer; 16 - nut; 17 — driven disk; 18 — disc pressure spring; 19 — pressure disk; 21 — clutch housing
There is no gap between the pressure spring 18 and the clutch bearing 8, so the inner ring of the bearing rotates at the engine crankshaft speed. During operation, the clutch does not require adjustments.
The clutch control drive for GAZ-3309, GAZ-3308, GAZ-33081 Sadko is hydraulic. The clutch master cylinder 15 (Fig. 2), mounted on the front panel of the cab, is actuated by the suspended pedal 20.
The master cylinder of the GAZ-3309, GAZ-3308, GAZ-33081 Sadko clutch is connected by a hose 2 to one of the sections of the three-section supply tank 1, equipped with an alarm sensor for an emergency drop in the brake fluid level (the other two sections of the tank supply the hydraulic drive of the dual-circuit service brake system).
Rice. 2. Clutch drive of GAZ-3309, GAZ-3308, GAZ-33081 Sadko cars
B - compensation hole; G - bypass hole; 1 - supply tank; 2 - supply hose; 3, 18 — fittings; 4, 23 — protective caps; 5, 24 — pushers; 6.33 — bushings; 7.34 - pistons; 8 — piston valve; 9, 14, 35 — cuffs; 10.32, 37 — springs; 11 - coupling; 12 - nut; 13 — thrust washer; 15 — clutch master cylinder; 16 — clutch master cylinder valve; 17 — thrust ring; 19 - pipeline; 20 - pedal; 21 - hose; 22 — clutch slave cylinder; 25 - cover; 26 — fork ring; 27 — fork support axis; 28, 30 — rollers; 29 - coupling pin; 31 — clutch bearing; 36 — spacer sleeve
The working cylinder 22, mounted on the upper part of the clutch housing, is connected to the main cylinder by a pipeline 19 and a hose 21, and is equipped with a valve to remove air from the hydraulic system. When the pedal is not pressed, the cavity under piston 7 of the main cylinder is connected to the reservoir through compensation hole B, which eliminates an increase in pressure in the hydraulic system and clutch slipping.
The bearing 31 of the GAZ-3309, GAZ-3308, GAZ-33081 clutch release clutch is pressed against the pressure spring with a force of 70-100 N (7-10 kgf) using spring 32 through piston 34, pusher 24, fork 3 (see. Fig. 1) and clutch 8. When the clutch linings wear out under the action of the pressure spring, the system takes a new position, compressing spring 32 (Fig. 2).
Excess fluid from the clutch slave cylinder GAZ-3309, GAZ-3308, GAZ-33081 Sadko enters the reservoir through a pipeline into the compensation hole in the master cylinder.
The existing bend in the length of the working cylinder for the movement of the piston provides (without adjustment) the calculated wear of the clutch linings. The position (travel) of the clutch pedal relative to the floor is regulated by changing the length of pusher 5. Repair work on the clutch can be carried out without removing the engine from the car.
Removing the clutch of a GAZ-3309, GAZ-3308, GAZ-33081 Sadko car
To remove the clutch, you must remove the gearbox and clutch housing.
To remove the clutch housing GAZ-3309, GAZ-3308, GAZ-33081 Sadko, you must do the following:
— disconnect the exhaust system pipe from the clutch housing; — Unscrew the fastening bolts and remove the cover of the clutch slave cylinder; — unscrew the nuts of the studs securing the clutch working cylinder, lift up the working cylinder assembled with the pusher, without disconnecting the hose;
Replacement and repair of clutch basket
Replacing the clutch basket is an operation that skilled drivers carry out in the garage, using a jack and support blocks. If it is possible to use a lift, then you should use it.
The work of replacing the basket and repairing the clutch is not an easy task for the uninitiated person. The technological features of removing the gearbox and disconnecting the clutch are different for different models, so we describe the principle and sequence of the operation for replacing the basket.
First, you need a manual, namely, a repair manual for your car. Necessarily
Namely, the method of repair and maintenance. The second thing you need is to get a catalog of parts (something may be superfluous, something may be missing). It is important that when disconnecting the gearbox, before removing the clutch, you need to mark the position of all rotating parts so that during reassembly (if installed incorrectly), vibrations do not occur. Disconnect the gear shift lever in the cabin. We get to the gearbox and disconnect it. Unscrew the bolts securing the basket to the flywheel. If the flywheel turns, then hold it with a mounting tool. Remove the clutch basket and driven disc. The clutch release clutch is dismantled along with the bearing
As the repair progresses, evaluate the condition of the clutch fork, and other parts, the bushing, and so on. The release bearing will need to be pressed out of the clutch. This is a labor-intensive operation. After pressing out, the clutch bearing is changed. For lubrication, use only those lubricants recommended by the manufacturer.
Before assembling the clutch, thoroughly wash all parts in kerosene and at the same time troubleshoot them. Never reinstall damaged clutch parts.
We assemble the clutch after cleaning the parts from old lubricant and applying new one. Naturally, we install the clutch and gearbox strictly in the reverse order.
Important! Pay attention to the tightening of the bolts. It is necessary to clarify the tightening torque parameters of the basket bolts to the flywheel, etc.
Where is the clutch located in a car?
The purpose of the clutch is to transmit torque from the engine crankshaft to the gearbox, so structurally it is located between these two units.
The specific location may depend on the layout of the base units, front-wheel drive or rear-wheel drive transmission, but in any case it will be at the front of the car under the hood.
Car clutch device
Being a connecting unit for transmitting rotation, the design of a friction clutch in a car is not particularly complicated.
The main components are: Pressure disk - has release springs at the base and is designed to connect to the flywheel. Due to its petal design, it received the title “basket” for its similarity in appearance. The driven disk has a coupling, a radial base and linings.
Special damper springs help reduce shaking when switching. Release bearing - located on the input shaft and drives the drive fork. Some designs may use locking springs for a more secure fit.
Clutch pedal - with the help of it, the driver from the cabin controls the work process, transmitting instructions to connect or disconnect the engine drive shaft and gearbox. In cars with an automatic transmission (automatic transmission) there is no pedal; the system operates using a special servo drive.
Modern car manufacturers offer customers different design options for friction clutches. Differences may relate to: number of disks - single or multi-disk systems; work environments – dry or wet options; drive - mechanical, hydraulic, electrical methods; method of pressing the pressure disk - clutch with a central diaphragm or springs in a circle.
Why is a clutch needed in a car?
It’s very simple to understand how a car’s clutch works - while the pedal is not pressed, the drive and driven disks are in contact, transmitting torque from the engine flywheel to the gearbox, and then through the driveshaft to the wheels. Pressing the pedal disconnects the discs, rotation is no longer transmitted, and the driver can change gear. Then you need to slowly lower the pressure so as not to burn the friction clutch if the discs contact too sharply, and it is important not to hold the pedal down for too long.
Clutch operating principle
In words, this is explained simply - the friction clutch ensures the interaction of the engine flywheel and gearbox, ensuring their separation for changing gears.
But how much time does it take for novice drivers to master in practice how to properly depress the pedal so that there is a smooth and soft start from a standstill without jerking or jerking.
It will take more than one hour until the car enthusiast starts driving well, but we should not forget that maneuvers on the road can ruin the clutch of your car.
Cost of replacing clutch disc friction linings
The cost of restoring a clutch disc depends on the size and type of clutch disc; we have a special article about types of discs. The prices in the table are based on statistics and are approximate. The exact cost after a free inspection of the disk by a specialist.
| Disc diameter, mm | Kevlar economy (holds 20% more power but not for long), rub. | LUK classic (installed on the assembly line on Mercedes, BMW, AUDI, VW, etc. Maximum service life and smooth start-up), rub. | LUK Kevlar (holds 25% more power, lasts a very long time, loves extreme loads), rub. | Repair time |
| Up to 210 | ∼1499 | ∼2400 | ∼3600 | About 1 hour |
| 211-255 | ∼1999 | 2600 | ∼3800 | About 1 hour |
| 256-350 | ∼2600-3300 | ∼2600-3500 | ∼3800-4500 | About 1.5 hours |
| 351-430 | ∼3300-4500 | ∼3500-5500 | To order | About 2 hours |
VAZ 2106 clutch replacement
- home
- About company
- Services Engine repair
- Suspension repair
- Repair, replacement of clutch
- Steering rack repair
- Brake system repair
- Cooling system repair
- Muffler repair
- Replacing timing belts
- Change of oil
- Manual transmission repair (DSG)
- Changing the gearbox oil
- Cleaning the injector and nozzles
- Computer diagnostics
- Refilling car air conditioners
- Auto electrician
- Installation of parking sensors
- Car alarm installation
- Car audio installation
- Xenon installation
- Tire service. Wheel repair and replacement
- Disc rolling
- Seasonal wheel storage
- Wheel alignment 3D
- Post-warranty maintenance
- Checking the car before purchasing
- Guarded parking lot
BRANDS
- Audi repair
KIA repair Toyota repair BMW repair Hyundai repair Mercedes repair Mazda repair Chevrolet repair Skoda repair Suzuki repair Nissan repair Mitsubishi repair Volvo repair Ford repair Volkswagen repair Citroen repair Peugeot repair Renault repair VAZ repair Ford repair Opel repair Honda repair Subaru Repair Lexus Repair Land Rover repair Porsche Repair SsangYong Repair Chery Prices Vacancies Promotions Tips Contacts
- Sign up
- Live chat
- home
- About company
- Services Engine repair
- Suspension repair
- Repair, replacement of clutch
- Steering rack repair
- Brake system repair
- Cooling system repair
- Muffler repair
- Replacing timing belts
- Change of oil
- Manual transmission repair (DSG)
- Changing the gearbox oil
- Cleaning the injector and nozzles
- Computer diagnostics
- Refilling car air conditioners
- Auto electrician
- Installation of parking sensors
- Car alarm installation
- Car audio installation
- Xenon installation
- Tire service. Wheel repair and replacement
- Disc rolling
- Seasonal wheel storage
- Wheel alignment 3D
- Post-warranty maintenance
- Checking the car before purchasing
- Guarded parking lot
BRANDS
- Audi repair
KIA repair Toyota repair BMW repair Hyundai repair Mercedes repair Mazda repair Chevrolet repair Skoda repair Suzuki repair Nissan repair Mitsubishi repair Volvo repair Ford repair Volkswagen repair Citroen repair Peugeot repair Renault repair VAZ repair Ford repair Opel repair Honda repair Subaru Repair Lexus Repair Land Rover repair Porsche Repair SsangYong Repair Chery Prices Vacancies Promotions Tips Contacts