Good day, dear car enthusiasts! Agree, it’s nice when everything in the car works, when all the levers and pedals perform their functions. We simply forget about this or that pedal until we feel that pressing it is not happening the same way as always.
It is precisely this question of how to adjust the clutch pedal that we will devote our time to. It turns out that adjusting the clutch pedal does not require higher education or qualifications as a car mechanic. That is, you can completely handle this yourself.
When is Clutch Adjustment Needed?
Adjusting the ZIL clutch pedal travel
Using the example of a clutch on a “classic”, we will try to understand the technology for adjusting the clutch drive. Why is clutch adjustment needed? The fact is that if the clutch drive adjustment is not carried out on time, this may lead to repair or replacement of the clutch.
Long travel of the clutch pedal results in the clutch being partially disengaged and the clutch disc still being in contact with the engine flywheel.
The pedal stroke is small, the driven disk does not fully engage, slipping occurs, i.e. loss of torque.
How to correctly diagnose clutch operation
As always, we turn to people's experience. You will need a ruler. But you will start measuring the pedal stroke when the car’s behavior tells you so, when changing gears or starting to move.
When you try to start moving smoothly, there are jerks or bumps, noise when you engage a gear, or the clutch pedal sticks - these are signs that the clutch needs to be adjusted.
In addition, you can conduct a diagnostic clutch performance test yourself. It doesn't take much. Start the engine, slowly release the clutch pedal and drive away.
If movement begins as soon as you start to release the clutch pedal, then this indicates a lack of free play. If the car does not move even with the clutch pedal fully released, it means that the pedal travel is greater than normal.
Using a ruler, measure the distance from the floor to the rubber pad on the pedals. The norm is 160 mm. if the distance is higher, then it is necessary to adjust the clutch drive.
How to adjust the clutch
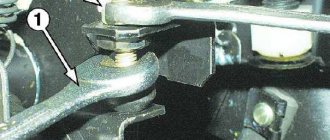
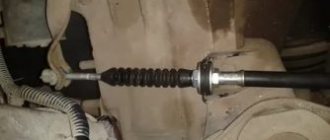
We will bring the mechanical clutch into working condition by adjusting the clutch drive, or more precisely, the adjusting bolt. At the end of the cable (in the engine compartment), there is a bolt that is locked.
By turning the adjusting nut, it is necessary to adjust the clutch pedal travel so that it is 120 -130 mm. To increase the pedal stroke - screw the nut onto the tip; to decrease the pedal stroke - unscrew the nut.
After adjustment, you need to press the clutch pedal 3 times and again measure the distance from the floor to the pedal platform. If necessary, continue adjusting the clutch until you reach the desired pedal travel distance.
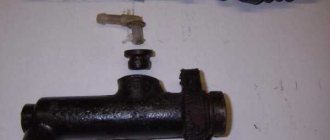
The hydraulic clutch is adjusted as follows. The total length from the pusher rod to the release fork should be within 5 mm. Remove the spring from the working cylinder and fork bracket.
By unscrewing or tightening the adjusting nut on the cylinder rod so that the free play of the fork is 5 mm.
Important! We have given you examples of clutch adjustment on classic models. It’s not a fact that your car’s parameters may be the same. Therefore, when starting to adjust the clutch on your car, first read the maintenance and repair manual from the manufacturer.
Good luck with your DIY clutch adjustment.
In a car, especially a used one, from time to time it is necessary to adjust various systems and controls. For example, sometimes the clutch pedal needs to be adjusted. This can be done independently, and you will need to have a minimum of tools.
When to adjust the clutch
The easiest way to understand the design of the clutch is on classic cars such as GAZ or VAZ. If the clutch is not adjusted, this will lead to faster failure of the clutch as a whole. If the clutch pedal travel is very large, this will mean that the clutch is partially released, despite the fact that the clutch disc will still be in contact with the engine flywheel. And if the pedal travel is small, this will lead to a loss of torque, since the driven disk will not fully engage and there will be slipping.
Adjusting the double disc clutch
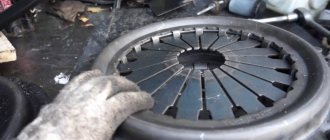
Basically, modern passenger cars are equipped with a “dry” single-disc mechanism. For the operation of most cars, this design is quite reliable and efficient. However, cargo and special vehicles, as well as sports models, require the installation of a double-disc mechanism. Similar to the single-disc design, torque is also transmitted from the flywheel to the gearbox. The only difference is that the double-disc mechanism is capable of transmitting relatively greater torque, while having a much longer service life. Structurally, the mechanisms also differ in the number of driven disks and the presence of an additional spacer between them.
The principle of operation is the same. The pressed clutch pedal moves the release bearing, which in turn acts on the levers, moving the pressure plate away from the driven one. At the same time, the release springs are also released, acting on the intermediate drive disk, which is retracted by the springs of the second friction disk. The second moves at the same pace as the first. Thanks to this, one press of the pedal exerts double force on the mechanism. The reverse procedure when engaging the coupled mechanism is performed in the same way, connecting all the disks in series. The double-disc design can be called an advanced version of the single-disc design, in which force and load are distributed evenly. It is the uniformity of distribution and increased resource that distinguish both of these versions of the “dry” type mechanism.
We will analyze the adjustment of the clutch and its other elements using the example of a MAZ truck. First of all, you should check the gap between the surfaces of the structure. To do this, adjust the distance to which the drive disk is retracted. It is also advisable to check the gap between the adjusting nut and the valve body cover. If necessary, it is worth adjusting these elements.
Next, the flywheel housing is dismantled along with the hatch cover. This is necessary for more flexible adjustment of the output of the middle drive disk. Adjustment at this stage is carried out in several steps:
- the clutch engages;
- The gearshift lever is moved to the neutral position;
- the engine flywheel rotates;
- the locknuts of the adjusting screws are unscrewed;
- 4 screws are screwed into the middle drive disk until it stops.
Then, after loosening the screws one turn, you need to continue rotating the flywheel. All elements are then secured with locknuts. At each stage of adjustment of the MAZ double-disc mechanism, it is necessary to ensure that the adjusted gap does not go astray. To do this, you have to constantly hold the screw using a suitable tool.
We recommend
“Clutch cylinder design: a little theory for successful practice” Read more
The next step is to measure the gap between the edge of the rear valve cover and the nut. The value should not be more than 3.3 mm. Correcting this gap is a necessary step in the entire adjustment of the MAZ double-disc mechanism.
This distance can be adjusted by loosening the corresponding lock nut. Having fixed the gap with the adjusting nut within 3.3-3.7 mm, the lock nut should be tightened. This completes the setup of the MAZ double-disc clutch mechanism.
Practical Guide to Adjustment
The mechanical clutch is adjusted using its drive. To do this, you should find a cable in the engine compartment, at the end of which there is a bolt with a lock nut. By turning the adjusting nut, you need to ensure that the free travel of the pedal is 12-13 cm. To increase the stroke of the PS, the nut should be tightened; to decrease the stroke, the nut should be unscrewed. Then you should press the PS three times and measure the distance between the pedal and the floor. The clutch is adjusted until the required distance is reached.
Adjusting the drive cable
If the procedure is performed after replacing the unit, then it is necessary to ensure that there is no air in the hydraulic drive system. If present, it must be removed by purging the system. The essence of regulation is to establish the necessary clearances between the rod and the piston of the main cylinder of the unit. In addition, the required distances are established between the friction ring of the pressure plate and the release bearing.
In order to adjust the hydraulic drive, it is necessary to remove the spring from the master cylinder bracket and fork. Next, measure the gaps between the pusher and the release fork. This distance should be approximately 5 mm. By unscrewing or tightening the adjusting nut on the cylinder rod, you need to ensure that the free play of the fork is 5 mm.
This procedure is carried out on simple systems and is given as an example. There are other clutch drive systems. To correctly adjust the unit, it is better to refer to the vehicle's operating instructions. The quality of vehicle movement depends on the correct adjustment.
Clutch adjustment procedure
The adjustment must be carried out without air in the system. If it gets inside the hydraulic drive after replacing a unit or other carelessness, it should be removed by blowing it out. The essence of the clutch adjustment method is to set the gaps between the working cylinder piston and the rod, as well as set the required distances between the disc friction ring and the release bearing.
The mechanical clutch is adjusted by a special nut in the steering column, near the end of the drive cable. By turning it left or right with the key, you can change the free play of the pedal. After finishing work with the adjusting nut, the pedal is pressed all the way 3 times, then the measurement is made again. If the result is unsatisfactory, the setting is repeated. If the result is positive, the locknut is tightened on the bracket, preventing the adjusting mechanism from relaxing.
The average normal value of play is 160 mm, but for some models the standards may be different. For example, for the clutch pedals of VAZ 2108, 2109 and 2199 this value is 180-200 mm, and for the Lada Priora it is 123 mm.
The indicator is calculated using the XY formula:
- to begin with, use a ruler to measure the X value from the fully depressed clutch pedal to the floor;
- then Y is measured in the same way on the pedal, with your hand pressed all the way down;
- the resulting value is subtracted from the first.
To adjust the hydraulic device, you need to measure the distance from the pusher rod to the fork. Permissible deviation is 5 mm. If the deviation is greater, an adjustment is made. To do this, you need to disconnect the spring from the working cylinder bracket, providing access to the adjustment mechanism.
Turning the adjusting nut affects the stroke of the fork. You need to turn it until the required value is reached.
To adjust the drive disk, you need to remove the crankcase and flywheel hatch covers. Then unscrew the adjusting screws one turn and lock. This will provide guaranteed clearances between the driven discs and the flywheel surface when the clutch is disengaged. The mechanisms are checked for absence of “driving” when the clutch pedal is pressed all the way, with the engine running.
At the final stage, it is necessary to check the operation of the mechanism. The engine starts, first gear is engaged, and the clutch is carefully released. If the adjustment is carried out correctly, the car will move smoothly in the middle of the pedal stroke. If the car starts moving earlier or later, it is better to repeat everything again.
Repairing or replacing the clutch mechanism will cost much more than adjusting it. Therefore, adjustments need to be made periodically, at the first symptoms of a breakdown. At the same time, you must not forget about timely filling the car with technical fluid.
This is interesting: Grooving brake discs with your own hands
Clutch diagnostic methods
The main symptoms of a faulty mechanism:
- Slippage (when the disk and basket, when connected to the motor, rotate at different angular speeds).
- Strong vibration inside the mechanism, especially noticeable when starting from a standstill and accelerating.
- Noise generated when the clutch operates.
- Violation of the accelerator stroke.
We recommend: 4th generation HBO for cars: 7 advantages of use
Diagnostics of the clutch of modern cars requires the use of professional equipment. However, you can do a simple test yourself. To check, press the pedal several times with the engine off. Then listen. Creaks, clicks, and other extraneous sounds will indicate problems with the box.
Another test is carried out in neutral speed mode. The clutch pedal is pressed all the way, then reverse gear is engaged. If you hear a crunching or crackling noise, one of the drives is faulty.
The check at the third stage is carried out in motion. The gears are sequentially switched to 3rd, then the gas pedal is sharply depressed. If the car does not accelerate, but the crankshaft speed increases on the tachometer, this is a sign of a malfunction. At the same time, it begins to smell unpleasantly of burnt rubber.
Serious damage to the transmission device can be judged by an unsuccessful attempt to engage one of the gears. Therefore, when the motor is turned on, you need to use all speeds.
When is clutch adjustment needed?
It is necessary to pay attention to the behavior of the car when changing gear. If, at the beginning of the movement, jerks or slight impacts are felt, or noise is heard when changing gears, then you need to check the free play of the vehicle's clutch pedal.
To do this, the engine starts and the clutch pedal is gradually released from the previously released state. If the car starts moving immediately after the pedal starts to be released, it will not have free play. If the pedal is released all the way, but the car does not move or begins to move only at the very end, then it means that the pedal travel limit has been exceeded.
Thus, if there is a violation of the clutch pedal free play adjustment, normal movement of the vehicle becomes impossible. Problems arise - you can’t get going, you can hear a crunching sound when changing gears, the car slips and has poor acceleration.
When the trip actuator needs checking
The free play of the clutch pedal must be checked and adjusted every 20 thousand km. This also needs to be done if the car starts to move at the very beginning or at the end of releasing the pedal. A correctly adjusted clutch release drive causes the car to start moving when the pedal is released approximately halfway.
Adjustment of the drive with hydraulics and with a cable is slightly different. To adjust the hydraulic drive, as a rule, you need a pit or overpass. Cable adjustment is usually done in the engine compartment from above, simply by opening the hood.
Clutch adjustment on different brands of cars
For different cars, the distance for the combined pedal stroke may be different and this point must be clarified using the operating instructions. Let's look at the step-by-step adjustment procedure for different models.
VAZ-2108, 2109, 2199
The clutch adjustment procedure is as follows.
- Measure the distance between the bottom edge of the pedal and the floor with the pedal fully depressed. The optimal distance for these models is 18 - 20 cm.
- Press the pedal all the way with your hand and measure the distance from the floor to the bottom edge. The optimal value is 6 - 7 cm.
- Subtract the result of the second measurement from the first, in the end you should get 13 - 14 cm.
- Loosening or tightening the clutch is advisable if the value obtained by subtraction does not correspond to the norm.
- Hold the adjusting nut with one wrench and loosen the locknut with a second. Rotate the adjusting nut clockwise to increase pedal travel. The latter should move down.
- Take control measurements and tighten the locknut if you have achieved the required distance.
How to find out that the VAZ 2109 electrical circuit is faulty? Read about this in our author’s detailed and informative material.
"Lada Kalina"
The adjustment occurs as follows:
- Open the hood and unscrew the air filter housing bolts to remove it.
- Disconnect the mass air flow sensor and unscrew the clamp.
- Remove the cable as far as possible, holding it by the threaded end. Be prepared to overcome the resistance that the spring attached to the clutch pedal will provide.
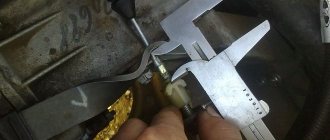
- Use a caliper to measure the distance between the fork arm and the plastic leader. The resulting measurements should correspond to 2.7 cm.
- Use an open-end wrench to loosen or tighten the nut if you get a different result.
- Take repeated measurements by pressing the appropriate pedal.
- Reinstall the air filter.
VAZ-2107
Adjustment in this case requires the use of an overpass or pit. As a last resort, you can install the vehicle on supports using a jack:
- After adjusting the free play, you need to achieve a distance of 0.4-2 mm between the top position of the pedal and the stop. To adjust, if necessary, use a 10mm wrench and lightly unscrew the nut locking the limiter using rotational movements.
- The need to remove the protective shield arises if the engine system involves fuel injection.
- Clean the tappet threads of any dirt before applying the lubricant mixture.
- Check the stroke of the pusher as it affects the stroke of the release bearing. Push the fork back to the very end and measure the distance of the pusher stroke (4 - 5 mm). It is better to disconnect the spring from the lever in advance, otherwise you will have to apply force.
- Use a 17" wrench to adjust the pusher stroke. At the same time, hold the adjusting nut from turning. To loosen the locknut, use a 13mm wrench.
- Use the “8” key to fix the pusher and set the required distance to 4 - 5 mm using the “17” key.
- Lock the locknut and check the pedal travel. The distance between the moment of shutdown and its upper position should be 3 cm.
"Lada Priora"
In the case of the Lada Priora, you can use two methods to measure the position of the cable. In the first case, the reference point should be the clutch pedal travel (123 - 125 mm). In the second case, you can measure the length of the cable that exits the casing. 2.7 cm should be in the released state. In the vast majority of cases, drivers prefer the first method because it is more reliable.
VAZ-2114, 2115
For these models, the clutch adjustment is as follows:
- tighten the handbrake and remove the battery for maximum safety;
- locate the clutch cable in the engine compartment;
- loosen the cable end fixing nuts using two wrenches;
- achieve a distance of 125 - 135 mm by loosening or tightening the nuts;
- take the driver's seat and press the clutch pedal all the way at least three times;
- re-measure and adjust the clutch again if necessary.
We also recommend reading our specialist’s article, which talks about how to tighten the handbrake on Kalina.
Clutch adjustment steps
Adjustment is possible on two types of clutches:
- On a mechanical one, the mechanism is driven by a cable attached to the levers of the device;
- On a hydraulic system, the drive is activated due to forces transmitted through a closed line (based on the principle of operation of the brake system).
Below - more details about the adjustment of each of them.
Adjusting the mechanical clutch
The first step is to determine which parameter needs to be adjusted - so that the disks are coupled earlier or later. To do this, measure the distance from its platform to the floor. Then we squeeze it out completely and measure how far away it is now. Subtract the last from the first value. This will be an indicator of free amplitude.
Standards can be found in service literature. Most often it corresponds to 120-140 millimeters. This is the clutch start range. If the result obtained exceeds the norm, then the amplitude must be reduced, and if it is less, we increase it.
The process itself goes as follows:
- We are looking for the transmission lever. Sometimes this is enough to raise the hood (for example, in a VAZ 2108). It has a rod with fixing nuts;
- In some car models, the cable mount can be removed by simply pulling it and removing it from the lever;
- The fixing nut is unscrewed;
- The second nut is an adjustment nut (the cable casing rests on it);
- To increase the amplitude, the nut must be turned in the direction of the pedal, and vice versa - so that the mechanism works a little earlier;
- We put the mount on the lever and repeat the measurement;
- If necessary, repeat the procedure;
- We install the mount on the lever and secure it with a lock nut.
Lubrication is needed to facilitate the movement of the adjusting elements.
Adjusting the hydraulic clutch
Typically, such a modification is not regulated, because the free amplitude is compensated by the pressure in the system. But some models of hydraulic systems have an adjusting element with a lock nut located on the master or working cylinder.
If these parts are present, we perform the adjustment in the following sequence:
- When the working fluid level is low, the volume is replenished. Sometimes this is enough to restore the response of the mechanism;
- We hang the car or bring it to the inspection pit;
- Under the box there is a working cylinder with a pusher;
- Remove the spring from the fork;
- We press the fork, as this happens when the pedal is activated;
- Measurements are carried out identical to how this is done in the case of a mechanical analogue. Only here the amplitude of the pusher is measured. The gap indicator must also be indicated by the car manufacturer;
- Next you need to unscrew the lock nut;
- The adjustment nut rotates towards the working cylinder (to increase the clearance) or in the opposite direction (to decrease the clearance);
- We repeat the measurements and, if the standards are met, tighten the fastener.
Setting the pedal free play
First you need to check the free play distance. This is done by the simple method of pulling the fork away from the pushrod. The normal gap is 4-5 millimeters, and if this distance is different, then adjustment is also necessary here.
The whole process looks something like this:
- First, the spring that holds the clutch fork in its original position is dismantled.
- Then the locknut on the pusher itself is unscrewed.
- Now you need to fix the pusher with a key, and while holding it, adjust the thrust nut until the gap is as desired. To do this, just twist the part in different directions.
- After reaching the optimal position, you need to secure the thrust nut with a lock nut and check the resulting gap.
- If it has taken the desired size, then you can install the spring in place.
At this point the adjustment process can be considered complete, but now you must definitely test your work. To do this, you need to start the engine, engage a gear and slowly release the lever. If the clutch pedal adjustment was correct, the car will start moving approximately halfway through the pedal stroke. If you feel that this value is still increased or decreased, then you need to check everything again, especially since now you know how to adjust the clutch and there should be no problems the second time.
We recommend: Choosing LPG for a car: methane or propane, which is better?
How much free play should the pedals have?
There are acceptable limits to this term. For each model or brand of car, this figure must be in accordance with the technical requirements. Sometimes an incorrectly adjusted free play causes trouble. And this is not only incorrect clutch operation.
In the worst cases, this state of affairs can lead to breakdown. The car’s clutch will not work with the entire plane of the discs in the case of a large idle speed. If it is small, slipping may occur. As a result, parts will wear out faster.
To prevent such unpleasant cases and ensure proper operation of the car, it is advisable to do such a check as often as possible. And if the test result requires it, regulate it as well.
The clutch accelerator will require a change in cable length if the fork free play exceeds 3mm. To check it, you need to move the fork back. If this value does not correspond to this value, the clutch pedal free play is adjusted using a special nut located on the threaded part of the cable.
Not only the clutch assemblies need periodic adjustment, but also the brake drive mechanism, since over time it will naturally wear out, that is, an increased amplitude of the pedal will form.
As manufacturers recommend, after even a new car has traveled 2,000-3,000 km, it is necessary to check the technological clearances in the brake system components.
With a working brake mechanism, the unimpeded accelerator stroke (with the engine turned off) should be within 5 mm. If there is a lot of free play in the brake pedal, the gap is set by moving the brake light. What are the dangers of regulatory violations?
In the absence or extremely small stroke, spontaneous braking may occur, which leads to overheating of the pads and brake drums.
Adjusting the hydraulic drive
To adjust the hydraulic clutch pedal, you first need to make sure that there is no air in the system. In the absence of air inside the system, the pedal should not be soft when pressed, and after releasing it should return to its original position on its own.
If the tests have convinced you that the hydraulic drive is working properly, check the free play of the clutch release fork. For many models, this parameter should be in the range from 4 to 5 mm. What it should be for your car, check with its manufacturer. After this, check the pedal travel without load; for many models it should be within 25–30 mm. If the free play of the clutch release fork is normal, and the idle value of the pedal does not fall within the recommended limits, look for a malfunction in the clutch master cylinder piston pusher or in the clutch release fork.
If the drive adjustment is incorrect
- Too little free play of the clutch, as well as its complete absence, leads to the fact that the release bearing is almost constantly in contact with the petals of the diaphragm spring of the basket. Therefore, it rotates even when the clutch is engaged and wears out much faster than in a normal situation. Too much free play of the clutch leads to insufficient squeezing when disengaging the clutch and, as a result, the disengagement is incomplete, that is, the friction linings touch the driven disk of the flywheel and the pressure plate basket disk. This causes the flywheel and pressure plate to wear out much faster than usual. This means that too much movement without load, as well as too little, will bring the repair of this system of your car closer. In addition, incomplete disengagement of the clutch makes it difficult to change gears (especially reverse) and contributes to rapid wear of the gearbox synchronizers, as well as reverse gears.
Bath
Features of Renault Logan clutch adjustment
Renault Logan cars are equipped with a cable drive; exactly the same cable is present on the Renault Sandero model. This drive comes with all manual transmissions, regardless of engine type.
The cable is adjusted with a nut located on the cable itself, it is located next to the clutch fork. According to factory conditions, for an unworn DS, the cable should have a length between the gearbox bracket and the fork 86 plus or minus 5 mm; what the distances should be is shown in the figure below.
Over time, the clutch disc wears out and becomes thinner. Because of this, the PS rises, and the free play needs to be adjusted.
In order to adjust the pedal stroke, use a 10 wrench to loosen the lock nut, hold the hex key with a 7 wrench, and turn the adjusting nut.
Having established the required position of the Logan PS, we fix the cable tension with a locknut. We check the car while driving; if the free movement is not satisfactory, we repeat the operation.
We adjust the clutch on a VAZ 2107, VAZ 2106.
Clutch adjustment for VAZ 2107, VAZ 2106 is usually required after replacing the clutch. Correct adjustment ensures longer operation of the clutch parts. Before you begin checking and adjusting the clutch drive, make sure and, if necessary, remove air from the clutch hydraulic drive. It is also advisable that the fluid in the hydraulic pipe be replaced with fresh one if it is used for a long time.
Adjusting the clutch drive comes down to ensuring clearance between the rod and the piston of the clutch master cylinder, as well as between the release bearing and the friction ring on the clutch basket.
The gap between the rod and the piston of the master cylinder is considered normal if it is 0.1–0.5 mm, which in turn provides free play of the clutch pedal to a value of 0.4–2 mm. This gap is adjusted using the pedal travel limiting screw.
The gap (2 mm) between the release bearing and the friction ring on the clutch basket can be determined by the amount of free play (4–5 mm) of the working cylinder rod.
It will be more convenient to check this gap on an inspection hole or a lift. To do this, we will do the following;
- Press the clutch fork, resting your finger on the clutch slave cylinder rod. The clutch fork should move freely relative to the rod by 4–5 mm.
- If the gap does not correspond to these values, the gap will need to be adjusted...
- ...to do this, use keys “13” and “17” to loosen the lock nut on the rod of the clutch working cylinder...
- ...and, holding the rod with a “8” wrench, we adjust its free play by rotating the adjusting nut with a wrench.
- After we complete all the adjustments, the free play of the clutch pedal should be 25–35 mm. Next, tighten the locknut.
Clutch in a car and its purpose
The clutch serves to enable disconnection and subsequent implementation of a rigid connection between the internal combustion engine and the gearbox, that is, it is necessary to transmit torque from the engine to the gearbox shafts, from where the torque is transmitted further to the wheels.
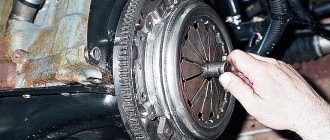
At the same time, the clutch in a car is a complex mechanism consisting of several parts. The main one can be considered the clutch disc, which interacts with the engine flywheel, as a result of which torque is transmitted.
When to press against the flywheel and when not, the driver himself controls by pressing the clutch pedal (turning the clutch on and off). If the disk is pressed, then torque is transmitted. When the pedal is depressed, the disc does not press.
The pedal has three positions:
- extreme upper;
- extreme bottom (disc pressed);
- average, when at a certain moment the disk and flywheel begin to interact.
Before and after the middle position, the pedal has free play. On different machines, the middle position may also be different. But the driver can adjust it to suit himself. In addition, adjusting the clutch pedal travel is important for driving safety and extending the life of mechanisms and individual machine parts.
How to diagnose a clutch
To understand whether the clutch is adjusted correctly, you need to take a ruler and measure the stroke, but everything will become clear while driving. Therefore, in order not to guess and not measure anything again, you must immediately set the clutch to the middle position.
You can use a ruler to measure the distance from the pedal to the floor. The normal distance is 160 mm. if it is more or less, then this situation needs to be corrected and the clutch adjusted.
If while driving, when shifting gears, jerks, bumps and other incomprehensible things appear, then clutch adjustment is needed. If you notice that when you press the gas pedal and the car accelerates slowly, this means that the clutch is slipping and you just need to replace the clutch (disc, release bearing and basket). There are times when it is enough to simply change the disk or bearing, but everything is fine with the basket.
The diagnosis itself is simple; the clutch pedal must have sufficient free play; if there is little free play, then adjustments must be made. That's all the diagnostics are. Or vice versa, if the clutch grabs very high, then this is also not normal.
How to adjust the clutch?
The mechanical clutch must be adjusted using an adjusting bolt. It is located at the end of the clutch cable under the hood of the car. The pedal travel can be adjusted by turning the adjusting nut. In this case, the procedure must be performed so that the clutch stroke ends up being 120-130 mm. Once the adjustment has been made, you need to check the clutch pedal. To do this, press it several times and then measure the distance from the pedal to the floor again. If necessary, you can continue adjusting the clutch pedal. You can do this until the pedal travel becomes desired. The hydraulic clutch is adjusted differently. The length from the rod to the release fork should be no more than 5 mm. First you need to remove the spring between the bracket and the cylinder. Using the nut, achieve a free play of 5 mm. The idle speed of the fork will be adjusted by unscrewing or tightening this part.
More information about clutch adjustment will be discussed in this video:
Published: December 18, 2021
When is it necessary to adjust the clutch?
The clutch is adjusted periodically. Over time, the pedal stroke increases and the shutdown does not occur completely. Thus, when the PS is pressed to the maximum, the shafts do not completely turn off, and they remain in contact with the engine, which increases the load on the teeth and shortens the service life of the unit.
If the PS does not move freely enough, the driven disk does not turn on completely. As a result, not all torque is transmitted when driving, in which case the car loses power. In addition, even with a smooth release of the PS, the driven disk may suddenly turn on, and noise will be heard in the transmission, and the car will twitch.
You can diagnose that adjustment is required based on the following signs:
- jerks or impacts when starting to move;
- PS sinks;
- PS has insufficient free play;
- there is a fluid leak from the drive system;
- Extraneous noise appears when changing gears.
It is easy to determine the need to regulate PS. You need to measure the distance from the floor to the pedal, it should be approximately 16 centimeters.
We measure the distance from the floor to the PS
We recommend: What engine oil additives are worth buying?
When is clutch pedal adjustment needed and how is it done?
During operation, as well as after repair work (for example, replacing a cable or cylinder, depending on the type of clutch), the pedal stroke, and therefore the operation of the clutch, may change. Moreover, if there is too much free play, the clutch may not disengage completely. That is, the disk will come into contact with the engine flywheel in any case.
On the other hand, if the pedal travel is too small, slipping will occur. That is, the movement of the car begins as soon as the pedal leaves the lower position. In this case, torque is lost, loads increase, difficulties arise when starting from a standstill, etc.
The driver does not have to wait until the incorrect pedal stroke becomes noticeable. It is possible and necessary to carry out preventive maintenance, as well as, if necessary, adjust the free play of the clutch. To do this, you will need a ruler, with which you can determine the amplitude of the total pedal stroke.
We also recommend reading the article about why the clutch pedal has become soft. From this article you will learn about the reasons for a soft clutch pedal, why the clutch pedal “fell”, and also what to do in this case.
The procedure is simple: you need to fully depress the pedal by hand and measure the distance from the floor to the pedal. After this, carry out the same measurement when the pedal is in its highest position. The difference between these two numbers is the stroke amplitude. For most cars (the classic version, so to speak), it is 16 cm. However, it is better to check the instruction manual in each specific case.
Free play is checked a little differently. To do this, you will have to measure the gap between the fork and the pusher (clutch elements). When the fork is pulled out, it should be 4-5 mm.
- Adjustment of the overall pedal travel is also necessary. Before adjusting the clutch pedal, for convenience, it is better to install the car on an overpass, lift or inspection hole. The tools you will need are wrenches of different sizes (depending on the make of the car).
If the clutch is mechanical, then you need to adjust the cable (cable drive). To do this, you need to find the adjusting bolt, which is located in the engine compartment. After unscrewing the locknut, rotate the adjusting nut. You can check the result by taking a new amplitude measurement (after pressing the pedal three times).
If the clutch is hydraulic, then the full pedal travel is adjusted inside the car with a stop screw. The free play is also adjustable from the cabin, but you will have to first determine its value. This can be done by pressing the pedal with your hand and noticing the moment when pressure resistance appears.
The amount of free play should not exceed, as a rule, 15 mm. Adjustment is made by rotating the master cylinder pusher rod. After all adjustments, it is important to tighten the locknuts well.
Clutch structure and mechanism
The operating principle of a conventional mechanical device is simple: it transmits engine torque to the gearbox input shaft. It is based on the interaction of two disks - the slave and the master. You can close the connection, separating the power unit from the box, to change the speed. The force is transmitted using a drive: when the clutch is pressed, liquid under pressure enters the working piston. Then the cylinder rod acts on the fork and bearing, the moment is transmitted further to the mechanisms. After releasing the pedal, all drive parts return to their original positions. The basket and disc fit snugly against each other.
The drive is carried out hydraulically or mechanically. Pneumatics are rarely used. Most modern passenger cars are equipped with a single-plate friction clutch, consisting of several mechanisms:
- disk with basket;
- flywheel;
- bearing;
- torsion damper;
- crankshaft with its own bearing;
- tangential leaf spring;
- release bearing forks;
- guide pipe;
- working cylinder;
- input shaft;
- ball head bolt.
All this is neatly placed in the manual transmission housing.
A robotic gearbox works on the same principle - with the difference that actuators controlled by the unit are responsible for squeezing the clutch, and the drive here is electric.
Is there a difference between automatic and manual transmissions?
Automatic transmissions use an electronically controlled hydromechanical drive (sometimes a hydraulic distributor). There is no usual clutch here. Dry discs are completely absent, and on a manual transmission they are the main element. The torque converter (or converter) is responsible for turning on/off the torque on automatic transmissions. Instead of discs, oil turbines are used, which is why the automatic transmission torque transmission and cancellation device is called “wet”.
If a manual clutch most often has a single-disc clutch, then an automatic clutch usually has a multi-plate clutch. Due to the absence of a separate accelerator, the force is transmitted by an actuator or servo drive.
Clutch mechanism
The clutch acts as a link between the transmission and the engine and is designed to disconnect and connect the gearbox input shaft from the crankshaft flywheel. Changing gears in a vehicle with a manual transmission is only possible with the clutch pedal fully depressed. At this moment, no torque transmission is observed, since there is no connection between the gearbox and the flywheel. As for the structure of the node in question, it is represented by the following components:
- A flywheel that takes on torque and transfers it to the gearbox through the basket. The basket, in turn, is attached to the flywheel.
- The pressure and driven disks are closely connected to each other. Their contact is affected by the position of the clutch pedal, which is located inside the car.
- The shutdown fork ensures that the disks are disconnected.
- The primary shaft of the gearbox, to which torque is transmitted.
- Additional elements include a casing, damper springs designed to soften vibration, a clutch release bearing, and friction linings. The latter are put on the driven disk and provide mitigation of friction between the basket and the flywheel.
The flywheel is directly connected to the pressure plate and rotates with it. A splined clutch with a gearbox input shaft located inside ensures transmission of rotation to the driven disk. The gear shift mechanism looks like this:
- transmitting pressure to the release fork through the drive system;
- displacement of the release bearing together with the clutch by means of a fork towards the release springs of the pressure plate;
- temporary disconnection of the basket from the flywheel under the influence of bearing pressure;
- lowering the pedal after changing gears, ceasing pressure on the springs from the bearing, and resuming contact between the flywheel and the basket.
Why adjust the clutch?
If you look at the problem from a practical point of view, then absolutely all clutch malfunctions can be divided into two main groups: those that can be eliminated by adjusting the drive, as well as those in which this method is no longer possible and repairs and sometimes replacement are necessary details. Accordingly, if you do not take care of adjusting the clutch in time, the malfunction will soon move from one category to another, and then it will take much more time and money to fix the breakdown.
In addition to wasting resources, an unadjusted clutch, of course, causes certain inconveniences during the operation of the car - the pedal sinks and falls, the car moves away unusually sharply, and sometimes jerkily. There may also be problems with the operation of the gearbox - speed switching, which is accompanied by loud sounds uncharacteristic of this process.
Thus, if you do the necessary pumping of the hydraulic line and adjusting the free play, the clutch system may completely fail at the most inopportune moment, which will lead to trouble. In order to detect and debug a breakdown in time, you need to correctly diagnose the problem and only then look for ways to solve it.
What does freewheeling mean?
What does this concept mean? It characterizes the freedom of movement of the clutch pedal until it is activated. You can feel it when you press it. At the very beginning, as soon as you start pressing the pedal, it will move quite freely. That is, you don’t feel much resistance.
After activation, you will notice the appearance of greater rigidity when pressing. It is this interval, while you press without much effort, easily, that is called a free stroke.
How do you know when it’s time to check this indicator? Everything is very simple! Just pay attention to how the car behaves when you change gear.
If you encounter shocks or slight jerks at the very beginning of the movement, or if the gear shift is accompanied by noise, then you should definitely check the free movement of your car. So, start the engine and slowly release the pedal.
If the car begins to move as soon as you start to let go, your car does not have free movement. If the car does not move and the pedal is completely lowered, the norm has been exceeded.
Find a regular ruler in your arsenal. With it you can measure the distance from the floor to the rubber pad on your pedal. The average norm is 160 mm. If your measurement results in more, you need to make an adjustment. Press the pedal carefully. Then, using a ruler, measure the distance when it moves freely until resistance appears.
Check the resulting value with the technical requirements of your car. This figure must fall within the acceptable limit. If it differs from the standard indicators, then it’s time to work a little in the garage.
Clutch, what it is and how it works
Imagine a vehicle in which the motor is directly connected to the gearbox. Do you think we started the car and drove off? No. The car will start to move away jerkily, it will be impossible to change gear, and when stopping, the engine will have to be turned off completely. After such a ride, the box will last no more than three days, and the resource of the power unit will be reduced several times as a result of overloads. The clutch helps to avoid such consequences.
Its purpose is to smoothly connect the engine flywheel to the transmission input shaft when driving from a standstill and when changing gears. In other words, the clutch is a torque switch.
How does the clutch work? Currently, the most common is the always-on, dry single-plate clutch. Its principle of operation is to tightly compress the surfaces of the flywheel, the pressure surface of the “basket” and the clutch disc linings.
What you need to know about clutch malfunctions
- If, during the operation of the car, the PS gradually begins to move upward, most likely the lining of the driven disk is worn out.
- When the clutch slips, the interior smells of burnt linings (ferodo). Checking the wear of the linings is quite simple: put the car in “handbrake”, start the engine, squeeze the clutch, add gas, and smoothly release the throttle. If the engine barely slows down, the disc pads are worn out. If the internal combustion engine stalls, the clutch is fine.
- Slipping can occur not only due to worn friction linings of the disc, oil can get on the basket and disc. To check your guess, you need to place the car on a lift or pit and perform an external inspection of the engine and gearbox from below. Oil enters the clutch through the gearbox input shaft oil seal, through the rear oil seal of the internal combustion engine.
- If the PS is stuck, then it could be: the fork has become sour, the piston has jammed in the working cylinder, the fork has flown off the release bearing hub (on ZMZ-402, UMZ engines of various models).
- If the PS has become “wobbly”, and in order to change gear normally, you need to depress the clutch pedal twice, it means that the master cylinder valves have begun to bypass. In this case, repair of the main circulation system or its replacement is necessary.
Troubleshooting clutch problems on a VAZ 2107
The clutch of a car is an important, one of the most important components in a car. If the clutch fails, it will simply stop and stop driving.
Device
Everyone is accustomed to the fact that the clutch is a simple pedal located under the left foot. In fact, this is a complex system that requires constant attention and care. Let's understand the principle of its operation, it is not at all difficult. First of all, we need to understand that modern cars have a hydraulic clutch, like brakes. The incompressibility property is also used here. By pressing the pedal, the driver transfers force to the piston, which pushes the working fluid from the master cylinder through the tubes. Then the liquid flows through the tubes, after which it transfers equal force to the piston of the working cylinder. A rod is attached to the piston, which is adjustable in length. We'll talk about adjustments later.
So, then the force is transmitted through the rod to the clutch fork, which is made according to the principle of a rocker arm. Thus, the fork presses on the release bearing (that’s what it’s called), after which, under its influence, the brake disc moves away from the flywheel. This is necessary in order to disconnect the drive wheels from the crankshaft at the time of gear shifting.
Basic faults
Now let's talk about what can break in such a system. First of all, the rubber seals that are located in the working cylinder suffer. As a rule, their service life is approximately equal to the service life of similar seals in the main cylinder. To eliminate this type of malfunction it is necessary to replace them. Here all the work comes down to simply removing the indicated components, disassembling them and simply replacing the parts, namely small rubber rings, with new ones. It is not difficult. Particular attention should be paid to the working cylinder. The fact is that it is located in a very inconvenient place. All problems can be solved with a lift or inspection hole.
So, we must not forget that there is brake fluid in the system, so you need to take care to drain it in a timely manner, because the strong flow that will break through after you pull out the piston cannot simply be plugged with your finger. It is advisable not to touch the flare nut, because then you will have to adjust the free play of the pedal. In principle, craftsmen can cope with replacing the clutch slave cylinder repair kit without removing the cylinder itself. But this requires skill.
Another problem that can cause clutch failure is wear of the release bearing. To replace it, no matter how you look at it, you will have to remove the gearbox. There shouldn't be any further problems. The friction linings of the brake disc can also wear out; this procedure is described in one of our articles. This type of wear is not at all difficult to detect. The fact is that then the clutch will begin to make noise, and at first the noise will not be constant, but only at the moment when you release the pedal. Then it will begin to develop into a constant hum.
And finally, the most typical problem is air that has entered the system. It should not be there, because in this case the efficiency of work is seriously reduced. Let's look at how to remove it.
Bleeding the clutch on a VAZ 2107
First of all, you need to stock up on brake fluid so that the fluid does not leave the system. You also need to take care of the container that will be used for draining. It should be accompanied by a transparent hose with a diameter of 4-5 mm in order to put it on the fitting. An assistant should also become an integral tool. So let's get started. The clutch pedal does not have a return mechanism or spring: it returns to its place using a spring that is installed on the fork. But this effort alone is not enough, so at first the assistant will have to return it with his foot.