Welcome, friends, to the DIY auto repair website. Timely diagnosis and repair of the brake system is primarily your safety.
Replacing the rear brake cylinder of a VAZ 2110
If you do not pay attention to the brakes, ignore noises or leaks, then a decrease in efficiency or complete failure of the system is possible.
At the same time, experts consider malfunctions of the brake cylinder to be the most dangerous and common problems.
Features of the system
VAZ 2110 cars have a special design. In them, the brake drums are controlled by different hydraulic drives, that is, the front and rear left wheels are controlled by one hydraulic drive, and the front left and rear right wheels are controlled by another.
The peculiarity is that these systems are interchangeable. If any circuit fails, the second one is able to provide insurance and prevent an accident.
The hydraulic drive is based on four main elements - a brake cylinder, a brake pad, a rear brake shield and a guide spring. Moreover, the efficiency of the entire system depends on the integrity of the cylinder and its serviceability.
During operation, the unit may wear out, become damaged and fail. The only solution here is to replace the rear brake cylinder of the VAZ 2110.
When to change pads
The brake pads of the VAZ 2110, if you don’t delve into their design, consist of a friction lining and a special frame.
Friction linings perform braking and, precisely by the material from which they are made, these linings are distinguished.
This material (for the friction lining) is based on a special reinforcing component, which determines such design parameters as strength, stability, heat resistance and reliability of the braking qualities of the system.
New brake pads for VAZ 2110
Like any part, VAZ 2110 brake pads have their own service life, which is usually 30,000–50,000 km of vehicle mileage or the friction lining reaches a thickness of 1.5 mm.
(that is, they practically grind down to zero, but most often when braking, piercing unpleasant sounds arise from under the wheels). When the thickness of the brake linings is less than 1.5 mm.
Excessive stroke of the brake cylinder pistons occurs, which leads to its leakage.
Brake pads should also be replaced if:
- the friction linings are covered with an oily substance (oiled);
- mobility of the linings on the base was detected;
- Deep chips, grooves or cracks have appeared on the surface of the friction linings.
It is also necessary to monitor the wear of the brake discs, which should be replaced when they reach a thickness of 17.8 mm. (for ventilated discs) or 10.8 mm. (for non-ventilated ones).
Which ones to choose for replacement?
The quality of braking and comfort when slowing down the car (no whistling or grinding noise) also depend on the quality of the brake pads. It is also necessary to consider the following when choosing a consumable:
- Poor quality pad material can be the main cause of squeaking, as well as accelerated pad failure;
- When purchasing, choose front brake pads with manufacturer catalog number 21100-3501080-00;
- The same brake pads can behave differently with different brake discs, which significantly complicates the choice;
- To make the right choice when buying brake pads, you need to read reviews in magazines about cars, directly at points of sale, among friends.
Recently, Ferodo, ATE, Allied Nippon and Lucas brake discs have become very popular for the VAZ 2110..
How to remove
For this operation, you need to prepare key No. 17, key No. 13 and pliers. First we jack it up, remove the wheel as when replacing it, and prepare a set of new brake pads intended for the VAZ 2110. Next:
- Using pliers, bend the edge of the locking plate at the lower bolt on the wheel cylinder.
Using pliers, bend the edge of the locking plate
- We take wrench No. 13 and unscrew this lower bolt, but at the same time hold the guide pin with an open-end wrench No. 17.
Take key No. 13 and unscrew the bottom bolt
- We take out the lower bolt and plate.
We take out the lower bolt and plate
- We pry off the caliper and cylinder with a screwdriver and lift them up.
We put on the caliper and cylinder with a screwdriver, lift them up
- We remove the brake pads from their guide.
We remove the brake pads from their guide
- To install new brake pads, perform the above steps in reverse order. However, you must remember to clean the seats from dirt, install the internal block, and move the bracket to the working position. Then we move the bracket with a screwdriver, resting it on the brake disc and retracting the piston with a screwdriver, which is inserted through the hole for the caliper.
Using a gas wrench, press the piston into the brake cylinder
- If the new front pads are equipped with a wear sensor, then you need to connect it. We cut the wire responsible for pad wear.
We cut the wire responsible for the wear of the pad
- Disconnect the brake pad connector.
Disconnecting the brake pad connector
- We take out the rest of the wire.
We take out the rest of the wire
- We connect a new block with a new connector.
We connect a new block with a new connector - After changing the brake pads, bleed the brakes by pressing the brake pedal several times.
This is done so that the pistons take their working position. Now we check the brake fluid level under the hood. If it is minimal, add brake fluid. By the way, be careful, it is very toxic and can corrode rubber hoses and even paintwork! Brake fluid reservoir for VAZ 2110
It happens that the brake disc piston does not return to its original position. In this case, you should unscrew the brake bleeder, which will make it easier to return the piston.
If this does not help, then we remove the entire brake mechanism of this wheel to squeeze out the piston in a yew and replace the seals.
It is very important that when performing this work you do not hit the piston, as this can lead to its distortion and scratches on the cylinder surface.
- To replace the rear brake pads, put the car on a lift, inspection hole, or simply on a flat platform, remove the wheel and release the hand parking brake.
Next, take key No. 12 and unscrew the two guide pins. You may have to use a seven-millimeter hex key instead of a No. 12 key. Use key No. 12 to unscrew the pins - We strike the brake drum with a hammer, turning it evenly. It is better to strike the drum not directly, but through a wooden block or other hard object.
Hitting the brake drum with a hammerTap the brake drum through the backing
- Remove the brake drum.
- Using a screwdriver, disconnect the end of the upper tension spring from the brake pad.
Use a screwdriver to pry off the tension spring from the block - Pull out the spring.
We take out the tension spring - Use a screwdriver to pry up the guide spring and disconnect it from the block.
Use a screwdriver to pry up the guide spring - Disconnect the tension spring at the bottom and remove the block.
Remove the lower tension springRemove the brake pad by disconnecting the tension spring
- Remove the expansion bar.
Preparing to install rear brake pads - Pull the brake pad drive lever out of the cable end.
Rear brake pad installation stage - We replace the pad guide spring after removing it from the hole in the brake mechanism.
We unfasten the axis of the lever for the manual drive of the brake pads. We pull out the axle and move the lever to the new brake pad. We rivet the axle. Next, we reassemble in reverse order. Replace the pad guide spring after removing it from the hole in the brake flap
With the wheel already removed, it is recommended to also inspect other parts of the brake system, as well as the suspension. Brake hoses must be intact and absolutely free of cracks. Brake pads need to be replaced only as a set (in pairs), otherwise the car will pull to the side when braking.
Source: https://motorltd.ru/kak-zamenit-perednie-i-zadnie-tormoznye-kolodki-na-vaz-2110/
Brake cylinder malfunctions
A breakdown can be recognized by several main symptoms:
- Reduced efficiency of the braking system (the braking distance of the vehicle increases noticeably);
- the appearance of “softness” when pressing the pedal.
The first thing to do in the situations described above is to bleed the brakes and check the condition of the pads. If no problem is identified, then most likely the cause is a failure of the brake cylinder.
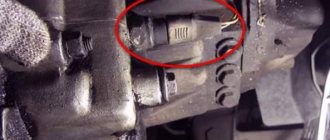
The appearance of a leak in the cylinder area. This can be diagnosed by the appearance of an oil stain on the brake support disc. In such a situation, you cannot hesitate, because we are talking about depressurization of the system.
In such a situation, the pedal simply “falls” to the floor, and braking does not occur. Disassembling the unit and installing new cuffs most likely does not help. The rear brake cylinder needs to be replaced.
The process of replacing the rear brake cylinder of a VAZ 2110
Once you have diagnosed the problem, proceed with the replacement. At the same time, learn that it is better to install new cylinders on two wheels at the same time.
Attention! Practice shows that when one device fails, the “life” of the second also comes to an end. So it's better to save your time and do the work in one go.
The sequence of actions for replacing the brake cylinder is as follows:
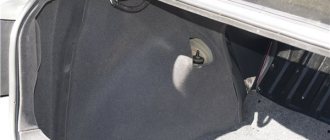
1. Place the car on the pit (you can use a lift or find an overpass nearby). The main thing is that there is full access to the bottom.
2. Secure the front wheels (install locking shoes).
3. Remove the rear wheels.
4. Using a hammer with a rubber base, “knock out” and then remove the brake drum.
5. Remove the edge of the upper lag spring from the brake pad.
6. Raise the handbrake all the way to the top. Thanks to this simple manipulation, the brake pads are moved apart and removed much easier.
5. Unscrew the brake pipe from the cylinder.
6. Remove the brake cylinder itself from the rear support disk.
7. Assess the condition of the old node. Replace it if necessary.
8. Reassemble everything in reverse order.
9. Bleed the brake system.
Please note that all work on removing the brake cylinder and replacing it must be carried out in strict order. Particular attention should be paid to the subsequent tightness of the system and high-quality bleeding of the brakes.
Cylinder removal video
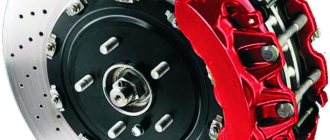
Front brake device for VAZ 2110
The front brakes are installed in the front right and left wheels respectively.
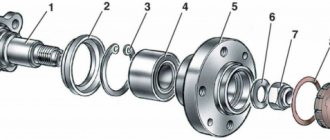
The design of the front brakes of the VAZ 2110: 1 – brake disc; 2 – pad guide; 3 – caliper; 4 – brake pads; 5 – cylinder; 6 – piston; 7 – sealing ring; 8 – protective cover of the guide pin; 9 – guide pin; 10 – protective casing.
They include:
- Brake disk.
- Brake pads (their degree of wear must be carefully monitored).
- The brake cylinder (in combination with the caliper and with proper elasticity of the sealing ring, ensures self-regulation of the distance between the discs and pads).
- Brake cylinder piston (located in the brake cylinder and equipped with an O-ring).
- Caliper (connected to the brake cylinder using bolts).
Signs of major front brake failures and how to fix them
Let's look at breakdowns of the main elements of the front brakes and briefly describe how to fix them:
- To stop a moving VAZ 2110, you need to press the pedal with significant force, then the pedal becomes very pliable and is easily squeezed. In this case, the reasons and how to eliminate them may be the following: ❶ The brake pipes, hoses or fittings connecting them are clogged or bent uncontrollably. This is revealed by inspection - in case of bends, it is recommended to replace the part, and if there are no bends, blow out the brake line (it consists of these same tubes, hoses and fittings) with air. For example, using a compressor, a rubber bulb or a large medical syringe. Of course, the entire highway must be dismantled before this. ❷ The o-rings of the brake cylinder piston have swollen and caused it to seize. This is revealed after disassembling the brake cylinder. The cause of this malfunction is engine oil getting into the brake fluid. This can be corrected by replacing the O-rings and, accordingly, completely replacing all the brake fluid. Before adding new fluid to the brake system, it is recommended to thoroughly flush the system. ❸ The pistons of the brake cylinders are tightly jammed (due to misalignment). After disassembling them, you need to replace them with new ones.
- When you press the brake pedal it moves too lightly. In this case, the reasons and how to eliminate them may be the following: ❶ Incorrect interaction of the brake discs and brake pads. Usually occurs due to uneven surfaces. The way out of this situation is to carefully grind and adjust both the brake disc and pads. ❷ Upon visual inspection, after disassembling the brake assembly, curvature of the pads is visible. In this case, you just need to replace the deformed brake pads with new ones. ❸ If the first two explanations do not apply, then most likely there is atmospheric air in the hydraulic drive of the brake system. The solution is to remove it completely. In this case, simple equipment is used, such as a rubber bulb and a plastic container with a volume of 1.5-2 liters. An assistant is needed for this operation.
- During operation, the brakes seem to jam, stick, and then it goes away. In this case, the reasons and how to eliminate them may be the following: ❶ During a visual inspection, you may notice a weakening of the caliper brackets. Therefore, the bolts securing them just need to be tightened. ❷ The inspection may also reveal that the caliper thrust plate bolts are loose. In this case, as in the previous one, you need to tighten them more tightly. ❸ If the above symptoms were not noticed, then you should pay attention to the brake disc. After studying its markings, it will probably turn out that it does not correspond to the required VAZ 2110 in terms of friction properties. The solution is to immediately replace it.
- When you press the brake pedal, you can feel the rigidity of its movement. In this case, the cause is most likely seizing or wedging of the brake cylinder pistons. The caliper may also be deformed. After disassembling the unit, the caliper and cylinders can be repaired, but it is advisable to replace them with new ones.
- When you press the brake pedal steadily for some time, it seems to fall through, the distance between it and the floor of your VAZ 2110 sharply decreases. Most likely there is a leak somewhere in the brake line or the components it connects. This can be determined by inspecting the brake system. Here you need the help of a second person. He must depress the brake pedal as much as possible, and at this time the technician must carefully inspect all brake pipes, hoses, fittings and cylinders for leaks. It is recommended to completely fill the brake system with fluid before this procedure.
- When you press the brake pedal, you feel it go all the way down, but after that the normal motion returns. These signs indicate contamination of the brake disc or significant corrosion of the parts securing it. This will be determined after inspection. Contamination and corrosion are then neutralized by thoroughly cleaning the surfaces.
- Applying constant force to the pedal, we observe its sharp lowering to the floor of the car. There may be two reasons for this. The first is a leak from the brake fluid system. Having determined this, eliminate the leak by replacing the leaky part. The second reason is that the brand of brake fluid does not match your VAZ 2110. If the brand of brake fluid is unknown, then you need to drain it, flush the system and fill it with the recommended brake fluid.
- The distance that the brake pedal was usually pressed suddenly became significantly greater than before.
This phenomenon indicates that either atmospheric air is in the brake lines. In this case, it must be removed as described above, or upon inspection, severe wear of the brake pads will be noticed (more than 30% of the thickness of the new pads has been erased). In the latter case, you need to change the pads from the entire wheel axle to new ones.
Self-replacement of the front brake cylinder on a VAZ 2110
As is clear from the above material about breakdowns and methods for eliminating them, it is often necessary to replace the front brake cylinder.
- Let's look at this process step by step:
- VAZ 2110 is installed on overpasses or above an inspection hole. Next, it is raised using a jack and secured with reliable supports. The rear wheels are also secured with anti-recoil devices.
- On the side where the cylinder to be replaced is located, remove the wheel.
- Carefully remove the brake hose seal and loosen the degree of twist of its tip.
- Using a large screwdriver, remove the caliper fasteners (unscrew the bolts and bend the antennae of the lock washers). Here it is appropriate to use a suitable second key in the opposite direction.
- Having removed the mounting bolts, we completely dismantle the caliper and brake cylinder. Be careful - when you disconnect the brake hose, fluid will leak from it. Take care of your eyes!
- After fixing the caliper (for example, with a clamp or vice), the brake cylinder is separated from it - unscrew the two bolts with an internal hexagon. When removing the retaining rings, act carefully so as not to damage the protective cover of the brake cylinder.
- Let's start disassembling the cylinder itself. To do this, we supply air from the compressor to the cylinder (we use the hole to supply brake fluid into it). After this, easily remove the piston from the cylinder.
- Carefully remove the sealing ring and inspect the inner surface of the cylinder and the outer surface of the piston. If damaged or worn out, replace the entire cylinder with a new one.
- Even if we don’t change the cylinder, we definitely change the o-ring (whether it’s swollen or not doesn’t matter).
- We assemble the brake cylinder in the reverse order, attach it to the caliper and install everything in its original place. If necessary, lubricate the guides.
- We completely bleed the brake system.
How to repair a brake cylinder?
If the brake cylinder is intact and only some parts are worn out, then you can try to disassemble and repair the device.
For this:
- Remove the protective caps from the device;
- remove special pistons from the housing along with elements for automatically changing the gap;
- turn and remove the thrust screw;
- remove the support cup and sealing ring. These parts are removed along with the spring and “crackers”;
- separate the thrust screw and the ring.
After disassembly, pay attention to the following points:
Inspect the working parts of the cylinder - they should not show any damage, roughness or scratches.
If there are serious defects, a reliable option is to replace the brake wheel cylinder. Minor damage can be removed by lapping and sanding;
- Check the condition of the “crackers”, support cup, springs and screw. If one of the devices is damaged, the part will need to be replaced;
- replace seals;
- install new caps.
Replacement of rear brake cylinders in VAZ 2110, VAZ 2112.
The owner of the car lost his brakes, the brake pedal sank, and the car began to slow down at the very end. The rear right brake cylinder has failed and is leaking, that's what caused the whole problem. They must be replaced in pairs. Let's get to work, lift the rear of the car, dismantle the wheels. If you do this with a jack, be sure to place stones or wheel chocks under the front wheels. Unscrew the 2 guide drums:
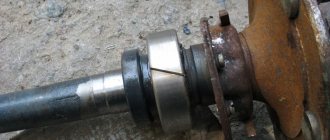
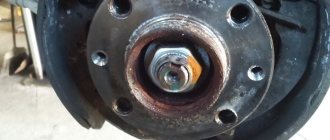
Remove the brake drum. We unscrew the brake cylinder, for this we use a split wrench, an ordinary wide one didn’t work, maybe you’ll get:
Be careful, it is very easy to damage the brake pipe, which will then have to be replaced. Next we unscrew the cylinder fasteners, this can be done using a regular spanner wrench:
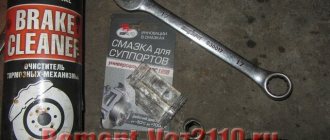
Using a bottle of brake cleaner, wash out all the dirt from the brake drum. After this, we install a new original brake cylinder from VAZ. We remove the plug from it and attach it to the tube:
We attach two of its fastening elements. After this, tighten the cylinder itself. Turning the pistons:
Replacement of rear brake pads in VAZ 2110, VAZ 2112.
Let's start replacing the rear brake pads on the drums. An original set of rear brake pads was purchased in advance, which is suitable for cars of the tenth family of VAZ, Samara, Kalina and Priora. First we put on the springs:
We assemble the block itself and put a new spring on it:
We remove the handbrake lever and put it on the cable. After this you can put on the pads:
Using a special hook, we put springs on them:
Install the lower spring on the pads:
New pads are installed, let's see how the drum stands up. If everything is fine, then lubricate the hub with copper grease. After this, we finally install the drum and screw it on. Tighten the handbrake cable:
Now we need to bleed the brakes.
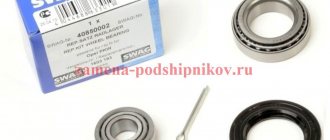
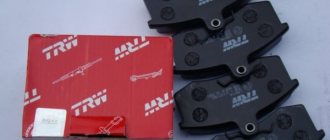
Required spare parts
Just 10 years ago, old pads were not replaced; they were glued on, linings were changed, or they were riveted. Today on the market you can easily purchase the entire mechanism. To replace, you need to prepare new pads. Experts believe that it is better to install replacement factory parts, article number 2110-3501080-60 (TIIR-260), 21100350180082 or 2110-3501080. There are other opinions. Some motorists believe that pads from well-known brands provide the best braking parameters on the VAZ 2110, 2111, 2112. These are parts from brands such as Brembo, ABS, Ferodo, TRW, Bosch, Optimal or Delphi.