Reasons for replacing and diagnosing wheel bearing failure
In addition to driving style and road quality, the reasons for wear are the following:
- product quality;
- quality of service;
- weather conditions (at high temperatures, overheating and expansion occur, and the bearing is also susceptible to drying out of the lubricant).
- other minor factors: serviceability of the suspension, tire profile, play in the units, alignment.
Let's look at the signs of a breakdown, there are several of them:
- Rear noise when driving;
- Vibration in the cabin;
- Over time, the noise will turn into periodic grinding;
- The wheel is loose when raised.
Similar symptoms are observed when the front hub bearings are faulty.
When Replacement May Be Required
If you hear a noise, a characteristic noise or a certain hum in the rear of your car, which only intensifies when entering a turn, this indicates an urgent need to replace the rear wheel bearing on your VAZ 2110.
Hub device
There are several ways to check the state of an element:
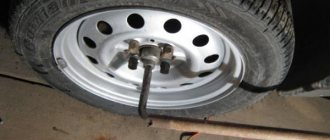
- Lock the wheel in a diagonal plane. Raise the rear wheels one at a time using a jack.
- It is recommended to lift them one at a time in order to correctly determine the source of the noise. It is not always necessary to replace two bearings at once. But if you take on one, replace the second one immediately. Fewer problems will arise in the future.
- Spin the wheel raised on the jack by hand, as hard as you can. The higher the speed, the better. If extraneous noise or humming noises are detected when the wheel spins, the part will definitely have to be replaced.
- If there is any doubt about the integrity of the rear wheel bearing, use the lateral play method. Grab the wheel by its edges and pull it towards you and away from you. If the bearing actually fails, the wheel will move along the axle. The movement may not be strong, but even slight fluctuations indicate the need to replace the element.
Rear wheel bearing VAZ 2110: price, dimensions, choice for replacement
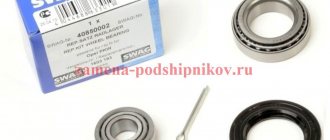
After diagnostics, making sure that repairs cannot be avoided, the question of choosing a new spare part will arise. The hub is equipped with a double-row angular contact bearing, number 6-256706E1S17 (marked according to GOST).
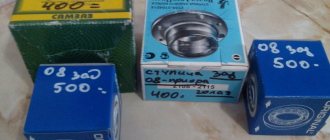
The price of the bearing varies from 600 to 900 rubles.
Recommended bearing manufacturers
| No. | Manufacturer, country | Catalog number | Dimensions, mm | Price, rubles |
| 1 | VAZ original | 2108-3104020 | 60*30*37 | 400 |
| 2 | Pilenga, Italy | PW-P-1307 | 435 | |
| 3 | Elastomag | EM52205 | 660 | |
| 4 | AT | AT30600337 | 455 | |
| 5 | Finwagle | HB321 | 480 |
To avoid mistakes when purchasing, check the markings and sizes:
- External landing diameter – 60 mm;
- Internal landing diameter – 30 mm;
- Height – 37 mm.
You can find more detailed information on this topic in the special article “How to choose a wheel bearing.”
It is important to know:
It is advisable not to purchase Chinese products; buy products from Russia, which are described above, in practice they are better. Beware of fakes, the photo shows an original wheel bearing from VPZ.
Advice:
If the roads in your city are bad, and besides, you like to drive recklessly, install a roller bearing with increased load capacity, number 537906. The only downside is that the permissible rotation speed will decrease.
Detailed instructions for replacing the rear wheel bearing
Replacing the rear wheel bearings of a VAZ 2110
So:
- The car stops at the front.
- Wheel bolts break off.
- The nut in the center of the hub breaks off, and you must first remove the cap.
- The required side is jacked up and the trestles are positioned.
- The wheel is removed.
- The area for installing the disc brake is filled with WD-40 or other special liquids.
Note! In this situation, you can use diesel fuel or any brake fluid.
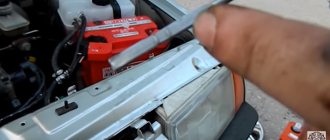
- The guide bolts are unscrewed, which it is recommended to first tap with a hammer.
Replacing the rear wheel bearing of a VAZ 2110
- Carefully remove the brake drum. If removal is difficult, you need to screw special bolts into the threads on this drum, tighten it and lightly tap it with a hammer. Usually such measures produce positive results.
Note! You can buy specialized drum pullers, but this is the last option when you can’t do anything on your own.
- The central nut is completely unscrewed. Of course, you can unscrew it immediately and remove the hub, wheel and drum together, but in this case there will be a high risk of damaging the brake pads.
Rear wheel bearing VAZ 2110
- The hub tightens. If one of the bearing races remains on the axis, you need to move it out of place using a puller or sharpened chisels.
- The axle is inspected for the presence of marks from bearing rotation; if such marks are present, the assembled hub will need to be replaced.
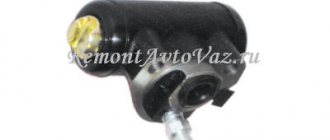
- The brake cylinder is assessed for leakage, and the pads are assessed for wear.
- The retaining ring is removed from the hub using pliers or screwdrivers.
- The edge must be cleaned of rust, after which it must be moistened with WD-40 or a similar liquid that is at hand.
VAZ 2110 rear wheel bearing
- There are three ways to press out a bearing: using a special press, a puller or a heavy hammer (sledgehammer). The third method may seem aggressive, but it is preferred by most service station technicians, so let’s look at it in more detail.
- The hub is securely installed on a hard surface, and the bearing is dislodged from its place through the mandrel with several blows of a hammer or sledgehammer. After this, the hub is installed on a vice.
Note! There must be a stop for the part and a place for the bearing to bounce off.
- A couple more blows are made, after which the bearing comes out.
VAZ 2110 rear wheel bearing
- The bearing seating surface must be carefully inspected, any existing rust should be sanded off and lubricated with plain motor oil.
- The purchased bearing must be screwed using a selected bolt through a washer, which must be selected in accordance with the internal races. Since the bearings are double row, they will have to be disassembled during installation.
- The hub is installed on a hard surface.
- A twisted bearing is installed on top, but first you need to lubricate its installed plane with oil.
- Use a one-kilogram hammer to slightly level the element in a plane.
- Take a suitable mandrel, for example, a pry bar, which is used to hit the part to press the bearing.
Brand rear wheel bearing VAZ 2110
Note! The main thing is not to apply strong blows, since the pressing will be uneven.
- When the bearing is about halfway through, you can hit harder.
- When reaching the cut part of the hub, you need to use the old clip as a mandrel.
Easy to replace rear wheel bearing
Note! Do not apply strong blows, as this is a high-carbon metal that can burst.
- You need to push it all the way, after which the stopper is installed; if it is not possible to install the last element normally, then most likely the bearing was not finished completely.
Note! The stopper should spring back into the groove without difficulty.
Bearing assembly procedure
So:
- Now it's time for assembly, the hub is put on the axle, and you need to remove the bolt used to tighten the cage.
Wheel bearing rear
- The central nut is tightened and tightened as much as possible. In this case, it means installing a new nut. We also install a thrust washer.
- The previously removed brake drum and wheel are put on and screwed on.
- The rotation is evaluated, if there is no noise, then all actions were performed correctly. The car is removed from the jack.
- The wheel with the central nut is tightened.
- The hub nuts are closed and the wheels are tightened securely.
Final tightening of wheel nuts
For a better explanation of the process, it is recommended to watch the video. A photo will also help as a visual aid. Using step-by-step instructions, you can quickly and easily replace the rear wheel bearing with your own hands, without spending money on repairs at a service station. By doing everything as required by the instructions, you can even save a lot of money, because the price of repairs in this case will be much lower. You can also find out about replacing the front wheel bearing on our website.
How to change the rear wheel bearing on a VAZ. First, let's prepare for repairs
We will prepare the car, as well as the tools according to the list:
- Jack;
- A driver or pipe to increase the torsional moment;
- Wrench 30, better with a head;
- A set of other keys;
- Wheel hub puller with claws (to remove the hub);
- Vise;
- Hammer and chisel;
- Round nose pliers;
- Torque wrench.
Now check out the hub design:
1 – rear axle; 2- hub body; 3- protective casing; 4 – lock pin. ; 5 – bearing; 6 – washer; 7 – nut; 8,9 – protective cap with gasket.
Place the car on a level surface, provide light, and install wheel chocks. Next, we put the first gear, and if desired, the parking brake, now we proceed to operations.
Step-by-step instruction
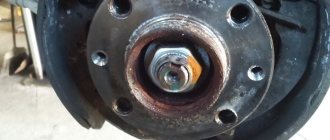
1. Using a flat-head screwdriver, remove the hub nut cap.
2. Loosen the hub nut using a 30mm socket. The nut is tightened with great force, so you can put a pipe on the knob to pull through a larger lever.
3. Loosen the wheel bolts and jack up the car.
4. Completely unscrew the wheel bolts and remove the wheel.
5. Now you need to remove the brake drum. To do this, unscrew the drum studs using a seven-deep socket. Next, screw the drum studs into the other holes only. This should be done evenly, twisting each pin a little. As you twist, you will see the drum move away.
After the studs have been completely screwed in, unscrew them and remove the drum by hand. If it doesn’t work, you can hit it with a mallet from the back side.
If it is difficult for anyone to imagine how to do this, watch the video.
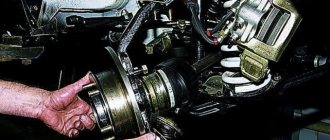
6. After removing the drum, completely unscrew the hub nut and remove the washer.
7. We put on the puller and pull the hub off the shaft. She doesn't sit very well.
8. Remove the bearing retaining ring.
9. Remove the ring on the hub. We clamp the hub in a vice and knock it down with a blunt chisel.
The ring must be removed for subsequent pressing of the bearing.
10. We select the head according to the size of the bearing, put it in the hub, clamp everything in a vice and squeeze the bearing out. He will reach the jaw of the vice and rest against it. We install spacers, for example, as in the photo below and press them out completely.
11. Clean the bearing seat from dirt and rust.
12. Lubricate the bearing seat with oil.
13. Place the bearing in the hub, clamp it in a vice and press it flush with the hub. Make sure that at the beginning the bearing moves without distortion.
Next, we substitute the old bearing as a cage and press it in until it stops.
14. Install the retaining ring.
15. Install the ring. We hit it through the spacer with a hammer so that it sits in its place.
16. We put the hub on the shaft and attach the hub nut.
17. Tighten the hub nut with a torque of 185–225 Nm. If there is no torque wrench, then tighten it with a 1 meter lever with a force 2 times greater than the tightening of the wheel bolts.
Make sure that the car does not fall off the jack; it is better to place a stop.
18. After tightening the nut, tighten it so that it does not unscrew.
19. Next we do the assembly in reverse order:
- install the drum
- install the wheel
- cap the nut
The work takes about an hour.
Video lesson
Tools and working materials
To carry out the work you will need:
- The key is "30".
- Chisel.
- Puller.
- Heads.
- Hammer.
- Jack.
- New bearing (it is recommended to use part 256706. It is distinguished by its quality and durability. You can also use a foreign analogue).
Rear wheel bearing made in Vologda.
Replacement algorithm
Such work can be done on your own, but you will have to work hard.
Before lifting the wheel, you need to “break off” the hub nut - this can be easily done using a 30mm socket, a powerful wrench and a pipe. Don’t forget to straighten the jammed side of the nut first!
Process:
- The car is jacked up and the wheel is removed from the desired side.
In addition to the jack, be sure to provide a reliable support.
Unscrew the pins and remove the drum.
In order not to damage the bearing when pressing, you should only act on the outer race. Don't forget about the retaining ring!
After completely tightening the hub nut, jam the flange with a wrench.
It is worth noting that for the longevity of the bearing, all work must be done carefully. If you make any mistake, it can cause serious consequences.
If installation rules are not followed, the service life of the bearing may be halved.
When a part needs to be replaced
If you hear a noise, hum or howl from the rear that increases significantly when cornering, this indicates that it is time to check the rear hubs. Modern verification methods are quite simple:
- Having stopped the wheel diagonally - opposite to the jacking point, you need to hang the two rear wheels alternately.
Note! Why each one separately? Mistakes are often made in identifying the side of the noise; in addition, it often becomes necessary to replace two bearings at once.
- The raised wheel needs to be spun as much as possible. If you hear extraneous sounds similar to a hum, in any case you cannot do without replacing the part;
- if you still have some doubts, you can look at the lateral play. You need to take the wheel by the edges and roll it away from you - towards you. If the bearing is bad, you will feel the movement of the wheel on its axle.
Today, stores sell individual bearings and assembled hubs. In fact, there is no point in buying an assembled unit (except in individual cases), since replacing the bearing is not as difficult as it immediately seems.