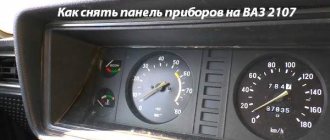
How to change light bulbs on a VAZ 2107
Good afternoon dear friends. Today we will deal with light in our favorite classic - “seven”. In this instruction I will try to change the VAZ 2107 light bulb in all possible places : headlights, interior, dashboard, taillights and glove compartment. Detailed videos will help prevent plastic parts from breaking and make the replacement process easier.
First of all, let's look at what kind of lamps are used in the seventh model Zhiguli car?
Instrument panels VAZ-2107: diagram, description
The VAZ two thousand one hundred seven car is equipped with a dashboard, which is necessary for the driver to monitor the state of movement and just right to notice malfunctions. When driving a car, the driver must monitor not only the road surface, but also the condition of the main parts of his own vehicle. These main parts include:
- movement speed;
- motor temperature;
- presence of fuel in the tank;
- amount of oil in the engine.
And these are just the main points that the driver watches while the car is moving. This article will tell you about the main elements of the device panel, which will be discussed in the diagram below.
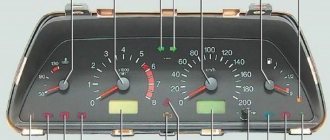
Instrument panel diagrams
So, the operating diagram of the devices located on the main panel in the cabin contains the following elements and compositions:
- indicator of the presence of engine oil in the engine;
- coolant temperature sensor;
- mounting switching block;
- fuel sensor;
- compositions of turns;
- indicator of the amount of fuel in the tank;
- tachometer;
- coolant temperature indicator;
- turning off the ignition;
- ignition relay;
The diagram indicates the connection of the sensors on the device panel with the main elements that specifically do the main job. Pointers only read information from operating devices and display it in an understandable form for human perception.
The above diagram makes it possible to correctly understand the clear location on the dashboard of devices that are necessary elements in driving a VAZ 2107 car.
| 1 | Lever designed to switch wiper and washer modes |
| 2 | Buzzer button |
| 3 | Turn signal control lever |
| 4 | Headlight switch (high, low) |
| 5 | Elements for supplying fresh or warm air to the cabin |
| 6 | Hydraulic adjustment of the front headlights |
| 7 | Lever designed to open the hood |
| 8 | 12V power socket |
| 9 | Turning off the ignition |
| 10 | Turning on the hazard warning lights |
| 11 | Clutch |
| 12 | Brake |
| 13 | Heater switch |
| 14 | Device panel lighting switch button |
| 15 | Gas/accelerator |
| 16 | Head unit |
| 17 | Switch panel (external light, heater fan, heated rear window) |
| 18 | Hand or parking brake |
| 19 | Lamp indicating that seat belts are not fastened |
| 20 | Reserve |
| 21 | Transfer speed switch |
| 22 | Integrated mechanical watch |
| 23 | Cigarette lighter with additional 12V socket |
| 24 | Lamp indicating the operation of the heated rear window |
| 25 | Warning light indicating the presence of brake water |
| 26 | Integrated ashtray |
| 27 | Storage box |
| 28 | Shelf for tools and things |
| 30 | Choke or manual gas |
| 35 | Device compositions |
READ What Bulbs Are on a Toyota Camry 55
Based on the above information, we can say that the VAZ two thousand one hundred seven car has in its own set virtually all the elements necessary to control the movement of the vehicle. It is important to monitor the operation of each device; if any of them does not work, then operation of the car is prohibited until the problem is corrected.
Another article will tell you how to replace and repair device panel sensors. At this point, all the necessary information on the device panel diagrams for the owners of the “seven” is described and will become useful.
What kind of light bulbs are on the VAZ 2106-07
Headlight unit:
Low and high beam. Type H4, 60 and 55 W respectively
Dimensions. Type T4W, power 4 W
Direction indicators. Type P21W, 21 W.
Tail lights:
Side light. T4W, 4 W,
Turn signal. P21W, 21 W,
Reverse indicator. P21W, 21 W,
Brakes. P21W, 21 W,
Rear fog light. P21W, 21 W.
Other installed lamps:
Fender-mounted turn signal, glove compartment light: Type T4W, power 4 W.
Room and interior lighting bulbs: C5W, 5 W.
Cigarette lighter, tachometer and speedometer (instrument panel), clock: T3W, 3 W.
Lamps for side lights, turn signals, high beams, low battery voltage, oil pressure: T3W, 3 W. On some modifications there is a type W1.2W, with a power of 1.2 W.
Parking brake indicator, low brake fluid level, rear fog lights on, heated rear window, throttle opening in carburetor models (suction), low fuel level alarm: W1.2W, power 1.2 W. In some modifications, a T3W, 3 W lamp is used for the level in the gas tank.
Engine block control errors (Check Engine) for injection models: W1.2W, power 1.2 W.
Knowing what is installed on our Zhiguli and where, we will move on to replacement. Let's start with the front of the car.
Lada 2107 PVN Tuning › Logbook › Illumination of instruments and interior of VAZ 2107
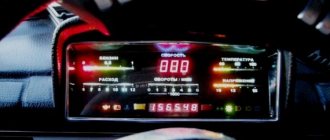
For a long time I was worried about the idea of improving the interior lighting and stylizing it to match the color of the car.
Deciding one day to keep myself busy on boring, bad weather evenings, I took the dashboard out of the car, bought an LED strip, wires, and it began... I cut out 4 pieces of LED strip, soldered the wires to them, and the wires to the tracks on the board. Pasted the tape
I covered the interior with food foil for a more even distribution of light.
I was very pleased with the result. Uniform green glow, clear visibility of instrument readings
All? No, I still had enough LED strip and even more enthusiasm))
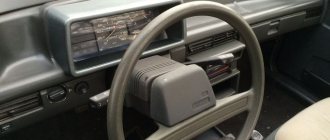
I started making lighting under the panel on the driver and passenger sides. I was so engrossed in work that I forgot about the photographs)) I took power from the positive terminal of the sidebar/low beam keys through the same key installed in the empty slot to the right of the foglights. Using male-male contacts, the wire was branched into two directions.
I glued the LED strip on the passenger side under the shelf, and on the driver's side two pieces of tape (to the right and left of the steering column) to the metal frame. It was very inconvenient to glue the tape near the steering column; I accidentally glued my fingers together)))
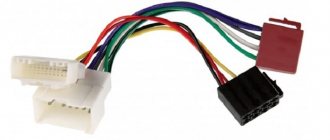
To make it easy to disassemble the car panel, I made connectors connecting the “passenger” and “driver” tapes with the power wire.
The lighting turned out to be spectacular
But I didn’t want to stop there either, I thought about which part of the panel I should still highlight... I decided to examine the panel with the clock. In vain... When opened, the watch fell apart into its components, the cigarette lighter shorted, and the indicators for the heated rear window and handbrake did not want to lock in place. Having put everything back together, having splashed once on the ice while replacing the fuse, I decided not to climb there anymore))) I illuminated this panel in a more cunning way. I glued a piece of tape into the recess for opening the ashtray. I don't smoke, I don't need an ashtray. I powered this piece from the size and low beam indicator lamp so that it worked in tandem with the instrument lighting.
Source
Block lights
Here are the turn signal bulbs, dimensions, low and high beams. To get to the side lights and low and high beam lamps, you need to:
Remove the protective cap. We turn it counterclockwise, the indicators are marked on it. It has no thread, but can be removed by turning it 180 degrees. In its inner part there are “antennae” with which it is fixed in the body of the headlight unit.
Remove the wire retainer. It secures the low beam lamps in the reflector housing. This clamp is made of elastic metal, so you need to remove it carefully. We take its upper ends out of the grooves and lower them down, freeing the socket of the high and low beam bulbs.
We take the lamp out of the reflector, holding it by the base, and remove the plug.
Important! If it is working properly, but you want to install a halogen or LED one, it is not recommended to touch it with your hands. Otherwise it may burn out.
Changing the headlight bulb
We take it out of the reflector housing along with the socket. If you haven't done this for a long time, then getting it out will be problematic. To do this, remove the low and high beam unit. We insert a finger into the reflector hole, feel for the size bulb and push it out with a little force.
To replace, you need to lightly press the light bulb and turn it half a turn. It will come out of the plinth retainers and can be easily removed. We insert the new one in reverse order.
Important! When installing into the headlight housing, do not use great force - the reflector may crack. To ensure installation without difficulties, it is recommended to treat the seat with fine-grained sandpaper. This will remove oxides, dust, and dirt that interfere with smooth installation.
Video, instructions for replacing light bulbs in the headlights and dimensions of the VAZ “Seven”:
Direction indicators
We turn the turn signal socket counterclockwise half a turn in the headlight unit housing.
Let's take it out. The lamp, similar to its dimensions, is fixed in the socket with two “antennae”. Therefore, they pressed lightly on it, turned it and took it out. The cartridge is made in the form of a single plate with a slot on one side. Therefore, the light bulb must be pulled out of it with little effort, because its contacts will cling to the socket.
Video about modifying the direction indicator in the headlight unit of a VAZ 2105-07, removing and replacing the lamp in it:
VAZ 2107 instrument lighting does not work
Re: another problem. All dimensions and lights do not work
Unread message guest » Fri Jun 17, 2011 8:21:39 AM
So what, what is not called. He was a key switch and will remain so.
PS. Leaves. Green leaves. Just leaves—are they not leaves anymore? Only green leaves—leaves?
Re: another problem. All dimensions and lights do not work
Unread message by Shim » Fri Jun 17, 2011 8:31:40 AM
Re: another problem. All dimensions and lights do not work
Unread message guest » Fri Jun 17, 2011 8:45:28 AM
Re: another problem. All dimensions and lights do not work
Unread message by Zayec » Fri Jun 17, 2011 9:08:30 AM
Re: another problem. All dimensions and lights do not work
Unread message by Smoky555 » Fri Jun 17, 2011 9:24:33 AM
Zayec, not for the sake of nonsense, but for the truth.
clause 7.6. Lighting and light signaling for VAZ 2104/2105 cars. The diagram for switching on external lighting is shown in Fig. 7-34. The side lights in the front and rear lights are turned on by switch 6 of the external lighting. At the same time, the license plate lamps 10 also light up, as well as the indicator lamp 7 for the side lights in the speedometer.
The headlight switching diagram is shown in Fig. 7-35. The low and high beam headlights are switched on by the steering column switch 5 for the headlights if the switch key 8 for the external lighting is pressed.
Turn signal
The housing of the side turn signals is fixed in the car fenders with plastic clips. They work on the principle of inserting and clicking. There are two options for replacing the lamp in repeaters: through the wing arch or by removing the plastic housing. In the latter case, there is a chance that this body will no longer be securely fixed in the wing due to breakage of the plastic clips.
Let's consider the second option
We pry up the repeater housing with a plastic flat object, you can use a screwdriver, but use a rag or other lining so as not to damage the paintwork of the wing. The body is surrounded by a rubber “skirt”, so you can lightly press on it with a hard tool and pry it, it should pop out of the metal of the car body.
We remove the rubberized cartridge from the turn signal housing. It uses, depending on the modification, T4W or W1.2W lamps. The last type is removed from the cartridge by turning 90 degrees so that the contacts come out of the latches, the second type is removed from the socket by hand, since it does not have a base.
The first option is through the arch
We do the same thing, just don’t pull the repeater housing out of the wing. It remains in place, which ensures the integrity of its latches. In this case, there are also nuances:
To get to it, you need to remove the fender liner. In some cases, when no one has climbed there for many years, unscrewing the screws will be problematic.
If there is no protection, then there is so much dirt that it will be even more difficult to get there.
We climb under the wing, find the cartridge and pull it out along with the lamp. And we do everything as in the second case. Assembly is carried out in reverse order.
Important! When you “push” the cartridge into the repeater body, you need to hold it from the outside, rest your finger against it so as not to squeeze it out. If this happens, the plastic clips may break and you will have to buy a new one.
Tail lights
We move to the rear of the car. There are screws on the trunk side that secure the protective cover.
- Unscrew them and remove the plastic cover of the lights
- Remove the power plug and loosen the plastic board holders with your fingers. To replace it, just loosen the board latches to remove it from the flashlight body
- We remove it from the taillight unit
All lamps are located on the printed circuit board. To replace them, you need to turn them a quarter turn and pull them out of the socket. We replace burned out ones. We assemble the lantern in reverse order.
Video, replacing rear light bulbs on a Zhiguli 2105-07:
Instrument panels VAZ-2107: diagram, description
The VAZ two thousand one hundred seven car is equipped with a dashboard, which is necessary for the driver to monitor the state of movement and just right to notice malfunctions. When driving a car, the driver must monitor not only the road surface, but also the condition of the main parts of his own vehicle. These main parts include:
- movement speed;
- motor temperature;
- presence of fuel in the tank;
- amount of oil in the engine.
And these are just the main points that the driver watches while the car is moving. This article will tell you about the main elements of the device panel, which will be discussed in the diagram below.
Interior lighting
- Use a screwdriver to pry up the lampshade on one side and remove it. It is detached entirely, complete with button and lamp.
- Loosen the clamps holding the bulb base and pull it out. We replace it and collect everything.
The main thing is not to use too much force when installing the lampshade in place. All fasteners are plastic, you can damage them and end up having to buy a new part.
Illumination of the glove box (glove compartment)
- Open the lid and use a screwdriver to unscrew the screws, shown in the photo
- We take out the inner casing of the glove compartment and gain access to the backlight
- We take out the socket with the light bulb from the limit switch housing
- We press on it and turn it 90 degrees so that the “antennae” come out of the fastenings, take it out and change it.
Assembly occurs in reverse order.
Instrument panel lighting
- We disassemble and remove the instrument panel to get to the board with the lighting and alarm lamps. You can change them without completely removing it, but you need to act carefully so as not to break the wiring
- Turn the light bulb socket that needs to be changed a quarter turn and remove it.
- The lamp is pulled out in the same way as the socket - by turning it 90 degrees.
Video instructions for replacing instrument panel light bulbs on a “classic”:
In some modifications of the VAZ 2107, baseless lamps can be used. Therefore, it is better to check which ones you have installed, buy them, and only then disassemble the dashboard. Such a light bulb is simply pulled out of the socket without rotation.
You can buy it on the market together with cartridges for installation in a panel. In this case, it is enough to remove it from the “tidy” board and install a new light bulb assembly with a socket - simple and reliable, but they are more expensive.
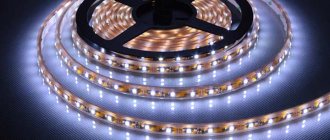
Why do you need additional lighting?
Today, car tuning is carried out not only outside, but also inside its interior, and there is no better place than the dashboard. Diodes built into the panel will allow you to achieve the following positive aspects:
The easiest way to illuminate such an element of a car as the dashboard is to install diodes in it. The following types of LED products can be used here:
Note! Additional lighting of the dashboard created with the help of such diodes allows them to be built into almost any part of the board. As a result, the lighting will fully meet the car owner’s requirements and provide illumination where it is really needed.
Instrument panel - removing and replacing lamps
Location of lamps on the instrument panel: 1 — fuel reserve indicator lamp (A 12-1.2 (W1.2W); 2 — instrument illumination lamps (AMN 12-3-1 (T3W); 3 — turn indicator indicator lamp (A 12-1.2 (W1.2); 4 — warning lamp for malfunction of the engine management system (A 121.2 (W1.2); 5 — warning lamp for turning on the external lighting (A 12-1.2 (W1.2); 6 - indicator lamp for insufficient oil pressure (A 12-1.2 (W1.2); 7 - indicator lamp for turning on the parking brake (A 12-1.2 (W1.2); 8 - indicator lamp for turning on the high beam headlights (A 12-1.2 (W1.2); 9 - battery charge indicator lamp (A 12-1.2 (W1.2)
1. We prepare the car for operations (see “Preparing the car for maintenance and repair”).
2. Disconnect the wire from the negative terminal of the battery (see “Battery - removal and installation”).
3. Using a slotted screwdriver, remove the handles from the heater control levers.
4. Unscrew the nut securing the trip odometer reset handle. Remove the nut and washer and push the handle into the space behind the panel.
5. Using a thin slotted screwdriver, pry up and remove the screw plug for fastening the shield, located on the right edge of the block of control levers for the interior ventilation and heating system.
6. Use a Phillips screwdriver to unscrew the self-tapping screw.
7. Remove the shield from the panel.
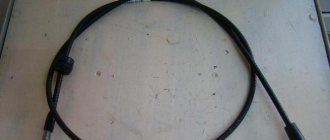
8. Unscrew the knurled nut of the speedometer drive cable and disconnect the cable.
9. Remove the vacuum supply hose from the econometer fitting.
10. Disconnect the three colored connectors of the wiring harnesses.
11. Remove the instrument panel.
Replacing the instrument backlight lamp
1. Having turned the lamp socket 90° until its protrusion coincides with the slot in the board, remove the lamp socket.
2. By pressing and turning 90°, remove the lamp.
Replacing warning lamps
1. Having turned the lamp socket 90° until its protrusion coincides with the slot in the board, remove the lamp socket.
2. Replace the lamp together with the socket.
Installation of all removed parts is carried out in reverse order.
Removing the instrument panel and preparing for replacement
As mentioned above, for all work on electrical equipment, it is necessary to disconnect the power supply from the battery. Including when removing the dashboard and performing manipulations with it.
To remove the panel you will need a minimum of tools:
- Phillips screwdriver;
- flat screwdriver;
- pliers.
First, remove the plastic tips from the interior heater control levers using a flat-end screwdriver.
Using pliers, unscrew the nut from the trip odometer reset handle.
On the front part of the panel near the interior heater control levers, open the plug using a flat-head screwdriver.
Using a Phillips screwdriver, unscrew the screw that secures the decorative panel to the car frame.
We move the right side of the panel to the side and towards ourselves. The flexible speedometer drive is visible inside.
Unscrew the nut by hand and pull out the end of the drive cable. Remove the pipe connected to the econometer. Disconnect the electronic wires going to the instrument panel and the three wires going to the electronic heater switch.
We turn over the panel together with the decorative overlay, turn it over, and unscrew the four screws that secure it to the overlay. After which the panel can be removed and the bulbs that have burned out can be replaced.
Replacing instrument panel backlight lamps on a VAZ 2107 car - removing/installing the dashboard
Removing the instrument panel from a VAZ 2107 car
1. We prepare the VAZ 2107 car for operations (see “Preparation of the VAZ 2107 car for maintenance and repair”). 2. On a VAZ 2107 car, disconnect the wire from the negative terminal of the battery (see “Battery for a VAZ 2107 car - removal and installation”). 3. Using a slotted screwdriver, remove the handles from the heater control levers.
4. Unscrew the nut securing the handle for resetting the daily mileage meter of the VAZ 2107. Remove the nut and washer and push the handle into the space behind the instrument panel.
5. Using a thin slotted screwdriver, pry up and remove the self-tapping plug for securing the instrument panel, located on the right edge of the block of control levers for the interior ventilation and heating system.
6. Use a Phillips screwdriver to remove the self-tapping screw securing the instrument panel.
7. Take out the dashboard of the VAZ 2107.
8. Unscrew the knurled nut of the speedometer drive cable and disconnect the cable.
9. Remove the vacuum supply hose from the econometer fitting.
10. Disconnect the three colored connectors of the wiring harnesses.
11. Remove the instrument panel from the VAZ 2107 car.
Replacing the backlight lamp in the instrument panel of a VAZ 2107
1. Having turned the lamp socket 90° until its protrusion coincides with the slot in the board, remove the lamp socket.
2. By pressing and turning 90°, remove the lamp from the socket.
Replacing warning lamps in the instrument panel of a VAZ 2107
1. Having turned the lamp socket 90° until its protrusion coincides with the slot in the board, remove the lamp socket.
2. Replace the lamp together with the socket.
Installing the instrument panel on a VAZ 2107 car
Installation of the dashboard and all removed parts on a VAZ 2107 car is performed in the reverse order.
Dashboard of a VAZ 2107 car (location of lamps)
The dashboard of the VAZ 2114 is out of order, what should I do?
If on a VAZ-2114 car on the instrument panel none of the indicators installed on it work (speedometer, odometer, tachometer, fuel level and coolant temperature indicators), then the first thing the driver will have to do is check the integrity of fuse F3, which is located in the mounting block. If it has burned out, then before replacing it, you need to find the reason why it burned out, otherwise the newly installed new fuse will have the same fate as the previous one. Most often, fuses burn as a result of a short circuit.
Even if the fuse is intact, then do not be lazy to take it out and check the condition of the contacts. There are cases when the contacts oxidize, and the electrical circuit in this place is interrupted. After making sure that the fuse is intact, the next step is to check the ignition relay, which is located inside the car to the left of the steering column. It is attached to a pin upside down. In the block where this relay is inserted, you can try to short-circuit the power wires using a jumper. If the instrument panel comes to life, the ignition relay will have to be replaced.
If the ignition relay is working properly, there are only two possible reasons for the instrument panel not working: the ignition switch and the mounting block. Before installing the ignition relay on the VAZ-2109 car, the lock contacts burned quite often, and they had to be cleaned by disconnecting the contact group from the lock itself. After changes were made to the principle of supplying voltage to the ignition switch, its contacts began to burn very rarely, but the likelihood of this phenomenon still remained. On the mounting block, in its board, tracks may burn out; in order to see this, the mounting block will have to be removed from the car.
In addition to the reasons listed above, which can lead to failure of the instrument panel, it is also necessary to check the reliability of fastening the ground wire.
Remove the instrument panel and change the light bulbs
The control devices stopped working or they began to “confuse” the readings, the control lamps and lights do not light up - in this case the panel will have to be removed.
Preparing for work
Before starting work, you need to buy replacement light bulbs. You can choose standard ones with or without sockets, as well as LED ones. If it is necessary to replace the incandescent lighting elements responsible for the backlight, then you will need light bulbs of the AMN 12-3-1 (T3W) type. These are ordinary filament bulbs that are installed in the dashboard of VAZs from the factory. If it is necessary to replace indicator lights, then type A 12-1.2 elements are used. Are you choosing LED?
You don't need a lot of tools:
- flat screwdriver;
- Phillips screwdriver;
- pliers.
If you are going to disassemble the panel and repair it, you will additionally need:
- multimeter or probe;
- soldering iron from 40 Watt;
- solder and rosin;
- side cutters;
- small screwdrivers.
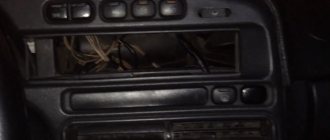
Removing the panel from the car
Using a slotted screwdriver, remove the plastic plug on which the heating sign is depicted. This plug is on the right, and under it there is a Phillips screw that needs to be unscrewed. (There are 2 screws under the plug, but only one needs to be unscrewed - the top one, which secures the right side of the dashboard).
Next to the hazard warning button, there is an odometer reset button, which is secured with a plastic nut. The nut must be unscrewed and removed with the washer located behind it. The button is recessed inside the panel.
The right side of the tidy is weakened at this stage, and it remains to perform several additional manipulations in order to completely dismantle the device. To do this, pull out the right side of the device, thereby freeing access to its rear part. Here you need to disconnect all the chips and wires to perform dismantling.
Initially, the power chips for the stove button are disconnected. Be sure to remember the location of the wires. It is recommended to take photos so as not to be confused when assembly is carried out. Next you need to disconnect the speedometer cable. It is secured with a special nut, which can be unscrewed by hand.
All chips connected to the dashboard are disconnected. It is almost impossible to confuse their locations, since they have different fastenings and differ in size.
The supply hose is removed from the economizer fitting. This cable is located on the left side of the device. After all the chips, cables and wires are disconnected from the device, you can dismantle it.
Determining what doesn't work
If the backlight of the VAZ 2107 dashboard does not light up, this may be due to the following factors:
Faulty incandescent lamps
This rarely happens, however, due to the fact that from the factory the lighting of the panel is realized through the use of incandescent lamps, their burnout periodically occurs. The problem can be fixed by replacing the lighting elements, or better yet, installing LEDs. To make a replacement, you will need to dismantle the instrument panel. This is not difficult to do, but it will take a lot of time to disassemble the shield. The panel contains lighting elements, which must be replaced in order to restore the functionality of the VAZ 2107 instrument panel lighting. Before replacing, you should first check the serviceability of each lamp. The design of the shield uses 4 main lighting elements, which are responsible for lighting, as well as additional ones that act as an indication. If you had to disassemble the panel, it is recommended to immediately change them to LED ones.
Brightness control
The malfunction may be hidden in the part that is responsible for adjusting the backlight intensity. Although this part fails extremely rarely, its malfunction cannot be ruled out, especially if it has been established that the incandescent lamps are in good working order and do not need to be replaced. The light brightness control is located directly on the right side of the steering wheel near the headlight range control. If diagnostics have shown that this particular part is the reason that the backlight does not light, then it should be replaced.
Circuit breakers
The search for the reason why there is no instrument lighting on the seven should begin directly with the fuses. These elements protect the circuit from voltage surges, and as soon as a large current flows in the circuit or a short circuit occurs, the fuse link blows. If such a malfunction occurs, replace the fuse and check the power circuit.
Absence or poor contact at the point where the chip connects to the power wire
The reason for the lack of contact may be that the chip is not tightly pressed to the terminal block of the instrument panel. Poor contact occurs when contacts become oxidized. You can fix such breakdowns yourself by cleaning the contacts from oxides.
In addition to the main faults, there are additional ones, for example, damage to the power cable. If you have a multimeter in your arsenal, then identifying such a malfunction will not be difficult. Even if you don’t have a multimeter, it’s not at all necessary to contact a car service to fix the problem; you can use a probe with a light bulb.
How to fix the dashboard backlight on a VAZ 2107?
One of the breakdowns that does not directly affect the operation of the car, but causes a lot of problems for the driver - the backlight of the VAZ 2107 device panel does not work. During the day the problem is unnoticeable, but at night the missing backlight significantly complicates driving your VAZ 2107. Because of this If a malfunction occurs, it becomes impossible to see the readings of the main devices: tachometer, speedometer, econometer, fuel level indicators, charging level, cooling water temperature.
The reason that the dashboard backlight of the VAZ two thousand one hundred seven does not glow is most likely the failure of incandescent lamps. As follows, to eliminate it, you will need to replace the damaged light bulbs with new ones. The task is easy and requires a minimum of tools and abilities. But, in order to gain access to the bulbs, you will have to remove the entire dashboard. Armed with a flathead and Phillips screwdriver, you can get to work by first removing the positive terminal from the battery.
First, you need to remove the plastic handles from the heater valve and air damper control levers and unscrew the nut securing the day counter reset handle so that they do not interfere with removing the VAZ 2107 dashboard.
Next, you need to use a Phillips screwdriver to unscrew the screw hidden behind the plug next to the above-mentioned levers. The device panel is freed, it remains to perform a few usual manipulations to remove it one hundred percent and begin the repair:
- Unscrew the speedometer cable nut;
- Disconnect the hose from the econometer;
- Disconnect the three electronic connectors.
After that, we remove the device panel of the VAZ two thousand one hundred seven and begin replacing the failed light bulbs. Everything is quite simple here, we take out the burnt out ones and install new ones in their place.
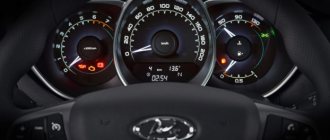
Thus, at VAZ two thousand one hundred seven, both the backlight and control lamps are replaced. Their location diagram is shown in the following figure.
Here the number two denotes the instrument panel backlight lamps. Other lamps are control lamps:
- Fuel level;
- Direction indicators;
- Engine control systems;
- Turning on the side lights;
- Engine oil pressure;
- Activation of the handbrake;
- Turning on the high beams;
- Battery charge.
It must be emphasized that many car owners, having reached the device panel of the VAZ 2107, do not bother with obvious repairs and do backlight tuning. To do this, instead of ordinary light bulbs, LEDs of the appropriate size are installed. Thanks to this modernization, the lighting works better. You just need to choose the right resistance (resistor) to be connected in the circuit alternately with the LEDs. In addition, you can glue elegant scales to instruments instead of gloomy standard ones. Another option for implementing LED backlighting is to install the lighting parts not in standard places, but along the perimeter of the panel. This method requires huge financial costs, and the result is more beautiful.
The instrument panel is assembled in the reverse order:
- Alternately connect the electronic connectors, the econometer hose, and the speedometer cable;
- Install the panel in its regular place;
- Fix it with a screw and put the plug in place.
- Put the handles in place and secure the daily counter reset handle with a nut.
As a result, the lighting of the devices works, the task can be considered completely completed.
Brightness control
This is a variable resistor, located to the right of the control wheel, near the clock. With its help, the intensity of illumination of devices and control lamps is changed. It fails occasionally, but from time to time it fails.
To check the regulator, you need to remove the plastic insert where it is located along with the clock and cigarette lighter. Pry it off with a flathead screwdriver. Then disconnect the power supply and remove the plastic round handle by pulling it towards you. Using a socket wrench, unscrew the nut securing the regulator to the liner and remove it.
The functionality of the regulator can be checked using a multimeter. If the resistor is faulty, replace it with a new one.
It should be understood that when working with electrical equipment, you need to disconnect the power supply from the battery.