VAZ 2114. I sat down today, warmed it up for about 20 minutes. The car was parked on the street all day and even the doors were frozen. Cleared the snow. -Sensors on the dashboard stopped showing (all at zeros) and the windows with mileage and hours were empty.
-The turn signals do not work (they do not sound or flash), but the emergency lights work.
-The front windshield wipers do not work, but the rear wipers work.
-Window regulators do not work (the diodes are on, but there is no reaction)
I think the fault is in the relay or the board itself. or something more serious. Share your experience. Thank you very much in advance!
The search for possible reasons why the VAZ 2114 instrument panel may not work periodically worries one or another owner of cars of this model. It’s clear that if you don’t see a single parameter on the dashboard, you can only drive, as they say, by touch. True, there are certain specialists who still managed to somehow crawl to the base without all the evidence, but somehow I don’t want to follow their example.
And is it necessary to create possible troubles for yourself and increase the risk of getting into an accident? I think no! In today's article I want to tell you about the possible causes of a malfunction in the VAZ 2114 dashboard, and give some ways to repair it yourself.
VAZ 2114 – why doesn’t the dashboard work?
Why does the VAZ 2114 dashboard not work? There can actually be many reasons, here are some of them:
- Blown fuse
- Burnt tracks on the board cannot be repaired. In this situation, everything can be solved by installing a new circuit. You shouldn’t be afraid of this, its cost is not high, and you can replace it yourself.
- A break in the electrical wiring can be called the most complex, unpleasant and difficult to identify type of breakdown. In this case, power is not supplied to the instrument panel or one of the indicators, and it stops working. The fault is determined using a multimeter. The required wire is called back, the location of the break or poor contact is determined and, if necessary, replaced or cleaned.
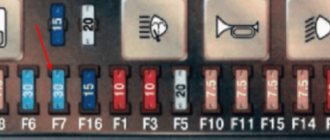
Wiring diagram VAZ 2114 injector - mounting block
Wiring diagram of the mounting block VAZ 2114 injector 8 valves with a full description
K1 - relay for turning on headlight cleaners; K2 - relay-interrupter for direction indicators and hazard warning lights; K3 - windshield wiper relay; K4 - lamp health monitoring relay; K5 - power window relay; K6 - relay for turning on sound signals; K7 — relay for turning on the electric heating of the rear window; K8 - headlight high beam relay; K9 - relay for low beam headlights; F1-F20 - fuses; X11 - terminals of the wiring harness block. The power supply circuit of the injection systems is protected by a fuse-link made of wire with a cross-section of 1 mm. Powerful consumers (starter, headlights) are connected to the VAZ 2114 injector wiring diagram via a relay.
F1 (10A) - Headlight cleaners. Relay for turning on headlight cleaners (contacts). Valve for turning on headlight washers.
F2 (10A) - Direction indicators and hazard warning relay-breaker. Hazard warning lamp.
F3 (10A) - Rear lights (brake lamps). Interior lighting.
F4 (20A) - Rear window heating element. Relay for turning on the heated rear window. Socket for portable lamp.е
F5 (20A) - Electric motor of the engine cooling system fan and switching relay (contacts). Sound signal and relay for its activation.
F6 (30A) - Power windows for front doors. Relay for turning on electric lifts.
F7 (30A) - Headlight cleaners (in operating mode). Relay for turning on headlight cleaners (winding). Heater fan motor. Window washer motor. Rear window wiper motor. Rear window washer timing relay.
F8 (7.5A) - Left fog lamp.
F9 (7.5A) - Right fog lamp.
F10 (7.5A) - Left headlight (side light). Left rear light (side light). License plate lights. Engine compartment lamp. Instrument lighting lamps. Indicator lamp for external lighting. Heater lever illumination display.
F11 (7.5A) - Right headlight (side light). Right rear light.
F12 (7.5A) - Right headlight (low beam).
F13 (7.5A) - Left headlight (low beam).
F14 (7.5A) - Left headlight (high beam). Indicator lamp for turning on the high beam headlights.
F15 (7.5A) - Right headlight (high beam).
F16 (15A) - Direction indicators and relay-breaker for direction indicators and hazard warning lights (in turn indication mode). Turn signal indicator lamp. Rear lights (reversing lamp). Gearmotor and windshield wiper activation relay. Generator excitation winding (when starting the engine). Oil pressure warning lamp. Air damper control. Coolant temperature gauge.
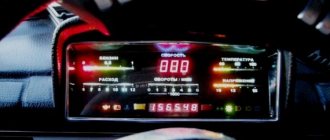
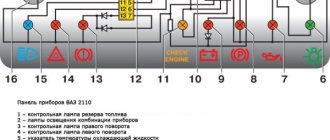
The VAZ dashboard has an electronic combination, as well as conveniently located backlighting. The lamps are illuminated from the inside, which is a feature of the 14th Lada.
Thanks to the instrument panel, the driver knows all the information he needs, what is the reserve and consumption of gasoline, mileage, etc. The panel should be easy to operate with a clear overview of the icons, scale, gauge and indicators.
What is the state of the automobile systems responsible for road safety, driving speed, the rest of the way to the intended object, rational engine operation and gasoline consumption, the operation of the suspension and electrical equipment - all this should be reflected on the control panel.
Signal lamps and equipment control devices must be required on the panel. There are a total of 19 symbols on the panel.
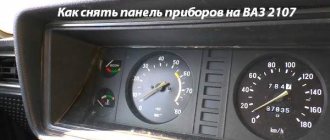
The dashboard of the VAZ 2114 is out of order, what should I do?
If on a VAZ-2114 car on the instrument panel none of the indicators installed on it work (speedometer, odometer, tachometer, fuel level and coolant temperature indicators), then the first thing the driver will have to do is check the integrity of fuse F3, which is located in the mounting block. If it has burned out, then before replacing it, you need to find the reason why it burned out, otherwise the newly installed new fuse will have the same fate as the previous one. Most often, fuses burn as a result of a short circuit.
Even if the fuse is intact, then do not be lazy to take it out and check the condition of the contacts. There are cases when the contacts oxidize, and the electrical circuit in this place is interrupted. After making sure that the fuse is intact, the next step is to check the ignition relay, which is located inside the car to the left of the steering column. It is attached to a pin upside down. In the block where this relay is inserted, you can try to short-circuit the power wires using a jumper. If the instrument panel comes to life, the ignition relay will have to be replaced.
If the ignition relay is working properly, there are only two possible reasons for the instrument panel not working: the ignition switch and the mounting block. Before installing the ignition relay on the VAZ-2109 car, the lock contacts burned quite often, and they had to be cleaned by disconnecting the contact group from the lock itself. After changes were made to the principle of supplying voltage to the ignition switch, its contacts began to burn very rarely, but the likelihood of this phenomenon still remained. On the mounting block, in its board, tracks may burn out; in order to see this, the mounting block will have to be removed from the car.
VAZ-2114 - searching for the cause of tachometer failure
To find out why the device in question does not work, diagnostics should be carried out. For this you will need a multimeter. With its help, first of all, ring the wire that supplies power to the VAZ-2114 tachometer, and then ground. This way you can easily detect a break in the electrical network. The tester should be set to ohms.
Before testing the circuit, make sure the multimeter is operating at up to 20 volts direct current.
Please note that the minus is always present in the circuit, but the plus appears only when the ignition is started. In this case, the tester will show pulses (regular voltage surges) if the crankshaft is spinning
During this process, be sure to inspect all connectors and make sure that the wires attached to them are held properly.
A blown fuse is the most obvious reason when the tachometer suddenly fails, and along with it they “die”:
- odometer;
- speedometer;
- sensor that monitors coolant temperature;
- fuel level indicator.
In this case, they function normally:
- panel lighting;
- indicators;
- multimedia center;
- optics;
- ignition.
With such symptoms, you should first look at the fuse, indicated in the diagram as F3. Its location is the mounting block. Keep in mind that installing a new one without finding out the reason for the burnout of its predecessor is pointless. Most often the culprit is a short circuit. Experts have noticed that old VAZ model 2114 very often puzzles its owners with this breakdown after washing.
Even if you do not find a short circuit, do not rush to forget about the fuse. Check the condition of its connector. It may burn, oxidize, or become dirty. All this creates a high contact resistance, which overheats the fuse-link and contributes to its destruction.
Dashboard VAZ 2114 – autotest
Some VAZ cars have a “dashboard check” function, which allows the arrows to make a full turn from start to finish. Such an auto-test of the tidy when the ignition is turned on is available on some foreign cars (Nissan, Subaru). In this article we will tell you how to do an automatic test of the instrument panel on a VAZ. Let's start with the fact that it is not possible to implement the function of checking the tidy when you turn on the ignition on every model. If you turn on the ignition while holding the mileage reset button and the arrows describe an arc, then this panel will work. As a rule, such calibration of the instrument arrows is available on AutoPribor models with one window (single-line), but again not on all versions. To modify the instrument panel you will need:
- Electromagnetic relay, small-sized (12V). For example, Tianbo HJR 1-2C.
- Transistor KT 503. Can be replaced with almost any npn structure.
- Capacitor 100uF, electrolytic (16V).
- Resistors for 1koma, 6.8koma, 22koma.
The principle of operation of the circuit: the relay, with its normally closed contacts, closes the tidy button. When you turn on the ignition, the circuit starts working after half a second, and then turns on the relay, which opens the button.
This test of arrows and dashboard indicators is already available on all modern models. The only thing is that it acts differently on different samples. For example, there may be 1 pass of the arrows, or three, or until the button is pressed, or even a pass only up to half the scales. The speed of the instrument panel arrows also depends on the manufacturer and version of the device. In other words, an autotest is a test button that automatically activates when the device is turned on. If there is a test during the standard test, then there will be one during the autotest. Therefore, doing an auto test of the VAZ 2114 dashboard is not a problem.
Checking the cigarette lighter
Everything is quite simple, this work is unlikely to cause any difficulties even for a novice driver. First of all, you should turn off the power to the car. Then remove the cigarette lighter from the socket. This must be done carefully so as not to damage the contacts. When the mechanism is in your hands, visually inspect it, are there any traces of burning on it? If everything is fine with it, and there are no obvious problems, then you will have to eliminate the consequences of the short circuit. Since this is the only relevant problem in your case that prevents the normal functioning of the devices on the panel.
The situation when the instrument panel on a VAZ-2112 does not work is not uncommon for the domestic automobile industry. Any transport has its shortcomings and disadvantages. For this reason, the owner of a VAZ-2112 has no choice but to independently identify and fix the malfunction, or seek support and assistance from a service station.
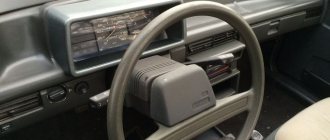
How to disassemble the dashboard of a VAZ 2114
Before embarking on this complex process, the driver must carefully familiarize himself with the design and arrangement of the instrument panel on his car. When disassembled down to the cogs, it looks like this:
If you carefully study this diagram, it becomes clear how to remove the panel on a VAZ 2114. Having determined the order for yourself, you can begin the process.
- Using a Phillips screwdriver, you need to unscrew the three screws holding the left console screen. For convenience, when doing this work, it is better to use a screwdriver with a short handle and blade.
- When removing the screen, carefully remove the lower edge of the trim from the body bracket.
- The right console screen is secured with five self-tapping screws. Using a Phillips screwdriver, carefully unscrew all the screws while holding the trim with your hand.
- Remove the screen without allowing it to get caught in the wiring harnesses that are hidden behind it.
- Disconnect the ground from the battery by disconnecting the connectors. If your car has a radio, disconnect it from the main bundle of wires by pulling out the connecting connector. If there is no radio installed on the car, then simply pull the wires out of the panel; they should be closed with a plug. Be sure to turn off the cigarette lighter and remove the socket with the ashtray light bulb.
- Remove the handles from the heater damper control levers. To make the process easier, pry them off with a flat-head screwdriver.
- Despite the apparent simplicity of this item, removing the handles from the levers can take a lot of time. To do this, a clear example is given of how this should be done on a removed unit.
- Remove the electric heater fan handle by simply pulling it towards you.
- Unscrew the cross-head screws securing the instrument panel to the brackets on the right and left with a screwdriver
- In the window on the instrument panel, where the instrument unit is located, there are two self-tapping screws at the top and two at the bottom - under the window. It is necessary to turn them out, loosening the cover (2) and the shield (8).
- Pull out the plug and unscrew the screw located behind it
- Remove the two screws from the bottom that hold the trim and remove it.
- Having marked the wires suitable for the switches, disconnect them.
- Remove the bolts from the steering wheel bracket
- Using the “8” key, unscrew the screws of the lower bracket fastening.
- Unscrew the self-tapping screw and remove the light guide.
- Remove the fasteners from the heating control unit and remove the cartridges from the back of the unit.
- remove the decorative insert, removing all external parts.
- Unscrew the nuts with a key set to “21”.
- Remove the hydraulic corrector illumination.
- Unscrew the upper and lower fastenings of the panel, and remove the fastening to the cross member on the left side.
- Now you can remove the VAZ 2114 torpedo.
- Installation is in the reverse order.
Tachometer for beginners behind the wheel
A tachometer is not a mandatory vehicle equipment, and you can drive the car without it. But, despite this, it is popular among drivers, especially among “newbies” who still find it difficult to subjectively determine engine speed and navigate gearbox shifts.
Connecting and replacing a tachometer is not a simple operation, therefore, without the appropriate knowledge and experience, you should not do it yourself. It is better to contact a specialized station. Do not install devices that do not match the model of your car - this is fraught with false readings, at a minimum. Read more information about the tachometer circuit here.
Causes of malfunctions
There are a number of reasons why the instrument lighting of the VAZ 2114 may stop working correctly.
The most common of them are:
- light bulbs have burned out or diodes have failed (with LED backlighting);
- contacts and connectors have oxidized;
- fuses are blown;
- damage has occurred in the wiring itself;
- the integrity of the common contact board has been compromised;
- Lost contact with the “mass”.
In order to find out the exact cause, you will have to perform dismantling work and carry out diagnostics. You don’t need any complicated tools for this—it’s enough to have a simple tester (multimeter) or voltmeter.
Malfunctions
On modern VAZ models, fully electronic instrument panels are installed. When you start the engine, all indicator lights light up, and after 2-3 seconds they go out (if all systems are working properly). If, when you turn on the ignition, one or several light bulbs do not work, then you need to find out the reason by performing a number of characteristic actions.
If one or more lamps do not light, the first step is to replace the lamps themselves. All indicators of the VAZ 2114, like the backlight, are illuminated by LEDs, and during prolonged use they tend to burn out.
If replacing the lamps does not help, then the situation is much more serious. As you know, each indicator is responsible for some kind of system, and in the case when it does not work, the cause may be any element associated with the indicator light in one circuit. For example, if the battery charge sensor does not work, you need to check the entire circuit using a voltmeter, starting with the battery itself and ending with the terminals, high-voltage wires, etc. In the event that a short circuit or breakage of contacts occurs in the system, the corresponding light also does not light up.
Very often, a situation occurs when all indicators stop working at the same time. The reason for this failure is obvious - failure of the corresponding fuse. When you replace it, everything will fall into place.
If the speedometer or tachometer on your VAZ 2114 has stopped working, then there are not many options either. The first of them is a failure in the electrical system itself. To eliminate it, you need to remove the terminals from the battery for 10-15 minutes and install it back. Thus, the system crashes and reboots. If after these steps the device still does not work, then the reason is clearly not in the instrument panel.
Also, sometimes such a problem occurs - the panel backlight does not light up. In order to correct the current situation, you need to decide: how many lamps are not working - one, several, or all.
Diagnostic procedure
In order to remove the instrument panel, you will need a set of screwdrivers and two wrenches - 8 and 21.
The entire procedure is performed in the following order:
- Unscrew the three screws and remove the trim.
- Unscrew the five screws on the right side of the console and remove the screen.
- Disconnect the negative cable from the battery.
- Disconnect the wiring harness that goes to the cigarette lighter.
- Disconnect the heater fan mount.
- Unscrew the bolts responsible for fixing the steering block brackets.
- Remove the light bulb sockets, light guide and decorative insert.
- Remove the lamp responsible for illuminating the hydraulic corrector.
- Unscrew the screws of the top and bottom rows of the panel and completely dismantle it.
At this point, dismantling the panel can be considered complete. Now you can move on to finding the reasons why the instrument panel of the VAZ 2114 does not light up.
Once the panel is completely removed, you should cover the electrical circuit of the wires with protective material to prevent dirt and debris from getting on it.
Checking the electrical panel backlight system is performed as follows. First, all light bulbs are checked for functionality. If they are in good condition, all connector contacts are cleaned of oxides (they can be treated with kerosene or WD-40). After this, the serviceability of the wiring itself is checked - to do this, it is necessary to “test” it using a multimeter.
Characteristics of panel types
Content
The panel located in front of the driver, containing a set of warning lamps, is called a panel.
It has another name - torpedo and consists of the following components:
- The unit that records the speed of the car – the speedometer.
- A device that keeps track of the number of revolutions - a tachometer.
- Two indicators: coolant temperature and fuel level.
- Indicator lamps of different colors.
- Six separate lamps responsible for illumination.
- A number of backup sockets where lamps can be turned on.
- One red block. On the electrical diagram it has X
- Another white block, marked X
Europanel for VAZ 2110 Panel for VAZ 2110 old model
On the VAZ 2110 there are 2 types of dashboards: old model and Europanel.
The differences between them are as follows:
- old panels have a symmetrical arrangement of devices;
- In the Euro device, the fuel gauges and the amount of heating of the coolant are shifted to the right.
Panel backlight upgrade
If the original dashboard lighting of the VAZ 2114 does not suit you, you can always modify it, thus improving its functionality and making it more pleasing to the eye. The first thing you need to do is purchase a new set of light bulbs. It is best to opt for LED ones - they have lower power consumption, have a higher light output, and also make instrument readings more readable.
True, you should first calculate the required number of LEDs to illuminate each device and alarm icon (there are 13 regular light bulbs in the dashboard, but more LEDs may be required. In case the replacement is made not with individual LEDs, but with LED blocks (lamps) , then their number will also be 13).
The process of upgrading the panel backlight is performed in the following order:
- dismantle the block;
- unscrew (counterclockwise) the original sockets, install the sockets for the LED backlight;
- install resistors and lamps in special sockets;
- bring the wires from the backlight to the common board and fix it on it;
- check the functionality of the new backlight;
- If everything works, reassemble it.
During such tuning, you should definitely monitor the condition of the instrument needles - they are a rather fragile element and, if handled carelessly, can easily bend, break or deform, as a result of which instrument readings may be incorrect. In addition, upon completion of the entire process, you should check whether the arrows are set to “zero” and, if necessary, adjust their readings.
Also, immediately after completing the installation of the new backlight, you should check the functionality of all electronic devices and components using the on-board computer. If all identifiers work correctly, then you can reinstall the instrument panel (proceeding in the same order as its dismantling (see above), but in reverse order).
Let's look at the problem: the backlight of the VAZ 2114 instrument panel does not light up
An element such as the dashboard is very important for the driver - because it is thanks to it that he can control the most important parameters of his car while driving. And that is why a serviceable instrument panel ensures not only comfortable driving, but also the safety of the motorist and his passengers.
For a clearer perception of instrument readings on the panel, especially at night, it has a built-in backlight. True, situations often occur when the backlight of the VAZ 2114 fails. We’ll talk about why this happens and how to restore its functionality with your own hands below.
Additional recommendations
If the dashboard on a VAZ 2114 does not light up, then the reasons for this are most often quite simple. In most cases, this is caused by oxidation of the contacts, and a little less often - by burnt-out light bulbs. Damage to wires and electronic components is quite rare.
That is why, before checking the entire electrical circuit of the dashboard, you must first clean all the contacts, even if they do not seem oxidized, and also test replace the light bulbs with new ones.
Sometimes the problem may be the wear of the cartridges themselves, in which case they will need to be replaced as well.
Main conclusions
When the dashboard on a VAZ 2114 does not light up, it is important to correctly remove the unit, conduct a detailed inspection of the instruments, examine them under a magnifying glass, check the condition of the fuse, and then check the correct power supply to the panel. Then ring the backlight lamp tester and if the fuses or LED lamps are faulty, replace the faulty unit according to the sample and technical specifications of the equipment.
Before replacing the light bulbs in the instrument panel of the VAZ 2114, it is necessary to remove the battery terminals, disassemble the decorative trim of the instrument panel and remove the shield. After troubleshooting work has been completed, it is necessary to check the contacts of the devices. To do this, you need to press the reset button and hold it for a few seconds, turning on the ignition before this action. When all the indicator arrows have checked from zero to maximum values, the VAZ 2114 instrument panel is assembled correctly and is ready for installation in its original place.
Every car owner must follow safety rules when working with vehicle mechanisms and correctly adjust the operation of all units to avoid breakage and damage to parts. Conduct equipment diagnostics in a timely manner, eliminating faulty elements accompanied by qualified support or directly at technical service points.
The dashboard is the driver’s first indicator of the car’s health, as well as a way to control various on-board systems. During the day, by and large, the instrument lighting is not needed, but at night it is a necessary component for safe driving. Thus, a malfunction of the backlight can even lead to an accident, so if a malfunction occurs, it must be eliminated as soon as possible.
Hard case
Until now, situations have been sorted out when the torpedo still showed some signs of life. If non-working power windows, turn signals, and windshield wipers have been added to the devices, the issue is no longer a matter of relays and fuses.
There may be 2 options:
- The contacts on the ignition switch are burnt. In principle, after installing the relay (even on the VAZ-2109 version), this problem rarely arises. However, the possibility remains. The lock is removed, the contacts are checked and, if necessary, cleaned;
- Mounting block. There may be burnt tracks on its board. The only thing that will save you is replacing it with a new one. However, the cost is by no means astronomical, and the installation is available as a standalone option.
VAZ turn signal relay - do-it-yourself diagnostics and replacement
Turn signals are perhaps a very important part of any vehicle. Carrying out maneuvers on the road becomes quite a dangerous task if the turn signals do not work. The VAZ 2107 turn signal and hazard warning relay is responsible for the correct operation of the direction indicators. This device is used on all cars of the classic family. Let's consider why a turn signal relay is needed, how is a relay malfunction determined and how is it replaced?
Purpose of the turn signal and hazard warning relays
Everyone knows that direction indicators and hazard warning lights blink during operation. This is necessary in order to attract the attention of other traffic participants. The flickering of lamps cannot be confused with any other signal supplied by lighting devices.
A small device called a turn signal relay . In addition to the blinking of the turn signals, the relay provides another function - creating the necessary sound signal (click), which indicates that the turn signals are in operation.
The Zhiguli used two types of relays, which differ both in their design and in their operating principle.
- The first type is an electromagnetic type relay , which is mounted in the engine compartment of the car. The basis for the operation of the electromagnetic thermal relay is a special nichrome string, which, when heated and cooled, closes and opens the direction indicator circuit. These types of relays were used on early models of the “classic” family: VAZ 2101-2102 and VAZ 2103.
- The second type of relay began to be used on VAZ 2106 and higher vehicles. It is an electronic circuit built on semiconductor circuit elements. In addition to semiconductors, the relay also includes an electromagnet, which performs the functions of closing and opening. The frequency of operation of the electromagnet (or flickering of lamps) is achieved using a “key”, or a special electronic circuit.
Diagnostics of malfunction of the direction indicator relay VAZ 2107
If one day the turn signals stopped working. It's time to check what happened and, if possible, replace the faulty part of the circuit. Malfunctions of the turn signal relay can be recognized by several signs:
- The turn signals light up but do not flicker . This directly indicates a breakdown of the relay, or rather, its electromagnetic part. In this case, the electromagnet has closed in one of the positions and cannot return to its original state.
- The turn signals blink too quickly or too slowly . This can happen, but not only due to the fault of the turn signal relay. Sometimes the flickering speed of lamps can change if the turn signals use lamps that are not of the same power as those specified by the manufacturer. However, it wouldn't hurt to install a new relay as a test.
- The turn signals don't work at all . This means that the turn signal lamps and the lamp on the dashboard do not blink and there are no corresponding relay clicks. However, as in the second case, the malfunction does not always concern the turn signal relay. Sometimes the reason is a faulty hazard warning button.
Hard case
Until now, situations have been sorted out when the torpedo still showed some signs of life. If non-working power windows, turn signals, and windshield wipers have been added to the devices, the issue is no longer a matter of relays and fuses.
There may be 2 options:
. In principle, after installing the relay (even on the VAZ-2109 version), this problem rarely arises. However, the possibility remains. The lock is removed, the contacts are checked and, if necessary, cleaned;
. There may be burnt tracks on its board. The only thing that will save you is replacing it with a new one. However, the cost is by no means astronomical, and the installation is available as a standalone option.
Turning relay for VAZ-2107
Every car has turn signals, the main purpose of which is to inform other road users that a maneuver is being performed or intended to be performed.
If your car's turn signals are not working, it greatly increases the likelihood of an accident when maneuvering or changing lanes. Why don't turns work on the VAZ 2107? The causes of such a breakdown in frequent cases are nothing more than the turn relay.
Today we will pay attention to the question of how to replace this relay on the “seven”.
Purpose of the device
Initially, it should be noted that turns operate differently than other lights on a car. They operate in intermittent mode, which is ensured by a product such as the VAZ-2107 turn relay (breaker).
It should also be noted that in addition to intermittent operation, the turn relays emit audible signals in the form of clicks, which help the driver. By these clicks, the driver understands that the device is currently functioning.
In addition to the fact that the breaker is responsible for the functioning of the light alarm necessary for maneuvers, it also allows them to work in emergency mode. The VAZ-2107 uses an electronic relay, the blinking frequency of which lamps depends on the settings of the electronic circuit. Above is a photo of a modern electronic turn signal relay, which is used on VAZ-2107 cars.
Diagnosis of turn signal faults
If one day the turn signals stop functioning, this indicates that it is time to diagnose the car. To do this, there is no need to go to a service station, but you can do everything at home. The following signs indicate that the mechanism has stopped functioning:
- When turned on, the turn signals light up, but they do not flicker. This type of failure is directly related to the failure of the relay. To correct the problem, you need to replace the breaker.
- Accelerated or slow flickering of turn signals. Accelerated flickering indicates that the filament of one of the lamps has burned out. Slow flickering indicates that at least one lamp of higher power than recommended is connected to the circuit. With the advent of modern LED lamps, many motorists are eager to install them on their cars. When installing LED lamps in turn signals, they flicker too quickly, this is due to their low power consumption.
- The devices do not function at all. The reason may be a malfunction of the relay, fuse, steering column switch or hazard warning light button. The connection diagram is designed so that the power for the turn signals passes through the emergency light button. If the button is faulty, then the turns will not function.
Source: https://provaz07.ru/elektrooborudovanie/rele-povorotov-vaz-2107.html