The VAZ 2110 panel or the “tens” dashboard has become a new word in the interior design of Lada cars. Despite its interesting shape and ergonomic appearance, panel 2110 eventually begins to make a lot of unnecessary sounds when the car is moving. This is especially noticeable on cars with high mileage. Therefore, very often the “tens” torpedo is completely disassembled in order to carry out total sound insulation and eliminate squeaks.
Let's say right away that disassembling the VAZ 2110 panel is not difficult in principle, but it is a very labor-intensive job that requires time and attention. The fact is that to remove the panel you will have to completely unscrew the steering wheel and disconnect a lot of electrical connectors. In order not to damage the electrics, before disassembling the VAZ 2110 dashboard, be sure to disconnect the battery . This is how the “tens” panel looks schematically.
This figure shows in detail, in the smallest detail, all the fasteners of the VAZ 2110 panel.
- 1 – panel
- 2 – side nozzle for ventilation and heating of the cabin
- 3 – instrument panel trim
- 4 – cover fastening screws
- 5 – panel fastening screws
- 6 – box
- 7 – console trim
- 8 – cover
- 9 – instrument panel panel
- 10 – mounting block cover
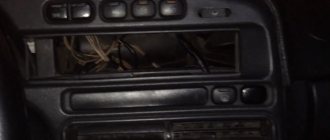
If you remove the panel completely, then only this should remain, look at the photo -
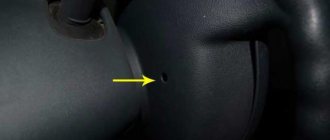
The red arrows indicate where the nuts and screws are attached, and the two large white arrows indicate the special mounting pins. When installing the panel, it must be installed on them; they serve to center the dashboard relative to the body.
Removal and installation of VAZ 2110 panel
Below are step-by-step instructions for removing the “tens” dashboard.
- Disconnecting the battery
- Remove the steering wheel and steering column switches
- Be sure to remove the top lining of the floor tunnel
- Remove the glove compartment and unscrew the mounting screws
- Remove the headlight hydraulic adjustment handle by pulling it towards you
- Unscrew the hydraulic corrector nut and remove it
- Remove the upper side air duct deflectors by prying them up with a screwdriver
- Under the deflectors we find the panel fastening nuts, unscrew them
- We unscrew the screws from the bottom of the dashboard, next to the hood release lever, at the mounting block, in the niche of the glove box, etc.
- Now you can remove the door seals, remove the lining covering the front pillars
- Disconnect the electrical wiring terminals
- You can remove the panel by holding the steering column adjustment lever in the desired position
The fully unscrewed VAZ 2110 panel is supported by two guide pins (see photo above) with white arrows pointing to them. We assemble the panel in the reverse order.
Soundproofing panel VAZ 2110
To soundproof the “tens” dashboard, they mainly use bitoplast, modelin, sealant and even polyurethane foam. Bitoplast and modelin are used to cover plastic panels on a disassembled dashboard, which eliminates squeaks and improves sound insulation. Something like this in the photo below -
Bitoplast is glued with a special glue; when installed in place in the right places, this material is compressed where necessary. It is recommended to paste over the panel naturally from the inside.
Some craftsmen turn the front panel into an impregnable fortress for vibrations and squeaks using ordinary mounting foam. However, it is not recommended to use such a radical method without some experience. As a result, this is what sticks out from under the torpedo -
In addition to soundproofing the VAZ 2110 panel, it is necessary to carry out a similar procedure with the floor, roof, and doors. Such comprehensive sound insulation will ensure maximum acoustic comfort in the cabin.
In conclusion, I would like to say that there are two panels installed on the “ten”, old and new models. Photos of the old version can be found at the beginning of our article. A photo of the new version of the panel is attached below.
The most interesting thing is that a new-style panel or a Europanel for the “ten” can be installed instead of the old-style panel. In principle, they are interchangeable, but it is worth considering that along with the installation of a new panel, you will have to install a new instrument panel assembly, another ACS unit (automatic control system for interior heating) and add an electric heater damper drive. The mounting points of the old and new panels themselves are the same, so there are no problems with installation.
Add a comment Cancel reply
You must be logged in to post a comment.
Replacing the entire torpedo or its lining may be necessary not only because you don’t like it, and that’s that. Although this option is not the last one on the list of reasons, since the designers did not show too much imagination when developing the instrument panel.
Panel trim for old VAZ 2110
But not all car owners know how to do the replacement themselves, and also how to make the dashboard on a VAZ 2110 look cooler and more modern, and not squeak like an old cart, although they would certainly like to learn this. Let's start with the question: why might this be needed at all?
Panel trim VAZ 2110 Kashtan
Stylish and modern overlay
Many VAZ 2110 owners quickly get tired of the boring standard panel (in the video), but they don’t want to buy an alternative one, which is equipped with a computer and costs a lot of money. What to do in such a situation? There is an excellent option that will allow you to carry out economical tuning yourself. One of the easiest ways is to buy an overlay.
You can find them without any problems in online stores (the photos presented there give a general idea of such details). To install it, you need to remove the “tidy” and carefully pull out the arrows. When installing the arrows in place, you should make sure that nothing interferes with their movement. Otherwise, you will have to disassemble everything again.
If you add illumination of the scale and arrows to this tuning option, you can almost instantly transform your own car beyond recognition.
Reasons for disassembly
So, we have already almost indicated the first reason - I don’t like it. This may also be necessary in the following cases:
- For tuning. That is, when we try with all possible forces to correct the “face” of the car, which everyone sitting in the cabin is staring at, that is, the torpedo. To improve comfort and overall aesthetic appearance, you can install new linings, of which there are quite a few types today. The following linings are perfect for the VAZ 2110: • Euro 1, also known as Caprice. It looks nice, but it doesn't have a shelf on the passenger side;
Panel trim VAZ 2110 Euro-1
• Euro 2 – similar to the previous one, but with a passenger shelf;
Panel trim VAZ 2110 Euro-2
• There are trims that are installed directly on top of the instrument panel. Installing them yourself is not at all difficult. Among these, one of the most popular is Chestnut;
• In addition, you can order an exclusive trim that makes the interior similar to that of the Nissan Primera, with the instrument panel in the center.
Perhaps car owners will also find other reasons to replace the dashboard.
Let's prepare a new dashboard trim for installation
To do this, we cut off the remaining material of the Euro lining. There is no need to cut out any space under the dashboard, otherwise there will be a gap between the control column and the trim. In this place you simply need to make 2 cuts on the sides so that this part of the lining can be slightly bent as needed. Also, there is no need to cut off 10 mm from the sides of the lining in the area of the side air ducts; these places must be adjusted to the location.
We measure the panel overlay and adjust it as necessary. At this step, it is recommended to use anti-creak (soundproofing the panel). This way, you will insure yourself against squeaks in the future.
To install the dashboard in the Euro trim, you can use one of the methods:
- Use fasteners from the Euro lining kit.
- Use fasteners from an old lining (from drilling).
- We connect connectors and Europanel keys according to the instructions:
When the overlay is ready, let's try to install it. Fastening the Europlate in positions 1-7 of the diagram. We fix 35mm screws on top, which are then hidden under a plastic cover.
The advantage of this method is time. If you dismantled the panel, then you will spend no more than 3 hours changing the lining. If this is the first time you are faced with a similar type of work, then about five hours.
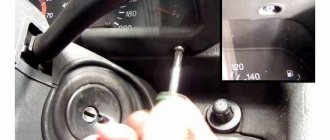
How to properly remove a torpedo on a VAZ-2110 without damaging it: step-by-step instructions
In the design of the VAZ-2110 car, the torpedo is the most revealing part. Every driver wants to sit in a beautiful and expensive interior while driving. But the factory panel has a moody, angular appearance. This becomes especially noticeable after using the car for a long time, when abrasions and scratches begin to appear on it.
Each driver solves this problem in his own way, some purchase a new factory dashboard, others install a panel from foreign car manufacturers. A beautiful trim from a third-party manufacturer allows you to decorate the interior to the level of a foreign car. Whatever option is chosen, you initially need to know how to remove the dashboard on a VAZ-2110 car in order to install another one.
The material from which the pad is made is much softer than the factory panel and is not surprising at the presence of a grinding noise while the machine is moving.
In most cases, motorists dismantle the standard panel precisely because of grinding and squeaking. There are several options for the updated panel for the VAZ-2110, which differ in their design. The panel is available for sale as a set:
- New version of the panel, significantly different from the factory design.
- Brackets, buttons, instrument panels and air vent inserts.
- Set of wires and block for switch.
- Buttons for low beam, fog lights, dimensions and heating.
- Special plugs that are installed in places where there are no buttons.
If disassembly is needed
Let us immediately note that if you have to replace the lining with a new one (the one you choose), then a complete disassembly may not be necessary for this.
But if noise insulation is planned due to the fact that the dashboard rattles when driving, then this cannot be avoided.
Disassembly work requires a lot of time and special scrupulousness. After all, if some fastening is spoiled or broken, then the new or tuned torpedo will not work as it should, it will creak and rattle unhappily while driving, spoiling the mood of the careless disassembler.
Dismantling algorithm
- We remove and remove the front seats from the interior so that they do not interfere with the disassembly;
- Disconnect power from the battery;
- We lower the steering wheel of the VAZ 2110 to the lower position;
- Unscrew the screws that secure the panel covers. These are two screws on both sides of the tunnel. Now you can remove the shield;
- We remove the plug on the tunnel in the center by prying it off with a screwdriver;
- We unscrew the screws of the central tunnel to remove it. Before doing this, disconnect the wires from the cigarette lighter;
- We remove the air duct for heating the interior of the VAZ 2110. To do this, having disconnected the cover from the gearbox, you need to pry off the latches with a screwdriver, then remove the air duct;
- We remove the central panel by unscrewing it from the floor;
- Now it is possible to disassemble the torpedo. First, unscrew the mount that holds the glove compartment, disconnect it from the backlight, and take it out;
- In the hole where the glove compartment was located, we remove the screws on both sides, as well as directly behind the glove compartment;
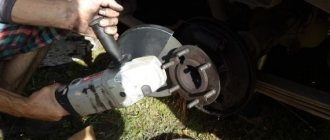
- We unscrew the VAZ 2110 torpedo mount with a key and a screwdriver;
- Near the left pillar we pull out the air duct by prying it with a screwdriver;
- With special care you need to remove the torpedo, supporting it with your hands while unscrewing the nut with a spanner. Then, lifting it up, remove it from the pins;
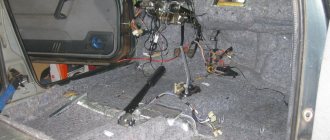
- Now you need to remove all the wires, marking them with a marker as you go so that you don’t get confused when reinstalling them;
- It became possible to replace the lining and carry out noise insulation work.
Car differences
Self-repair and replacement of pumps for VAZ 2110/11/12 cars
Lada Priora and VAZ 2110 are of course identical cars, but they also have differences. Car enthusiasts often find it difficult to decide which model to give preference to. But in any case, the Priora is a more modern car. Thus, the electric power steering gives greater comfort when driving a Lada Priora than driving a ten. In dozens, power steering was introduced only in 2006, and the VAZ-21104 immediately came from the factory with an electric power steering wheel. If someone comes across a ten with electric power steering, then know that it was installed by someone in a car service center.
A feature of the Priora steering is a large amount of play in the steering wheel, which takes some getting used to. At high speed, you have to “catch the car on the road,” as it were. Therefore, many drivers at the time gave preference to the VAZ 2110, which behaves more confidently at speed. But still, when cornering and when driving in a zigzag manner, the VAZ 21104’s movement is more comfortable and confident than that of its predecessor. The Priora behaves more dynamically at speed if an appropriate brace is installed between the supports of the front struts. In this case, drivers note improved handling.
The engines of both cars are reliable and simple. The Priora's engine has superior technical characteristics, but the eight and sixteen valve units do not differ much in the traction properties of both cars. Some will say one or the other is better, but in general we can say that they are all the same.
There is a little less transmission noise in the Prior and the cabin is probably a little quieter. But most likely this is due to the fact that the developers did a good job on sound insulation in the VAZ-21104.
And yet, driving in a Prior is quieter and more comfortable. The size of the car interiors is absolutely the same. The seats and all the plastics fit from one car to another. True, the seats on the Prior are a little higher. This fact will please small drivers and disappoint giants.
Priora at one time enjoyed enormous success in the post-Soviet space. In the Caucasian republics it was the best-selling car. In general, it is impossible to say with certainty which car is better and which is worse. Each person makes his own choice based on personal experience.
Noise Removal
Basically, the panel rattles both due to improper installation and because the three parts that make it up touch each other, which causes creaks and rattles in the cabin.
That is why sound insulation is necessary, which the manufacturers did not take care of properly, and it is up to the owner to finalize it. Modelin can be used as sound insulation. They can paste over:
- All places where three parts of the panel touch;
- Those parts of the panel where it comes into contact with the radio, on-board computer, etc.;
- All bolt holes are also covered with modelling. It won’t hurt to screw them in, but there will be additional sound insulation, as well as protection against heat loss;
- Sides of the glove compartment;
- "Black box" in those places where it comes into contact with the panel.
It is better to cover the back of the panel with bitoplast. There is advice - also use vibration material, but this is not necessary.
The remainder of the bitoplast can be placed at the bottom of the glove compartment. Now, sound insulation done by yourself will eliminate squeaks, and replacing the lining will be pleasing to the eye.
Repairing a VAZ 2110 is a broad topic, and part of it involves interior repairs. In this article we will talk about how to restore the panel (dashboard).
The tens panel consists of three parts:
Content
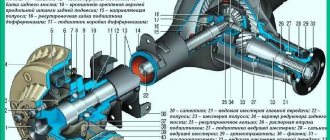
Actions in emergency situations Daily checks Operating instructions Warnings and technical rules Basic instruments, measuring Engine and its systems Transmission Chassis Steering Brake system Vehicle electrical equipment Body Interior ventilation and heating system Applications Fault codes Electrical circuits In 1996, production of a new family of front-
wheel drive VAZ cars began -2110. It is noteworthy that this is the only family of VAZ cars that did not receive a name, and therefore is sold under the factory index (even for the foreign market the model is simply called LADA 110). The family includes modifications in sedan (VAZ-2110, LADA 110), station wagon (VAZ-2111, LADA 111) and hatchback (five-door - VAZ-2112, LADA 112; or three-door - BA3-21123). In addition, there are various small-scale options, for example, the extended VAZ-21108 Premier or the VAZ-21104M - a sedan with different wings, hood, bumpers, and original door trim.
The new family was distinguished by good aerodynamics and original exterior and interior design. For the manufacture of body parts that are most susceptible to corrosion, galvanized metal is used, and fixed windows (windshield, rear and side) are glued into the body. Even sedans have a very spacious luggage compartment for their class, and hatchbacks and station wagons, in which the rear seat backs can be folded, can even be used to transport fairly large cargo, for example, a refrigerator.
Initially, only short-stroke carburetor 1.5-liter BA3-21083 engines with a power of 69 hp were installed on the “Ten”. With. however, quite soon this power unit gave way to a new generation of engines with distributed fuel injection and electronic control. New engines of 1.5 and 1.6 liters can have either two or four valves per cylinder, which affects their traction and economical qualities. This manual discusses the sixteen-valve VAZ-2112 (1.5L) and VAZ-21124 (1.6L) electronically controlled Bosch, “January” or GM engines currently installed on all models of the family, however, the description given is also fully suitable for repairing eight-valve engines installed previously. All engines are coupled with five-speed manual transmissions. In the basic configuration, cars of the “tenth” family can boast of a tweed interior, an immobilizer, central locking, electric windows for the front doors and athermal windows. More expensive trim levels are equipped with heated front seats, fog lights, an on-board computer, a velor interior (which some dealers call velvet) and alloy wheels. The list of equipment that can be installed upon request is completely unlimited: a set of plastic body kits, chrome door handles, a modified instrument panel, air conditioning, etc. The “Ten” can no longer be called a new product, but its maintainability is acceptable, as well as low prices and the availability of spare parts continue to make this car one of the most popular among buyers. Even after the production of the “tenth” family in Tolyatti was discontinued in 2007, production of the models resumed in Ukraine at the Automobile.
Like the VAZ, the Bogdan 2110 is well suited for long journeys on domestic roads - this is facilitated by good dynamic performance, comfortable suspension and low fuel consumption. The factory warranty for cars of the “tenth” family is 35 thousand km or 2 years, whichever comes first. Many official dealers also provide their own, longer warranty, while reducing service intervals by one and a half to two times. This manual provides recommendations for the repair and operation of VAZ/Bogdan 2110/2111/2112 cars with sixteen-valve injection engines of 1.5 and 1.6 liters.
1.5i Engine capacity: 1499 cm3
Doors: 4/3/5 Gearbox: manual
Stories from our readers
“Fucking basin. "
Hi all! My name is Mikhail, now I’ll tell you a story about how I managed to exchange my two-wheeler for a 2010 Camry. It all started with the fact that I began to be wildly irritated by the breakdowns of the two-wheeler, it seemed like nothing serious was broken, but damn it, there were so many little things that really started to irritate me. This is where the idea arose that it was time to change the car to a foreign car. The choice fell on the melting Camry of the tenth years.
Yes, I had matured morally, but financially I just couldn’t handle it. I’ll say right away that I am against loans and taking a car, especially not a new one, on credit is unreasonable. My salary is 24k a month, so collecting 600-700 thousand is almost impossible for me. I started looking for different ways to make money on the Internet. You can’t imagine how many scams there are, what I haven’t tried: sports betting, network marketing, and even the volcano casino, where I successfully lost about 10 thousand ((The only direction in which it seemed to me that I could make money was currency trading on the stock exchange, they call it Forex. But when I started delving into it, I realized that it was very difficult for me. I continued to dig further and came across binary options. The essence is the same as in Forex, but it’s much easier to understand. I started reading forums, studying trading strategies. I tried it on a demo account, then opened a real account. To be honest, I didn’t manage to start earning money right away, until I understood all the mechanics of options, I lost about 3,000 rubles, but as it turned out, it was a precious experience. Now I earn 5-7 thousand rubles a day. I managed to get the car buy after half a year, but in my opinion this is a good result, and it’s not about the car, my life has changed, I naturally quit my job, I have more free time for myself and my family. You’ll laugh, but I work directly on the phone)) If If you want to change your life like me, then here’s what I advise you to do right now: 1. Register on the site 2. Practice on a Demo account (it’s free). 3. As soon as you get something on the Demo account, top up your REAL ACCOUNT and go to REAL MONEY! I also advise you to download the application to your phone, it’s much more convenient to work from your phone. Download here.
- Top lining
- Central part (the most massive)
- The lower plastic cover, which is attached to the bottom of the central
Materials
So, you have disassembled the interior, so you can start gluing the surfaces.
Don’t rush to spend a lot of money buying all the materials that catch your eye. Especially in stores they like to “cook” something more expensive, despite the fact that there are a lot of cheaper analogues. You can listen to our advice, and this will allow you to save a lot from a financial point of view, but provide the car with high-quality sound insulation.
Material
Peculiarities