Replacing the instrument cluster and light bulbs in it for a VAZ 2110, VAZ 2111, VAZ 2112
Welcome! Composition of devices. on many cars, the composition of the devices differs from each other, in some it is not significant, and in others it is radically changed, but the interior in almost all remains the same, they just differ in appearance and the lights and indicators are the same. but the composition is subject to deformation and it can simply be damaged, and therefore, if you take some old cars, on every second car, the composition has already changed, despite this, the composition is a very important thing, because if something happens to the engine, then By composition you can only find it, find out the speed at which the car is moving, and without looking into the tank, you can also find out how much fuel is left in the tank only by looking at the combination of devices.
Note! To remove and install the combination, you will need: A screwdriver and pliers, if you have a standard torpedo, then you will do the work quite quickly and most likely no difficulties will arise!
How to replace the instrument cluster on a VAZ 2110-VAZ 2112?
Note! Over the entire period of production, cars of the tenth family were installed on cars of the tenth family, different compositions of devices, as well as torpedoes differed from each other, we will not disassemble all the panels, but will only touch on the standard torpedo that was used on most cars of the tenth family!
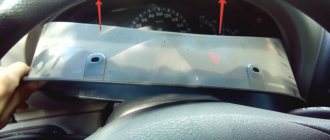
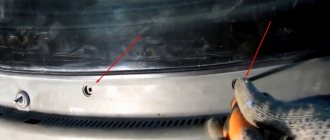
Removal: 1) To get to the composition of the devices, you will first need to remove the shield, since it prevents access to the composition, the shield is fastened with several screws (there are only 4 screws, two screws are located at the bottom and two more at the top, look more carefully at the photo below ), by unscrewing which, it can simply be removed from the car.
Note! There are buttons on the shield, you can NOT disconnect them, but simply when the screws are unscrewed, move the shield to the side (so as not to interfere), but if you need it to be completely removed from the dashboard, then pull these buttons and pull them out as This is shown in the photo below, push the connectors that are connected to them inward and remove the shield completely from the tidy (Lower the steering wheel completely down, use the lever at the bottom so that the shield does NOT rest against anything during removal)!
2) When the shield is retracted, using a Phillips screwdriver, unscrew the two screws that hold the device on the sides and straighten the claws into the two clamps using pliers (see small photo), remove the combination towards you, in the rear part two are attached to the composition The speedometer cable should also be disconnected from the connector, if you cannot get to it and it will hold the combination of devices (will not allow it to come out), then disconnect this cable from the box.
Note! The speedometer cable is not used in all cars of the tenth family, but only on carburetor cars, when installing the composition, be sure to connect it back, or if the central part of it is completely damaged (It has edges there, if they are torn off), then in this In this case, we will replace the cable with a new one!
installation: The composition is installed in the reverse order, if you need to change the light bulbs in it, use the photo and description of it a little lower, the lamps themselves are placed in the sockets, if it is necessary to remove a lamp, then first the socket will need to be removed from the composition ( This is done by turning the socket counterclockwise), and when you have it in your hands, simply grab the lamp with your fingers and remove it from the arrangement of devices and make a replacement.
Additional video: How to change compositions or light bulbs in it, you can see clearly in the video, which is located below:
Light bulbs in the dashboard of the VAZ 2110 Removal and disassembly
Do-it-yourself removal of the instrument board is carried out using the following method:
- First, remove the casing;
- Use a Phillips screwdriver to unscrew the fastening bolts;
- We find and unlatch the latches. It’s better to snap off the one at the bottom first, and then push it up. So it will just come off;
- Before tuning, you need to remove the arrows. At first, just simply pull them. If they don't give in. start turning from right to left, while doing this, pull it up a little. will definitely be removed.
Disassembly and replacement of devices
To replace (repair) devices, you need to perform the following actions in a strictly established order:
The entire combination of devices should be completely removed.
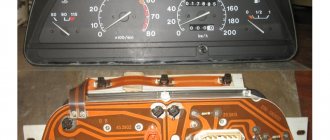
Unscrew the screws (2 pcs.) that secure the tire. After which the bus itself must be disconnected from the device system board.
Unscrew the screws (7 pcs.) that secure the frame with glass.
READ What Oil to Use in Chevrolet Aveo T300
You need to remove the frame by disconnecting it from the device system.
Unscrew the 2 screws that secure the device composition board.
Disconnect the left light filter, which is marked with warning lamp symbols.
Disconnect the right light filter, which has warning lamp symbols on it.
Unscrew the screws (2 pieces each) that secure the reddish and snow-white pads. Then remove these pads.
Unscrew the nuts securing the fuel level sensor, cooling water temperature sensor and tachometer. Each device is secured with 3 nuts.
Disconnect the board from the device system housing.
Unscrew the screws securing the device scale to the body (5 pcs.).
Remove the scale with devices from the system body.
Very carefully, prying the arrow of the fuel level indicator with a screwdriver, you need to remove it from the wasp.
Unscrew the screws (2 pcs.) that secure the fuel level indicator to the scale.
Disconnect the fuel level indicator. Install a new one in its place. When installing the sensor, we will perform all actions in the reverse order of removal.
Change other devices in the same order as described. This is the entire repair of the VAZ 2110 device panel. You see, there is nothing difficult and there is no need to go to a special service, and pay the money.
The assembly of the device system must be carried out in the reverse order of the disassembly procedure. When carrying out this work, you need to take into account that the nuts that secure the tachometer have a different thread.
Similar news
Checking the brake fluid in a Volkswagen Passat
Removing the composition of VAZ 2110 devices
Throttle position sensor: replacement
Electronic circuits Nissan Almera
Warning lamps for cooling water and brake pad wear
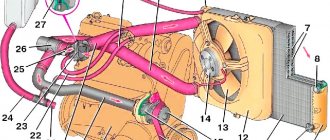
Scheme of a VAZ 2110 with a carburetor engine
RENUMAX. will remove scratches on the car body in 5 minutes!
Fix cracks in glass with GLASS PROFI in 10 minutes! Candidate for glass replacement
Nanoceramic coating Ceramic Pro. 100% car body protection
Repair of instrument panel VAZ 2110
On cars of the VAZ 2110-2112 family, the dashboard contains control lights and on-board instruments, with the help of which the driver can easily monitor the condition of the car. The following indicator lights are displayed on the device panel: cooling water temperature, turn signals, tachometer, fuel level, speedometer, an image in the form of a gas station, indicating that you need to refuel, lights for turning on the dimensions and high beams, low brake water level, a screen reflecting the vehicle’s mileage, emergency alarm system, Check Engine, which indicates engine defects, a screen with a clock, an indication of a generator malfunction or battery recharging, an indication that the handbrake is turned on, a low oil pressure light in the engine and, on carburetor engines, a choke light).
Why the instrument panel does not work
Disassembled dashboard
The first thing you need to figure out is why the instrument panel on the VAZ 2114 does not work. If the backlight goes out, there may be several reasons for this:
- The incandescent lamps burned out, the LED lighting groups stopped working;
- The connectors have oxidized;
- The electrical wiring is faulty, there are defects in the circuit;
- The fuse box has stopped working;
- Damage appeared on the common contact board;
- The dimensions system is damaged;
- There is no minus on the body (weight).
Simple and fast upgrade
In principle, with your own hands you can either completely change the device panel of a VAZ 2110 or tuning the existing one.
One of the fairly popular options. replacing light bulbs with LEDs. However, there is no difficulty in this. You need to take out the light bulbs and put LEDs in their place.
But there is one little trick: they work perfectly only in this case if the polarity is observed! If, when connected, the LED does NOT light up immediately, you need to pull it out, return it 180 degrees, then plug it back into the socket.
Even such a simple substitution will increase the brightness of the dashboard, but this is not enough, it is unlikely that they will finish the tuning with their own hands.
Replacing warning lamps in the instrument panel
In almost all cars, including the VAZ 2110, A12 warning lamps have been used in the composition of devices? 1.2. When replacing the lamp, you need to perform the following steps:
The socket together with the burnt out lamp should be returned all the way counterclockwise.
Remove the lamp socket from the device system.
A new lamp is installed in place of the burnt one in reverse order. The same method is used to replace all other lamps of the device composition.
https://ladafakt.ru/lampochki-v-pribornuyu-panel-vaz-2110.html
Assembly of the VAZ 2110 instrument panel
The instrument panel of the VAZ 2110 is made in the form of a composition of devices, indicator lamps, and in some modifications with the possibility of placing an on-board vehicle. Typically, the plastic from which the panel is made is not of the highest quality, therefore, during operation and overheating, its deformation is NOT excluded, which affects NOT so much the appearance as the performance of the devices.
The standard instrument panel contains four dial devices, a trip computer screen, an odometer reset button and a set of warning lights. 1st on the list, last left device. cooling water thermometer, it is shown in the diagram under the first number. The pointer device has a division value of approximately 50 degrees. The reddish stripe marks the zone of critically high temperatures at which cooling water can boil. The additional panel contains control lights and an indication of the climate system.
Problems with the backlight of the VAZ-2110 dashboard: causes and repairs
It’s probably no secret to anyone that the reliability of VAZ “ten” leaves much to be desired. Often, owners of THESE cars have to deal with problems or other defects. One of these problems is the lack of dashboard lighting. It is clear that the damage should be corrected as quickly as possible. After all, it will be quite problematic to go anywhere at night. Not many people will like to move, in fact, in the dark, and without seeing either the current speed or other, but more fundamental characteristics.
Speedometer and tachometer
The speedometer on the device panel (2) is a pointer device, but not with a mechanical drive, as was the case in older cars, but with an electronic one. In fact. This is a voltmeter that reacts to an impulse generated in the speedometer sensor, and it is installed in the box. The higher the voltage at the sensor output, the higher the speed the device indicates. The factory error is approximately 5 km/h, but with all this you need to take into account the diameter of the wheels, which greatly influence the accuracy of the electronic speedometer.
READ How much oil is needed in a VAZ 2115 engine
The tachometer on the device panel is indicated by the number 5 and it is also an electronic device that responds to an impulse generated by the crankshaft speed sensor. The sensor first transmits readings to the electrical engine control unit for analysis and adjustment, after which the impulse is sent to the tachometer control circuit. The reddish zone of the tachometer scale indicates unacceptably high speeds, at which rapid wear of engine parts, incorrect operation and an increase in the temperature of the cooling water are likely. Very unacceptably long engine operation in the reddish zone of the tachometer.
Tidy indicator lamps 2110
Lamps 3 and 4 indicate that the direction indicators are turned on outside the car and they light up and flash immediately after the right or left indicators are turned on. At the end of the maneuver, the power button returns to its initial position and the pointer should turn off automatically. If this does not happen, the reason should be found in the reversible mechanism of the indicator button.
The lamp that deserves special attention is located in the center of the tidy and is indicated by the number 14 in our diagram. This is a warning lamp that indicates defects and inaccurate operation of the electrical engine control system, otherwise it is called the Check Engine lamp, by analogy with imported cars. When this warning light is activated, the following performs computer diagnostics of the engine and identifies error codes. Some errors are removed by software, and some require intervention in the engine control systems: in the power supply system, ignition and other systems that could lead to errors.
Number 12 in the diagram shows the digital odometer screen and the daily mileage indicator, which is reset by a button located directly on the device panel. The top line indicates the total mileage of the car, and the bottom line, which can be reset, indicates the mileage for a certain period.
The VAZ 2110 device panel is a description of the lamps and indicators of which we will complete with ordinary and conventional warning lamps for any car:
- position 8 points to the lamp for turning on the external light;
- lamp number 9 indicates that the brake water level in the reservoir has been reduced to a minimum;
- distant light. lamp 10;
- triangle under the number 13. hazard warning lamp;
- position 18 usually remains in reserve, and in cars equipped with airbags, a sensor activation lamp is located in this place.
Other warning lamps: handbrake, emergency oil pressure in the lubrication system and critical battery discharge are located in the bottom row in order. Let the emergency lamps glow less frequently on your dashboard, for better and unsullied roads!
[Closed] Resolved: Dashboard lights do not come on, but indicators work. Tuning the dashboard of the VAZ 2110 (old model). Designations on the coolant temperature dial indicator
On the left side of the tachometer there is a universal pointer indicator, which regulates the temperature characteristics in the coolant. The device receives current signals from the corresponding cooling water temperature indicator, which is located next to the cylinder head and thermostat structure.
Here, the division price is considered to be 20 degrees, and the general digitization characteristics begin with a value of 50 units. and end with a division of 130 degrees. The reddish color highlights the terrible operating zone of the device, which starts at a value of 105 degrees. If the device's arrow begins to fall into this zone, the VAZ-2110 engine must be immediately turned off and the car stopped.
If the engine overheats, failure may occur not only of the main set of power unit units, but also of the fan switching sensor, as on the VAZ-2107.
The meaning and location of the main instruments on the VAZ panel
Compositions of all devices on the most popular brand (VAZ-2110) are placed specifically on the left side of the panel itself. This part of the dashboard is often referred to by drivers as a “torpedo”. The instrument panel also contains switches of different functions and types and a set of indicator lights. They are responsible for controlling the operation of lighting equipment, heaters and other fundamental units.
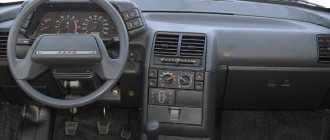
Standard device panel on a VAZ-2110 car
First, when examining the dashboard, the eye falls on the abundance of dial devices and indicators under them, which are equipped with a small electric digital window and a set of signal lights with different functions. The main elements here are:
- Standard induction speedometer;
- Tachometer model;
- Pointer type indicator for adjusting the coolant temperature;
- A device for determining the fuel level in a tank.
Let's take a closer look at any of the devices.
Advice: if light bulbs, indicators and dial gauges do not work, then the problem lies in the wiring. Be sure to check the fuse box on the VAZ-2110.
Dial indicators on the VAZ 2110 panel
The number 6 indicates the fuel level indicator in the gas tank. The device’s readings are NOT particularly accurate, but it is logically clear that at mark 0 the tank is actually empty, with a few spare liters remaining. of fuel at the ½ mark the tank is half full or empty, as you like, and at the 1 mark the gas tank is full. Light indication of the fuel level is entrusted to control lamp 7, which begins to flash when the vehicle's range on the remaining fuel is about 100 km, which is approximately 9-9.6 liters. To ensure that the fuel pump does NOT fail, it is not allowed to produce fuel from the tank one hundred percent.
https://tuning-vaz2106.ru/raznoe-2/lampochki-paneli-priborov-na-vaz-2110-lampy-v-pribornoj-paneli-vaz-2110-kak-zamenit-esli-sgorela.html
Instrument control panel illumination
To illuminate the stove, you first need to carefully remove the plastic handles of the levers that control the dampers and remove the glass. Below it is the stove itself. To do this, take any sharp object (knife or scissors) and carefully pry the glass. Prepare foil according to its size. It will be an additional source of illumination.
Fixed on the inside of the glass, it will give a very attractive appearance to the stove, and the console illumination will not be concentrated only in the place where the LED is installed next to the handle.
The next step is to remove the lamp socket from the backlight of the stove control unit. The lamp must be replaced with a purchased LED. In order for the light to spread around the entire perimeter of the stove, an LED strip is used, which is glued to the bottom. Two wires are usually soldered to the contacts, which are connected to the cartridge.
All connections are carefully insulated. Assembly is carried out in reverse order. If one of the parts does not work, check all contacts and connections again. The lighting of the stove control panel will become much better and more modern; the light from it will spread throughout the entire perimeter both day and night.
READ Replacing the fuel pump Audi a6 c5
Illumination of the heater (stove) control console.
Remove the plastic handles for the heater damper control levers. Remove the glass of the stove control unit by picking it up with a knife. We make a reflector out of foil and fix it under the glass of the VAZ 2109 heater control unit. If it is not made, the console backlight will be concentrated only in the place where the backlight LED is installed next to the heater fan speed control knob, and will decrease towards the opposite area, which does not look very good attractive.
Then we unscrew the lower part of the center console (the beard), remove the socket with the backlight lamp for the heater control unit and change the lamp to an LED. We put everything back together in reverse order.
It should be noted that simply replacing the backlight lamp with an LED one, despite all the tricks, will not achieve completely uniform illumination of the heater control panel. Although this is still better than the standard backlight.
To finalize the illumination of this unit, it is best to stick a 10 cm long LED strip to the bottom, solder 2 wires (plus and minus) to its contacts, and connect the wires to the backlight lamp socket of this unit. Just act carefully, do not leave uninsulated sections of wires to avoid a short circuit!
LED strip for illuminating the heater control panel
Now the backlight of the heater control panel glows brightly and evenly over the entire area. Moreover, this illumination is noticeable both day and night.
Illumination using LED strip
This is what the backlight looks like during the day
However, if in the daytime everything is great with the backlight, then when it got dark, I realized that the brightness of such a backlight was excessive for me, and it would be nice to make it a little less bright. You can, of course, adjust the brightness of the entire instrument panel illumination using the corresponding regulator to the left of the steering wheel, but the brightness of the remaining instrument panel illumination lamps suited me, so I did it differently. We take a black marker and paint over the coating above the LEDs (my LED strip is insulated) to the desired level of light transmission - and the problem of excess brightness is solved. The photo above shows a version of the backlight already modified in this way. You can also cover the LED strip with a piece of tint film, the effect will be the same.
Instrument panel VAZ 2110. description of lamps and indicators
Designations of indicator lamps on the device panel of the VAZ 2110 15.
Many car owners are faced with this seemingly common question. What do the indicator lights on the device panel mean?
Well, how do we know, all of them together light up only when the ignition is turned on, and when one of them lights up while driving, it becomes slightly restless.
I didn’t know it myself when they would move to the “dvenashki” after the “seven”; in 2107, in general, half of them were not lit, so I didn’t know what it was and why. And a friend of mine, after buying a car in Novorossiysk, even bought a whole book on VAZ, due to ignorance of THESE light bulbs.
READ How to remove the panel VAZ 21 0 7
The designations on the device panels on all VAZs are virtually identical, just placed differently.
Let's start in order.
Cooling water temperature, in degrees Celsius.
Tachometer, engine speed.
Speedometer, car speed in km/h.
Fuel level in the tank. With a remainder of 5-7 liters. The yellow light comes on. warning or icon with a picture of a gas station.
In fact, this is an image of a gas station, signaling the need to refuel.
Indicator lamp for turning on the dimensions.
The brake water level is low, it may be leaking here and there.
Turning on the high beams.
Clock adjustment knob (hours / minutes. X switch when pressed), from time to time this knob does the function of switching total mileage / daily mileage (on narrow screen panels).
The screen displaying total mileage/daily mileage may be narrow on some models.
Hazard warning lamp. "Emergency."
Check Engine is often indicated by this icon. This means there is a malfunction in the engine, it is recommended to stop the engine.
Screen with a clock (can show the outside air temperature if there is a temperature sensor).
Malfunction in the battery charging system: loose or broken alternator belt, alternator malfunction, open circuit and other problems.
Parking brake indicator.
Insufficient oil pressure in the engine, it is recommended to turn off the engine and find the cause.
Choke light (on carburetor engines)
I’ll also add about the lamps on the additional panel in the dashboard of the VAZ 2110 12.
On the other side from above:
This is what the review came out with. If some kind of lamp lights up and the signal beeps, do not panic. As a rule, these are little things.
Save this note to your own social network by clicking on one of the buttons below.
https://www.ladatuning.net/mat-chast/602-panel-priborov-vaz-2110-opisanie-lamp-i-indikatorov
Indicator lamps located on the additional panel of the VAZ-2112
An additional panel is installed in the VAZ-2112 dashboard, on which the designers also placed several indicators. In particular, in the middle there is a silhouette of a car with its doors open. If one of the doors is illuminated, it means that it is not closed tightly enough.
On the left side of the vehicle indicator (one above the other) there are three indicators:
- low engine oil warning (optional);
- warning about low fluid level in the windshield washer reservoir;
- additional warning about high coolant temperature.
To the right of the car silhouette, again one above the other, there are three more indicators:
- indicator of malfunction of brake lights or side lights;
- warning of high brake pad wear;
- seat belt warning.
If you respond in a timely manner to the warnings displayed on the panel by one or another indicator, then everything will cost you only with work to eliminate the malfunction that has arisen, while ignoring the warning signals, as you might guess, can result in more serious consequences. And you shouldn’t forget about the red zones on dial gauges - you don’t need to rev the engine to maximum speed, wait until the coolant temperature rises to 130 degrees or until the tank runs out of gasoline.
How many light bulbs are there in the dashboard of a VAZ 2110
The dashboard of VAZ cars, like all others, displays current information about the condition of the car at that moment. The main material used in its manufacture is plastic. The front side is rich in all kinds of light indicators in the form of icons, illuminated by light bulbs.
With a significant number of lamps, one has to deal with the problem of their burnout. Also, the colorful glow of the factory backlight does not always force you to change it to a more colorful optional one. A similar replacement of light bulbs in the dashboard of a VAZ 2110 can be carried out even in a garage.
Deep revision
It is also advisable to add lighting - using an LED strip. You can take a white one, or a colored one. Preferably something that is not too harsh on the eyes – perhaps blue or green, depending on the owner’s taste.
Today, blue light is the most popular - it gives good visibility of readings on all instruments, but does not interfere with the driver’s ability to see the road clearly.
Another good idea is to make the arrows glow a different color. To do this, they need to be cleaned of old, red paint, and then painted white.
It could be nitro enamel or, even simpler, white nail polish. A color LED must be installed next to the needle on the instrument scale. The arrow, changing its position, will be colored differently.
Additionally, when using only white light, a colored overlay will help. That is, even without electrical intervention, the colored film overlay will change its appearance.
Classic tidy "tens"
The driver behind the wheel of the tenth VAZ model can monitor the main indicators displayed behind the steering wheel on the panel. There are pointer type control devices:
- speedometer;
- tachometer;
- fuel tank full;
- cooling water temperature values.
Apart from the differentiated values displayed on the scale, the car provides information in the form of glowing or blinking indicators, for example, high beam indicators, turn signals, possible problems with the internal combustion engine, emergency lights, handbrake, etc. If the lamps turn off spontaneously, the driver will be misled , which can lead not only to the failure of one of the components, systems or devices, but also create a terrible (emergency) situation on the road.
It is important to know that the functionality of the display on the 2110 dashboard can be tested independently by holding the reset button and turning the ignition key to the 1st position (then I release it). You can finish the check by pressing the button on the panel again.
Why is it necessary to change the backlight bulbs?
When driving in conditions when it is night outside, the headlight light reflected from the ground has a small blinding effect on the driver, who does not see the readings taken from many of the car’s instruments. These may be: speedometer, tachometer, fuel or coolant level indicators, etc. In addition, various buttons on the instrument panel and levers designed to control the heater air damper become invisible.
Trying to find all these devices and use them in the dark can be quite a dangerous undertaking. This is due to the fact that the driver is distracted for a very long time in order to find this or that button, or to determine, for example, a parameter such as speed.
Malfunction of lamps, as well as their absence, disrupts the overall illumination of the dashboard and complicates the process of driving a car at night. That is why it is important to promptly change burnt-out lamps and monitor their condition. Let's try to figure out how to replace backlight bulbs on various VAZ cars.
preparatory operations
The disassembly process begins with lowering the control column to the bottom position. Before changing the light bulbs on the VAZ 2110 device panel, unscrew the pair of upper screws holding the decorative trim. Next we unscrew the row of screws securing the tidy.
There may be a problem with the speedometer cable, which will prevent the operation from being completed completely. First, it is unfastened from the box. The locking ring is pulled to the side, then we pull the cable chip upward and push it into the cabin. By slightly pulling the board inside the cabin, you will be able to unfasten the cable from it.
All electrical connectors are simply disconnected. To remove the lamps, turn the socket counterclockwise and remove it together with the baseless bulb. Now you can change it to the newest one. Assembly of the instrument panel is carried out in the reverse order of disassembly.
To have a complete set, you should know how many light bulbs are in the dashboard of a VAZ 2110. Usually from the factory there are 3 for backlighting, 12 in the bottom row and one for battery monitoring. There is also a 6th illuminator in the BSK (on-board control system), but usually there are LEDs there.
Working with the center console
During the process, you will need a pair of screwdrivers (Phillips and flathead) and new lamps. It is better to disconnect the negative terminal on the battery and the operating cable on the speedometer before work. Then pry up the cover with a flat screwdriver and remove the switch from the external lighting.
The backlight lamps are removed after tightening the antennae of the socket, this is done with a screwdriver. The emergency lights are replaced in the same way. The principle is to disconnect the connector from the switch by slightly pressing it down.
Using a Phillips screwdriver, unscrew a couple of screws holding the trim to the dashboard. We take out the heater and ashtray from the socket. We remove the standard radio from our landing site. In the process, we press out the spring brackets holding the pad and pull the shield towards us. Using a screwdriver, loosens a pair of plastic tendrils, which allows you to lift the shield, along which the 3rd fastening bracket is pressed.
We remove the cigarette lighter connector, which hides the backlight. The cigarette lighter blades will need to be held in a compressed position when dismantling.
After all the replacements, I return the battery terminals to their place. We carry out testing on all lighting devices of the panel before the panel is completely installed in its place. The light bulbs in the buttons are replaced in the same way, prying each one off with a flat screwdriver and then changing the light element inside.
https://ktonaavto.ru/remont-i-obsluzhivanie/elektrooborudovanie/skolko-lampochek-v-pribornoj-paneli-vaz-2110.html
Sources:
https://tuning-vaz2106.ru/raznoe-2/lampochki-paneli-priborov-na-vaz-2110-lampy-v-pribornoj-paneli-vaz-2110-kak-zamenit-esli-sgorela.html https:/ /www.ladatuning.net/mat-chast/602-panel-priborov-vaz-2110-opisanie-lamp-i-indikatorov https://ktonaavto.ru/remont-i-obsluzhivanie/elektrooborudovanie/skolko-lampochek-v- pribornoj-paneli-vaz-2110.html
How to replace dashboard lights
- The steering wheel lowers to the down position.
- The two upper screws are unscrewed and the decorative trim is pulled out.
- Unscrew the three screws securing the dashboard.
Tip: The speedometer cable prevents you from pulling out the dash. To turn it off, it is first unfastened from the box, the locking ring is pulled to the side and the cable chip is pulled up, which is then pushed into the cabin. Part of the tidy is pulled out towards you, and the cable is conveniently unfastened from the speedometer.
- The cable remains in place, the device is pulled out, all electrical connectors are disconnected.
- The socket is rotated counterclockwise and removed along with the lamp. Baseless light bulbs.
- After replacing the light bulbs in the instrument panel of the VAZ 2110, assembly of the unit is performed in the reverse order.
How to replace the center console light bulbs
When operating the vehicle, the lamps located on the center console of the VAZ 2110 may fail. In this case, replacing the lamps on the instrument panel of the VAZ 2110 is easy to do with your own hands. The cost of the work is low. For this you will need:
- The screwdriver is flat.
- Phillips screwdriver.
- New light bulb.
Work instructions:
- The negative terminals are disconnected from the battery and from the speedometer cable drive to the gearbox.
- The outdoor lighting switch is pulled out. To do this, you need to pry off the element with a flat screwdriver. The connector is disconnected from the switch and pushed inside the dashboard trim.
- Replacing the VAZ 2110 dashboard light bulb to illuminate it is done by squeezing the socket antenna with a screwdriver, which is then removed from the switch. The lamp is pulled out of the socket and replaced with a new one.
- Use a flat screwdriver to pry up the hazard warning switch, which is then pulled out. The connector is disconnected from the switch and pushed into the panel trim.
- Unscrew the two self-tapping screws with a Phillips screwdriver, which secure the dashboard console trim, and the trim is removed. The heating element and ashtray are pulled out of the socket.
- The car radio is pulled out of the socket. The spring brackets securing the panel to the cover are pressed out with a screwdriver, and the shield is pulled towards itself. Use a screwdriver to release two plastic antennae from the lower fixation of the shield to the dashboard. The shield is raised and the third spring bracket for its fastening is pressed out.
Removing the panel on the center console
- The connectors for connecting the cigarette lighter (see VAZ 2110: replacing the cigarette lighter yourself), the backlight for it, and the lamp for the hazard warning switch are disconnected. The instrument panel panel is removed.
- Replacing the VAZ 2110 instrument panel light to illuminate the hazard warning switch on the inside of the instrument panel is done after removing it with its socket. To do this, they are rotated in the holder.
- The antennae of the cartridge holder are compressed and the element is removed from the cigarette lighter. The cigarette lighter blades are compressed, the part is pulled out, the light bulb is removed from the dashboard trim and changed if necessary.
- Use a Phillips screwdriver to unscrew the two screws that secure the instrument cluster to the panel. The instrument cluster is moved to the side. The union nut of the speedometer cable is unscrewed from the speed sensor. The cable is disconnected from the speedometer, then removed and routed through the hole in the front panel.
- The connectors are disconnected and the instrument cluster is removed. To replace the instrument panel bulbs on a VAZ 2110, the socket must be turned counterclockwise and the instrument cluster removed from the device. New lamps are being installed. Assembling and installing the combination is carried out in the reverse order.
- The battery is connected.
- The operation of the light bulbs on the instrument panel is checked.
How to replace light bulbs in buttons
- To replace the backlight bulb of the hazard warning light button, the panel with deflectors is removed, after which the hazard warning light button is pulled out of it.
- The deflectors are directed as high as possible.
- On the left and right below them there are mounting ears. Using a slotted screwdriver, they are pulled down and the panel is pulled towards itself.
- The hazard warning button is pulled out.
- There is a socket with a lamp on the side. You need to turn it counterclockwise with tweezers and pull it out.
- The contacts on the light bulbs are wrapped around the sides of the socket. The light bulbs are the same size as a matchbox.
- In order to replace the lamps in the instrument panel of the VAZ 2110 fog lamp, you need to carefully pry the panel with the button with a screwdriver and pull it towards you.
- The remaining operations are performed similarly to the same actions as replacing the instrument panel bulbs of a VAZ 2110 emergency system.
The light bulb for the headlight adjustment wheel is changed in the same way:
- Pry it up with a screwdriver and pull out the wheel.
- Using a small screwdriver, the socket is rotated along with the lamp and pulled out.
- The light bulb changes.