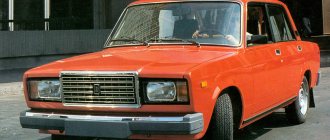
Checking and replacing the VAZ 2107 relay
Let's look at the replacement process using the rear window heating system relay as an example. This element is located in the mounting block. You can find out the exact installation location by looking at the diagram printed on the back of the protective cover:
- Turn off the ignition and open the fuse box.
- Find the relay that needs to be tested and replaced.
- Remove it using pliers located in the unit body.
- Install another device that is known to work instead of the removed device. You can use a relay from the headlight or headlight cleaning system.
- If diagnostics show that the removed relay has failed, install a new one in its place.
The inspection and replacement process is the same for all devices. The only difference is their location:
- the main relays are installed in a fuse box;
- the device that ensures the operation of the ignition, as well as light alarms and turn signals, is located in the vehicle interior, on the front panel behind the instrument cluster;
- the starter activation relay is installed in the engine compartment, on the right mudguard;
- The windshield cleaning device is located under the instrument cluster on the driver's seat side; it is fixed to the car body with two bolts.
Possible malfunctions and their elimination
The connection diagram for interior lighting on a VAZ 2107 is quite simple, and therefore there will be few malfunctions, and all are relatively easy to fix. Here are those that you can eliminate on your own:
- the light bulb burned out;
- fuse is blown;
- one of the limit switches located in the door pillars has failed;
- the switch built into the lampshade has failed;
- wiring fault.
We will eliminate them all, starting with the simplest ones.
How to replace lamps
First, let's look at replacing light bulbs in lampshades - this is the simplest procedure, and the malfunction is the most common.
- The interior lamp of the VAZ 2114 does not light up
For work we will need:
- small flat screwdriver;
- replacement C5W bulbs.
The interior light is mounted on two spring latches located at the top and bottom. We take a screwdriver, pry up the upper or lower part of the lampshade and gently press it until the latch comes out of the groove in the body.
Release the bottom latch
After this, the lamp can be easily removed and hangs on three wires
Removed interior lamp of VAZ 2107
We find the light bulb and remove it by pushing it to the side.
Removing the light bulb
We put the new one in place, check it, and snap the lantern into place.
Reinstalling the interior light
Expert opinionAlexey BartoshSpecialist in repair and maintenance of electrical equipment and industrial electronics.Ask an expert a questionImportant! Regardless of the position of the switch and the state of the doors, on-board voltage (+12 V) is constantly present at one of the terminals of the flashlight, so before replacing the lamp, you must disconnect one terminal of the battery or turn on the ground switch.
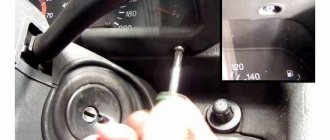
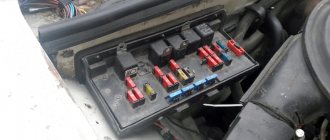
Fuse location
The next most difficult problem to troubleshoot is failure of the fuse (insert). You just need to know which one and where to find it. The fuse responsible for interior lighting is located in the mounting block, and the block itself is located in the engine compartment, immediately behind the windshield opposite the passenger seat. In the photo below it is marked with the number 5 and covered with a protective cover.
Location of the mounting block in the VAZ 2107
Depending on the modification and year of manufacture, the car can be equipped with one of two types of mounting blocks. The old-style device looks like this:
Mounting block VAZ 2107 old model
And the new one is like this:
- How to replace light bulbs in the dashboard of a VAZ 2107
New model VAZ 2107 mounting block
The fuses (there are 17 in total) for the old model are numbered in order from left to right:
Numbering of old-style mounting block fuses
It is not clear what guided the developers of the VAZ 2107, but in the new model it is quite difficult to find logic in the numbering of inserts.
Numbering of fuses in the new type mounting block
In both modifications, the F11 insert with a rating of 8 (old block) or 10 (new block) amperes is responsible for interior lighting.
But before we get into the mounting block, let’s try to determine the serviceability of the insert logically. In addition to the interior lighting, the insert powers the brake signal lamps (brake lights) and the trunk lighting lamp. If they work, then the fuse is probably good, and you don’t have to go under the hood for now. If they don’t work, we climb under the hood, open the mounting block and check the serviceability of the insert. If we change, then only for an insert of the same denomination.
Switches malfunction
Now let's move on to checking the switches. There are 6 of them in total: two in the lampshades, four end ones in the doors. But, of course, you don’t have to check all 6 - just understand the power supply circuit for the room lights and think a little to logically figure out the faulty switch.
Backlight connection diagram
The power supply circuit for the VAZ 2107 interior lighting lights is quite simple, and anyone familiar with the basics of electrical engineering can understand it:
Electrical diagram for connecting interior lights
The numbers on the diagram indicate:
- 1 – mounting block;
- 2 – switches (limit switches) located in the front door pillars;
- 3 – switches (limit switches) located in the rear door pillars;
- 4 – lampshades with built-in switches.
We are not interested in the remaining positions. As can be seen from the diagram, all door switches are connected in parallel and one contact is connected to the middle terminal of both lights, and the other to the car body. The lights are connected to the body by the second terminal, and +12 volts are constantly supplied to the third terminal, regardless of the position of any switches, including the ignition switch.
How does the scheme work? We move the lamp switch to the right position according to the diagram, the lamp is connected to the car body, the light comes on. We move it to the left - the door switches are connected in series with the light bulb. Now the lamp will light up only if one of the doors opens. That's the whole algorithm.
Checking and replacing door limit switches
Which limit switch is faulty? If both interior lights work in the right position according to the diagram, but do not light up when any of the doors is opened (the switch is in the left position), then the problem is in the switch of this door. If they always light up when the doors are closed, you will have to check all 4 door limit switches. This is not difficult to do. We open the door and find the limit switch. It is located on the door pillar.
Door switch location
Using a Phillips screwdriver, unscrew the fixing screw and remove the switch
Removing the door switch VAZ 2107
If before this the lamp was constantly on, and we pulled out the faulty limit switch, then the lamp should go out. Fault found. We buy a new one and change it. If the flashlight did not respond to the opening of a door, then dismantle its limit switch, pull off the wire from it (it is on the blade connector) and connect this wire to an unpainted part of the body. Did the lantern light up? Fault found. We buy a new limit switch and change it.
Checking and repairing the lamp switch
If the interior lighting lamp does not react to open doors at all and does not turn on with the right lamp switch according to the diagram, and the second one works as expected, then you will have to check this switch in the “dead” lamp.
We remove the lampshade (see the section “How to replace lamps”), disconnect the three blade blocks. Using two pieces of wire, we apply voltage from the battery to the terminals, as shown in the photo:
Diagram for connecting the interior light to the battery for testing
When “minus” is applied to the middle terminal, the lamp should light up when the switch is moved to the upper position. If “minus” is applied to the lower contact, the lamp lights up when the switch is moved to the lower position. If everything is so, the flashlight is working. If not, then buy a new one or disassemble this one and clean the contacts.
Expert opinionAlexey BartoshSpecialist in repair and maintenance of electrical equipment and industrial electronics.Ask an expert a questionImportant! Before disconnecting the wires from the lampshade, you need to mark them or write down the colors, so that later you can correctly assemble the circuit and not confuse anything.
If we chose the second option, then we will need:
- soldering iron;
- stationery or mounting knife;
- fine-grained sandpaper.
Theoretically, the interior lighting lamp is non-separable - it is assembled with plastic rivets. But nevertheless, you can open it. Turn on the soldering iron, place the lampshade with the rivets facing up and heat the riveted part of the rivets with the soldering iron.
Soldering rivets
Before the plastic hardens, we cut it off with a utility knife, but without fanaticism - we still have to solder them back. Turn the lampshade over with the rivets facing down and remove the side trim.
Removing the side cover from the lampshade
We carefully examine the insides of the switch so that we can assemble it later, and take out the switch button, pushing it down.
Important! At the end of the button pusher there is a spring-loaded ball, which, like a sparrow, flies out - you won’t catch it. We remove the key with extreme caution, making sure that the ball and the spring do not fly away in an unknown direction.
There is a spring-loaded ball on the key pusher.
Using fine-grained sandpaper, we clean the contacts: both the movable one and the two fixed ones. We assemble the lantern and solder the rivets. We check the operation of the switch, as described above, and install it in place.
Wiring
If the previous operations did not help, then the problem is most likely a break or short circuit of the +12 V wire to the body. It (the wire) is white in color. Its short circuit to the body is characterized by the fact that when a new fuse is installed instead of a burnt one, it burns out again. If the fuse turns out to be intact, and all the limit switches and switches are working, then there is a break somewhere.
In the first case, you will have to inspect all the white wires running from the mounting block to the body lamps and trunk lighting, find the short circuit and fix it. If the fuse has not blown, then it is enough to inspect only the white wire running from the mounting block to the faulty lamp.
But the problem is that some sections of the harnesses run in the body niches and are inaccessible for visual inspection. Therefore, if inspection of what is visible does not produce results, then it is better to contact a specialized service center.
So we have figured out the design and operation of the interior lighting lamps on the VAZ 2107. Now replacing the bulbs in them with your own hands and eliminating the main faults is not a problem for us.
In order to replace the lamps in the lighting fixtures of your car, it is not at all necessary to go to a service station and pay a highly qualified specialist. All operations can be done independently with minimal effort and money. Today we will talk about replacing light bulbs in the dashboard (DP) of a VAZ 2107 car.
Contents: 1. Location of lamps on the instrument panel of the VAZ 2107 2. Removing the instrument panel and preparing for replacement 3. What lamps are needed 4. Replacing warning lamps and backlight bulbs 5. How to make the arrows illuminated with your own hands
Replacing an old-style fuse block with a new one
To dismantle the mounting block, you will need to remove the glove box:
- To gain access to the four nuts that secure the device, disconnect the connectors from the fuse box, as well as the chips that are located in the engine compartment.
- Also disconnect all chips and connectors that are located in the vehicle interior behind the glove box.
- Unscrew the four nuts securing the device and remove it from its seat.
- Take a new PSU and install it instead of the removed one. It installs without problems and fits into the mounting points, just install a gasket before installation. Otherwise, the unpleasant smell from under the hood will enter the cabin. Also, its absence will contribute to an additional draft.
- Reinstall all connectors and chips, and then tighten the nuts. The chips are marked with a specific color, so you won’t be able to mix them up.
- Close the unit cover and replace the glove compartment.
Possible problems
What problems may a car owner encounter after replacing the device:
- The horn on the steering wheel stopped working;
- there is no excitation of the generator device;
- The cooling system fan operates after starting the engine without interruption.
Factory backlight
The VAZ 2107 has interior lighting from the factory, which is implemented through the use of an interior lamp with a low-power incandescent lamp. The disadvantage of this lamp is that it provides low illumination. The factory light has two operating modes - turning on when the driver's door or any other door is opened and turning off when it is closed, as well as turning on from a button. The low illumination of this lamp means that if you need to see something, you have to bring it close to the light. The situation can be corrected by replacing the standard lamp with an LED lamp, which not only consumes low current, but also shines 2-3 times brighter.
Often there is not enough light in the center in the interior, so the question arises how to add it. To do this, you can install factory lighting from the Lada Priora car. It is presented in the form of a compact lamp that has three operating modes: bright light, low backlight and off. This lamp must be installed in the interior of the seven under the visor next to the rearview mirror. The principle of installing the lampshade on the visor is to perform the following steps:
- First you need to remove the visor.
- Using a marker or pencil, you need to trace the outline of the lampshade on the visor, and then cut out a hole.
- Install the lamp assembly with the wires that need to be connected to the on-board network.
- To ensure that the lamp stays firmly on the canopy, it is necessary to resort to the use of sealant.
There are no problems with connecting the wires, since one wire is connected to the positive, and the remaining two to the negative (as an option, lead one negative to the wire from the door switch so that the lamp can light up when the interior door is opened). As a result, we get updated lighting in the interior of the VAZ 2107 car. If you need a simple option, then instead of the lampshade you need to take a piece of LED strip and glue it to the visor. This method is fast, but there is no need to talk about aesthetics, although such “collective farm” tuning is very popular among owners of not only sevens.
Tuning interior lighting
The standard interior lamp of the VAZ 2107 does not cope with its purpose well enough, so the question of how to make the illumination in the seven with your own hands remains relevant. In addition to the standard lamp from Priora, there are other options for equipping the VAZ 2107 with internal illumination. Let’s consider the features of the implementation of these options.
Wires for connecting electrical appliances
| Connection type | Section, mm2 | Insulation color |
| Negative terminal of the battery - vehicle ground (body, engine) | 16 | Black |
| Starter positive terminal - battery | 16 | Red |
| Positive contact of the generator - plus battery | 6 | Black |
| Generator - black connector | 6 | Black |
| Terminal on the generator “30” – white MB block | 4 | Pink |
| Starter connector “50” – starter relay | 4 | Red |
| Starter Start Relay - Black Connector | 4 | Brown |
| Ignition switch relay - black connector | 4 | Blue |
| Ignition switch output “50” – blue connector | 4 | Red |
| Ignition switch connector “30” – green connector | 4 | Pink |
| Right headlight plug - ground | 2,5 | Black |
| Left headlight plug - blue connector | 2,5 | Green, gray |
| Generator output “15” – yellow connector | 2,5 | Orange |
| Right headlight connector - ground | 2,5 | Black |
| Left headlight connector - white connector | 2,5 | Green |
| Radiator fan - ground | 2,5 | Black |
| Radiator Fan - Red Connector | 2,5 | Blue |
| Ignition switch output “30/1” – ignition switch relay | 2,5 | Brown |
| Ignition switch contact “15” – single-pin connector | 2,5 | Blue |
| Right headlight - black connector | 2,5 | Grey |
| Ignition switch connector “INT” – black connector | 2,5 | Black |
| Six-pin block of the steering column switch - “ground” | 2,5 | Black |
| Two-pin block of the steering column switch - glove box illumination lamp | 1,5 | Black |
| Glove compartment light - cigarette lighter | 1,5 | Black |
| Cigarette lighter - blue block connector | 1,5 | Blue, red |
| Rear window defroster - white connector | 1,5 | Grey |
Fuse box VAZ 2104 2105
Where is the VAZ fuse mounting block located: 2104, 2105 (carburetor, injector)
The mounting block is located in the engine compartment on the right side and is attached to the front panel. The mounting block is closed on top with a lid on which symbols for the purpose of the relay, fuse numbers and the circuits they protect are printed. Most of the vehicle's electrical circuits are protected by fuses installed in the mounting block.
| F1 | 10 | Tail lights (reversing lights). Heater motor Warning lamp and rear window heating relay (winding) |
| F2 | 10 | Electric motors for the windshield wiper and washer pump. Windshield wiper relay |
| F3 | 10 | Spare |
| F4 | 10 | Spare |
| F5 | 20 | Rear window heating element and heating relay (contacts) |
| F6 | 10 | Cigarette lighter. Portable lamp socket |
| F7 | 20 | Sound signals and relay for turning on sound signals. Engine cooling fan motor and motor switch relay (contacts) |
| F8 | 10 | Direction indicators in hazard warning mode. Switch and relay-interrupter for direction indicators and hazard warning lights in emergency mode |
| F9 | 7.5 | Generator voltage regulator (on vehicles with G-222 generator) |
| F10 | 10 | Turn indicators in turn signal mode and corresponding indicator lamp. Turn signal interrupter relay. Turn signal indicator Tachometer Fuel level indicator. Coolant temperature gauge. Voltmeter. Fan motor activation relay (winding). Battery charge indicator lamp. Indicator lamps for fuel reserve and parking brake activation. Warning lamps for emergency drop in oil pressure and insufficient brake fluid level. Indicator lamp for turning on the parking brake. Indicator lamp for covering the carburetor air damper (for a carburetor engine). Electric fan thermal switch. Carburetor pneumatic valve control system Generator excitation winding (generator 37.3701) |
| F11 | 10 | Rear lights (brake lamps). Body interior light |
| F12 | 10 | Right headlight (high beam). Winding of the relay for turning on the headlight cleaners (with the high beams on) |
| F13 | 10 | Left headlight (high beam). Indicator lamp for high beam headlights |
| F14 | 10 | Left headlight (side light). Right rear light (side light). License plate lights. Engine compartment lamp Indicator lamp for turning on side lights |
| F15 | 10 | Right headlight (side light). Left rear light (side light). Cigarette lighter lamp. Instrument lighting lamp. Glove compartment lamp |
| F16 | 10 | Right headlight (low beam). Winding of the relay for turning on the headlight cleaners (with the low beam on) |
| F17 | 10 | Left headlight (low beam) |
Connection diagram of the mounting block:
P1 — relay for turning on the heated rear window; P2 - relay for turning on headlight cleaners and washers; PЗ - relay for turning on sound signals; P4 - relay for switching on the electric motor of the engine cooling system fan; P5 - headlight high beam relay; P6 — headlight low beam relay; A - the order of conditional numbering of plugs in the mounting block blocks. The outer number with the letter “Ш” in the plug designation is the block number, and the inner number is the conventional number of the plug. The plugs of the blocks without color marking are conventionally shown in brown
Location of relays and fuses in the mounting block: 1 - relay for turning on the heated rear window; 2 — place for installing a relay for turning on headlight cleaners and washers (the relay is installed on some manufactured cars); 3 — mounting jumper in place of the relay for turning on sound signals (in a variant, a relay is installed); 4 — mounting jumper in place of the relay for turning on the electric motor of the cooling system fan (in a variant version, a relay is installed); 5 — relay for turning on the high beam headlights; 6 — relay for turning on low beam headlights;
F1-F17 - fuses (circuits protected by pin-type fuses are indicated in the table above).
Electrical equipment that consumes high current during operation is connected through relays that protect switch contacts from overload. To replace pin fuses and relays, special plastic tweezers are provided in the mounting block.
Fuses of different ratings are painted in different colors; In addition, the fuse is marked with a numerical value of the current for which it is designed (rated value).
The color of the fuse body and its correspondence to the rating 20A - Yellow 15A - Blue 10A - Red
7.5A - Brown
Brake lights do not work on VAZ 2105, 2107 cars
The reasons for brake lights not working on VAZ 2105, 2107 cars can be either a banal bulb burnout or a short circuit in the wiring. Let's look at the most common faults that lead to their failure, as well as how to consistently identify the cause.
Causes
The bulb in the rear light socket has burned out
One or two light bulbs can burn out at once. Moreover, visually they may look like workers. We replace the faulty lamp with a known good one and see if it lights up or doesn’t light up. The P21W bulb can be taken from the reversing light or from the turn signal in the same rear light. We replace faulty light bulbs with new ones.
The contacts in the rear brake light sockets have oxidized
Turn the light bulb in the socket several times to remove the oxidized layer. A more radical repair would be to sand the contacts in the cartridge with sandpaper.
The contacts in the rear light wire blocks have oxidized
We remove the block and clean the contacts in it and the contacts on the rear light board. The red wire is responsible for supplying current to the brake lights (to both the right and left lights).
Fuse blown
Brake lights on VAZ 2105, 2107 cars are powered through fuse No. 11 (F11) 10A in the mounting block. In addition, it also has interior lighting. So, if the “stops” and the lamp do not work at the same time, the fuse has definitely blown. Replace the burnt fuse with a new one. Subsequently, it will be necessary to find out the reason for the blown fuse, since there may be a short circuit.
Brake light switch sensor faulty
It is located under the brake pedal. When the driver presses the pedal, the sensor contacts are closed, and current flows to the brake lights and into the rear lights. The electric current comes to the sensor through the red and white wire from the fuse mounting block, and goes to the “stops” along the red wire, also through the mounting block. It is necessary to remove the wires from the sensor, connect them together with a piece of wire, turn on the ignition and see if the brake lights are on. If they suddenly light up, change the sensor-switch.
For a more thorough check, use a test lamp or tester to check for the presence of current in the red-white wire. Suddenly there is a break in it. Current is supplied to it from the 11th fuse in the mounting block.
Burnt out contact tracks on the rear light boards
Visually inspect the rear light boards. If necessary, check the integrity of the tracks using a test lamp or tester. You can solder wires onto a faulty track and thereby restore its functionality.
No "mass"
The negative wires come from the taillight plugs (black wire) and are attached to the body. The fastening of the wires to the body should be checked for oxidation.
The wiring blocks of the mounting block have come off, or their contacts have oxidized
Clean the contacts in the blocks (you can simply remove and reinstall them several times) and make sure they fit securely in the mounting block.
Open or short circuit in wiring
Check the main components of the brake light wiring diagram for short circuits or open circuits using the diagram below. Special attention should be paid to the red wire in the wiring harness to the brake lights. It stretches across the entire car along the right threshold. It may fray or burn out during welding.
electrical connection diagram for brake lights VAZ 2105
electrical diagram of connections for brake lights and parking brake of a VAZ 2107
The plus in the brake light connection system comes from terminal “30” of the generator. Minus – black wires in the rear light plugs connected to the body.
Notes and additions
— It should be noted that the brake lights only light up on a vehicle with the ignition on.
More articles on VAZ 2105, 2107
— Electrical connection diagram for brake lights and parking brake of VAZ 2105, 21051, 21053 cars
— Electrical connection diagram for brake lights and parking brake of VAZ 2107 cars
— Electrical connection diagram for starter 35.3708 for VAZ 2105, 2107 cars
We improve the light in the interior of the VAZ-2107 - install a lamp from Kalina
As we know, over all the years of production of classic cars, AvtoVAZ developers never bothered to install a central lamp in the interior, limiting themselves to only two side lamps. And they are clearly not enough for normal lighting, plus a poor design and regular problems with light.
Today we will try to correct this shortcoming by installing a lampshade from Kalina.
We will install it in the central part of the ceiling lining.
For this we need:
- The lampshade itself
- Terminals: female 3.6 mm - 3 pcs., male 6 mm - 2 pcs., ground - 1 pc.
- Wires with a cross-section of at least 0.5 mm: red and green - 2 m each, black - 30 cm
- Heat shrink tubing, electrical tape, reinforced tape
- Three self-tapping screws with a wide head 3-4 cm long
- Stationery and penknives
- Metal file
- Narrow-nose pliers (nose-nose pliers), pliers
- Screwdriver
- Soldering iron
- Drill with a set of metal drills
- File
- Pencil, tape measure
To begin, remove the ceiling trim by unscrewing the sun visors and rear view mirror.
Now, remove the cover of the lampshade and place the lining in the center, where it should stand, outline the outer contour.
Having retreated 8 mm inward, we draw an internal contour and along its line we cut out and remove the filler foam to the metal.
We insert the lampshade, its “legs” will rest against the metal base, so we measure and cut them, but do not throw them away - we will need them later.
We file the lampshade and remove the filler in the places of the protrusions, adjusting it in place.
Now, the plastic protective cover of the lampshade contact plate will interfere with us, so we mark and cut a hole for it in the metal base.
Also, it is necessary to drill holes for the protruding rear parts of the lampshade.
When the lampshade sits tightly flush with the trim, we proceed to its fastening. We will fasten it at three points, using two existing ones, and drilling an additional third hole from the top.
We insert the previously cut legs on the other side and cut them flush - they will be used as washers for self-tapping screws.
We drill holes for the screws, screw on the lampshade and trim the ends of the screws with a margin of 1-2 mm.
Let's move on to the connection. The lamp chip has three contacts: the red wire is the constant “+”, the green wire is the intermittent “-” limit switch, and the black wire is the “ground” of the car. We will attach the ground to one of the rear view mirror mounting bolts, and we will extend the remaining two wires to the side lamp, which has similar contacts.
Since the metal base of the trim is in contact with the “ground” of the car, and the lampshade has many open contacts, it must be insulated - we will use reinforced tape or other insulating material, pasting the plate on both sides.
We solder the “mother” and “ground” terminals to the wires, and wind the wires into a bundle.
Now, finally, we screw on the lampshade and connect the contacts, leaving a small supply of wire along the length so that, if necessary, you can dismantle the lampshade without removing the ceiling trim.
We install the cover with the lampshade back in place.
Where the wires exit from under the trim so that it is not noticeable, we cut a small hole in the headliner and stretch the wires to the side lamp.
Also, leaving a small margin in length under the upholstery, we cut the wires, solder them to the ends of the male terminals, connect them to the ceiling wiring and securely insulate them. We put the lamp in place
We attach the ground wire to the mirror mounting bolt.
We check the operation of the lamp from switches and door limit switches.
The central bulb of the lampshade can be replaced with an LED one.
How to make interior lighting for a VAZ-2107 with your own hands
Modern materials make it possible to illuminate almost the entire interior. LED strips are usually used for this. If you often move in the evening, it is worth replacing the main lighting lamp with a more powerful one. Let's figure out how to modernize the interior lighting of a VAZ-2107 car.
How to change standard lighting
Standard lamps can be replaced with more powerful and modern ones. The most suitable option is considered to be the main lamp for interior lighting, borrowed from Priora. To install it you will need to have:
- masking tape;
- sharp knife (can be a stationery knife);
- wrench 12;
- Screwdriver Set;
- pencil or marker for making marks.
Carefully remove the visor next to the rearview mirror. Please note that its weight is quite high, so if you are not careful, the ceiling may collapse completely. Outline the place of the new shade on the visor with a pencil, cut a hole along the contour. Secure the new lamp in this hole using sealant.
Since the old wiring does not work with more modern devices, make a new one. You will need to throw at least 2 wires - “minus” to the body and “plus” to the contact of the new lamp. In foreign cars, the light comes on when the doors are opened, this is very convenient. If you want to do the same, then place the third wire on the limit switch in the door. Route the wiring along the right pillar.
Fog lights
Driving a car in rain or snow can create a lot of trouble for the driver who is forced to drive the car in poor visibility conditions. In this situation, fog lights (FTL) come to the rescue, the design of which provides for the formation of a light beam that “spreads” over the surface of the roadway. Fog lamps are usually yellow, since this color tends to dissipate less in fog.
Fog lights are usually installed under the bumper, at a height of at least 250 mm from the road surface. The installation kit for connecting PTF includes:
- set of wires;
- relay;
- button.
In addition, a 15 A fuse will be required, which will be installed between the relay and the battery. The connection should be made in accordance with the diagram supplied with the installation kit.
The fog lights must be connected in accordance with the diagram supplied with the installation kit.
Location of lamps on the instrument panel of VAZ 2107
The photograph shows the reverse side of the car's instrument panel. Light bulbs are marked with numbers. Four of them under No. 2 are backlight lamps, the rest are control lamps.
They are located on the board and are intended for visual information to the driver. Each of them indicates the operation of certain systems, components and assemblies of the car:
- Alarm for low amount of gasoline in the tank.
- Instrument lighting.
- Monitoring the operation of direction indicators.
- Signal about lack of battery charging.
- Indicator of included side lights.
- Low oil pressure alarm.
- Indicator of the applied handbrake.
- High beam indicator.
- Alarm about malfunction of the forced injection system on engines.
Dismantling and installation of VAZ 2107 watches
You have to take off your watch to check it, repair it, tune it, or replace it with a more advanced version of the device. Before removing the watch, you must disconnect the ground terminal from the battery. The removal procedure is slightly different on models before and after 1993. In the first case, the sequence is:
- remove the three plates covering the instrument cluster mounting screws;
- Unscrew the screws and lift the dashboard;
- release the clock fastening brackets and remove them from the panel;
- disconnect the terminals of the wires connected to the clock.
To remove the watch on a “Seven” older than 1993, you must perform the following operations:
- unscrew the screws securing the center console and remove it;
- unscrew a couple of screws located at the bottom of the ashtray;
- remove the radio;
- Unscrew a couple of screws securing the radio frame;
- remove the decorative plate from the frame of the upper ventilation nozzles that covers the screw;
- unscrew the screw;
- Unscrew the 4 screws of the lining installed under the control panel for the interior ventilation and heating system;
- dismantle the switches installed under the central heating and ventilation nozzles of the cabin;
- unscrew the screw holding the instrument panel;
- pull out the instrument panel, disconnect the wire terminals from the clock;
- remove the panel along with the ventilation nozzles;
- unscrew a couple of screws securing the clock;
- remove the watch.
Installation of the clock is carried out in the reverse order of dismantling.
Additional designations
When connecting a generator or tampering with the wiring and ignition system of a VAZ, you should know the location of the fuse box in the car. There are 17 of them in total, of which 2 are reserve.
- reverse gear rear lamps;
- electric motors for headlight and glass washer pumps;
- heated rear window;
- direction indicators, hazard warning lights;
- fog lights;
- tachometer, voltmeter, warning lights on the dashboard;
- cigarette lighter and clock;
- sound signal;
- interior lighting, brake lamps;
- high beam headlights;
- high beam warning lamp;
- engine compartment lighting and license plate lighting;
- glove compartment lighting;
- low beam on the right;
- low beam on the left.
Author of the material: Dumchenkov Mikhail
PROMOTION: SALE OF NEW CAR 2021 PRODUCTION
Connection diagram for interior lighting lamps of VAZ 2105
- Connection diagram for interior lighting of a VAZ 2105 car
- Description of the connection diagram for the interior lighting of the VAZ 2105 car
— Plus is supplied to the electrical circuit of the lamps for the interior lighting of the VAZ 2105 from output “30” of the generator. They are constantly powered, regardless of whether the ignition is on or not. The circuit is protected by fuse No. 11(8A) - mounting block 15.3722 with finger fuses or F11(10A) - mounting block 40.3722 with blade fuses..
— “Ground” has two wires: one from the lamp switches (“limit switches”), the other from the car body.
— “Limit switches” (switches) are installed in the pillars of all four doors. They are connected by one wire (black and white in the diagram). When the doors are closed, their contacts are recessed and the electrical circuit is open. After opening at least one door, the circuit is closed and ground is supplied to the lampshades.
— You can forcefully turn on the interior lights with the doors closed by pressing the lamp button. In this case, the “ground” to the lamp will be supplied not from the “limit switches”, but from the car body.
- Notes and additions
- — An AC12-5-1 (C5W) lamp is installed in the interior lampshades.
- More electrical circuit diagrams for the VAZ 2105
Scheme for connecting the direction indicators of a VAZ 2105 car
Diagram of the contact ignition system of VAZ 2105, 2107
Source: https://twokarburators.ru/shema-osveshenia-salona-vaz-2105/
Determining what doesn't work
Before you begin work on removing the instrument panel and changing light bulbs, you need to visually determine which of them are out of order. If the panel is not illuminated at all, there are several options for where to start checking.
Circuit breakers
First, check the fuses; they are located in the mounting block under the hood on the right side (in the photo under No. 5).
Fuse F10 is responsible for the instrument panel.
Brightness control
This is a variable resistor, located to the right of the steering wheel, near the clock. With its help, the intensity of illumination of instruments and control lamps is changed. It rarely fails, but sometimes it fails.
To check the regulator, you need to remove the plastic insert where it is located along with the clock and cigarette lighter. Pry it off with a flathead screwdriver. After this, disconnect the power supply and remove the plastic round handle by pulling it towards you. Using a socket wrench, unscrew the nut securing the regulator to the liner and remove it.
The functionality of the regulator can be checked using a multimeter. If the resistor is faulty, replace it with a new one.
It should be borne in mind that when working with electrical equipment, it is necessary to disconnect the power supply from the battery.
Faulty incandescent lamps
If everything you did above did not produce results, you need to remove the panel and check all the light bulbs.
Failure of incandescent lamps involves burnout of the tungsten filament. In another case, there may be physical impact on the lighting device, after which it will not be able to function.
You can check it visually, one by one removing the electronic board from the sockets and inspecting the integrity of the tungsten filament. Or using a multimeter.
To eliminate all the reasons why lighting and signaling devices may not work, it is worth checking the integrity of the conductive paths printed on the electronic board.
Due to environmental influences, they oxidize and break down. It's not difficult to fix. It is necessary to find, clean and solder. It is also worth checking the terminals connecting the wires.
Advertisements on NN.RU – Auto
With us you can not only extend the frame to fit a body of 5.1 m, 6.2 m, 7.5 m, 9 m for Maz Zubrenok, Maz, Kamaz, Ural, Zil, Mitsubishi, Nissan.
Wide selection of hydraulic pumps and hydraulic motors of all series. Axial piston hydraulic motor. Splined shaft, reverse rotation. Analogs - (many. Price: 1,000 rub.
We sell KAMAZ injection pump (All types) BOSCH injection pump for KAMAZ 1 year warranty Bosch Euro-3 injection pump 1 0402698817 (electr.) EURO-3 – 134,200 rub. 2. Price: 131,000 rub.
A certified truck conversion organization invites you to: lengthen, re-extend and convert, p.
Sooner or later, most car owners are faced with the fact that the interior lighting stops working. Let's look at the reasons for this malfunction and figure out what to do in this or that case.
To understand where to look for the cause of a breakdown, you need to understand how the interior lighting system generally works. Here is a typical simplified diagram. It may include many more different devices, but the cars are different and it is impossible to draw a diagram for each specific instance. In most cases, the interior light is connected like this:
Now let’s go over the reasons that can cause interior lighting to fail.
Reason #1: Burnt out light bulb
It’s very simple and elementary, but some car owners start looking for a “fault” in the depths of the electrical system. No need - just check the lamp. You can just look at the thread, or you can ring it with a tester. The latter option will help you identify a burnt-out light bulb much more accurately - sometimes it is not the spiral that burns out, but the contact inside the base, and everything looks quite good in appearance.
Reason #2: Blown fuse
The second reason why the interior light may not work is a blown fuse . Almost always, interior lighting “shares” a fuse with other devices. Therefore, if, along with the light, a clock or radio tape recorder, for example, stopped working, then the likelihood of a blown fuse is extremely high.
Find the correct fuse in the appropriate block and make sure it is intact. If the fuse does blow, there is probably a reason for this - a short circuit. Therefore, it is not a fact that after inserting a new fuse everything will work. It is quite possible that it will burn out immediately. If this happens, there is definitely a short circuit. Need to know how to find a short circuit in a car
.
At the same time, a fuse does not always blow due to a short circuit. Its jumper may simply be old (tired) or made of poor quality material.
Reason #3: Oxidized contact
There are plenty of contacts in the interior lighting circuits. But the contacts inside the lampshade and door limit switches are most susceptible to oxidation. Limit switches very often oxidize in many Russian cars, since they do not have a rubber casing.
It is very easy to identify an oxidized contact - just look at it. Remove the lampshade, disassemble it and make sure the contacts are clean. If there is oxide, clean it with a small flathead screwdriver or fine sandpaper. Do the same with the limit switches - each such switch must be removed and inspected. Before removing the limit switches, it is better to disconnect the battery, because very often during removal the positive wire of the switch shorts to the body.
Reason #4: Broken wire
The reason why the light in the cabin does not work may be a broken wire. Wires that are forced to bend due to their location are especially susceptible to damage. So, the wires running into the trunk lid or doors often break. This occurs due to frequent twisting or bending of the wire when opening these body elements. In theory, the interior lighting wiring does not go into the doors or trunk, but the general meaning is the same - the wire can be broken, crushed or broken.
The main causes of malfunctions of the VAZ 2107 cigarette lighter
The cigarette lighter of the VAZ 2107 quite often fails. This happens for various reasons.
Fuse blown
If the cigarette lighter is used as a power outlet to operate multiple high-power devices through a power strip, the cigarette lighter fuse, rated for a maximum current of 10 A, may blow. Due to the peculiarities of the VAZ 2107 electrical connection diagram, the clock and radio will stop working along with the cigarette lighter.
Poor contact or oxidation
Sometimes the cigarette lighter contacts or connectors become oxidized and the device stops working. In such a situation, they must be cleaned by first disconnecting the negative terminal from the battery. The latter will eliminate the possibility of a short circuit. In addition, often the connector of the device connected to the cigarette lighter does not fit into the socket tightly enough. Such unreliable contact can lead to short circuits, melting of contacts and failure of the cigarette lighter. The contacts may also melt when installing a fuse of a higher rating (for example, 15 A). In such cases, you can try to clean and resolder the contacts. If this does not lead to a positive result, the cigarette lighter will need to be replaced with a new one. The cost of a new device for the VAZ 2107 is about 150 rubles.
Sometimes the cigarette lighter coil burns out. In this case, the device is replaced with a new one.
Broken electrical wiring
The cigarette lighter may stop working due to pinching or chafing of the wires, followed by broken contacts. You can diagnose this situation using a multimeter by testing the wiring of the cigarette lighter connection circuit.
After finding the damaged section of the wiring, it is replaced with a new one.
Particular attention should be paid to the integrity of the wire insulation - this will reduce the likelihood of a short circuit and fire to a minimum.
Floor lighting
One of the popular and modern methods of tuning is to make floor lighting with a 12 V LED strip. Many people wonder where the wires go in this case:
- The tape at the driver’s feet extends from the steering column, and a bundle of wires for connection is also located there.
- If you are lighting the passenger seat, the wires should be at the passenger's feet.
- To illuminate the rear seat, the tape is placed under the shelf.
Car enthusiasts can even place LEDs in the trunk or on the bottom of the car. It looks unusual and beautiful. For the floor, bottom, trunk, it is recommended to choose types of tapes that are protected from moisture and contamination. They
are much more expensive. Don’t try to save money, buy only high-quality LEDs. Carefully insulate the backlight connection points to prevent short circuits and protect the wiring from combustion.
Choose the color of the ribbon yourself. The most advantageous option is to match the color of the car with the shade of the backlight. You can choose exotic combinations. Some drivers of such cars specially repaint the body or cover the interior with leatherette. This requires a significant investment of effort. Large-scale tuning is recommended only for those who are familiar with the intricacies of this work.
Installing a lampshade from Kalina on a VAZ 2105
Interior lighting for VAZ 2105
clearly not enough, there is practically no sense from the standard lamps installed on the side pillars.
They, of course, emit light, but they do it extremely inefficiently. So it is necessary to modify the interior of the car and install a courtesy lamp from Kalina on a VAZ 2105
.
First, we remove the safety visor trim, this is done by unscrewing the rear view mirror and removing the sun visor, then unscrew a couple of bolts securing the visor. Now the work will be done directly with the lampshade from Kalina. We remove the protective cover from it and mark its contours on a sheet of paper. After the outline of the lampshade has been drawn on the paper, you need to cut out the template. It is recommended to cut 5 mm less than the original contour of the lampshade, since it is preferable to cut the hole rather than drill a hole in the ceiling. So, apply the template tightly and use a knife to cut out a hole. As a result, it will be discovered that due to the metal back plate, the lampshade will not fit into the prepared hole. At this stage, a jigsaw will come in handy; with its help, we make a hole in the metal along the contour. Don’t forget to try on the lampshade in a timely manner, trimming the hole in the right places. It is also necessary to shorten the legs of the lampshade so that they are lower than the level of the metal trim. There is a stop at the back of the lamp, so it only needs to be secured from the front. To do this, you can use a strip of iron and secure them with screws and washers. The lampshade is securely fastened, all that remains is to insert the light bulbs and put on the protective cover. The next stage is installation on a VAZ 2105
overlays with built-in lampshade.
Now we need to supply the food. You can get power from the side lamp, and lay the wire under the door seals. The lampshade has three wires, two of which are negative wires, and one is a permanent positive wire. Another power supply option is to connect it to a cigarette lighter. The positive wire is connected there, and the ground contact is connected to the limit switch, which is on the front doors. So when the doors are opened, the lamp will begin to emit light. In this case, the central light was too bright. When it was turned on, the glass became like a mirror, that is, the visibility of what was happening on the street disappeared. This light bulb was replaced with a triple blue LED. The glow from the side lights is quite enough, you can calmly read a book without straining your eyes. But if you like bright light, then you can leave the standard lamp. If this is not enough, then a small piece of foil tape is glued inside the lampshade, then the glow will become even brighter. The installation does not take too much time and you can do it yourself. Plus, such a modification does not require any adjustments in the technical regulations of the VAZ 2105
, during a technical inspection, such an installation will not cause any complaints. If necessary, it is possible to select different colors, but in this case it would be best to use standard yellow or white, because they provide sufficient visibility and are not irritating to the eyes.
Connection
Further tuning of the VAZ-2107 in terms of lighting involves connecting additional wiring. It is better to pull it through the right pillar, placing the wires on the trims, with subsequent output to the glove compartment.
In the cars under consideration, the wiring runs in the glove compartment through the power supply of the standard interior lighting with the connection of the positive end. The negative part is connected to the car body. If desired, you can activate the second analogue, which will allow you to turn on the lamp when the doors are opened. Before connecting the assembly to the door ends, try it on. This will make it possible to adjust the design to size, without additional modification.
VAZ “classic” - do-it-yourself lighting of internal and external handles
Cars from the classic VAZ range are still valued today for their unpretentiousness, low price and, most importantly, for their tuning capabilities in the most global sense of the word. There is quite a wide scope for creativity when using various lighting options, in particular, the illumination of the internal and external handles of a car, made by yourself, looks very unobtrusive and elegant
General idea for improvement
The main idea of the proposed modification is to supplement the handles with LED power sources and power them through a control relay from the door limit switches, which normally supply power to the interior lighting.
In other words, and according to the attached diagram, the LED backlight is connected as follows:
- From the door switch KN1 (which controls the interior lamp) we take -12V;
- Through a white wire with a black stripe we use -12V going through the limit switches KN2-KN4 of the other three doors;
- The +12V power supply (white wire) can be taken, again, from the lampshade;
- We connect a 5-pin relay with normally closed contacts according to the contact numbering.
As a result, we obtain an operating algorithm according to which, when any door is opened, the lines of LEDs LED1-LED3-LED4 begin to glow. At the same time, LED2 and LED3 will light up on open doors. In a situation when another door opens, LED1-LED3-LED4 also light up on it, and if LED2 was on before, then the power from it will switch to LED1 (on closed doors, LED2 and LED3 continue to light). The rest of the doors work using the same logic.
Please note that if the final result is expected in accordance with the “plan,” it is recommended to use internal handles from earlier VAZ models, namely those made of foam rubber and equipped with chrome moldings. With other options, it will be somewhat more difficult to implement the idea
Refinement of internal handles
- We take out the molding and remove the chrome film from it with any suitable tool;
- We lightly sand the plastic of the cleaned molding in order to obtain the necessary diffusion of LED light;
In accordance with our preferences, we mark out the niches for the side lamps (not forgetting that cutting the LED strip depends on the multiplicity of the elements) and cut out the corresponding holes;
- From any plastic at hand (suitable, for example, from an old fluorescent lamp), we cut strips that will cover both the moldings and the white light shades. In the absence of suitable plastic, a fairly wide selection of material is available in any advertising agency;
- Heating the strips on the moldings using a technical hair dryer, bend them along the profile of the handles;
- We glue the tape with red LEDs into the groove of the molding, install the molding in place, which, in turn, is covered with matte plastic;
As for the lampshade for white light, for reliability it is recommended to make it two-layer (where the top layer must be matte, and an LED strip is laid between the layers). The length of the wire from the LED strip should be enough to lay through the handle itself and the door trim;
Finally, all that remains is to drill holes for the wiring, stretch the wires and install the handles in their places.
Refinement of external handles
- We dismantle the handles and, in accordance with its configuration, determine the shape and placement of the lampshades;
- Lampshades for external handles should be three-sectional (the outer sections are white and the central section is colored, in our case orange). If there are no LEDs of the required color, you can use reflectors, rear light lenses, etc. Accordingly, three wires should come from each lamp: one common and one each for the white and colored sections;
- Again, we drill holes for the wiring, and secure the lampshades themselves with glue. Don't forget to install protective rubber bands in the technological holes.
We choose the location under the relay at our discretion, for example, you can scroll it to the handle mounting pin.
Tags Tuning, VAZ, do it yourself
Factory backlight
The VAZ 2107 has interior lighting from the factory, which is implemented through the use of an interior lamp with a low-power incandescent lamp. The disadvantage of this lamp is that it provides low illumination. The factory light has two operating modes - turning on when the driver's door or any other door is opened and turning off when it is closed, as well as turning on from a button. The low illumination of this lamp means that if you need to see something, you have to bring it close to the light. The situation can be corrected by replacing the standard lamp with an LED lamp, which not only consumes low current, but also shines 2-3 times brighter.
Often there is not enough light in the center in the interior, so the question arises how to add it. To do this, you can install factory lighting from the Lada Priora car. It is presented in the form of a compact lamp that has three operating modes: bright light, low backlight and off. This lamp must be installed in the interior of the seven under the visor next to the rearview mirror. The principle of installing the lampshade on the visor is to perform the following steps:
- First you need to remove the visor.
- Using a marker or pencil, you need to trace the outline of the lampshade on the visor, and then cut out a hole.
- Install the lamp assembly with the wires that need to be connected to the on-board network.
- To ensure that the lamp stays firmly on the canopy, it is necessary to resort to the use of sealant.
There are no problems with connecting the wires, since one wire is connected to the positive, and the remaining two to the negative (as an option, lead one negative to the wire from the door switch so that the lamp can light up when the interior door is opened). As a result, we get updated lighting in the interior of the VAZ 2107 car. If you need a simple option, then instead of the lampshade you need to take a piece of LED strip and glue it to the visor. This method is fast, but there is no need to talk about aesthetics, although such “collective farm” tuning is very popular among owners of not only sevens.