Replacing valve stem seals on a VAZ 2106
The valve stem seals on the VAZ 2106 are replaced after approximately 30,000 kilometers. If it is not there, then it is still better to replace it after 2-3 years, because the caps dry out from old age. Find out how to replace the caps on 2106 in the article.
At the moment, in stores you can find silicone valve stem seals, which in terms of their characteristics are much better than rubber ones. Nobody talks about their durability, it's all about the elasticity of silicone. This is very important in Russian winter conditions, especially if the engine is not equipped with a pre-heater.
Replacing the VAZ-2106 valve stem seals should be carried out directly on the vehicle, which greatly simplifies and can speed up the work. Performing these actions does not require removing and then replacing the timing block element. It is enough to park the car in a place that is protected from dust, dirt and precipitation.
Apply the handbrake and place the gearshift lever in the neutral position.
To replace oil seals on a VAZ-2106 car, you need to have a set of new oil seals and a new gasket for the timing cover, a set of open-end wrenches and some equipment.
https://youtu.be/https://youtu.be/XXDR-YCpquM
_
Replacing valve stem seals for VAZ 2106
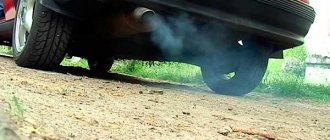
Seeing bluish smoke from the exhaust pipe of a VAZ 2106, the owner automatically begins to remember the last time he changed the oil scraper rings and rebuilt the piston. Then the budget for major repairs is automatically calculated, which always comes unexpectedly, like snow in January. But there is no need to rush. Most likely, the reason is different - in the valve stem seals.
How does valve seal wear manifest?
Valve seals, or valve stem seals, are designed to ensure that the oil that lubricates the gas distribution mechanism does not enter the combustion chamber. Valve bushings cannot ensure tightness on their own, so they are fitted with seals made of high-quality soft rubber with an oil scraper edge, which prevent oil from penetrating the valve stem into the cylinder.
Oil entering the combustion chamber in large quantities causes characteristic blue smoke from the exhaust pipe. Oil scraper rings may also be to blame for this, but if the engine smokes during a cold start, and the smoke disappears when warmed up, then we can say with one hundred percent certainty that the valve seals have outlived their usefulness.
Another sign of oil seal failure is increased oil consumption and greasy deposits on the spark plugs.
Tools and accessories for replacing caps
Replacing the valve stem seals of a VAZ 2106 is no different from the same work on engines of the entire classic VAZ series. To carry out the work, we do not need to remove the head, much less the engine. Therefore, we will do all the work ourselves with a minimum amount of tools and a minimum amount of time. It is advisable to carry out the work in a garage, under normal lighting and without excess dust - after all, we open the engine.
We will need, in addition to the usual set of keys:
- torque wrench;
- tweezers;
- set of heads with a knob;
- valve puller;
- a mandrel for shrinking the oil seal onto the bushing.
During the repair process, if necessary, we will illustrate some points, to the extent possible, but nothing complicated is expected in the process. Almost. To compress the springs, we will use a special puller with a lever, although you can do without it if you know all the intricacies of the process.
Replacing caps
We will begin replacing the valve seals by providing access to the cylinder head; further actions will be performed step by step, without breaking the sequence.
- We remove the air filter cover, the filter itself and its housing, after covering the carburetor diffuser with a rag so that nothing gets into the intake manifold. Otherwise you will have to remove the block head.
- Remove the timing cover and align the mark on the camshaft drive sprocket with the mark on the camshaft housing so that the pistons of cylinders 1 and 4 are at top dead center. They will prevent the valve from falling into the cylinder when we remove the spring.
- Loosen the chain tensioner by about half a turn, loosen the sprocket mounting bolt without unscrewing it completely.
- Using a screwdriver, press the plane of the chain tensioner and tighten the cap nut until it stops, after which you can unscrew the sprocket mounting bolt. We remove the sprocket, carefully tying it with wire to any convenient stud or to the hood spring.
- Unscrew the nuts securing the camshaft housing, remove it and unscrew the spark plug on the 1st cylinder. Then remove the drive levers by snapping the spring clip.
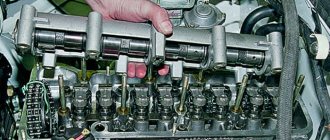
- We unscrew the adjusting bolt and fix the puller stop in its place, as shown in the figure.
- We insert any suitable sized rod into the hole for the spark plug - plastic, wood or very soft metal to fix the valve in the seat.
- Using a puller, we compress the spring, and using tweezers, remove the crackers mating the valve stem and the spring support plate.
- Remove the crackers, springs and support washers. The valve must remain closed.
- Carefully remove the old valve seal using pliers. Be extra careful not to chip off the edge of the valve sleeve - it is made of brittle cermet.
- Lubricate the fresh oil seal with clean oil and carefully place it on the valve stem, seating it as tightly as possible on the bushing. For tighter shrinkage, a cap mandrel will be required.
- We assemble the valve drive mechanism in the reverse order and move on to the next valve.
Before work
The combustion chamber of the engine must be protected from foreign substances, so the cylinders need protection from oil. This is where valve stem seals, or oil seals, come into play, protecting the combustion chamber as the valve stems move. Over time, they lose elasticity and the quality of their work decreases. Nothing prevents oil from getting where it shouldn't be.
If you notice that the exhaust has become bluish and thick, soot or even soot has appeared on the spark plugs, and your VAZ-2106 eats oil like gasoline, then it is very likely that the problem with the seals has affected you too. You need to have the courage to open the hood and examine the problem. Perhaps the entire gas distribution mechanism needs to be replaced, but for now we will only talk about the caps: if we really strain ourselves, then do it systematically.
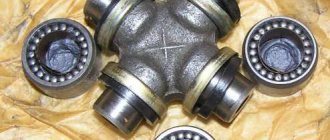
The design of valve stem seals is not very complicated, although there are both high-quality samples and short-lived ones. They consist of the following parts:
- Frame. Steel bushing that guarantees the strength of the seal.
- A spring that applies pressure to the valve stem and ensures a tight seal.
- The cap itself removes any remaining lubricant from the rod. Made from elastic materials such as rubber or fluoroplastic. It is this part of the structure that hardens.
To prepare to replace the valve stem seals, you will need to find some tools. If you wish, you can do the work without them, trying to use available analogues, but who needs to hammer a nail with a cigarette lighter when a hammer has been invented. You will need:
- puller, tweezers or pliers for removing old caps;
- valve depressurizer for compressing springs;
- mandrel for installing oil seals;
- a rod or tube of soft metal to keep valves from falling.
If you are sure that you will earn more in the time it takes to tinker with the car, you can entrust the VAZ-2106 to professional auto mechanics. But, perhaps, if you are here, therefore, you are determined to change the caps yourself.
How to make your own devices
It is convenient to use a special device, since there is no need to hold it with your hands; it holds the springs compressed with a bolt. If you don’t have such a device, you can make it yourself. To do this, it is enough to have two steel square bars 10x10 mm, 300 mm long. They need to be fastened at three points, at the ends and in the middle, so that there is a gap of 12 mm between them, like rails, then the price will be much cheaper. So:
- You can attach it in any way; bolts, clamps, welding, in the fastening points between the rods you need to place metal plates 12 mm thick, which will provide the necessary gap between the rods.
- The valve stem will fit into the gap when the springs are released. To install valves, instead of a mandrel, you can use a steel tube 120 mm long, with an internal diameter of 14 mm, and a copper washer with a hole matched to the rim of the cap.
Preliminary preparation
Before starting work, it is advisable to watch the video, replacing valve stem seals on a VAZ 2106; you definitely need to thoroughly wipe the surface of the upper part of the block and the head cover. For convenience, you need to remove the air filter housing. Cover the carburetor with film or cloth to prevent dirt from entering during operation. Unscrew the spark plugs, remove the cover with the gasket.
- Set the fourth cylinder to top dead center on the compression stroke. To do this, the crankshaft rotates to a position where the intake and exhaust valves of the fourth cylinder remain closed before and after the piston passes TDC. This is determined by the clearance between the valve and the rocker arm.
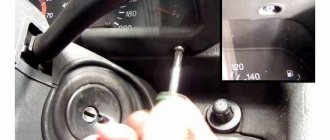
- The position of the piston is determined by measuring with any rod through the spark plug hole. Check the alignment of the marks on the sprocket and the housing.
Checking whether labels match
- Use a screwdriver to bend the lock washer using a 17 mm spanner. Loosen, but do not unscrew, the nut securing the sprocket to the camshaft.
- Using a 13 mm spanner, unscrew the cap nut securing the tensioner two turns.
- Free up the chain as much as possible.
- Unscrew the nut completely and carefully remove the sprocket from the camshaft axis.
- To prevent the chain from falling off the sprocket, you need to tie it with wire and hang it together with the sprocket on the edge of the cylinder block.
Disassembly sequence
- Unscrew the nine nuts holding the camshaft housing and remove it along with the shaft.
- Using a screwdriver, lift the pressure spring, pull out the pressure lever with a little force, push the spring out from under the stopper and pull it out.
- A soft wire is tightly inserted through the spark plug hole between the piston bottom and the valve so that the valve does not fall when the springs are pressed. The higher the part of the rod into which the fixing nuts are inserted, the less the springs will need to be pressed to install them.
Attention! It is not allowed to hold the valves with hard objects; there is a risk of scratching the piston or cylinder.
- A nut is screwed onto the camshaft housing mounting stud closest to the valve, as in the photo, to which a special puller or the end of a homemade device clings with a grip. It covers the stud on both sides, rests against the lower plane of the nut and rests on the upper plate of the springs.
- The valve stem with crackers is passed between the rods of the device.
Repair procedure
- First of all, you need to get to the valve stem seals. We unscrew the cover nuts from the block head, do not forget to put the washers in a separate place so as not to lose them.
- We turn the crankshaft and carefully watch when the marks on the cover coincide with the marks on the camshaft sprocket. This position will ensure the safety of the valves after removing the crackers.
- Unscrew the camshaft bearings. Fixing the sprocket and chain can save you from a lot of problems, because they love to fall into the engine crankcase and ruin the rest of the day.
- The piston in the first cylinder has reached top dead center. Now is the time to dismantle the spark plug and remove the spring. After this, move the lever to the side.
- The adjusting bolt must be loosened, then a spring puller must be installed.
- We insert a rod or tube made of soft metal into the hole of the candle, this will protect the valves from falling.
- We take out the cracker and press the spring until the crackers appear. Sometimes they get stuck and need to be released by lightly tapping them.
- Remove the springs, valve plates and washers.
- We fix the valve with a clamp and remove the obsolete oil seal. You can help the process by lightly tapping the hammer.
- Before the procedure, lubricate the new valve stem seal with engine oil. We put protective caps on all new oil seals, which should be included in the kit. This will protect the valve surface from scratches during the pressing process. Pressing is done with the same desiccant, only on the other side.
- Repeat the same steps on the remaining valves. It is important to remember to crank the crankshaft before working on the second and third cylinders.
After installing the new, elastic and sealed valve stem seals, reassemble everything in the reverse order. If everything worked out correctly, you can be happy with yourself! The repair has been completed.
Replacing valve stem seals
Signs by which you can determine the wear of the valve stem seals on a VAZ 2101 car are an increase in oil consumption, the appearance of bluish smoke when revving up, when the engine starts, when starting at intersections. If the replacement of valve stem seals on a VAZ 2101 is made from other brands of cars, then it is necessary to take into account:
- So that the diameters of the valve stem and the seating belt of the guide bushing match.
- The height of the new element should be no more than the “original” one up to 0.5 millimeters, otherwise, with the largest stroke of the valve, the cap may be damaged by the spring plate.
- The cap should not be too large in diameter so that it can move freely inside the valve spring. This is especially necessary to take into account if there are two springs on the valve. Then, the outer diameter of the cap is limited by the inner diameter of the spring.
- The lengths of the cap seat and the guide sleeve should be close in size. If it has a short belt, the part may be damaged by the edge of the sleeve when installing the cap “deeply” on the sleeve. In addition, the latter can press the edge of the element away from the valve stem, which can break the seal.
- The internal profile of the cap must be carefully examined. Often parts that do not have a reinforcing sleeve have an annular protrusion on the inner seating surface. When installing a cap on a smooth bushing, a large amount of tension must be created, and the protrusion can damage the cap or the part will come off the bushing.
- The year of manufacture of the engines whose products need to be replaced, and those from which they are planned to be used, is taken into account.
Why can cartridges fail?
The main reason for failure of guide bushings is their wear. As a result, the consumption of lubricating fluid increases, since the backlash of parts leads to rapid failure of the valve stem seal and oil leaks into the combustion chamber. As a result, there is the formation of carbon deposits, a violation of the temperature regime of the engine, an increase in the toxicity of exhaust gases and breakdown of the catalyst (if the car has one).
Timely replacement of engine oil and proper operation of the vehicle’s internal combustion engine allows you to extend the life of the bushings and change them every 180–200 thousand kilometers. However, due to valve clearances and engine oil non-compliance with recommended standards, lateral wear of the bushings and a decrease in valve mobility along the axis of the rod may occur due to an increase in the radial load on it. For this reason, after changing the valve stem seals, the gap in the guide bushings must be adjusted. If the gap is too large and play is detected, the bushings must be changed.
How to install new caps
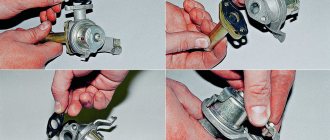
On VAZ-2106 cars, the valve stem seals are replaced independently using a simple plastic device. It must be placed on the top of the valve stem to cover the recesses on it. In this case, you will not have to remove the springs from the valve seals. The work is carried out according to the following algorithm:
- Install the plastic bushing on the valve.
- Lubricate the auxiliary bushing and valve stem with engine oil.
- Push the oil seal on until it stops.
- Remove the plastic sleeve.
- Using a “10” tubular wrench or a large mandrel, you need to hammer in the cap.
- Install the support washer, spring and plate.
- Install the valve depressurizer and compress the spring.
- Put the crackers in place, and then release the desiccant.
This completes the replacement of the VAZ-2106 valve stem seals. If necessary, you need to double-check all gaps and correct them. Assembly of the entire assembly is carried out in the reverse order of removal.
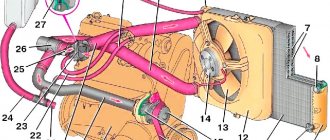
Cylinder head and valve design
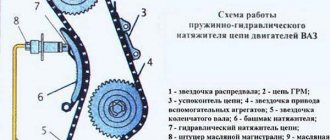
The functioning of the valve mechanism on VAZ 2106 and VAZ 2109 cars depends on the operation of the chain drive (modern car models are equipped with belt drives).
The structure of the cylinder head is quite primitive: these are seats, springs, guide bushings. The valves in the system close automatically using built-in springs. To prevent engine oil from leaking into the combustion chamber, an oil seal is attached to the bushing.
The valve mechanism operates in difficult conditions with high temperatures and oil starvation. Its main task is to ensure the tightness of the entire system. Problems in its operation can cause a decrease in power, increased fuel consumption and rapid wear of the timing belt.