Lada 2106 “Red Garnet” › Logbook › Replacing crosspieces
Good day to all!
Yesterday we replaced the universal joint crosspieces. Due to noise during gear shifting. As it turned out, the bearings on the crosspiece were worn out.
How to determine crosspiece wear
If, when lowering the pedal, when shifting gears, or during sudden acceleration or braking, you hear a knocking sound in the cardan drive, vibration of the axle, this indicates severe wear of the crosspiece and bearings. It is urgent to carry out work to replace these worn-out parts. You can, of course, ignore the symptoms, but then there is a high probability that the bearing will collapse and the cardan will fall out someday right on the road. The gearbox may also be damaged.
You should have the following tools at hand: open-end wrenches 12 and 13, a copper or aluminum adapter, compression pliers, a hammer, a socket wrench 13 and 27. If it becomes necessary to replace the outboard bearing, you will need a tension puller and an old flange of the elastic coupling.
Removing the cardan on a VAZ 2106 Sequence of actions when removing the cardan
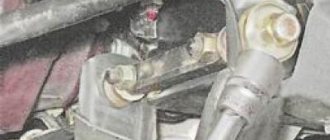
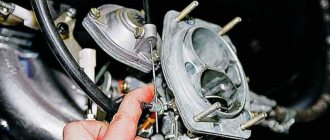
Using round nose pliers or pliers, disconnect the tension spring from the body bracket and remove it.
Mark with paint the joint between the gearbox flange and the cardan (this will be useful during assembly). Having jammed the cardan with a screwdriver so that it does not turn, unscrew the self-locking nuts (there are four of them) with a No. 13 wrench.
After the nuts are unscrewed, one end of the cardan can be easily removed.
The relative location of the elastic coupling flange and the cardan should also be carefully noted.
Bend back the 4 locking tabs on the seal ring near the elastic coupling.
Carefully move the cage towards the cardan (together with the seal).
Using a 13mm socket, unscrew the two nuts and remove the safety bar.
Using a 13mm wrench, unscrew the two nuts and remove the plate of the outboard bearing, secured to the body through rubber washers, from the studs that secure it to the body.
Remove the cardan shaft from the splines of the flexible coupling flange and remove it.
Which crosspiece is better to install?
Car service specialists say that if the time has come to change the crosspiece, then it is better to change them as a set, both of them. In fact, this is not always the case. The front crosspiece, as a rule, lasts much longer than the rear one. Sometimes three crosspieces are replaced at the shank, but at the outboard bearing the crosspiece remains fully functional.
Experts advise not to “kill the ears of the cardan”, and not to change the crosspiece unless necessary.
When purchasing, you should not save on cost, it will be more expensive. Quite good crosspieces made in Germany are of high quality and come complete with retaining rings, which come in very handy if the “original” ones break during disassembly.
Trialli reinforced crosspieces (with an oiler at the end of the tenon) - made of high-carbon steel, uniformly hardened over the entire surface. Withstands high static and dynamic loads. The improved seal design provides reliable protection from sand and dust to the bearing units.
Kraft crosspieces (with oiler) are made of a special stainless steel alloy that is resistant to corrosion. The manufacturer guarantees high quality based on multi-stage control during the production process.
Crosspieces from Weber, GKN, etc. The only disadvantage of imported crosspieces is that the retaining rings often need to be adjusted.
Installation of crosspiece VAZ 2106
First, you should check the presence of lubricant in the new crosspiece on the inner surface of the bearing housings and the spikes of the crosspiece. If necessary, lubricate the crosspiece bearings with Fiol. Place seals and plastic plugs on the crosspiece. Insert the spider spikes into the fork. Place the bearing housings and press them into the fork holes. The bearing should go deeper than the groove for the retaining ring. Install retaining rings. Tap the forks with a hammer (preferably one with a plastic striker). The gap between the bottom of the bearing and the retaining ring is eliminated under the influence of impacts and gaps will appear between the ends of the crosspiece studs and the bearing housings. Use a feeler gauge to check the axial free play of the crosspiece - it should not exceed 0.04 mm. If the axial stroke is greater, replace the ring with a larger diameter. Retaining rings are available in five sizes. For clarity, each size has its own color. Rings with a thickness of 1.5 mm are unpainted, 1.52 mm are dark brown, 1.56 mm are blue, 1.59 mm are black, 1.62 mm are yellow. Check the balancing of the cardan drive and the ease of rotation of the hinge forks.
Here is the result. =)
All that remains is to install the cardan in place =)
Source: www.drive2.com
Rules for choosing a cross
This is what the part looks like
On VAZ 2106, auto mechanics advise changing the crosspieces as a set. In some cases, 3 crosses are replaced at the shank. The best parts are made in Germany. Products from the following manufacturers are installed on the VAZ 2106.
- Trialli with oiler. Made of steel and uniformly hardened over the entire surface. Such parts can withstand significant dynamic and statistical loads.
- Kraft. Made from anti-corrosion stainless steel alloy. The manufacturer provides a warranty on the part.
- Weber, GKN and other foreign manufacturers. The disadvantage of such products is the need to adjust the retaining rings.
- Domestic products. Plus - affordable price.
Replacing the crosspiece on a VAZ 2106 car involves dismantling the cardan. To do this you will need an inspection hole or a jack. Removal and installation are carried out using keys “12”, “13”, “27” and a hammer.
The suspension bearing is installed using a tension puller and an old flange. The release spring is disconnected from the bracket using pliers, then it is dismantled. The cardan is jammed with a screwdriver. Unscrew the nuts and remove 1 end of the cardan. The plank and plate of the suspended structure are dismantled. The cardan is removed. The location of each part is noted so that the balancing of the shafts is not disturbed. The retaining rings are dismantled. Using a puller or vice, remove the bearing. If an anvil is used for this, then the cover of the 2nd bearing should not rest against the plane of this device.
The VAZ 2106 cardan is turned over 180°. Similar actions are carried out with the 2nd bearing. If the process is carried out without a puller, then the blows are made on the crosspiece or on the 2nd part of the cardan (with a transverse crosspiece). The bearing is pulled out of the fork. The transverse cross is disengaged. The puller is installed on the 2nd pair of bearings.
VAZ 2106 replacing the crosspiece yourself
The photo shows the universal joint of a VAZ 2106
Note: The driveshaft is a mechanism that transmits torque from the gearbox to the wheel drive. Used in a variety of vehicles. The main feature is a cardan transmission, invented by Gerolamo Cardano, which allows the transmission of torque between two non-parallel axes. The main working part of the cardan transmission is the crosspieces. They most often require replacement. The VAZ 2106 cardan contains two identical crosspieces. Our instructions will help you replace the VAZ 2106 crosspiece yourself; the replacement is quite simple and will allow you to save on car service costs.
How to diagnose wear on crosspieces
Replacing the crosspiece in a VAZ 2106 is carried out after diagnostics:
- When, during rapid acceleration or braking of a car, when changing gears, a knocking sound from the cardan transmission or vibration of the axle is heard, all this indicates wear of the crosspiece and its bearings. There is an urgent need to replace the VAZ 2106 crosspiece, which has become unusable.
- If you don’t pay attention to these signs in time, then the result will be destruction of the bearing and the cardan falling out directly onto the road. The axle gearbox and the underbody of your car can also be damaged.
Signs of faulty crosspieces
The VAZ 2106 crosspiece, like any other car part, has a certain service life. Theoretically, the service life of the part is quite long, about 500 thousand km, but the real figures are 10 times less. Therefore, replacement has to be carried out after 50–70 thousand kilometers. This is due not only to the quality of the parts, but also to our roads and the intensity of vehicle operation. Lack of periodic maintenance of crosspieces only brings the need for their replacement closer. The following characteristic signs indicate that there is some problem with the hinge:
- blows and knocks;
- chassis vibrations;
- squeaks when driving or accelerating.
Clicks and bumps
Often problems with crosspieces appear when the seals are damaged and dust, sand, dirt and water get inside the bearings. All these factors negatively affect the service life of the product. When the joints wear out, clicks will be heard when changing gears while moving, impacts at a speed of about 90 km/h, and a crunching or rustling sound will also appear. If metallic sounds occur, it is recommended to twist parts of the cardan, for example, by placing the car on an overpass. If large play is detected, the crosspieces will need to be replaced.
When diagnosing the gap in the crosspieces, the gearbox must be in neutral gear.
Video: play of the cardan cross
If clicks appear in the cardan area on my car, but I am sure that the crosspieces are still in good condition and should move, then, most likely, there is simply not enough lubrication in the hinges, for which they need to be injected. If clicks appear, I advise you not to delay maintenance, since the bearings will break and it will no longer be possible to do without replacing the crosspiece.
Creaks
The cause of squeaks in the area of the driveshaft is usually associated with souring of the crosspieces. The problem is clearly noticeable at the beginning of the movement and when driving at low speed, while the car creaks like an old cart.
The malfunction occurs when the hinges are not maintained, when the bearing simply cannot cope with its task. Sometimes, after removing the cardan, it is discovered that the crosspiece does not move in any direction at all.
Video: how the cardan cross creaks
Vibration
Malfunctions in the form of vibration with the universal joints can occur when moving forward or in reverse. The problem can be present with both old bearings and new ones. In the first case, the malfunction is caused by jamming of one of the hinges. If the vibration persists after replacing the crosspiece, then a low-quality part may have been installed or the installation was performed incorrectly. The crosspiece, whether old or new, should move in any of the four directions freely and without jamming. If you have to exert little effort when moving the hinge by hand, you can lightly tap the bearing cup; it may not be seated properly.
Replacing the driveshaft crosspiece on a VAZ 2106
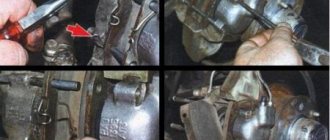
- We first mark the relative positions of the parts (cardan joint forks) so as not to disturb the factory balancing of the cardan shaft during assembly.
- Then we mark the locking rings and their seats in order to install them in their standard places during assembly. Remove the retaining rings (four from each hinge).
We take out the locking rings
- We press the bearings out of the hinge fork using mandrels of a suitable diameter.
- Since the bearings are not pressed in completely (the joint cross rests against its fork), we remove the bearing using pliers
- We disconnect the cardan joint by moving its crosspiece in the direction of the removed bearing, slightly turn the crosspiece and remove it from the hinge fork.
- Press the opposite needle bearing out of the hinge fork.
- We carry out steps 3 and 4 for other needle bearings and remove the cross.
- We do the same with the second cross if necessary.
As you can see, replacing the crosspiece on a VAZ 2106 with your own hands is not particularly difficult.
If necessary, replace the intermediate bearing
- Unlock the nut securing the front shaft fork. We unscrew it and press the fork using a puller from the front shaft.
- Remove the dust deflector from the front shaft.
- Screw the nut onto the threads of the front shaft so that it is flush with the shaft itself
- We compress the intermediate shaft support (we apply force to the inner race of the bearing) and unscrew the nut.
- Remove the support along with the bracket from the propeller shaft
Tip: Remember the position of the arms - the long and short support bracket relative to the driveshaft (it is better to mark the position of the support bracket relative to the driveshaft).
- We unscrew the bolts securing the bracket to the support, remove all the washers and disconnect the bracket from the intermediate shaft support.
Advice: Disassembling the intermediate support requires special tools and certain skills, therefore, it is recommended to change the intermediate shaft support assembly.
Defective parts
- We thoroughly clean the parts with a brush before inspecting them.
- To cull the cardan transmission elements you will need: a bore gauge, a dial indicator.
- Since we have removed the cardan and disassembled it (albeit partially), we check the integrity of the welds. Drive shaft splines so that they do not contain wear marks
- For the rear cardan shaft, we check the presence of balancing weights, the condition of the seams and measure the diameters of the fork holes for the needle bearing. Dents of pipes and misalignment of the holes of the cardan forks are not allowed.
Important: Be sure to measure the diameter of the holes in the universal joint forks, where the needle bearings go, so that it does not exceed 23.825 millimeters. Measurements are made with a dial gauge.
- We check the condition of needle bearings, oil seals, their cages and spider spikes for damage and significant wear.
Note: A clear sign of a defect in the studs, upon detection of which the entire joint is replaced, are longitudinal dents left by the bearing needles.
- At the same time, check (while the cardan is removed) the condition of the rubber coupling of the cardan.
- The presence of cracks, mechanical damage or detachment of rubber from steel liners is not acceptable.
- We check the intermediate support for deformations. Cracks or ruptures of the elastic clip, as well as peeling of the rubber, are not acceptable. Replacing the defective support assembly
- We check the intermediate support bearing, rotate its inner race in two directions, while pressing it against the outer race (the inner race should rotate smoothly). We check the bearing seals for mechanical damage.
- We replace all defective parts.
We assemble the cardan in the reverse order, taking into account the features given below:
- Before installing the front shaft fork, lubricate the splines of the fork and shaft with grease.
- When installing the front shaft fork, tighten the nut securing it with a torque wrench 8.1-10 kgf•m (79.4-98 N•m) and tighten the nut with a chisel.
- When installing the oil seal race, the oil seal itself with the flange onto the front driveshaft splines, we fix the oil seal race by bending its three “tendrils”.
- Using an oil syringe, coat the splined part of the front driveshaft. Remove excess grease with a rag. We unscrew the grease nipple and screw in the plug in its place.
How to change the crosspiece 2106 with your own hands
In the article you will learn for what purposes the 2106 crosspiece on the cardan shaft is needed, as well as how to replace it with your own hands. The Six is one of the few cars that can be repaired independently, without the help of specialists at service stations. Unfortunately, everyone tries to earn as much as possible, and mechanics are no exception. Along with replacing the crosspiece, they will force you to install a new driveshaft, and this significantly increases the cost of service. Moreover, you can also run into “black” craftsmen who will include in the cost of repairs those items that were not actually completed. But we have moved away from the topic of conversation, let's still look at how a car is repaired.
Replacing the crosspiece of a VAZ 2106 - nothing is easier
So what does the cross do? With its help, it becomes possible to bend the driveshaft. Pay attention to how the rear axle flange and the gearbox shaft are located relative to each other. That's right, the axis of the second one is located higher, therefore, you need to somehow cheat in order to transmit the rotation. The driveshaft must “break” in two places so that movement from the gearbox to the rear axle is transmitted without any problems. In addition, the center of gravity of the entire propeller shaft must be such that axial runout does not occur. Don’t forget about the VAZ 2106 suspension bearing; it is used to attach the shaft to the bottom of the car. If it is destroyed, the axial runout increases, which leads to failure of the crosspieces.
To repair the driveshaft you will need the following tool:
- Open-end and ring wrenches for “12”, “13”, “10”. The latter can also be an end one.
- Pliers.
- Flathead screwdriver if necessary.
- Puller for retaining rings.
- Puller for crosspieces.
- Hammer and wooden spacer.
The procedure is quite simple, it will not take much time:
- Place the car on a flat surface, place stops under the front wheels, and lift the rear with a jack. If there is a hole, overpass or lift, these procedures do not need to be performed.
- Using a 10mm wrench, unscrew the two bolts that secure the suspension bearing to the bottom of the car. You shouldn’t remove them right away; it’s better to do it at the end, just before removing the cardan.
- Hold the head of the bolt that secures the cardan and rear axle flanges to each other with a 12mm wrench. Unscrew the nut with the head to “13”.
- Loosen the bolts securing the outboard bearing and apply several sharp blows to the shaft to knock it out of the rubber coupling.
- Using a puller, remove the rings and apply sharp blows to the driveshaft through the spacer with a hammer. In this case, the crosspiece 2106 should literally fly apart - the glasses will fall out of their seats.
- Before installing a new crosspiece, be sure to clean the seat under it and apply a small amount of lubricant. Do not hit the glass, as this will lead to the destruction of the needle bearing. It is very difficult to collect.
- First, install the VAZ 2106 crosspiece on the driveshaft, then on the flange. Or in reverse order.
The middle cross, located at the outboard bearing, changes in the same way. Before installing the cardan, make sure that the retaining rings are installed correctly and that they will not fall out of their grooves with the slightest force. Please note that the new rings that come with the kit may be thicker than the groove for them, so you will have to use old ones. And most importantly, before starting work, it is advisable to outline the location of the propeller shaft relative to the gearbox coupling and the rear axle flange. If an imbalance occurs, an extraneous hum and high vibration will appear.
Source: vaz-remzona.ru
Replacing the VAZ 2106 universal joint
The cardan crosspieces must only be replaced, since the bearing needles and the outer and inner parts of the race wear out, which leads to the formation of play. This indicates the impossibility and inappropriateness of restoring the part. If characteristic signs indicate that the cardan joints need to be replaced, you will need to dismantle the shaft itself, and then begin repairs. For the upcoming work you will need the following tools and materials:
- open-end wrench 13;
- head 13 with a knob or ratchet;
- copper or aluminum extension;
- hammer;
- compression pliers with thin jaws;
- universal puller;
- chisel;
- new crosspiece;
- lubricant “Fiol-1” or “CV joint-4”;
- large screwdriver.
Removing the cardan
On the VAZ “Six” the driveshaft is mounted to the rear axle gearbox, and closer to the gearbox the driveshaft is held by an outboard bearing. Removing the shaft from the car is carried out as follows:
- Unscrew the cardan mount with a 13 key.
Removing the cross
After dismantling the driveshaft, you can immediately begin disassembling the crosspiece:
- We mark the universal joint forks to avoid disturbing the factory balancing during assembly. To apply marks, you can use paint (pictured below) or hit it lightly with a chisel.
- We remove the retaining rings using special pliers.
Installing the crosspiece and cardan
We install the hinge and shaft in the following order:
- We remove the cups from the new cross and insert it into the eyes.
Video: replacing the cardan cross on a VAZ 2101–07
The cardan crosspieces are filled with lubricant from the factory. However, when replacing a product, I always syringe the hinge after the repair. There will be no excess lubrication, and its lack will lead to increased wear. For crosspieces, it is recommended to use “Fiol-2U” or “No. 158”, but in extreme cases “Litol-24” will also do. Although I know car owners who use Litol for both crosspieces and spline joints. When injecting, I pump the lubricant until it begins to come out from under the seals. According to the regulations, the hinges must be serviced every 10 thousand kilometers.
You don't have to be an experienced auto mechanic to replace universal joints. The desire of the car owner and step-by-step instructions will help identify the malfunction and carry out repairs in a garage without making mistakes.
Replacing the driveshaft crosspiece of a VAZ 2106
Replacing the driveshaft crosspiece of a VAZ 2106
So, let's start, as always, briefly and without unnecessary, unnecessary information! It is better to take the original VAZ crosspiece. My choice fell on a domestic plant, the cost is about 120 UAH ($5). It is also worth buying 4 locking rings. Old ones, as a rule, break and become deformed during dismantling.
Before starting work and removing the cardan, it is necessary to make marks (.) on all parts and joints of the cardan, otherwise, if it is not assembled correctly, it will knock, vibrate, and generally fail.
The cardan is connected with 4 x 13 bolts to the rear axle shank. We unscrew them
Next, unscrew the mounting of the outboard bearing.
Remove the cardan from the gearbox
Replacing the driveshaft crosspiece in a VAZ 2107 2105 2106 with your own hands.
Today we will learn with our own hands how to quickly and correctly replace the driveshaft crosspiece on VAZ cars of the classic family, such as VAZ 2107, VAZ 2105, VAZ 2106, etc.
We drive into the inspection hole, as in our case, or lift the car on a lift. Unscrew the 4 bolts on the cardan shaft:
We unscrew the two bolts on the suspension bearing (a 12 or 13 wrench, depending on which bolt you have):
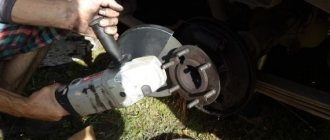
We dismantle the cardan. We wrap the splined part with a clean rag to prevent sand and other dirt from getting there. We tap through the mandrel:
We pull it out using pliers:
We select a suitable mandrel and press out the old cups through it:
The last part is knocked out with a hammer. We clean the seats from sand and dirt with a metal brush, carefully clean all the grooves with a screwdriver, and lubricate them. Installing a new driveshaft crosspiece:
We use round-nose pliers to install new locking rings (they come complete with a new cross):
We check the work by rocking it in each direction. The crosspiece should rotate equally left and right, up and down. If one of the sides rotates worse, then when you put the driveshaft on the car you will feel vibration. One of the sides rotates tighter, so we remove the retaining ring from this side and grind it down with sandpaper to make it a little thinner:
After turning and reinstalling, the flange began to move easily in each direction, it can be easily moved with a finger. At the same time, we check the suspension bearing, twist it, make sure there is no noise or play, the rubber band should be intact and not torn.
When replacing the middle crosspiece, mark the cardan with the half-cardan with chalk so as not to confuse it. The removal process is identical to the rear crosspiece:
The video shows the process in full. Before installing the cardan, lubricate its splined part with nigrol.
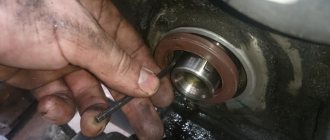
How to replace a driveshaft bearing?
In order to change the propeller shaft bearing , it is enough to knock out the old bearing, after first removing the retaining ring. And slowly hammer the new bearing into place.
Catalog number of the propeller shaft support bearing:
- 1)180505
- 2)62205
“When you choose a driveshaft crosspiece, it is better to give preference to the VAZ crosspiece”
- 1)Buy a cardan shaft crosspiece;
- 2)Buy retaining rings.
How to buy a driveshaft crosspiece for VAZ 2106, VAZ 2107, VAZ 2101, VAZ 2105, VAZ 2102, VAZ 2104?
Before buying a driveshaft crosspiece , you should go through two stages, the first is to select a driveshaft crosspiece and check the driveshaft crosspiece.
I decided to write down information on how to buy a universal joint for a driveshaft because of frequent requests on the Internet about: What are the best manufacturers of universal joints? What are the quality crosspieces? How to buy a high-quality driveshaft crosspiece? How to determine if the driveshaft crosspieces are defective?
Let's look at a list of reliable and inexpensive crosspieces for the VAZ 2106, VAZ 2105, VAZ 2107, VAZ 2101, VAZ 2102, VAZ 2104, VAZ 2103 (Fig. 1).
- 1) GKN cardan shaft crosspiece is a German-made crosspiece, characterized by good quality and a fairly inexpensive price. I advise you to install such a crosspiece on newer cardans, since when installing a crosspiece on a tired cardan, the crosspiece will also wear out quickly.
- 2)The AvtoVAZ driveshaft crosspiece is produced in Russia in the city of Togliatti. It has excellent quality and price. I would buy a cross from AvtoVAZ.
- 3)VolgaAvtoProm driveshaft crosspieces are also good crosspieces, but you should pay attention when purchasing and take time to check the driveshaft crosspiece.
Checking the driveshaft cross
You can check the driveshaft crosspiece using a regular mirror. Place the mirror on the table surface and place the cross on top. Take the propeller shaft crosspiece by the ends and rock it, checking for any play. If, when checking the crosspiece using a mirror, slight play and knocking are observed, then such a crosspiece can also be installed, but slight vibration will be observed, which is not very pleasant.
Tool for replacing the crosspiece and the outboard bearing of the propeller shaft of VAZ-2101, VAZ-2102, VAZ-2104, VAZ-2105, VAZ-2106, VAZ-2107 (Fig. 2).
- 1)Open-end and socket wrenches for 12, 13, 27.
- Copper hammer attachment.
- Use pliers to remove the retaining rings.
- Flange and puller.
Sequence of work for replacing the suspension bearing and driveshaft crosspiece on a VAZ 2106, VAZ 2107, VAZ 2105, VAZ 2104, VAZ 2101, VAZ 2102
- We bring our car to the inspection pit.
- Raise the rear wheel using a jack.
- Remove the driveshaft from the car (unscrew the 2 bolts securing the outboard bearing of the driveshaft with a 13mm wrench, and unscrew the nuts securing the driveshaft to the shank). (When removing the driveshaft, be sure to mark with chalk (Fig. 5) how the parts were installed for ease of reassembly) (Fig. 3,4).
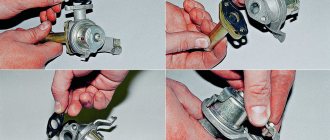
- Replace the crosspiece (remove the retaining rings using pliers (Fig. 6) , knock out and remove the cup of the crosspiece (Fig. 7,8,9).
How to install the driveshaft crosspiece in place?
Remove the two cups of the crosspiece, tuck the crosspiece into the eyes. Put on the cup (Fig. 10). Install the locking ring and put it on (Fig. 11).
Source: www.autoezda.com