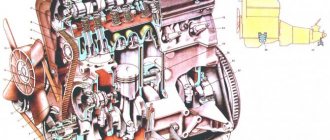
Briefly about the drive design
To change the chain and related elements yourself, you need to know the structure of this part of the power unit. The mechanism that drives the camshaft of the VAZ 2106 engine includes the following parts:
- a small drive sprocket is mounted on the crankshaft;
- large idler gear;
- the upper large gear is bolted to the end of the camshaft;
- double-row timing chain;
- tensioner shoe supported by a plunger rod;
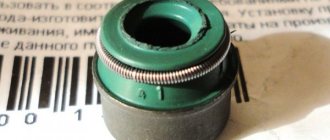
- damper - a metal plate with a wear-resistant lining;
- pin - the chain runout limiter is installed next to the lower sprocket.
When rotating, the chain is held on both sides by the guide and tensioner pads
In older versions of the “six”, a mechanical tensioner plunger was installed, where the rod extends under the influence of a spring. The updated modification of the car is equipped with a hydraulic plunger device.
While the engine is running, the timing chain must be kept in tension, otherwise there will be beating, accelerated wear and the links jumping over the gear teeth. A semicircular shoe supporting the part on the left side is responsible for the tension.
Find out more about tensioning the timing chain: https://bumper.guru/klassicheskie-modeli-vaz/grm/kak-natyanut-tsep-na-vaz-2106.html
After the camshaft sprocket (in the direction of rotation), a damper plate is installed, pressed against the chain drive. To prevent the element from jumping off the lower gear as a result of strong stretching, a limiter is installed nearby - a metal rod screwed into the cylinder block.
In the updated versions of the “six”, automatic tensioning devices were installed, powered by oil pressure
The drive mechanism is located at the front end of the engine and is covered by an aluminum cover in which the front crankshaft oil seal is installed. The lower plane of the cover is adjacent to the oil pan - this feature must be taken into account when disassembling the unit.
Replacement instructions
To install a new chain drive, you need to purchase a set of spare parts and consumables:
- double-row chain, suitable for a specific engine type;
- 3 gears - two large and one small (sold as a set);
- tensioner shoe;
- damper plate;
- power unit front cover gasket;
- high temperature silicone sealant.
Some manufacturers produce complete repair kits that include all the necessary parts.
If, when diagnosing problems, you find oil leaks under the crankshaft pulley, it is worth purchasing a new oil seal built into the front cover. The part is easy to change during the disassembly of the timing drive.
Why is it recommended to change all drive parts, including gears:
- over a long period, while the chain was stretching, the teeth of the sprockets also had time to wear out;
- for the same reason, the damper and tensioner linings were worn out;
- The repair operation is very labor-intensive, and it is impractical to repeat it for each worn-out drive element.
The teeth of worn sprockets are literally licked and allow the chain to slip
Tools and working conditions
As for the special tools, you will need a 36 mm socket wrench to unscrew the nut (ratchet) holding the crankshaft pulley. Because the ratchet is located in a recess, it is much more difficult to grab it with an open-end wrench.
With a special wrench with a long handle, it is easy to tear off the ratchet nut when unscrewing
The rest of the toolset looks like this:
- a set of open-end wrenches and sockets with a ratchet and a wrench;
- flat screwdrivers - regular and reinforced;
- mounting blade;
- pliers;
- hammer;
- rags, protective gloves.
Replacing the timing chain drive is done using a regular garage tool.
It is most convenient to replace the timing chain in an inspection ditch in a garage. As a last resort, an open area will do, but then to disassemble the unit you will have to lie down on the ground under the car.
Preliminary disassembly
The purpose of the preparatory stage is to provide convenient access to the front cover of the power unit and the timing drive. What to do:
- Place the car on the inspection hole and turn on the handbrake. For ease of disassembly, allow the engine to cool to a temperature of 40-50 °C.
- Go down into the ditch and remove the oil pan protection. Immediately unscrew the 3 front bolts connecting the pan to the end cover, loosen the nut on the lower mount of the generator. To loosen the belt, you need to unscrew the lower mount of the generator
- Open the hood and remove the air filter box attached to the carburetor. The air filter housing blocks access to the valve cover mounting nuts
- Disconnect the tubes running above the valve cover. Disconnect the drive cable of the starting device (in common parlance - the choke) and the accelerator rod. The gas pedal linkage is attached to the valve cover, so it needs to be removed
- Remove the valve cover by unscrewing the 10 mm wrench bolts. The valve cover is removed after unscrewing 8 M6 nuts
- Disconnect the electrical cooling fan connector.
- Loosen and unscrew the 3 bolts holding the electric fan to the main radiator, and pull the unit out of the opening. The cooling fan is attached to the radiator with three 10mm bolts
- Using a spanner wrench, unscrew the nut on the generator mounting bracket. Using a pry bar, move the housing towards the engine, loosen and remove the drive belt. To loosen the belt, the generator housing is moved towards the cylinder block
In addition to the listed parts, you can remove other elements, such as the battery and the main radiator. These steps are optional, but will help increase access to the chain mechanism.
At this stage, it is recommended to clean the front part of the engine as much as possible from dirt and oil deposits. When you remove the timing cover, a small opening will open in the oil sump where foreign particles can enter.
Disassembling the injection “six” is done in the same way, only together with the air filter housing it is necessary to dismantle the corrugated pipe leading to the throttle, the crankcase ventilation pipes and the adsorber.
Video: removing the electric fan and radiator of a VAZ 2106
Removing and installing a new chain
If this is your first time disassembling the camshaft chain drive, strictly adhere to the sequence of work:
- Unscrew the ratchet nut with a 36mm wrench. To loosen, fix the pulley in any convenient way - a mounting spatula, a powerful screwdriver or a pipe wrench. It is more convenient to unscrew the ratchet nut from the inspection ditch
- Remove the pulley from the crankshaft by prying it from different sides with a flat-head screwdriver. The tight-fitting pulley easily comes off if you pry the edge with a pry bar.
- Unscrew the 9 bolts securing the front cover using a 10 mm wrench. Using a screwdriver, separate it from the mounting flange and move it to the side. The front cover is held on by six bolts and three 10 mm nuts.
- Bend the edges of the lock washers on the bolts securing the two large sprockets. Grasping the flats on the end of the crankshaft with a wrench and holding the mechanism from rotating, loosen these bolts with another 17 mm wrench. The locking plates on the gear bolts are unbent using a screwdriver and hammer
- Align the mark on the top gear with the protrusion on the camshaft bed. Before removing all the sprockets, you need to align the mechanism with the marks
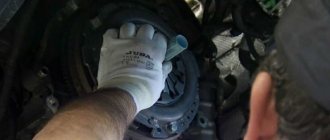
- Remove the damper and tensioner plunger by unscrewing 2 10 mm socket-head mounting screws. The damper is screwed on with two M6 bolts, the heads of which are located outside the cylinder head.
- Finally unscrew the bolts and remove both sprockets, carefully lowering the chain down. When all the marks are set and the chain is loosened, you can finally unscrew the bolts and remove the gears
- Unscrew the stopper, remove the chain and the small lower gear without losing the keys. Unscrew the tensioner shoe. If the marks are aligned correctly, the sprocket key will be on top and will not get lost
During the disassembly process, you may encounter a situation where a chain stretched beyond normal limits has destroyed or broken the damper, and debris has fallen into the crankcase. Ideally, they should be removed by dismantling the pallet. But since the oil pump is equipped with a mesh, and waste always accumulates in the crankcase, the problem is not critical. The likelihood that part residues will interfere with oil intake is almost zero.
When replacing the chain on my father’s “six,” I managed to drop a piece of plastic stabilizer that had fallen off into the crankcase. Attempts to extract it through the narrow opening were unsuccessful; the fragment remained in the pan. Result: after the repair, my father drove more than 20 thousand km and changed the oil; the plastic is in the crankcase to this day.
Installation of new spare parts and assembly is carried out in the following order:
- Clean the adjacent surfaces of the cover and cylinder block, covering the crankcase with a rag.
- Lower the new chain into the cylinder head opening and secure it with a pry bar so that it does not fall. To prevent the chain from falling into the opening, secure it with any tool
- Since you aligned all the marks before removing the chain, the keyway on the crankshaft should be aligned with the mark on the block wall. Carefully install the small sprocket and put on the chain. Check the position of the marks before installing the chain drive
- Install a new damper, limiter pin and tensioner shoe. Bolt the idler and top gears with the chain on.
- Install the plunger and use the spring mechanism to tension the chain drive. Check the position of all marks. When the outer bolt is unscrewed, a plunger mechanism is activated, tensioning the chain
- Apply sealant to the cylinder block flange and screw on the cover with gasket.
Further assembly is carried out in reverse order. After attaching the pulley, it is recommended to re-check the correct position of the marks. The mark on the side of the pulley should be opposite the long strip on the front cover.
Video: how to correctly change the chain on a VAZ 2101-07
Purpose of the sedative
The damper is designed to dampen vibrations and jerks that occur during startup on the timing chain. Without this device, the chain would easily break off the guide gears and break at the most inopportune moments.
Most often, the timing chain breaks at the moment when the crankshaft rotation speed reaches its maximum. The break occurs so quickly that the driver has no chance to react in time and turn off the engine. As a result, all engine valves fail.
After the valves, problems begin in the cylinders. It is almost impossible to restore the engine after such a breakdown. Especially when it comes to seven. After all, the cost of repair work can significantly exceed the cost of the entire car. And it’s easier to sell a car for spare parts than to restore the engine.
Therefore, we can conclude that the timing chain guide is one of those parts that needs constant monitoring. This is the most important protection of your engine from major breakdown.
Checking the chain for suitability
Every element of the car is subject to wear and tear. In order to avoid troubles on the road, especially when traveling long distances, it is recommended to regularly check car parts for wear. The same applies to the timing chain. How do you know if the chain is worn out or not? A worn and stretched timing chain is extremely difficult to distinguish from a new chain in appearance. The chain may not be mechanically damaged, but it may have worn pins - this is almost impossible to determine by visual inspection.
To check chain wear, it’s time to use a proven method. To do this, you need to take 20 cm of chain - place one side parallel to the horizon, then turn it in your hand so that the pin is perpendicular to the surface. Next, evaluate the hanging angle of the chain. On an unworn chain, the angle of inclination to the horizontal surface will be no more than 20 degrees; on an old worn chain, the angle will be more than 45 degrees. This indicates that the timing chain needs replacement.
You can also use another method to determine the degree of chain wear. To do this you need to take a caliper. Count out 8 links and determine the distance between the outer pins - it should be within 122.6 mm. Thus, it is necessary to measure at least three arbitrary sections of the chain; if in any section the distance exceeds the maximum permissible value, the timing chain needs urgent replacement.
Purpose and characteristics of the circuit
The timing drive mechanism of the VAZ 2106 engine solves 3 problems:
- Rotates the camshaft, which opens the intake and exhaust valves in the cylinder head.
- The oil pump is driven by an intermediate sprocket.
- Transmits rotation to the ignition distributor shaft - distributor.
The length and number of links of the main drive element - the chain - depends on the type of power unit. The manufacturer installed 3 types of engines with a displacement of 1.3, 1.5 and 1.6 liters on the “sixth” Zhiguli models. In the VAZ 21063 (1.3 l) engine, the piston stroke length is 66 mm, on modifications 21061 (1.5 l) and 2106 (1.6 l) - 80 mm.
Many manufacturers indicate information about the number of links directly on the packaging
Accordingly, on power units with different displacements, chains of two sizes are used:
- 1.3 l engine (VAZ 21063) – 114 links;
- engines 1.5-1.6 l (VAZ 21061, 2106) - 116 links.
How to check the length of a chain when purchasing without counting the links? Pull it out to its full length, placing both parts close to each other. If both ends look the same, you have a 116 link part for long stroke engines (1.5-1.6L). On a short chain for VAZ 21063, one end link will rotate at a different angle.
If the ends of the stretched chain look the same, there are 116 sections.
How the timing chain drive of the VAZ 2106 car works: review and replacement
The popular VAZ 2106 car, whose production began during the Soviet era, was equipped with three types of engines - with a displacement of 1300, 1500 and 1600 cm3. The design of the listed motors is the same, the difference is only in the sizes of the cylinder-piston group, crankshaft and connecting rods. On all power units, the timing gears are driven by a double-row chain. The latter gradually stretches out and needs periodic tightening; the minimum service life of the part is 100 thousand kilometers. When tensioning does not produce results, the entire chain drive is changed - along with the gears.
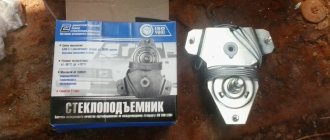
Which timing chain and tensioner should I install on the VAZ 2106, VAZ 2107?
timing chain number is 2103-1006040, the average price is 380 rubles.
Analogues:
- Fenox PC2103C3 — 519 rub.
- Kraft KT 017736 — 620 rub.
The original number of the timing chain tensioner is 2101-1006060, the average price is 364 rubles.
Analogues:
- TSN 671 — 254 rub.
- Riginal RG2101-1006060 — 230 rub.
- Trialli MT 151 — 407 rub.
Prices are current for 2021, although the cost has not changed much in three years.
Replacing the VAZ 2106 timing chain without disassembling
Replacing the timing chain without disassembling
There is a simple way to replace the timing chain of a VAZ 2106 without removing the front cover. To do this, you only need to remove the valve covers and prepare a new chain.
The principle of how to change the timing chain on a VAZ 2106 is as follows: you need to disconnect one link of the old chain, as well as one link of the new one. After this, the edges of the old and new chains must be connected by making a corresponding mark at the junction with chalk or a corrector. Then you need to take the second end of the old chain and pull it out of the mechanism, while the new chain will gradually be put on the sprockets.
When the old chain comes out completely, it must be disconnected from the new one, and carefully rivet the links of the replaced chain.
How to change the timing chain on a VAZ 2107 with an injector
Replacing the timing chain on a VAZ 2107 injector is carried out according to the same principle as on a Zhiguli 2106. Moreover, you can install a new element either in the standard way by removing the front cover, or in a simpler way.
Checking the timing chain quality
Before changing the timing chain on a VAZ-2107, you should decide on the manufacturer and quality of the chain.
The reliability of a new product can be roughly checked by taking the chain by one end and lifting it horizontally. Holding the chain edge up, its second end will bend down slightly - the smoother this bend is, the stronger and more reliable the product!
Prepare the necessary keys and be sure to put proofreader or chalk somewhere nearby.
How to set the ignition on a VAZ 2106 - procedure
First, you will need to install the ignition mark. The crankshaft can be rotated either using a ratchet or using a special wrench using the nut. On the front cover of the engine and on the crankshaft pulley there are ebbs and notches, the combination of which corresponds to different ignition timing:
The first mark in the direction of travel is an advance of the ignition angle by 10 degrees. Angle advance is an adjustment to the fuel burning rate. So, 10 degrees is the mark for 72 gasoline.
Next comes the middle mark - 5 degrees ahead. It is for 80 gasoline.
After the installation of the ignition mark is completed, you must immediately set the required gap in the contacts, naturally, where they exist. To do this, remove the distributor slider and unscrew the breaker fixing screw.
Before setting the gap, it is advisable to clean the contacts with sandpaper (600-800)
Well, now we go directly to the ignition installation of the VAZ 2106. We unscrew the distributor mount (nut 13), and then pull it out of the housing.
Now you need to insert the distributor into place, taking into account several mandatory points:
- We set the top dead compression stroke mark in the first cylinder; accordingly, at this moment the spark should appear in it. In order to catch this moment, we put the cover on the distributor and mark the place where the armored wire from the spark plug of the first cylinder enters. Now you need to remove the cover and align the outer contact of the slider exactly opposite the mark. That is, at the moment when the piston is at top dead center, a spark is supplied from the central wire of the distributor through the contacts of the runner to the armored line from the first cylinder.
How to replace a dampener
To work you will need:
- new part (cost approximately 500 rubles);
- 20 centimeters of one and a half millimeter steel wire;
- open-end and socket wrenches;
- flat screwdriver.
- Remove the air filter.
- Using a 13mm socket wrench, unscrew the mounting bolts on the cover. Remove the cover.
- Loosen the cap nut that secures the chain tensioner.
- Using a screwdriver, carefully press out the shoe and hold it in this position.
- Tighten the loose cap nut.
- Insert the wire hook into the eye of the damper.
- Unscrew the mounting bolts, holding the device itself with a hook so as not to drop it into the motor.
- After the mounting bolts have been removed, use a spanner to turn the timing shaft a third of a turn. This will release the chain tension.
- Using a steel hook, carefully remove the damper.
- Put a new one in its place.
- Follow steps 1 to 9 in reverse order.
So in a short time you can easily replace the damper in your garage, saving about 700 rubles. Usually this amount is asked to the service station for similar work.
Replacing a timing belt without marks
In some cases, it is necessary to install the belt if there are no marks.
For this you will need:
- Calipers.
- Screwdriver
First of all, remove the belt protective cover and unscrew the spark plugs.
Let's take a closer look at the process of replacing a belt without marks on an 8-valve engine.
- It is necessary to align the camshaft in the overlap, for example, it is convenient to select the second cylinder. To do this you will need a caliper and a screwdriver. Slowly turn the camshaft clockwise and observe the overlap position. To do this, use a barbell. Place it on the expansion joints and rotate the camshaft until the expansion joints are at the same height. That is, the position of the barbell should be straight, not beveled.
- After determining the overlap, it is necessary to set the TDC (top dead center) of the second cylinder. Insert a screwdriver into the spark plug channel. Slowly rotate the engine, only in the direction of engine movement, so that the piston rises up. At a certain point, you will feel that the flywheel begins to rotate easily. After this, you need to feel the lower and upper points with your hand and set the upper one.
- After adjustments, put on the new belt so that it matches, you may need to turn it a little. And also pull it tight.
- The next stage is checking the belt installation. Rotate the flywheel and look for a mark on it. Set it to the top position and check the marks on the camshaft. If the adjustment is made inaccurately, the risks will disappear.
On a 16-valve engine (2 camshafts), the installation is carried out according to the same principle.