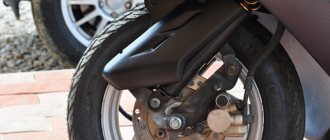
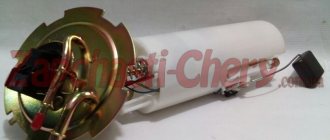
What does the fuel pump look like?
External view of the fuel pump on Lifan Solano (also suitable for Breeze)
The pressure in the fuel system (rail) of the machine is an important parameter that should be monitored regularly once every few months. This is a simple procedure that is carried out first, after which they begin to eliminate other shortcomings. The quality of engine functioning in all operating modes depends on the correct pressure.
Possible options
You can use several methods to check. The simplest option would be to purchase a special device, which includes a pressure gauge and some other elements. The price of such a set is about forty dollars, depending on the manufacturer (we specifically indicate the price in dollars, since the price in rubles now fluctuates greatly due to fluctuations in the exchange rate).
If you turn to a service station for help, then for a one-time measurement you will be asked for an amount equal to one fifth of the price of the finished device.
Let's have fun
You can use special means
But, there is a more affordable option, where we will use improvised means. We are talking about a standard pressure gauge that allows you to measure tire pressure. Almost every car owner has it. But here you need to remember that air pressure gauges are designed to measure pressure with large values, about sixteen atmospheres, while models for fuel are limited to six atmospheres.
Replacement
Replacing a fuel pump with a new one requires careful selection of the manufacturer; each pump has its own performance. The absolute leader in this area is BOSCH.
To replace or remove for repair the VAZ 2110 fuel pump we will need: a 17mm wrench, depending on the modification, a 10mm socket, pliers, a flat screwdriver. We remove the rear seat, it is advisable to unscrew the gas tank cap to relieve excess pressure in the system. Disconnect the plastic pump power terminal.
Depending on the modification, we remove the fuel supply and return hoses, or, by pressing the spring clip and pulling the hose, disconnect it from the fuel pump housing. In the second option, use a 17mm wrench to unscrew both fittings and disconnect the tubes.
In both cases, it is necessary to disconnect carefully, since the system is under pressure and when disconnected, the pressure will be released from the injector and a small amount of fuel will leak. If the performance of the old fuel pump is small, there will be no pressure in the system.
Unscrew the 8 nuts from the studs using a 10mm socket and remove the retaining ring with the seal. Carefully pull out the VAZ 2110 fuel pump housing at a slight angle so as not to damage the fuel level sensor; repairing it is unlikely. Using a screwdriver and pliers, remove the lower part of the fuel pump housing and remove the connectors and hoses from the pump. We dismantle the pump.
Pressure check
The first sign that should hint at a malfunction in the engine power system is its unstable operation; the engine may stall or stall.
Even those who lack the appropriate skills can figure out how to measure the pressure of a fuel pump. So, you will need to find a special plumbing-type tape, which is used to seal threaded connections, as well as the pressure gauge itself, which is a special measuring device with a pipe on which the specified tape should be wound.
The diameter of the pipe should be nine millimeters. To ensure fire safety, it is necessary to cover the generator with heat-resistant film or other object. Next, we approach the ramp (read how to measure the pressure in the fuel rail here), the location of which is different for all cars. Focus on the specific model of your vehicle and its instructions.
You can also use a regular air pressure gauge.
Step by step details
This procedure can be carried out both in your garage and in the field, when there are no additional tools at hand.
As for the pressure on different car models, it can be completely different. Check the exact values on websites with car instructions. For example, on domestic VAZ cars, where the engine volume is 1.6 liters, the fuel pump pressure should be about four atmospheres.
Restoring the fuel pump
If the engine stalls while driving, the cause of the malfunction may lie in its electrical part. Check the fuel pump relay. Connect a tester to the fuel pump connector (sold in car stores, it is a measuring device with a wire and a clamp at the end), turn on the ignition and observe the behavior of the light bulb. If the light comes on for a couple of seconds, look for the cause of the problem elsewhere.
Problems identified in the fuel pump are eliminated with the help of special repair kits purchased in specialized stores or from car dealers. If necessary, the following must be replaced: diaphragm, valves, gaskets and fuel filter. Some of these parts inevitably have to be changed from time to time. You can replace parts yourself or at a service station.
A mechanical pump should pump half a liter of fuel in 30 seconds. If less fuel is pumped, its performance can be restored by increasing the pressure. To do this, pump the fuel line running between the fuel pump and the gas tank with compressed air. In addition, you can remove the control gasket from under the fuel pump.
Sometimes the damage to the fuel pump is so critical that the only solution is to replace the unit. Replacing the fuel pump involves dismantling it. Most often, the fuel pump becomes unusable due to damage to the diaphragm. You can secure the damaged area with plastic film.
Such minor repairs will not last long, but they will help you get to the service station, where the unit will be replaced. It is not recommended to change the fuel pump yourself; entrust this operation to professionals from a service station. If the car is under warranty, the fuel pump is replaced under warranty at your car service center. Good luck and easy travels!
Instructions for diagnosing pressure and repairing a fuel pump
In this situation, the absence of a vacuum effect in the pipe will indicate that the diaphragm or discharge valve has been damaged.
And, if there is no vacuum or discharge pressure, then in addition to the indicated possible breakdowns, it may turn out that a foreign object is stuck in the fuel pump filter.
Don't forget to wash the filter
To eliminate it, it will be enough to rinse the filter with regular gasoline, and then blow it with compressed air or a compressor.
If the filter is excessively deformed or cannot be cleaned to the required level, it must be replaced with a new one.
How to buy a quality device?
The price for a VAZ 2110 fuel pump in market conditions will be 2 times lower than in a specialized store. The equipment is in durable and sealed packaging. Inside the package is purified gasoline. If you smell gasoline, then the seal of the packaging is broken and there is a possibility of corrosion forming inside the gasoline pump. Submerged equipment is lubricated and cooled by fuel. When using low-quality additives and gasoline, internal electrical mechanisms are corroded. If additional substances are not used in the operation of the device (dry), then the brushes wear off and it overheats. The service life of the equipment is longer. Some car owners are planning to replace the VAZ 2110 Bosch fuel pump, the characteristics and pressure of which are not normal only due to long-term use. Its pressure can be 6-7 atmospheres. It was amazing to hear from an experienced driver his method for testing the fuel pump. To do this, he took a jar of water, turned it on on the battery, and by the flow of liquid he realized that the power of the gas pump had decreased.
Checking the serviceability of the fuel pump on the injector
When, when you turn the ignition key, you hear a slight buzzing, a slight hum, this is how the fuel pump works, pumping gasoline creates pressure in the system. If, when you try to start, there are no such signs of the fuel pump working, then you can assume a malfunction of the electrics, the pump itself or its individual parts. Therefore, let’s look at how you can check the operation of a gas pump using a step-by-step logical chain. Starting from whether power is supplied to the fuel pump and ending with whether the fuel pump pumps at all, and if so, what pressure is created in the fuel rail.
Step 1: Checking the fuse
Checking the fuel pump fuse involves inspecting the integrity of the conductive plate and, if broken, replacing it. But if there is no new fuse, then wind one strand of copper wire around the fuse contacts. If it burns out again, it means the problem may be in the wiring.
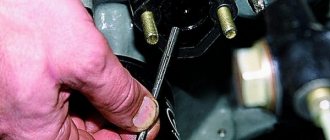
Stage 2: Checking the relay
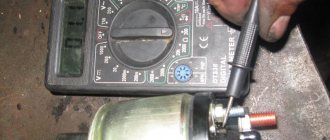
To check the fuel pump relay, remove it from the socket and connect a 12 volt light bulb according to the diagram. If the light bulb works, the relay itself is also working properly. An alternative is to use a multimeter in ohmmeter mode to measure the resistance of the relay coil winding. One probe is connected to terminal 85, and the other to 86. The device will show a break if the relay has failed.
Make sure that the terminals are not oxidized - this will negatively affect the power supply to the fuel pump engine!
Stage 3. Checking the power supply to the BN
Checking the fuel pump voltage is done using a multimeter . The probes of the measuring device in voltmeter (from 0-20 volts) must be connected to the power terminals of the fuel pump. Turn on the ignition and take readings on the device. 12-12.5 volts is normal operating voltage. If there is voltage, but the pump does not work, check the electric motor.
Stage 4. Checking the fuel pump motor
To prevent damage to the electric motor, we supply 12 volts directly from the battery to the fuel pump terminals. It works - we check its performance, check valve, measure the pressure with a pressure gauge. If it doesn’t work, check the coil for a break.
When voltage is applied to the terminals of the gasoline pump, does it not work? Let's check the stator winding: take a tester (multimeter) and switch it to ohmmeter mode, it should show resistance, otherwise there is a problem with the winding and it needs to be replaced. If there is a resistance reading, the problem may be that there is a short winding on the fuel pump body. The tester probe goes to the positive terminal, the second one goes to the body. If it shorts, there will be no break.
Step 5. Checking the coarse filter
By removing the coarse filter (see vehicle technical documentation) from the fuel pump, you can even visually determine how dirty it is. If there is a large amount of deposits, it is recommended to replace the filters; if the problem occurs on the road, use a brush and gasoline to clean it.
Step 6: Check the check valve
The check valve must constantly prevent the movement of liquid in the opposite direction. During operation, its performance decreases, which reduces its technical characteristics.
1 way . Checking the check valve involves measuring the pressure with a pressure gauge. It needs to be connected to that part of the system that is directly involved in supplying fuel to the internal combustion engine. Pressure readings should not exceed 3 kg/sq.m. see (true for passenger cars). And when the engine is stopped, the pressure should not drop sharply.
Checking and cleaning the check valve
Method 2 . To check the operation of the fuel pump check valve without a pressure gauge, you need to clamp the return line and watch how the engine operates. If the check valve is faulty, the internal combustion engine will operate at higher speeds (provided there are no other problems).
3 way . Combines diagnostics and cleaning of the check valve at the same time. Remove and inspect it—clogging that requires cleaning can be seen with the naked eye. You can blow out the valve with a dense stream of air, but it is better to pass water through it under pressure. This way you combine checking the valve with cleaning it. If after this the valve does not work, it needs to be replaced.
Step 7. Pressure check
In order for diagnostics to correctly determine pressure readings, you need to reset the initial fuel pressure by turning off the fuel pump fuse.
Checking with a pressure gauge how the fuel pump pumps
How to check a fuel pump with a pressure gauge
You can check the fuel pump with a pressure gauge for serviceability as follows: connect the device to the fuel rail. The output is through the edge of the hood onto the windshield, where we install the device securely.
We record measurements in:
Static position . Turn the ignition key and look at the pressure gauge readings, they should not exceed 3.7 atm .
Dynamics . We turn on third gear (speed about 50 km/h), observing the pressure gauge data. When driving, if the problem is pressure, the readings will be either below 3 atm. , or above 3.7 atm .
Low pressure in the fuel system may be due to a fuel leak. The passage of fuel will show a decrease in pressure below 1.6 atm. Fault location: injector or fuel regulator.
It should be noted that, despite all the similarities (principle of operation, purpose), the methods for diagnosing a mechanical fuel pump differ, and in what way we will consider in more detail below.
Different measuring methods
In addition to measuring against the wall, there are many other ways to measure yourself. One of the options for checking the fuel supercharger is the “plug” diagnosis. In this case, the return line is clamped for two seconds, the engine starts, and the pressure reading is taken.
Another testing option. The speed of the power plant increases to three thousand revolutions per minute. At the same time, you need to monitor the instrument readings. If the pressure drops to 0, this is a sign of a “dead” pump.
The pressure on the ramp is measured as follows:
- fum tape is wound around the pipe;
- the device hose is reinforced with a clamp (if homemade);
- a rag is placed on nearby parts to prevent fuel from spilling (especially carefully you need to close the generating device in order to avoid a fire hazard in the engine space);
- there is a cap on the fuel rail that needs to be unscrewed;
- access to the hole with the nipple is opened - the latter is unscrewed with a cap from the car wheel;
- To prevent gasoline from splashing too much, it is necessary to release the pressure in the vehicle in advance;
- the end of the meter hose is threaded into the ramp hole and is also secured with a clamp;
- The rag is removed, the engine starts, and readings are taken.
Article on the topic: How to intentionally lean the mixture in a carburetor
On a vehicle without return.
- It is necessary to measure the pressure at the outlet of the fuel pump module (located on the fuel tank). For measurements, a hose with a diameter of eight millimeters is suitable, which must be resistant to gasoline. An ordinary pressure gauge is suitable as a meter.
- The original hose is removed from the pressure gauge and an 8 mm one is inserted. Pressure readings are taken, which should be within 5-7 atm.
Measurements are made in different ways:
- with the ignition on, watch how much the scale needle jumps;
- measurements are carried out with the RTD (fuel sensor) hose removed;
- separate idle pressure test;
- check with a pinched return hose.
Checking the fuel pump of a carburetor car (mechanical)
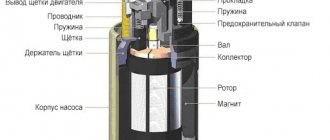
Mechanical fuel pump - diagram
To check the operation of the fuel pump, you should:
Delayed jet output is not a sign of a breakdown, especially if the car has been parked for a long time. As a rule, diaphragms eight and nine are the main cause of malfunction.
Be that as it may, you need to inspect both the strainer and the inlet/outlet valve.
Even if the gaskets are replaced, fuel may leak. In this case, the problem lies in the tightness of the fuel pump housing due to deformation during repairs.
Let's summarize:
The causes of fuel pump problems, both electrical and mechanical, are varied, and the need to find/fix a breakdown may take you by surprise along the way. By following the above recommendations, you will be able to independently carry out the entire necessary set of measures to diagnose this device. And you should start with the power supply (if it is an electric fuel pump) and the operation of the diaphragm when checking a mechanical fuel pump. Very often, the unstable operation of a fuel pump is not due to its breakdown, but to related parts - a filter, check valve or injectors.
Source
Determination of RTD performance
An RTD is a sensor that, if faulty, affects pressure readings in the entire system. To determine the performance of an RTD, 2 main methods are used.
- Close the nearby contacts on the diagnostic block near the gearshift lever if the pressure with the engine stopped is below 2.8 atm. A short circuit will allow the fuel pump to bypass the engine.
- Stop the fuel pump. Measure the pressure, which under normal conditions should drop to 0.7 atm and remain at this level, without varying. On the contrary, if the indicator instantly drops to 0, either the sensor is faulty or there is a problem in the pump return system. Fuel leaks, poor condition of injection elements, etc. are also possible.
Fuel pump malfunction: main signs and symptoms
The performance of electric fuel pumps, which are a mandatory element of the fuel system of injection cars and are mounted inside the fuel tank, is much higher compared to mechanical fuel pumps. Mechanical pumps are installed on carburetor engines and are mounted outside the gas tank.
An implementation scheme is also possible when there are two fuel pumps: one device is activated when it is necessary to supply a small amount of fuel at a higher pressure, while the second pump works with a large volume of fuel, supplying it under reduced pressure.
The list of main signs that indicate a breakdown of the fuel pump or a clear decrease in its performance includes:
A possible cause of these malfunctions is low pressure in the fuel system. In other words, in different operating modes the engine simply does not have enough fuel. To diagnose and fix the problem, you need to know how to check the pressure of the fuel pump yourself.
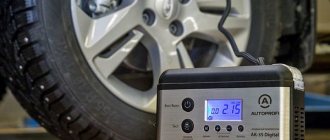
What devices are used
Converted tire pressure gauge
Several instruments can serve as devices for taking pressure readings.
- A special device purchased from an auto parts store. It comes complete with an adapter, drain hose and pressure gauge. Costs about 1.5 thousand rubles.
- Converted tire pressure gauge. The instrument scale and tube are subject to modification. As you know, the air pressure gauge shows a value of up to 20 atm, and the fuel measurement limit is around 5-7 atm. For this reason, reading errors may occur, and the device is modified to take this into account. Regarding the tube: you need to change it to a gas-resistant version.
Table of fuel pressure values by car brand
| car model | Pressure, atm |
| fiat albea | 3,8 |
| Lifan Solano | 3,8 |
| Chevrolet Lanos | 3,8 |
| Chevrolet Cruze | 4 |
| Hyundai Solaris | 4 |
| Hyundai accent | 4 |
| ford focus 2 | 4 |
| UAZ Patriot | 4 |
| UAZ 409 engine | 3,8 |
| subaru legacy | 3,8 |
| Subaru | 3,8 |
| Renault Logan | 3,5 |
| Priora | 3,8 |
| Peugeot 308 | 3,8 |
| Niva Chevrolet | 3,8 |
| Matiz | 3 |
| m57 bmw | 3,8 |
| Lacetti | 3,8 |
| Kia Spectra | 3,8 |
| viburnum | 3,8 |
| infiniti qx56 | 4 |
| ZMZ 406 | 3 |
| ZMZ 405 euro 2 | 3 |
| gazelle 405 euro 3 | 4 |
| gas 3110 | 3 |
| VAZ 2115 | 3 — 3,8 |
| VAZ 2114 | |
| VAZ 2112 | |
| VAZ 2110 | |
| VAZ 2107 injector | 2,5 — 3 |
| gazelle 4216 | 3,8 |
| z18xe | 3,8 |
| nissan primera | 3,8 |
| lexus is 250 | 3,8 |
| ix35 | 3,8 |
| Daewoo Nexia | 3,2-3,8 |
How to check the fuel system at home?
The default first measurement point is the fuel rail exit. Here we certify the entire system and the fuel pressure regulator in particular. The condition of the injectors is assessed based on measuring the pressure at the inlet and outlet of the ramp. And by the pressure at the outlet of the pump and in front of the fuel rail, we can judge both the condition of the pump itself and the fine filter.
Fuel rail pressure
Having found the tube under the hood that distributes gasoline to the injectors, we feel for the plastic cap on it. Its dimensions and texture are almost identical to those on wheels. Under this plug is the familiar spool valve. The unit is necessary to bleed excess pressure from the fuel line after a recent engine stop, for example, when replacing a fine filter.
Bleeding fuel from the line is as easy as shelling pears. It is enough to press the spool, placing a bottle or rag in front of it. Before connecting the pressure gauge, this same nipple must be unscrewed according to a principle similar to dismantling the wheel spool rod.
The pressure gauge is connected to the fuel rail using a hose. To avoid leaks and breakdowns, the tube in the area of the fittings is crimped with clamps. Having installed the equipment, start the engine and first of all check whether gasoline is leaking at the points where the measuring equipment is connected. If everything is in order, we proceed to taking readings.
Systems with and without full “return” give different numbers on the pressure gauge. First, let's look at diagnosing a fuel system with a return line:
- After starting the engine, the pressure in the fuel rail should be 2.5-2.7 atmospheres.
- When re-gassing, the pressure should increase to 3 atmospheres.
For systems with an RTD located in the pump housing, the numbers should be 3.8 and 4 atmospheres, respectively. Short-term pressure fluctuations within 0.2 atmospheres indicate a clogged coarse filter (fuel pump intake screen). The reason for this is the mediocre care of gas stations about saving tanks, observed, as a rule, among outsiders in the rating of gas stations in terms of gasoline quality.
Fuel pressure regulator - is it working properly?
Continuing the inspection of the fuel system, it is worth checking the fuel pressure regulator, a part that ensures a constant pressure of gasoline in the line. On fuel systems with “return”, this element is located in the fuel rail, and the hose coming from it is called the return line.
When should measurements be taken?
The operation of the power system is structured as follows:
When the wear of the regulator (abbreviated as RTD), pump or injectors reaches a critical level, the pressure in the gasoline circuit will change towards a decrease or increase. There are 2 possible scenarios: there is not enough fuel mixture for normal engine operation, or there is an excess of it - the spark plugs are literally flooded with fuel.
In both cases, checking the pressure in the fuel rail located next to the cylinder head will help identify the problem. The element is a manifold with branches for injectors, to which the main gasoline line is connected.
The fuel pressure in the manifold should be measured if the following symptoms occur:
The first two signs indicate a clear lack of gasoline, resulting from a drop in pressure in the ramp. The third case is unburnt fuel entering the exhaust manifold with subsequent combustion (a popping sound is heard). The fourth symptom indicates leaking injectors when the cylinders are filled with pure gasoline during parking. Until the pistons release excess fuel, the engine will not start.