Replacing the fuel pump assembly for Lada Largus
When the pressure in the Largus fuel system decreases, you should first of all pay attention to the performance of the fuel pump, since it is this part that is responsible for the normal operation of the system. If it turns out that the pressure is weak, then the reasons may be as follows:
- Reduced pump efficiency
- The mesh (strainer) of the fuel pump is clogged
If the problem is in the grid, then we change it to a new one, which you can read about in the following reviews on Lada Largus repairs. In the meantime, let's look at the procedure for replacing the assembled fuel pump module on Largus. And for this we may need the following tool:
- flat blade screwdriver
- two short screwdrivers (phillips preferred)
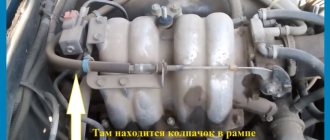
So, the fuel pump on Lada Largus cars is located in the gas tank, and to get to it, you need to remove the back seat and pry off the plastic plug, as is clearly demonstrated in the photo below:
After this, disconnect the power plug from the module.
Now, using two screwdrivers, press the fitting clamps on both sides and disconnect the fuel pipes from the pump.
Now all that remains is to unscrew the plastic ring that secures the fuel pump in the tank. This can be done either using a screwdriver, carefully twisting the ring counterclockwise, or using long-nose pliers to try to unscrew it.
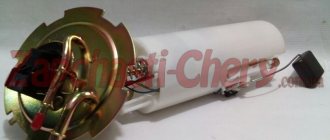
Now you can easily remove the fuel pump module assembly, carefully removing it from the tank so as not to damage the fuel level sensor.
After this, you can replace the pump with a new one. You can change both the module assembly and the motor itself separately. The price of a new one can reach up to 8,000 for the original, and sometimes even more. Although, a non-original one can be bought from 4,000 rubles.
When to change
You will not be able to know if the fuel filter is dirty unless you regularly check its integrity and condition. Due to the specific design, the fuel cell on Largus is endowed with a “heroic resource”. As AvtoVAZ says, fuel filters together with the fuel pump are designed for the entire period of operation of the car, that is, about 160 thousand kilometers. But is this true? Based on practical experience, no.
Considering the average statistics, we can highlight the following:
- a mesh filter in the nozzle of the injection system, which passes fuel through itself after primary and fine cleaning, can last no more than 30-45 thousand kilometers;
- The main fuel filter has a service life of 80-120 thousand kilometers.
Experienced car repairmen advise every Largus owner to dismantle the entire fuel pump module and check the level of filter contamination every 20 thousand kilometers. The check is also carried out if:
- slight loss of traction;
- problems with the fuel system;
- reduction or increase in fuel consumption.
The main difference between the fact that it is the fuel filter element that is dirty is the gradual appearance of the symptoms described above.
Removal and repair of the Lada Largus electric fuel pump module
We remove the fuel pump module if the electric fuel pump fails completely or partially, the fuel pump filter is clogged, or the fuel gauge sensor is faulty.
Preparation for module removal largely depends on the car model.
To remove the module, we prepare the car for work.
It is advisable to remove the module so that the amount of fuel in the tank is less than half the tank.
1. If the car is a station wagon, then we tilt the rear row of seats forward for a five-seater configuration and the middle row for a seven-seater configuration.
2. Disconnect and lift the floor covering
If the car has a van body, then remove the trim from the middle pillar, on the right side.
Remove the right side of the body partition.
Remove the right front part of the cargo compartment floor.
3. Remove the plastic cover of the fuel tank hatch
4. Using a flat-head screwdriver, press out the clamp of the wiring harness block
5. Disconnect the block
6. Start the engine to relieve pressure in the fuel system and wait until it stalls.
After this, turn off the ignition and remove the negative terminal of the battery.
Squeeze the fuel pipe tip clamps and remove the tip from the fuel module fitting.
7. Unscrew the union, plastic nut using a mounting spatula
8. If the nut does not budge, you need to make a device from a rod and use this device to unscrew the union nut
9. Remove the union nut
10. Place a rag around the hole to prevent any remaining fuel from spilling onto the car parts.
Carefully remove the fuel module from the tank, removing the float of the level sensor.
Pour the remaining fuel from the module into a container prepared in advance.
11. Remove the rubber o-ring.
12. Disconnect the level sensor wire block.
13. Bend the level sensor clamp.
14. Remove the fuel level sensor.
15. Use a flat screwdriver to release the three glass latches, while prying up the glass
16. Remove the cover from the filter housing
17. The fuel pressure regulator channel tube is sealed with a rubber ring
18. A fuel pressure regulator and an anti-drainage valve are installed in the bottom cover of the module.
19. Remove the filter from the fuel pump. It is best to replace it, but if this is not possible, you can wash it.
20. Using a flat, thin screwdriver, press out the latch of the top cover of the fuel module
21. Remove the cover
22. Remove the spring from the guide
23. Disconnect the fuel pump plug from the connector on the top cover
24. Remove the fuel pump from the fuel filter housing
25. Using a technical hair dryer, heat the plastic tube and remove it from the pump.
Installation is carried out in reverse order.
Install the O-ring correctly on the tank neck
We try not to move the rubber ring when installing the module.
We orient the module so that the arrow on the module is located opposite the arrow in the tank.
Press down on the module cover and screw the plastic cap nut onto the neck of the tank.
We tighten the union nut until it stops until the arrow on the ring is located opposite arrows 1 and 2.
We install all the details.
We connect the negative terminal of the battery and check the tightness and operation of the fuel module.
Connection and installation of car alarm pandora dx 50 on lada largus
The Lada Largus does not have a can tire (there is only a lin tire). Therefore, all connections are made analogue.
You can connect the ground to the standard place behind the instrument panel.
masses
Connect the parking brake switch to the black connector of the instrument panel.
Handbrake
You may have to insert a diode into the break in the handbrake wire and make the connection according to the figure below.
Connect the tachometer to the black connector of the instrument panel.
tachometer
Do not forget to select the method of monitoring engine operation in the Alarm Studio program - an analog tachometer. Otherwise, if you leave the default value - digital tachometer, then there will be no auto start, since the alarm will not be able to determine whether the engine is running or not.
Setting up the Alarm Studio program
It is also possible to connect to the generator wire for engine control. In this case, the car alarm should be connected to the pin 13 wire of the black connector on the instrument panel - orange wire. In the Alarm Studio settings, you should allow control of engine operation via the generator and assign one of the additional alarm inputs as a “charging lamp”.
Setting up the Alarm Studio program
In the harness of the gray connector of the instrument panel, connect the limit switches of all doors
Door switch
You may have to use decoupling diodes to connect to the limit switch. In this case, we use the following connection diagram.
You can also connect to the door switches on the BCM, located to the left of the steering column.
Signals from the door and trunk switches are located on the wires in pins 30 and 40 of the green insert of the black 40-pin BCM connector.
Door and trunk limit switches
It may also be that the car is missing limit switches for all passenger doors (or only the rear doors). Then it is necessary to install additional sensors. It is possible to install both an original limit switch and a non-original one.
Opening and closing the central lock is carried out by connecting to a button on the central panel. Negative impulse control.
Locking the lock unlocking the lock
You can also connect to the central locking control wires in pins 17 (closing) and 8 (opening) in the brown insert of the black 40-pin BCM connector.
The warning light is connected to the hazard warning button on the center panel, brown wire. Management of potential negative potential.
Emergency crew
Steering control can be done by connecting to the wires on the BCM.
Turns
It is convenient to connect to the power wires for autostart behind the dashboard.
12ignitionassstarter
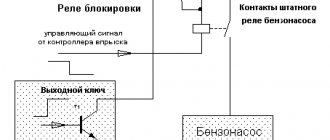
Electric fuel pump circuits can be used as a blocking mechanism. The fuel pump can be blocked at the fuel pump relay under the hood (white wire) or in the driver's threshold.
Gasoline pump
After all the connections have been made, it is necessary to record the idle speed in the Pandora DX-50 memory. To do this, enter the programming mode at level 1-3 and perform the steps described below.
Replacing the fuel pump Lada Largus
Initially, the car did not keep idle speed when “cold”; the only thing that helped was to keep the engine at low speed until it warmed up. Since the Largus was being painted, this did not bother me much, until it stopped starting altogether - the starter turned, but to no avail. In this case, I wouldn’t have to rack my brains and go for diagnostics, but I couldn’t drive under my own power, and I didn’t really want to drag it on a cable. As a result, after studying math. parts on the Internet)) was done: 1. All relays and fuses were checked. 2. Cleaned the throttle and replaced the small o-ring (it already had a square shape and microcracks. I didn’t change the big one, it was in good condition externally). 3. Cleaned the DPKV, measured the resistance - 243. It seems to be normal for the K4M engine. It was very difficult to get it; personally, it took me an hour of time and a little swearing)). 4. I noticed the immobilizer operation indicator - it stopped blinking if the key was inserted into the ignition. An experienced mechanic would say. What’s wrong with the fuel pump? Can he check it? But I didn’t want to believe that it died at 104,000 km, because before that I had done 150 thousand km on other cars of different brands. In short, after listening, Does the pump work before starting the engine? I decided to remove the fuel module from the gas tank.
I won’t post photos of the whole process, there’s a lot on the internet, but I couldn’t find how to get it out of the van. Maybe it will be useful to someone. 1. Remove the negative terminal from the battery. 2. Remove the rubber carpet in the cargo compartment, if there is one. 3. The floor of the cargo compartment is divided into three parts; unscrew the part that is closer to the right cargo door. You will need a Torx wrench, I don’t remember how much, take a set because you will need 2 sizes. 4. Part of the floor goes under the plastic bulkhead - in order not to unscrew it, I simply lifted it up and secured it to the ceiling with a rope.
5. I had a LOT of dust in the well of the fuel module (3 centimeters), so it is advisable to vacuum it or blow it with air so that it does not get into the tank. I took a photo of the fuel pipe that fits onto the Module; the inside is terribly dirty.
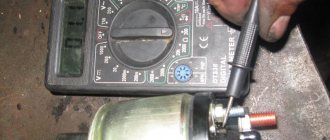
6. Then everything is standard - I took out the module, pulled out the fuel pump (I threw plus and minus on the battery and fuel pump terminals - it doesn’t work, so it needs to be changed). I bought a pump from a VAZ 2110 in a nearby store, along with a cleaning mesh - 550 rubles. I read that there was still a need to change some kind of module for fine cleaning - I didn’t bother, in the future there are plans to convert the car to gas.
When the pressure in the Largus fuel system decreases, you should first of all pay attention to the performance of the fuel pump, since it is this part that is responsible for the normal operation of the system. If it turns out that the pressure is weak, then the reasons may be as follows:
- Reduced pump efficiency
- The mesh (strainer) of the fuel pump is clogged
If the problem is in the grid, then we change it to a new one, which you can read about in the following reviews on Lada Largus repairs. In the meantime, let's look at the procedure for replacing the assembled fuel pump module on Largus. And for this we may need the following tool:
- flat blade screwdriver
- two short screwdrivers (phillips preferred)
So, the fuel pump on Lada Largus cars is located in the gas tank, and to get to it, you need to remove the back seat and pry off the plastic plug, as is clearly demonstrated in the photo below:
After this, disconnect the power plug from the module.
Now, using two screwdrivers, press the fitting clamps on both sides and disconnect the fuel pipes from the pump.
Now all that remains is to unscrew the plastic ring that secures the fuel pump in the tank. This can be done either using a screwdriver, carefully twisting the ring counterclockwise, or using long-nose pliers to try to unscrew it.
Now you can easily remove the fuel pump module assembly, carefully removing it from the tank so as not to damage the fuel level sensor.
After this, you can replace the pump with a new one. You can change both the module assembly and the motor itself separately. The price of a new one can reach up to 8,000 for the original, and sometimes even more. Although, a non-original one can be bought from 4,000 rubles.
The fine fuel filter on Largus station wagons and vans is built into the fuel pump module. According to the regulations, this filter must be changed together with the module, and the period between replacements is 160 thousand km. The Renault company, unlike VAZ, specifies an interval of 120 thousand, but the essence will be the same - replacing the fuel filter on the Lada Largus and Logan is carried out only with a pump. We will look at what can be done to get a completely usable, but still temporary solution. At the same time, it will be indicated how to replace the mesh filter.
If anyone doubts the presence of a “paper” filter, you can look at it from the inside. Here's a video.
Gearbox malfunctions and methods for eliminating them
Any mechanism has a tensile strength, especially if it operates under variable loads. It is necessary to take into account the driver's driving style, which significantly affects the durability of the part. Summarizing the accumulated experience and analysis of breakdowns that occur during the operation of the car, gearbox faults can be grouped into several main groups: noise in the gearbox, difficulty engaging the gear and spontaneous shutdown of the transmission.
Noise and difficulty shifting gears
The main causes of noise in the gearbox include:
- low oil level;
- water entering the system;
- wear of bearings or gears.
To fix the problem, you should add or replace the oil in the gearbox, replace the bearings and gears with new ones.
Difficulty shifting gears can be caused by the following factors:
- faulty gearbox control rod;
- loosening of fastenings;
- deformation of control drive parts;
- wear of synchronization rings;
- incomplete disengagement of the clutch.
Spontaneous transmission shutdown
The reasons for spontaneous shutdown of the gearbox are usually:
- gear wear;
- damage occurs on the rubber supports of the box;
- wear of the synchronizer rings.
These faults can only be corrected by replacing them with new parts. Do-it-yourself transmission repair requires high qualifications and a set of special tools. Only a competent specialist can remove and disassemble this part correctly.
If the gearbox malfunctions, it is better to contact a service station, where they will not only repair the unit, but will also give you a guarantee that you can use in the event of a subsequent gearbox breakdown.
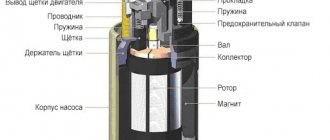
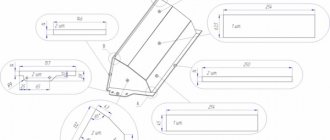
Design of the fuel filter flask in the pump
What is outlined in the figure is the fine filter. Through mesh 2, fuel enters the pump, then it enters container 3. This container is connected to the ramp through the upper fitting and pipe. Connection 1 is also an important element, since it is connected to the return valve.
Fuel module disassembled
The return flow valve is built into the lower glass, and it allows you to relieve excess pressure.
By the appearance of part 3, you can always assess the degree of filter clogging. It's a pity that the container is non-separable. Unfortunately, it is pointless to look for the article number for part 3: the fuel filter on the Lada Largus is replaced as an assembly with the pump.
Removing the fuel module
We will perform all the steps as if we were trying to replace a fuel pump:
- We tilt the sofa cushion and remove it. We lift the plastic hatch and move the carpet forward. Remove the round cover from the hole;
Getting rid of unnecessary details
Understanding electricity
First - the pipe, then - the clamp
By removing the module assembly, you can replace the mesh filter. Be careful not to lose the O-ring installed between the module and the tank.
Replacing the filter mesh
On the Lada Largus, the coarse fuel filter is a removable mesh in front of the pump. Replacing it will be simple:
- We snap off the glass latches (3 pcs.);
Let's start disassembling the module
The very first element in the fuel tract
Installation of all modules and components is carried out in the reverse order. If the mesh is not badly damaged, it can only be washed and dried. Car chemicals based on xylene or ethoxylated alcohols will help.
How to change the filter element with your own hands
So, the step-by-step algorithm for replacing the fuel filter on Largus is as follows:
- Remove the rear sofa cushion and lift the plastic hatch that is located under it. For greater convenience, experts recommend removing the carpet.
- Having disconnected the battery in advance, bend the tab located on the fuel pump connector and turn it off.
- Next, you need to connect the battery and start the engine. The running engine should run for two to three seconds and then stall. Next, de-energize the entire system again by disconnecting the terminals. Disconnect the fuel pipe and turn the fuel pump retaining washer counterclockwise. Using a special mounting spatula will help make the job easier.
- Having completed all the above steps, the fuel pump module can be removed without any problems. If necessary, the mesh filter or the fuel pump is replaced completely. After replacement, you need to reassemble the entire structure in reverse order.
We disassemble the module in order to replace the filter
The main thing to remember: first disconnect the brown connector. Then remove the level sensor by unfastening the clamp with a screwdriver.
Disassembling the pump module
Similar clamps hold the top cover. Having removed it, disconnect the white connector (see photo). How to remove the lower part of the module is discussed in the previous chapter. But you will have to tinker with the nozzles: when putting them on or removing them, the fittings must be held above the steam.
The most difficult operation
No one was able to achieve results right away.
Instead of standard pipes, black, shiny and beautiful, you can buy corrugated hoses from a VAZ-2110 car. This replacement is proven.
What is the best way to deal with the flask?
On the Lada Largus, the fuel filter is a flask containing paper. This flask is not sold separately and cannot be replaced. But it can be cut to remove the filter element completely.
Fuel filter housing
At the last step, both halves are glued together, and drying is done under pressure (on ties).
For gluing, use any petrol-resistant sealant.
So, we have an “empty” filter housing that is being installed in place. After assembling the module, it can be used, but there is a condition: after 1000-2000 km the module will have to be replaced. Follow our advice if the engine has run for 150-160 thousand and you don’t feel sorry for it anymore.
What not to do!
It would seem that you can drive for a long time with a cleaned bulb, you just need to insert a new filter into the fuel line. This is usually done by taking a filter from Renault Logan (phase 1).
Fitting the filter into the line under the hood
It turns out this:
- If the flask is empty and an “external” filter is added, the engine starts and stalls after 2-3 seconds;
- If the flask has not been cleaned, adding a new filter is useless: the load on the pump increases, and that’s all.
Let the reader draw his own conclusions.
Alternative option
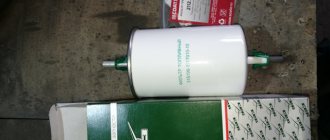
Below is a flask that looks almost the same as the original Lada Largus fuel filter.
JS Asakashi brand components
This flask can be installed instead of the standard one. You just need to shorten the fastening elements (tubes) by about 20 mm. We were talking about filters for Nissan cars:
- JS ASAKASHI FS22001
- JAPANPARTS FC-130S
- PATRON PF3924
Fuel filter part numbers
Let's name the fuel module part numbers here: 8200307403, 6001547605 and 6000591702. Renault also uses part number 172024388R. As for the mesh filter, there is no original article, but there are substitutes:
- MASUMA MPU025N
- NPA NP51109412
Selection of analogues
The fuel module can be produced under the following brands:
- BOSCH 0 986 580 957 or 0 986 580 369
- ERA 775120
- ASAM 30290
- PIERBURG 7.00468.77.0
- MAPCO 22100
- DELPHI FG0993-12B1
- MAGNETI MARELLI 519746909900 or 313011313047
- VALEO 347066
- BRECKNER BK14003
- KRAUF KR0820M
- WEEN 1920001
- VAICO/VEMO V21090001
- LEX HT2544
- TSN 7262
- HOFFER 7506872
- AIRTEX E10367M
- SIDAT 72268
- MESSMER 775120
- MEAT & DORIA 76872