Subscribe to topic
Notification by e-mail about replies to a topic during your absence from the forum.
Subscribe to this forum
Notification by e-mail about new topics on the forum during your absence from the forum.
Download/Print theme
Download the theme in various formats or view a printable version of the theme.
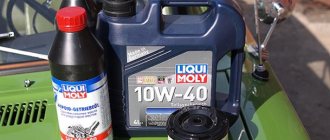
Proper operation of the machine increases its service life, so it is important to carry out appropriate maintenance on time. One of the stages of this procedure is changing the oil along with the filter. Many people prefer to trust the experts from the car service center. But this process is not at all complicated and even a novice car owner can easily cope with it. But there is a nuance: before installing a new filter, you need to unscrew the old one. And this doesn’t always work out the first time. How to unscrew the oil filter and why change it at all is discussed further.
Why change the oil filter?
The recommended mileage after which an oil change is necessary is on average 15 thousand km. It all depends on operating conditions, the degree of engine wear, and driving style. For example, when constantly moving with a trailer, it is recommended to change the lubricant more often. The same can be said about drivers who prefer an aggressive driving style. Each oil change is accompanied by the installation of a new filter.
Inexperienced drivers sometimes do not understand why this element needs to be changed: they say, it is enough to fill in fresh oil. The fact is that any lubricant that is poured contains foreign particles that negatively affect the operation of the engine. Plus, there are always tiny chips inside the motor, and dirt can get inside it. All this needs to be sifted out, which is what the oil filter does. It has been calculated that if it were not there at all, the engine’s service life would be reduced by five (!) times.
Is it possible to change the oil filter element without changing the engine oil?
The design of the engines is such that to replace the oil filter it is not necessary to drain the oil from the crankcase. It is enough to turn off the engine and wait until the remaining oil from the top of the engine flows into the crankcase. The level of the oil filter is located significantly above the crankcase, so oil losses when dismantling the filter element are theoretically zero.
You will lose almost 200-250 ml of oil. This is due to the fact that this volume is stored in the filter after the engine is running. To avoid spilling these grams on the protection or cylinder block, the filter element should be carefully removed from the engine compartment so that the residue remains inside the oil filter.
Is it possible to determine the suitability of a filter?
It is impossible to do this by appearance. Mileage won't tell you anything either: the car can be used in different conditions. It would be fairer to take into account not only the number of kilometers traveled, but also the engine hours.
As mentioned above, riding style is also important. Drivers who prefer it are better off focusing on expensive products. This is due to the fact that during sudden acceleration or stopping the engine requires a large amount of lubricant. And expensive filters contain synthetic elements that cope well with high loads, temperatures and quickly remove the lubricant. If you are a fan of a quiet way of transportation, you can purchase less expensive products that have a felt base. The oil in them takes longer, but you don’t need it any faster.
How to unscrew the oil filter
There are special keys for this that can be purchased at car dealerships. But it happens that it is impossible to get to the filter with such a tool due to limited space. Or another situation: instead of a standard product, you installed a higher quality element with larger dimensions. In such cases, the question arises: how to unscrew the oil filter without a key? But first it’s worth identifying the reasons why the product cannot be turned away by hand. There are two of them:
- during the previous oil change, the filter was tightened too tightly with a wrench (this is typical for car repair shops);
- the product just got stuck because it hasn’t been changed for a long time.
Below are all the popular ways to replace an old filter with a new one. However, this product must be unscrewed by hand. There is also a trivial situation: maybe you just don’t have enough strength. Then invite a stronger assistant.
Using a screwdriver
The tool must be long: longer than the diameter of the filter. You just need to pierce it, and right through it. The screwdriver here plays the role of a lever, which should be sharp and thick. Don't forget to drain the oil first: however, some of it will still spill out, so take care in advance and place a suitable container down. It is worth noting: all filters turn counterclockwise.
Using a leather belt
A regular trouser shirt will do. You need to make a loop out of it and throw it over the body. The free end is a kind of lever.
If the belt turns, place a piece of sandpaper under it. If you have an alternator belt from a VAZ or other car at hand, you can use that too. The filter must be unscrewed.
Using a gas key
Removal in this way is only acceptable if there is enough space in your car and the tool can easily fit there. The handle of the tool will be the lever. However, fanaticism is not needed! Be careful not to roll anything else along the way.
Using a chisel and hammer
Everything is clear here: take a tool (it should be sharp), place it on the rim of the filter, closer to the engine (this makes it easier to remove). The blows must be strong and sharp.
Using a homemade tool
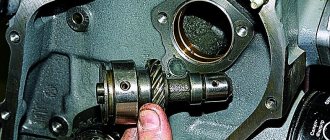
It makes sense to make a puller yourself, similar to the factory product. To do this you will need a regular bicycle chain. If it has 30 links, then this is an ideal option for the VAZ classic. The chain must be connected into a ring using a rivet or a regular lock. Next, take your used 19 or 22 socket head: you need to make a cut in it, the width of which corresponds to the width of the chain. This is where you need to insert it. To make it more convenient to unscrew the filter, insert a wrench or ratchet into the square hole of the head. All that remains is to smoothly twist the homemade puller counterclockwise.
When the old filter is unscrewed in one way or another, thoroughly wipe the seat with a rag, removing all particles of dirt. Fill the new filter with oil and screw it in by hand. Try to do this with force, but not excessively! Only after this can the filter replacement procedure be considered complete.
Reasons why the oil filter is not dismantled
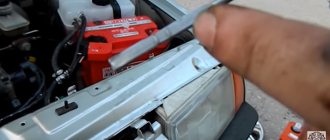
To unscrew the old filter, you need to place the car on a pit or lift the car using a lifting device. Then you need to unscrew the old filter, but difficulties may arise here. If it does not come off, this may be due to its sticking. The motor becomes very hot during operation. Because of this, parts that are not very heat-resistant melt. Such components include a rubber gasket, which is included in the design of the oil filter. It can melt and stick to the engine, especially if oil gets on the gasket.
Problems arise when the filter is twisted too tightly. When changing the filter element, you need to tighten it well so that the rubber band is pressed tightly against the motor. In this case, the oil filter is often screwed on too tightly, especially when using a wrench. If you take into account the melting of the gasket, it becomes clear that unscrewing the filter will be enough.
It is important that the oil filter is not located in the most convenient place, therefore, it becomes impossible to exert maximum effort to unscrew it. In addition, when unscrewing, your hands get dirty with oil and slip.
3/4 turn experiment
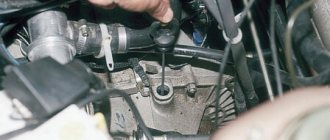
Before screwing on the new oil filter, do not forget to lubricate the rubber O-ring.
I don't put oil in the filter itself. Why? For those interested, you can look here.
And we move on. We lubricated the ring with oil, now we install the filter in place.
We begin to screw it in with light movements until it comes into contact with the engine block. Once the filter touched the block, I took a permanent marker and made a mark on the top of the filter that would show us the process of twisting the filter and show how close I was to the ¾ turn mark.
Now, according to the instructions, to properly tighten the filter, you need to tighten it ¾ of a turn. How will I do this? And I will do this with my hands, or rather with one hand.
When tightening the oil filter, it is not clear how far it has already been turned, so after tightening it a little, I stopped to look at the mark.
As you can see, I have not yet tightened it to the ¾ turn mark. So I keep going.
But now I screwed the filter “all the way”, as far as I had the strength to do it with one left hand. At the same time, I didn’t see the mark and didn’t know how much I had already tightened it, I just tightened it as much as I could. Let's see.
As you can see, I overdid it just a little. We will consider this an error, because at the very beginning I very gently tried to turn it until it came into contact with the engine block. If I had applied a little more effort at first, the filter, after contacting the block, would have turned a little further. Accordingly, I would have placed the mark with a marker in a different place, it would have moved a little back. And then the mark on the filter would now stop at exactly ¾ of a turn.
Which way to unscrew the oil filter?
When difficulties arise with unscrewing the filter element, the motorist may begin to be tormented by doubts regarding which direction the device should be unscrewed. Remember that the oil filter must be unscrewed counterclockwise (to the left). In the same way, a regular nut or bolt is unscrewed (if you do not take into account fasteners with reverse threads).
If you cannot unscrew the oil filter on your own, ask a stronger person for help. In fifty percent of cases this method works. The main thing is to achieve a breakdown from the starting point. This is easier to do with a warm engine. When the engine cools down, it becomes difficult to unscrew the filter.
For dismantling, you can use one of the following methods:
One of the factory oil filter wrenches
1. Special key. In stores selling car accessories, you can find a wrench that is designed to unscrew the oil filter. It can be one of three types:
Such a tool needs to be hooked onto the filter. After that, start rotating it.
You will also be interested in:
The oil filter does not unscrew: what to do?
If you can’t unscrew the oil filter yourself, you can suggest that someone who has more strength try to do it. In most cases, you can unscrew even a strongly “stuck” oil filter without unnecessary tricks. But when you cannot unscrew the element even with outside help, you can use one of the methods described below:
- Special wrench for oil filters. In automobile accessory stores you can find a special wrench designed to unscrew oil filters of various diameters. It is enough to hook such a key onto the element and then start rotating. Using it to unscrew the oil filter is not difficult, but not all drivers have such a key, and you must first purchase it;
- Creating a lever. In the garage you can always find a lot of unnecessary parts and various tools from which you can build a lever. For example, you can put an old timing belt or generator belt on the key, then tie it around the filter and start rotating. Due to the unique lever and the absence of rubber sliding on the oil filter, unscrewing the element will not be more difficult than using a special wrench;
- Screwdriver and hammer. A simple and effective method that is suitable if you are not afraid of getting dirty in oil. It implies that a screwdriver must be driven through with a hammer into the oil filter. When the filter is broken, you can use a screwdriver as a lever, unscrewing the consumable element. It should be understood that if the oil filter is broken, residual oil will flow out of it;
Please note: Some drivers recommend not punching through the filter with a hammer, but rather driving a screwdriver into the area of the mounting location with a hammer. Doing this is quite dangerous, since the screwdriver may accidentally fall off and pierce the engine components.
( 439 votes, average: 4.57 out of 5)
The windshield washer does not work: the main reasons
Spark plug gap: what it should be, how to measure and adjust