A mixture is formed in the carburetor, which then enters the engine; it must be periodically adjusted. The composition comes in three types: normal (ratio 1:15), enriched and depleted. The quality of the connection is determined by the fuel to air ratio. An increase in the amount of air leads to a leaner mixture .
As a result of this, consumption can be minimized, but maximum power cannot be achieved. Reducing the amount of air leads to a richer mixture. With a ratio of 1:12.5 or 1:13, the engine is able to operate at maximum efficiency, but gasoline consumption increases significantly.
The delta moped carburetor is adjusted in the following order:
- The engine is pre-warmed. You can make adjustments after a trip, when the engine is already well warmed up.
- Before making adjustments, it is advisable to replace the spark plug, clean the air filter, look at the exhaust system and clean it. The carburetor channels must be washed and blown with air.
- The screw that regulates the quality of the mixture is tightened all the way and returned 1/2 turn back.
- The minimum stable rotation of the crankshaft is set by turning the idle screw. By turning the quality screw, the air ratio is increased until interruptions in engine operation begin.
- Using the idle screw, stable engine operation is restored.
- The quality screw is turned again. This reduces the rotation speed. The previous steps are repeated until a minimum stable crankshaft speed is obtained.
- The result of regulation is checked by closing the throttle. If the engine stops, the mixture must be leaner, and if it stalls, it must be enriched. Most often, the quality screw needs to be turned 1/4 or 1/2 turn.
It is also necessary to periodically check the condition of the damper to ensure there is no deformation. To do this, check the condition of the damper in the open and closed positions. In normal condition, the damper should be at an angle of 60°-70°.
Not only the performance of the engine, but also its power and fuel consumption depend on the correctly adjusted operation of the carburetor. Both rich and lean mixtures negatively affect engine wear, the frequency of replacing spark plugs, and the condition of the exhaust system. Correct carburetor regulation can be monitored by the condition of the spark plug.
If the candle is brown, then the mixture is normal, if it is black, the mixture is enriched and needs to be depleted to normal, if white, the mixture is lean and needs enrichment. A properly adjusted carburetor ensures minimal gasoline consumption without loss of engine power.
Carburetor adjustments should not be made indoors. During operation, exhaust gases will be released, which are very poisonous to the body. Garage doors must be open, otherwise serious poisoning can occur.
Debriefing, or Adjusting the carburetor unit of the Alpha moped
After the moped has been run-in, a full cycle of technical inspection is carried out, which includes changing the oil in the transmission and engine, as well as adjusting the valve clearance. In addition, the manufacturer recommends replacing the air filter element. During operation, disturbances in dynamics are possible, requiring individual adjustment of the carburetor on an Alpha moped. Qualified adjustment of this unit will improve driving performance and help reduce fuel costs. This operation is similar to adjusting the carburetor on a scooter and will not cause much trouble for both beginners and experienced motorcyclists.
Signs that require an urgent check of the carburetor
Most motorists know the principle of operation of the carburetor unit and the necessary conditions for its stable operation. The main indicator for the full functioning of the engine is the composition of the combustible mixture, which should consist of 15 parts air and 1 part gasoline. Violation of the ratio leads to enrichment or, conversely, to depletion of the composition.
The main signs of a lean mixture:
- instability XX;
- difficult starting;
- popping sounds in the carburetor;
- the engine does not gain momentum;
- white carbon deposits on the candle.
Signs of over-enrichment of the combustible mixture:
- increased fuel consumption;
- candle covered in soot;
- popping sounds in the exhaust pipe;
- slow acceleration.
What is the need?
In order to prevent parts from wearing out too quickly, it is important to select the correct mixture at idle, at full throttle and in modes when the throttle is not fully open. What should make the owner think about adjusting the carburetor of the Alpha moped in these modes? Violation of the ratio of air and gasoline. Ideally, it should correspond to 1:15, where there is only 1 part of gasoline. Signs of a violation may include:
- Difficulty starting the engine.
- Any instability in idle speed can be heard as irregular engine operation.
- When you turn the throttle all the way, the engine does not rev up and accelerates slowly.
- Popping sounds in the carburetor or exhaust pipe.
- Candle color is white or black.
Adjustment procedure
Proper engine operation depends on compliance with operating rules and strict compliance with technical inspection requirements. Before you start setting up the carburetor on the Alpha moped, you need to first carry out a number of works:
- Clean the carburetor body.
- Replace the spark plug.
- Replace the air filter.
- Make sure the connections are tight.
Now you need to accurately set the gasoline level in the float chamber by bending the float tongue. By connecting a transparent hose to the drain fitting, it is possible to determine the absolute fuel level. To do this, the hose is lifted up. Typically the height is at the junction of the carburetor caps.
The next step is to adjust the idle speed system using quantity and quality screws. The whole process takes place on a warm engine. The quality screw is screwed in until it stops and then unscrewed two turns. Start the engine and, by rotating this screw in both directions, achieve maximum speed. Then use the quantity screw to reduce the speed to the minimum stable speed. It is possible that the procedure may need to be repeated several times until the desired result is achieved.
Adjustment of the middle speed range occurs by raising or lowering the needle. To do this, you need to unscrew the throttle nut, remove the needle and move the corkscrew into one of the grooves: above the middle division to lean the mixture and below to enrich it.
This is interesting: Getting rid of scratches on the windshield in an hour
High-quality engine operation at high speeds is ensured by the size of the main jet
. Therefore, setting up the carburetor on an Alpha moped will be completed only after selecting the appropriate jet number. If the carburetor produced a lean composition, then it is worth installing a part with a higher throughput. To lean the mixture, you need to do exactly the opposite - set a lower number.
You can check the accuracy of the settings by inspecting the spark plug insulator. If it is light or brown in color without carbon deposits, then the system is adjusted normally. If the threads and insulator of the spark plug are smoked with black soot, the mixture should be adjusted to medium speed.
How to clean the carburetor on a moped - step-by-step instructions
Cleaning is necessary if a lot of dirt and condensation has accumulated. To ensure that this procedure is not necessary, it is advisable to disconnect and disassemble the carburetor. If it is clogged, it is useless to perform adjustments.
First, turn off the fuel supply valve, then you need to disconnect the fuel and drain hoses from the carburetor.
Next, you need to disconnect the inlet pipe from the carburetor, then unscrew the throttle valve cover and remove it from the carburetor. Now the part is held in place only by two bolts, which can be unscrewed with a 10mm wrench. That’s it, the carburetor has been removed. It is advisable to disassemble it on a white table so as not to lose small parts.
Next you need to disassemble the carburetor. First, unscrew the bolts located on the carburetor body. After this, the protective cover will be removed.
Next, the float chamber is pulled out; it is held on one pin, which is removed from the grooves. It can be removed without using tools. Together with the camera, a small cylindrical part with a cone-shaped tip will be removed - a shut-off needle, which is held between the float and the fuel supply channel. It is important to make sure that it does not fall on the floor and get lost.
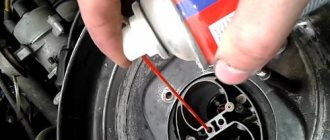
Now, using a screwdriver with a straight bit, unscrew the jets, the idle speed adjustment bolt and the mixture quality screw.
The unit is disassembled, you can proceed to cleaning. First, attach the tube attachment to the aerosol canister for cleaning.
The accumulated liquid is poured out of the carburetor cap, then the internal cavity is treated with a cleaning aerosol. The jets are treated in the same way; the aerosol tube can be lowered into the recesses and holes. Then all the internal cavities will be cleaned, and all the accumulated dirt will come out. An aerosol with a nozzle can be used to treat all other carburetor openings.
Small holes need to be blown out so that there is no dirt there. The cleaned parts are wiped dry with a cloth; it is important to wait until the applied aerosol has completely dried. Then reassemble the carburetor in reverse order. It is difficult to make a mistake during assembly, since all the parts differ in size and are placed only in certain holes.
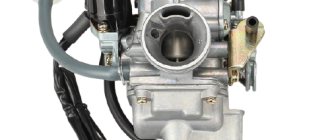
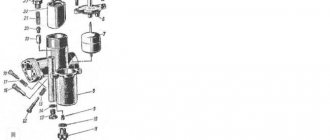
Disassembled carburetor of an Alpha moped
When installing a float chamber, first attach an element that shuts off the fuel supply through the hole near the jets. A pin is connected to the camera mount, after which the entire structure is placed on the socket. Next, the cover is mounted and the bolts are tightened. Tighten the mixture quality screw one and a half turns, then tighten the idle speed screw.
It is recommended to spray the assembled carburetor to keep it clean on the outside. Next, the part is put in its original place, first the fuel hose is connected. Then you need to open the fuel valve and wait a few seconds until the fuel fills. You can now start the engine, but it may not start or may be too loud. This means that adjustment is necessary.
You can learn more about how to clean the carburetor on an Alpha moped from this useful video:
How to adjust the carburetor on an Alpha moped
Most mopeds have a very simple carburetor design; it is also located in a convenient location, which makes it possible to quickly adjust. And if you are the owner of an Alfa moped and the like, this guide is about how to set up a carburetor on an Alfa moped for you.
Carburetor adjustment is necessary for most mopeds, because over time, precise settings are lost, and it becomes necessary to improve idle speed or fuel consumption. This need may arise when the Alpha moped begins to function incorrectly, producing a completely different fuel mixture. The standard ratio of gasoline to air should be 1 to 15. Deviation from the norm leads to the mixture becoming richer or leaner.
When a rich mixture forms, you will experience the following symptoms:
- frequent popping noises in the exhaust pipe;
- weak acceleration dynamics;
- high fuel consumption.
Signs of a lean mixture include:
- the presence of white carbon deposits on the candle;
- difficulty starting the engine;
- poor idle speed;
- inability to increase speed.
If you do not know how to adjust the carburetor on an alpha 50 or 110 cc moped, perform all the steps in sequence, but before doing this, make sure that the engine is properly warmed up. After this, you will have to perform the following steps to fine-tune the carburetor:
- replace or clean the air filter;
- check the spark plug;
- clean the surface of the carburetor from dirt;
- Check all hoses and connections for leaks.
Alfa moped carburetor overhaul
Before starting any work with the carburetor, you should know that any speck that gets into or is not washed out of the bowels of the unit can cause it to malfunction. Therefore, the workplace must be thoroughly cleaned. An important point is that all dismantling work is carried out only with the engine cooled down.
There should be no problems when dismantling the carburetor. You need to disconnect all the pipes from the unit (before disconnecting the fuel pipe, you need to turn off the fuel supply valve) and the throttle cable. Next, the assembly should be thoroughly washed from the outside using a brush and gasoline. As a “cleaning” agent, you can use gasoline, diesel fuel, kerosene, VD 40 or aviation alcohol of your choice.
Once all dirt has been removed from the carburetor body, you can begin disassembling it. It should immediately be clarified the purpose of the three (usually brass) flat-head screws located on the carburetor body (all three are on the left side).
- Located in the area of the air supply pipe and serves to adjust the quality of the mixture when the engine is idling
- Located near the throttle valve and is responsible for adjusting the idle speed
- Serves to dump sludge from the float chamber and is located at the very bottom of it
For people who do not have experience disassembling carburetors, it is recommended that they lay out the parts in a line in the order in which they were removed. This will greatly facilitate the process of assembling the unit and eliminate the appearance of “extra parts”.
- Debriefing, or Adjusting the carburetor unit of the Alpha moped
When disassembling, the following is removed from the carburetor:
- float together with axle;
- locking needle;
- fuel jet (integrated with the idle emulsion tube);
- main fuel jet;
- emulsion tube of the main dosing system;
- float chamber cover gasket.
When disassembling the unit is completed, all internal parts should also be thoroughly washed. After this, the integrity of the parts is inspected, and if a defect is detected, the part is replaced. If the carburetor parts do not have defects and are not clogged with debris, then carburetor tattoos are not suitable for this engine.
How to properly adjust the carburetor on an alpha moped
Step 1. Setting the mixture quality. The Alpha moped has a special screw for this, which must first be fully tightened and unscrewed a maximum of 1 turn. Next, we find the idle speed screw and rotate it until the moped begins to operate stably at normal speeds. The next stage is to lean the mixture; after idling, you will have to slightly unscrew the mixture quality screw until the engine begins to work poorly intermittently.
Step 2. We made the mixture lean, but we need to fix this; to do this, we enrich the mixture with the idle screw, tightening it. The adjustment continues until the motor starts working normally and without interruption. You can check that the carburetor of the Alpha moped is adjusted by pressing the gas handle. If, when it is opened abruptly, the engine immediately stalls or choke, you will have to enrich the mixture by slightly unscrewing the mixture quality screw.
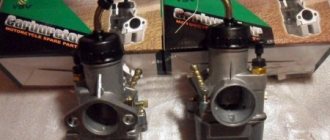
Carburetor of the Chinese moped Alpha DeltaIn this video we will show you what the Chinese Alpha Delta carburetor is made of and its components. in front of you is a 70 cc alpha, delta carburetor, here we see the impact chamber, the outlet to the inlet manifold, the air inlet, the fuel inlet, and the adjusting screws, the idle speed screw, the mixture quality screw, this mixture quality screw regulates the composition of the mixture only at idle, what does this mean while the hole valve is completely closed, the quality screw is involved in adjusting the composition of the mixture, but as soon as the valve opens and the engine reaches operating speeds and over the entire period of mixture formation, the metering needle is involved up to maximum speed when it is already fully open and there the mixture composition is limited the diameter of the diffuser and the diameter of the main jet, that is, at all operating speeds except idle and maximum, the composition of the mixture is regulated by the metering needle! If you have a bad mixture, do not try to turn the mixture adjustment screw; it will not give you anything; it serves to fine-tune the mixture; if you have a high mileage, clean or replace the air filter element, clean the float chamber, blow out all the jets, but if you know that If you have a bad mixture and the carburetor is not adjusted, then let's start adjusting! we remove the top cover, we take out everything, the insides are the return spring, and the spool with the metering needle, secured with a stopper latch, we take out the needle, the needle has 5 divisions under the lock washer, and the position of the needle is determined by this washer, to combine the mixture you need to lower the needle and thereby raise lock washer, it goes down easily, take the pliers and put them on the division we need, I do not advise moving the needle by 2 divisions at once because this will change the mixture so radically that your engine may simply not start, after adjustment, insert the needle into the spool, put a lock and watch the change in results in dynamics, it is worth paying attention that after each adjustment of the needle level, you should readjust the mixture composition with the screw. Let's start cleaning the carburetor, remove the bottom cover, then pay attention to the condition of the gasket; it stretches, then it doesn't fit well, then we look at the float. Next we clean the main jet, the Alpha carburetor and blow it out with a compressor!
Electrical diagram of Honda Lead NH50 NH90
How to set up a carburetor on an Alpha
On my moped it was possible to adjust the spark plug insulator only by checking it. Normal settings at 2.5-3 full turns of unscrewing the quality screw (2.5 turns is the minimum at which the soot stopped appearing) MY ENGINE STALLED WHEN CLOSING THE THROTTLE SHARPLY AND I NEEDED TO LEAN THE MIXTURE (AND I MIXED IT UP AND ENRICHED IT)
Next, after all that has been done, we drive the scooter for several kilometers as usual, unscrew the spark plug and visually determine by the color of the spark plug insulator what mixture the carburetor is “preparing.”
If the spark plug insulator is black and covered with a layer of soot, then the carburetor is “preparing” a “rich” mixture, in this case the situation can be corrected by UNLOCKING THE QUALITY SCREW (if this does not help, then lowering the carburetor needle to the desired division.)
It must be remembered that the reason for the enrichment of the scooter mixture can be not only incorrect carburetor settings, but also a dirty scooter air filter; and the cause of a lean mixture may be the scooter’s fuel system clogged with dirt.
How to clean the carburetor on a moped - step-by-step instructions
Cleaning is necessary if a lot of dirt and condensation has accumulated. To ensure that this procedure is not necessary, it is advisable to disconnect and disassemble the carburetor. If it is clogged, it is useless to perform adjustments.
First, turn off the fuel supply valve, then you need to disconnect the fuel and drain hoses from the carburetor.
Next, you need to disconnect the inlet pipe from the carburetor, then unscrew the throttle valve cover and remove it from the carburetor. Now the part is held in place only by two bolts, which can be unscrewed with a 10mm wrench. That’s it, the carburetor has been removed. It is advisable to disassemble it on a white table so as not to lose small parts.
Next you need to disassemble the carburetor. First, unscrew the bolts located on the carburetor body. After this, the protective cover will be removed.
Next, the float chamber is pulled out; it is held on one pin, which is removed from the grooves. It can be removed without using tools. Together with the camera, a small cylindrical part with a cone-shaped tip will be removed - a shut-off needle, which is held between the float and the fuel supply channel. It is important to make sure that it does not fall on the floor and get lost.
Now, using a screwdriver with a straight bit, unscrew the jets, the idle speed adjustment bolt and the mixture quality screw.
The unit is disassembled, you can proceed to cleaning. First, attach the tube attachment to the aerosol canister for cleaning.
The accumulated liquid is poured out of the carburetor cap, then the internal cavity is treated with a cleaning aerosol. The jets are treated in the same way; the aerosol tube can be lowered into the recesses and holes. Then all the internal cavities will be cleaned, and all the accumulated dirt will come out. An aerosol with a nozzle can be used to treat all other carburetor openings.
Small holes need to be blown out so that there is no dirt there. The cleaned parts are wiped dry with a cloth; it is important to wait until the applied aerosol has completely dried. Then reassemble the carburetor in reverse order. It is difficult to make a mistake during assembly, since all the parts differ in size and are placed only in certain holes.
Disassembled carburetor of an Alpha moped
When installing a float chamber, first attach an element that shuts off the fuel supply through the hole near the jets. A pin is connected to the camera mount, after which the entire structure is placed on the socket. Next, the cover is mounted and the bolts are tightened. Tighten the mixture quality screw one and a half turns, then tighten the idle speed screw.
It is recommended to spray the assembled carburetor to keep it clean on the outside. Next, the part is put in its original place, first the fuel hose is connected. Then you need to open the fuel valve and wait a few seconds until the fuel fills. You can now start the engine, but it may not start or may be too loud. This means that adjustment is necessary.
You can learn more about how to clean the carburetor on an Alpha moped from this useful video:
Soot contamination
Type of spark plug: dry soft soot of intense black color on the insulator, electrodes and spark plug body.
Consequences: poor start of the scooter engine; poor operation of a cold scooter engine; interruptions in ignition of the air-fuel mixture; bad reaction to gas.
Probable causes: excessively rich air-fuel mixture; The scooter's air filter is very clogged; The thermal range is incorrectly selected - the candle is too “cold”.
Remedy: adjust the working mixture; adjust the cold start system of the scooter engine; change the scooter air filter; clean the spark plugs or replace them with new ones - with the correct heat rating.
This is interesting: Comparative characteristics of solid oil and lithol
Sign in OK
Method 1. With the engine well warmed up, tighten the VK (quality screw) until it stops. Let's start the engine. Use the throttle to hold the MINIMUM SUSTAINABLE RPM, not allowing it to stall, TURN the VXX screw (idle speed screw) until the engine itself maintains the MINIMUM SUSTAINABLE RPM - without the help of the throttle. Then slowly unscrew the VK. The engine will begin to increase speed. By gradually unscrewing the VK we will achieve MAXIMUM RPM (if the RPM is too high, turn the VV a little to acceptable levels). Having achieved the maximum speed of the VC, we check that further UNLOCKING the screw does not increase the speed, try to TWIST it until the speed begins to decrease, leave it in this position and then, unscrewing the VC, set an acceptable idle speed. The operation can be repeated a couple of times. If this method does not work, it means the carburetor is clogged, there is an air leak or it is defective.”
Method 2. Carburetor adjustment is carried out only on a hot engine, so before starting the adjustment it is necessary to warm up the engine. The mixture quality screw is turned in completely, and then backed out half a turn - a turn. By rotating the idle speed adjusting screw, achieve a minimum stable rotation of the crankshaft, and then gradually unscrew the mixture quality screw (lean mixture) until interruptions in engine operation occur. Then slowly turn the idle speed screw (enriching the mixture) until the engine starts running stably. Tighten the mixture quality screw again, reducing the rotation speed, finding a new position of the idle screw. As in the first case, these operations are repeated until a minimum, but completely stable crankshaft speed is obtained.
The correct adjustment of the amount of mixture is checked by sharply opening and closing the throttle. If the engine stalls when the throttle is sharply opened, you should turn the quality screw 1/4-1/2 turn (the mixture will become richer), and if it stops when the throttle is suddenly closed, turn it out the same amount (the mixture will become leaner).
Correct carburetor adjustment is the key to minimum fuel consumption with maximum power output from the engine.
Source
Overheat.
Plug Type: Extremely white insulator with small black flecks and premature electrode erosion.
Consequences: loss of scooter power at high speed or under load.
Probable causes: the spark plug is not screwed in enough; The scooter's engine cooling system is not working properly; ignition of the scooter too early; The thermal range is incorrectly selected - the candle is too “hot”.
Remedy: check the torque of the scooter's spark plug; operation of the scooter engine cooling system; adjust the ignition timing; select the correct spark plug heat rating.
Type of spark plug: melted and burned central and grounding electrodes (or one of the electrodes) of the scooter spark plug; bubbling insulator with metal deposits on it.
Consequences: significant loss of scooter engine power; ignition interruptions. Continued use of such spark plugs may cause serious damage to the scooter engine.
Probable causes: thermal overload; significant overheating of spark plug parts due to glow ignition - combustion begins before a proper ignition spark appears; use of low-quality fuel; burning out of the remaining air-fuel mixture in the combustion chamber due to an incorrectly adjusted fuel system of the scooter or the ignition timing of the scooter; The thermal range is incorrectly selected - the spark plug is too “hot”.
Remedy: check the scooter engine, ignition system and fuel system, as well as the quality of the working mixture and the ignition timing of the scooter. Install new spark plugs with the correct heat rating.
Oil contamination
Type of spark plug: wet oily black deposits on the insulator, black oil deposits on the insulator, electrodes and spark plug body.
Consequences: poor start of the scooter engine, interruptions in ignition.
Probable causes: too much oil in the fuel mixture (for two-stroke engines); wear of the rings and/or piston liner - wastes oil.
Remedy: mix gasoline and oil in the correct proportion, install new spark plugs for the scooter (for two-stroke engines); inspect the condition of the scooter engine, if necessary, repair the engine, CPG; .
How to adjust the carburetor on an Alpha moped
Most mopeds have a very simple carburetor design; it is also located in a convenient location, which makes it possible to quickly adjust. And if you are the owner of an Alfa moped and the like, this guide is about how to set up a carburetor on an Alfa moped for you.
Carburetor adjustment is necessary for most mopeds, because over time, precise settings are lost, and it becomes necessary to improve idle speed or fuel consumption. This need may arise when the Alpha moped begins to function incorrectly, producing a completely different fuel mixture. The standard ratio of gasoline to air should be 1 to 15. Deviation from the norm leads to the mixture becoming richer or leaner.
When a rich mixture forms, you will experience the following symptoms:
- frequent popping noises in the exhaust pipe;
- weak acceleration dynamics;
- high fuel consumption.
Signs of a lean mixture include:
- the presence of white carbon deposits on the candle;
- difficulty starting the engine;
- poor idle speed;
- inability to increase speed.
If you do not know how to adjust the carburetor on an alpha 50 or 110 cc moped, perform all the steps in sequence, but before doing this, make sure that the engine is properly warmed up. After this, you will have to perform the following steps to fine-tune the carburetor:
- replace or clean the air filter;
- check the spark plug;
- clean the surface of the carburetor from dirt;
- Check all hoses and connections for leaks.
Setting up the delta moped carburetor
A mixture is formed in the carburetor, which then enters the engine; it must be periodically adjusted. The composition comes in three types: normal (ratio 1:15), enriched and depleted. The quality of the connection is determined by the fuel to air ratio. An increase in the amount of air leads to a leaner mixture .
As a result of this, consumption can be minimized, but maximum power cannot be achieved. Reducing the amount of air leads to a richer mixture. With a ratio of 1:12.5 or 1:13, the engine is able to operate at maximum efficiency, but gasoline consumption increases significantly.
The delta moped carburetor is adjusted in the following order:
- The engine is pre-warmed. You can make adjustments after a trip, when the engine is already well warmed up.
- Before making adjustments, it is advisable to replace the spark plug, clean the air filter, look at the exhaust system and clean it. The carburetor channels must be washed and blown with air.
- The screw that regulates the quality of the mixture is tightened all the way and returned 1/2 turn back.
- The minimum stable rotation of the crankshaft is set by turning the idle screw. By turning the quality screw, the air ratio is increased until interruptions in engine operation begin.
- Using the idle screw, stable engine operation is restored.
- The quality screw is turned again. This reduces the rotation speed. The previous steps are repeated until a minimum stable crankshaft speed is obtained.
- The result of regulation is checked by closing the throttle. If the engine stops, the mixture must be leaner, and if it stalls, it must be enriched. Most often, the quality screw needs to be turned 1/4 or 1/2 turn.
It is also necessary to periodically check the condition of the damper to ensure there is no deformation. To do this, check the condition of the damper in the open and closed positions. In normal condition, the damper should be at an angle of 60°-70°.
Not only the performance of the engine, but also its power and fuel consumption depend on the correctly adjusted operation of the carburetor. Both rich and lean mixtures negatively affect engine wear, the frequency of replacing spark plugs, and the condition of the exhaust system. Correct carburetor regulation can be monitored by the condition of the spark plug.
If the candle is brown, then the mixture is normal, if it is black, the mixture is enriched and needs to be depleted to normal, if white, the mixture is lean and needs enrichment. A properly adjusted carburetor ensures minimal gasoline consumption without loss of engine power.
Carburetor adjustments should not be made indoors. During operation, exhaust gases will be released, which are very poisonous to the body. Garage doors must be open, otherwise serious poisoning can occur.
We recommend reading:
(8
Source: https://MotoHolder.ru/remont/nastrojka-karbyuratora-mopeda-delta