Adjusting the vacuum brake booster - what does it mean?
Checking pipelines and connections To prevent sudden failure of the brake system of the VAZ 2110, VAZ 2111, VAZ 2112, carefully check the condition of all pipelines and connections, paying attention to the following: metal pipelines should not have nicks, scratches, burrs, active foci of corrosion and should be located away from from sharp edges that can damage them;
brake hoses should not have cracks on the outer shell visible to the naked eye and no signs of rubbing; they should not be exposed to mineral oils and lubricants that dissolve rubber; by pressing the brake pedal firmly, check to see if any swelling appears on the hoses, indicating their destruction;
all pipeline fastening brackets must be intact and well secured; loosening or destruction of the brackets leads to vibration of the pipelines, causing them to break; liquid leakage from the connections of the master cylinder with the tank and pipelines is not allowed, if necessary, replace the tank bushings and tighten the nuts without exposing the pipelines deformation.
When tightening the pipeline nuts, use wrench 67.7812.9525. Eliminate any detected faults by replacing damaged parts with new ones. Flexible hoses, regardless of their condition, should be replaced with new ones after 125 thousand kilometers or after five years of operation of a VAZ 2110, VAZ 2111, VAZ 2112 to prevent sudden ruptures due to aging.
Checking the functionality of the vacuum booster VAZ 2110, VAZ 2111, VAZ 2112 Press the brake pedal 5-6 times with the engine not running to create equal pressure, close to atmospheric, in cavities A and B (see Fig. 6-2). At the same time, by the force applied to the pedal, make sure that the valve body is not jammed.
Keep the brake pedal depressed and start the engine. If the vacuum booster of the VAZ 2110, VAZ 2111, VAZ 2112 is in good working order, the brake pedal should “move forward” after starting the engine. If the brake pedal does not “go forward”, check the fastening of the hose tip, the condition and fastening of the tip flange in the booster, the hose to the tip and the fitting of the engine intake pipe, since loosening the fastening or their damage sharply reduces the vacuum in cavity A and the efficiency of the booster. rice. 6-2.
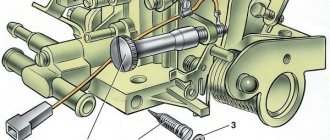
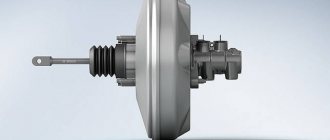
Vacuum booster: 1 - vacuum booster housing; 2 — amplifier housing cup; 3 - rod; 4 — adjusting bolt; 5 — rod seal; 6 — sealing ring of the main cylinder flange 7 — diaphragm return spring; 8 — amplifier pin; 9 — tip mounting flange; 10 - valve; 11 — hose tip;
12 - diaphragm; 13 — amplifier housing cover; 14 — sealing cover; 15 - piston; 16 — protective cover of the valve body; 17 — air filter; 18 — pusher; 19 — pusher return spring; 20 — valve spring; 21 - valve; 22 — valve body bushing; 23 — rod buffer; 24 — valve body;
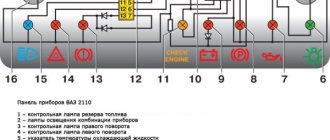
A - vacuum chamber; B - atmospheric chamber; C, D - channels Adjusting the brake drive of VAZ 2110, VAZ 2111, VAZ 2112 The free play of the brake pedal when the engine is not running should be 3-5 mm. The adjustment is carried out by moving the brake light switch 7 (Fig. 6-11) with the nut 6 loosened.
Install the switch so that its buffer rests against the pedal stop, and the free play of the pedal is 3-5 mm. In this switch position, tighten nut 6. fig. 6-11. Brake drive: 1 — master cylinder; 2 - tank; 3 - vacuum booster; 4 — brake pedal bracket; 5 — brake light switch buffer;
6 — brake light mounting nut; 7 — brake light switch; 8 - brake pedal WARNING Adjust the free play of the brake pedal when the engine of the VAZ 2110, VAZ 2111, VAZ 2112 is not running. If the brake light switch is too close to the pedal, it does not return to its original position.
If moving the brake light switch cannot eliminate the incomplete release of the brake mechanisms, then disconnect the brake master cylinder from the vacuum booster and check the protrusion of the adjusting bolt 4 relative to the mounting plane of the master cylinder flange (size 1.25-0.2 mm). This size can be set by holding the end of the rod with a special wrench, and with another wrench, tightening or unscrewing bolt 4.
Adjusting the parking brake system of the VAZ 2110, VAZ 2111, VAZ 2112 If the parking brake system does not hold the VAZ 2110 - 2112 car on a 25% slope when moving the lever by 2-8 sector teeth, adjust the system in the following order: loosen lock nut 7 (see Fig. 6-9) of the tensioning device and tightening the adjusting nut 6.
pull the cable; check the full stroke of lever 2, which should be 2-4 teeth per sector, then tighten the locknut. After performing several brakes, make sure that the stroke of the lever has not changed and that the wheels rotate freely, without sticking, when lever 2 is completely lowered. Fig. 6-9. Parking brake system drive:
- What are lubricant compositions for the Suprotec engine and the opinions of car enthusiasts What are lubricant compositions for the Suprotec engine and the opinions of car enthusiasts
How brand engine additives work
- How to register the replacement of a car's power unit this year?
How to register the replacement of a car's power unit this year? Procedure for dealing with paperwork. - How to adjust the valve mechanism on the engine of a GAZ 3110 Volga?
How to adjust the valve mechanism on the engine of a GAZ 3110 Volga? Why do you need to adjust the valves on the engine? - Adjustment of the valve mechanism YaMZ 238 Adjustment of the valve mechanism YaMZ 238
Precise adjustment of valves on diesel YaMZ 238: - Scheme of organization of changing the front door window regulator on the "seven" Scheme of organization of changing the front door window regulator on the "seven"
Design and procedure for replacing the window regulator - Chevrolet-Niva heating system: changing the interior heater heat exchanger Chevrolet-Niva heating system: changing the interior heater heat exchanger
Recommendations for replacing the interior heater radiator - Standards for the use of fuels and lubricants at the disposal of the Ministry of Transport of the Russian Federation Standards for the use of fuels and lubricants at the disposal of the Ministry of Transport of the Russian Federation
What basic fuel standards are offered by the Ministry of Transport
We remove the engine compartment upholstery, trim and trim of the wind window of the VAZ 2110 (see Removing the trim and trim of the wind window). To prevent air from entering the brake hydraulic system, do not disconnect the brake pipes from the master cylinder.
Using a 17mm wrench, unscrew the two nuts securing the master cylinder to the vacuum booster.
We remove the master cylinder of the VAZ 2111 from the studs and move it forward, carefully bending the brake pipes.
Disconnect the hose from the amplifier fitting.
In the cabin, disconnect the wires from the brake light switch.
Using a 13mm wrench, unscrew the four nuts securing the brake pedal bracket to the body. For clarity, the steering column has been removed.
We take out the vacuum booster assembly with bracket and brake pedal VAZ 2112.
To remove the brake light switch, use two 17mm wrenches to unscrew the locknut.
Using the “17” key, unscrew the brake light switch buffer.
Brake light switch and buffer
Using a screwdriver, remove the locking bracket of the VAZ 2110 pusher finger...
...and remove your finger.
Using a 17" wrench, unscrew the two nuts securing the amplifier to the bracket...
...and disconnect the vacuum booster VAZ 2112.
We perform assembly in reverse order.
When the engine is not running, the free play of the VAZ 2111 brake pedal should be 3-5 mm. We adjust the free play by moving the brake light switch while the nut securing it is loosened. The brake light switch is installed so that its buffer rests against the pedal stop of the VAZ 2110 with a free travel of the brake pedal of 3-5 mm. In this position, tighten the brake light switch mounting nut.
The VUT body is divided into two parts by a diaphragm, through which the rod passes. This rod is connected directly to the pedal itself and the other end creates pressure on the piston of the brake cylinder. The most important thing in our movement is safety on the road, which is why instructions on how to check the vacuum brake booster in a car before a trip will be useful.
And although its malfunctions will not lead to breakdown of the entire system, unexpected stubbornness of the brake pedal may frighten you while driving, and the result of the incident will depend on your reaction. Checking the vacuum brake booster is an integral part of the car inspection process. True, it makes no sense to climb under the bottom of the car every day; the operation of the VUT can be checked indirectly. We will tell you below what signs can tell you about the condition of the amplifier, and also offer repair options.
Adjusting the vacuum brake booster involves adjusting the free play of the pedal, and in order to set it correctly, you need to adjust the length of the rod. Adjusting the brake booster rod should result in a certain clearance, which determines the amount of force on the brake cylinder.
To adjust the timing of valve actuation, vacuum and atmospheric, you will need to work with the adjusting screw. This parameter affects the pedal's ability to return to its original position. By tightening the screw, you will get a pedal that is completely reluctant to return to its original position, and if you do not tighten it, you will get a pedal without the action of the vacuum booster, that is, you will need a remarkable force for braking.
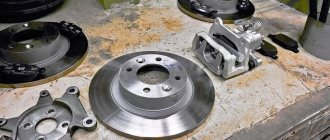
Master brake cylinder
Now let's talk about the master brake cylinder on a VAZ 2110 car. If you do not want to allow the brakes to fail while driving, they should be checked periodically, and if problems arise, take appropriate action immediately.
A common reason for replacing the master brake cylinder of a VAZ 2110 is precisely the fact that the brakes are lost.
Of course, brakes can completely lose their effectiveness for various reasons, but now we are talking specifically about the master cylinder. If the reason lies therein, then it can be determined by the following signs:
Replacement
To repair the master brake cylinder of a VAZ 2110, you will need to first disassemble it and then install a new element.
The most difficult process is disassembly. Therefore, let's talk about it in more detail.
- Carefully disconnect the master cylinder from the pipeline.
- Disconnect the block, which is equipped with wiring, from the emergency brake fluid indicator. The connection to the “ten” is made by terminals.
- Cover the pipe and assembly openings with something to prevent brake fluid from leaking. It will pollute the interior space, which is undesirable.
- Now remove the cylinder along with the reservoir. To do this, simply unscrew the fastening nuts that connect the element to the vacuum booster.
- After removing the brake fluid level sensor, drain the brake fluid present from the cylinder and the cylinder itself.
- If there is no serious need, you should not remove the tank. But for complete assembly, the tank is removed and then installed in place in strict order.
- Before reassembly, each element is washed with purified brake fluid. A good alternative is isopropyl alcohol.
- Do not forget to dry the parts with a compressor and wipe with a clean, dry cloth.
- Carefully avoid contact of the main cylinder with fuel or kerosene.
- Pay special attention to the O-rings. If you wash them with special alcohol, do not keep the rings in this liquid for more than 20 seconds. After processing, immediately dry and wipe the seals.
- Treat the surface of the piston and mirror to remove all rust.
- When replacing the master cylinder, new O-rings must be installed, regardless of their current condition.
- Check the elasticity of the piston springs under load. Refer to the VAZ 2110 repair manual, which indicates the appropriate loads and forces for testing.
- When free, the length of the spring should be 59.8 millimeters. If the indicator deviates from the norm, be sure to replace the springs.
Swelling of rings in cylinders.
The condition of the brakes largely depends on what kind of brake fluid is used during operation. If it is a product of a well-established company, the vehicle is rarely damaged or disabled. But if the fluid is of poor quality, one or more cylinders may not function well due to their O-rings swelling. The same thing happens when fuel and lubricant gets on the ring.
Previously, especially in the era of the Soviet automobile industry, the car owner sooner or later had to sort out the working cylinders. Such an activity was long and burdensome even for professionals. But now hardly anyone will do this if the vehicle is faulty. From the point of view of saving time, it is much easier to change them, and at the same time the brake fluid. However, you can avoid unnecessary financial costs if you use high-quality, albeit expensive, liquid from the very beginning, since repair costs are always higher.
Shorter braking distance means safer driving. The VAZ-2110 will become a safer ride
Russian roads have a bad reputation all over the world. Of course, an accident can happen in any country, but the quality of the road surface, or rather the lack thereof, creates additional danger for drivers and pedestrians. Therefore, the brakes must be in order in any case, and if you also take into account the dimensions of such cars as the VAZ, this aspect must be monitored very carefully.
One of the ways to improve road grip, shorten the braking distance, and, therefore, protect yourself and others, is the vacuum brake booster of the VAZ 2110. In our article we will look at this device in detail.
Basic faults and brake repair options
The best fix is prevention. When operating the VAZ 2108, it is necessary to strictly adhere to the scheduled maintenance periods for the brake system. This applies to the friction linings of the front disc and rear drum brakes. Complete wear of the friction linings threatens unexpected brake failure in an extreme situation. Periodically check the condition of the linings, monitor their level of wear, and replace if necessary.
Carefully monitor the brakes of the VAZ 2108 in terms of fluid leakage through worn gaskets and seals. Excessive wear of the sealing elements is fraught with the risk of insufficient force in the brake cylinders, failure of the pedal when driving the VAZ 2108, and an increase in the braking distance. All this creates very serious risks. Brakes are a critical safety system for drivers, passengers and other road users.
DIY vacuum booster diagnostics
First of all, it must be said that malfunctions and failure of the vacuum amplifier are not fatal. There is only a characteristic difficulty when braking the car and, in some cases, a disruption in the stable operation of the engine. In any case, before the trip, you can independently conduct a fairly effective and not requiring special skills check of the operation of the vacuum brake booster, for this:
- When the engine is not running, press the brake pedal several times at full speed;
- Keep it pressed;
- We start the engine.
If at the same time the pedal “goes” a little to the floor, it means that everything is in order with your vacuum amplifier, but if not, then we continue further diagnostics of the system.
How should you check the VUT for serviceability without resorting to an inspection hole? This is done like this: when the engine is not running, you need to press the brake about 6 times. Then, holding this pedal, start the engine. The pedal should move forward a little, and if this does not happen, first of all you need to check the tightness of the hose connections and the operation of the check valve.
If your vacuum brake booster hisses, then you definitely need to check several places. The most common problem with VUT failure is the hose that connects it to the engine intake manifold. It is imperative to check whether there are any cracks or tears on it; you need to check whether the clamps are tightened.
Signs of a malfunctioning vacuum brake booster include the case when the engine starts to stall. The first thing many car enthusiasts do is buy spark plugs and adjust the valves, but the engine still runs poorly. In such cases, it is worth carrying out a small check: close the amplifier hose so that it does not allow air into the engine. If the engine starts to work properly, then the problem is in the brakes.
Expert opinion
Ruslan Konstantinov
Automotive expert. Graduated from Izhevsk State Technical University named after M.T. Kalashnikov, specializing in “Operation of transport and technological machines and complexes.” More than 10 years of professional car repair experience.
Air in the brakes how to fix the problem
Brake vacuum is the most common cause. It’s another matter if the texture of the sound differs significantly from the ear. That is, the hissing turns out to be quite loud and, as it were, choking.
At the same time, when pressing on the brake pedal when it is cold, we feel its movement being excessively stiff. And also - the buoyancy of the engine speed (and sometimes it can stall). In such cases, you should pay close attention to the vacuum booster as a possible cause of the problem.
Well, a tight pedal, of course, could also be due to frost, for example, until the main one warms up. But the revs and a fairly strong hiss are already direct indicators that you need to look under the hood! How to check it?
The car's braking system is subjected to constant loads, and with the so-called sporty style of city driving, it is also subject to overloads. This happens regularly even with a measured and leisurely rhythm - there is no escape from this problem. Therefore, this unit must be regularly tested to ensure maximum driving safety for the driver and passengers. So it is with the brake vacuum story. As a rule, problems with its operation occur due to the failure of a special diaphragm located inside the device.
It bursts, cracks, and ceases to perform its duties—to create a vacuum. Sometimes the exhaust valve also malfunctions. Checking the functionality of the vacuum on their own, available to every driver, is carried out in the following way. We start the engine and let it idle for a while until it reaches;
- We turn off the engine;
- Press the brake;
- The first press will be no different from the normal one when the unit is running.
- The pedal must be pressed as much as possible: at the same time, the diaphragm in the amplifier is extended and a vacuum is created;
Release the pedal and press it again. If there is something wrong with the system, then during the second approach a vacuum will not be able to be created, and you will tactilely observe an uncharacteristic small stroke of the pedal itself. These changes indicate a breakdown in the brake booster.
What is it, why, how does it work
VUT for VAZs is a device that is responsible for braking the car. Due to the vacuum, it helps create additional force on the brake pedal. Thus, it simplifies the operation of the braking system - the car wears out less, stops faster, and the driver needs to put in less effort behind the wheel.
But it's not that simple. On VAZ 2110 cars, brake boosters affect the operation of the engine, so you need to listen to their serviceability and look at it much more than the “jamming” of other parts. At idle, the injection on this car is equal to 3-4.5 milliseconds from 7 to 12 kg of air. At the slightest violation of the mixture ratio (air, fuel and evaporation), the engine will stop working evenly and begin to stall.
On cars of the VAZ 2110 series, a braking system is used based on diagonal separation of circuits. It works according to the following scheme:
- The first hydraulic drive circuit ensures efficient operation of the left front and right rear wheels;
- The second brake circuit is responsible for the operation of the right front and left rear wheels.
Thus, if one of the circuits fails (even while driving along the highway), the second will cope with a safe stop - the car will not spin, which significantly reduces the risk of damage to both the vehicle itself and the passengers in it.
Without a sorcerer
Knowing what the sorcerer's job is on the VAZ-2109, it is not difficult to guess what will happen if it is absent from the brake system. And the following will happen. The car will brake with all four wheels together. The wheels are blocked sequentially - first a pair of wheels on the rear axle, and then the front ones. The risk of an accident increases, since the driver moving behind is unlikely to react in time to a sudden maneuver. A collision will be inevitable.
A sorcerer in the car is very necessary. A VAZ-2109 car without a sorcerer can be very dangerous not only for others on the road, but also for the driver himself. This car is practically uncontrollable in a skid.
Only those who know exactly and understand well what they will get in the end remove the sorcerer. This is mostly done by professional racing drivers.
But some car owners still remove the sorcerer. At the same time, there are even claims that the car began to brake faster and better. Experts say it only seems so. In fact, everything is a little different. The problem here is that in the event of sudden braking, both pairs of wheels will jam in succession.
How to check the vacuum brake booster for a VAZ 2110 for performance
To protect yourself from possible incidents on the road, you need to regularly check your brake boosters for malfunctions. This is done very simply:
- Turn off the engine.
- Press the brake pedal several times (this is necessary to check for equal pressure in the cavities). If everything is in order, the valve body itself should not stick.
- Still keeping your foot on the pedal, turn on the engine. If the vacuum brake boosters are working properly on our VAZ 2110, then the pedal will move forward along with the foot.
If this does not happen, make sure that this is the reason (the problem may also be with the fastening of the hose tips, the unsatisfactory condition of the tip flange, which, by the way, can also come off). Also, the pedal may have difficulty responding due to a poor connection between the intake pipe fitting on the engine and the hose and tip. All these indicators negatively affect the operation of amplifiers and their efficiency.
How to check when purchasing
Before purchasing a new spare part, its quality can be assessed visually - there should be no obvious damage to the elements: body, boots, casings, protruding parts of the pusher and rod. If it is sold with a fitting and a check valve, then we check it for leaks (valve). To do this, you need to blow into the fitting from the hose connection side; if air does not come out on the other side, then the valve is working. You can also use a rubber bulb - squeeze the air out of it, insert it into the fitting on the vacuum connection side; if the bulb remains compressed, the valve holds.
In the same way we check the mechanism itself. For this you will need a soap solution and compressed air. We carry out this test in a garage environment, so after purchasing an amplifier, be sure to take a receipt from the store so that you can return it if it is found to be faulty.
In the garage we wash the place where the two halves of the mechanism are rolled, the boots, the cuffs, all the places where there may be air leaks. We take out the fitting. We direct compressed air from the compressor into the resulting hole and observe. Where bubbles appear, the seal is broken, the vacuum amplifier is defective.
Replacement and cost
In any situation when a breakdown is detected, timely replacement of the entire assembly is necessary. It is possible to correct some shortcomings in the form of replacing the valve, but this procedure may not bring a lasting effect, since the part itself in many cases (if we talk about the VAZ 2109 model) must be replaced due to its advanced age. After installing a new part, be sure to make adjustments.
Breakdowns of vacuum amplifiers do not happen so often with this model, however, due to their age (production of the model was discontinued in 2004), the amplifiers gradually wear out and become unusable over time.
There are many suppliers of parts for VAZ cars on the market. The average price (cost) of a new amplifier is about 2000 rubles.
General structure of the brake system of the VAZ 2110
In theory, the parking system should be able to hold the VAZ 2110 when the surface is tilted up to 25%. If it can’t cope, don’t rush to a car repair shop, where you’ll have to shell out a hefty sum - you can provide first aid to your car yourself:
- The tensioner locknut must be loosened.
- Then we tighten the cable.
- We check the full stroke of the lever (it should be 2-4 teeth per sector).
- Tighten the locknut more tightly.
- To be on the safe side, we perform several brakes, checking at the same time whether the stroke of the lever has changed.
In this simple way you can check how well the vacuum brake booster works on a VAZ 2110.
The wheels should rotate without effort, with the lever fully lowered.
Do-it-yourself design and adjustment of the brake system of VAZ 2110, VAZ 2111, VAZ 2112
The vacuum brake booster of the VAZ-2110 is located in the engine compartment of the car between the main brake cylinder and the brake pedal.
VUT layout diagram
Principle of operation
In the initial state, both cavities are connected to the atmosphere through a follow-up valve (not shown in the figure). When you press the brake pedal, the rod moves the diaphragm to the left, the follower valve separates the cavities and a vacuum is created in cavity “A”. And since cavity “B” is still under atmospheric pressure, both of these conditions (rarefaction of atmospheric pressure) together give additional force to the braking.
You can take a detailed look at the operation of the entire braking system of a car in its entirety in the following video tutorial.
Symptoms of a problem
- Stiff brake pedal when the engine is running.
- When you press the pedal, the engine starts to rev, and when you slow down sharply, it stalls completely. The described symptom of malfunction is typical for cars in which the vacuum for VUT operation is taken from the intake manifold. If the membrane or vacuum tubes are not sealed, when you press the brakes, unaccounted air will be sucked in, so the engine stalls and begins to stall. The described symptom of VUT malfunction does not apply to cars in which the vacuum is created by a vacuum pump.
How to check?
A torn diaphragm is the main cause of vacuum brake booster failure. The operating principle of the amplifier is based on the difference in pressure in the vacuum and atmospheric chambers, which provides additional retracting force on the pedals. If the vacuum chamber, for example, due to a rupture of the membrane, is connected to a medium with atmospheric pressure, the vacuum created will not be enough for the normal operation of the amplifier.
How to check VUT:
- Start the engine and press the brake pedal all the way. The appearance of hissing indicates that the VUT is not sealed, so air is leaking through it;
- Press the brake pedal vigorously 3-4 times. Keep it pressed and start the engine. If the vacuum seal is working properly, after starting the engine, the force on the pedal will change and it will go down a little.
Repair or replacement?
During production, parts of the amplifier housing are connected by rolling. At home, it is impossible to replicate the factory quality of rolling. Gaps in the contact areas of the housing parts will lead to leaks in the system. Therefore, in the event of a malfunction, a complete replacement is recommended.
General structure of the brake system of the VAZ 2110
First of all, you need to remove the upholstery and windshield trim in the engine compartment. The pipes connecting to the main brake cylinder should not be removed so that air does not enter the hydraulic system itself. Then you should unscrew the brake cylinder from the booster with a 17mm wrench. Remove it and gently tilt it forward so that the brake pipes do not bend. You must remember to disconnect the hose from the amplifier fitting.
To remove the amplifier along with the brake pedal, unscrew the four 13mm bolts and pull it out, having first disconnected the brake light wire. To disconnect the pedal and VUT together, you first need to pull out the pin that connects them and unscrew the two nuts that you will find in the mount to the bracket.
Principle of operation
By the way, according to the instructions, the standard “vacuum unit” of the VAZ-2110 cannot be repaired, only replaced, but we “do it ourselves.” And judging by the number of different instructions for self-repairing cars posted on the Internet, it can be argued that any domestic car enthusiast with more than five years of experience can safely be awarded the title of design engineer in absentia. Therefore, we will consider the repair procedure, especially since the difference in cost between the repair kit and the vacuum booster itself is disproportionately high.
In any case, first we will have to dismantle the VUT; for this we will need a minimum of available tools.
Order of Operations
Removing the VAZ 2110 vacuum booster and installing a new device is similar to the work on 2111 and 2112. Special conditions are not required to perform repairs. The machine is installed on a flat surface, and the following operations are performed sequentially:
- The soundproofing fasteners are unscrewed. Then you need to unfasten the expansion barrel belt, lift it, move it to the side, put it aside and fix it. The left part of the sound insulation must be removed and also put aside.
After the sound insulation is removed, the block with wires is disconnected from the sensor indicating the fluid level in the brake system.
Now you can remove the hose from the vacuum check valve and unscrew the two fasteners of the cylinder to the amplifier.
- The main cylinder turns to the side; here you need to keep an eye on the hoses; if they break, you will have to change them too.
- Now you need to go into the car interior. From here you can unscrew the four fasteners that hold the vacuum seal bracket to the body. They are located under the dashboard.
- Also in the cabin you need to disconnect the wire connectors from the brake light device.
The pin lock plate is now removed. You need to pry it off with a screwdriver. Then the finger is pushed out, it is made of metal, it is easy to pull it out by pressing from below or from above. Then the booster pusher is disconnected from the pedal.
Now you need to remove the amplifier from the bracket, having first unscrewed the two fasteners from the bracket.
This completes the procedure for removing a failed vacuum booster. The new unit is installed in the reverse order. The order must be strictly followed. Mistakes are not acceptable. Installation operations are carried out before the stage of reinstallation of the soundproofing material. Here you need to stop and test the amplifier in operation. If the test results are positive, you can complete the work completely. Do not forget about the smooth pedal stroke; it should vary between 3 and 5 centimeters.