How to properly replace valves on Lada Kalina
Many owners of the domestic Lada Kalina car are faced with the need to replace valves or pumps. There are many reasons to do this, for example, the cylinder head gaskets have partially or completely burned out, or a breakdown has occurred due to the timing belt. In addition, the valve stem may become unusable or the plate may crack. It is also necessary to monitor the operation of the fuel filter. On machines with eight valves, replacement can be done without the help of a specialist, if, of course, you have some mechanical skills. So, in order to make the replacement, you will need the following tools:
- a very important device called a desiccant. With its help, crackers are removed;
- remover for caps, thanks to which oil is removed;
- key to “13” and knob.
After all the tools are prepared, we proceed directly to the task.
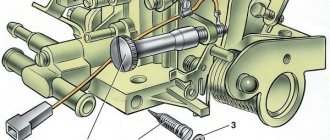
- The main cover is removed. After this you can see the camshaft.
- The gas distribution shaft is removed from the head.
- The pushers are dismantled.
- The desiccant device is fixed. Let us remind you that with its help “crackers” are removed from the valves.
All work must be carried out carefully and carefully, because if done incorrectly, the device can shoot out a “cracker”. In this case, it will be impossible to find it. After removal, you can begin to remove the spring with the plates. Note that they are dismantled very easily. Next you need to remove the valve. We recommend marking their location so that when assembling you do not make a mistake and put everything in its place. Use the points made with a punch as marks.
Result after replacing the fuel pump
So, after replacing the fuel pump, a pressure gauge was immediately connected and when starting the engine, excellent readings of 4 kg/cm² could be observed, and when the speed was set to almost maximum, the pressure did not decrease.
Here you can see information on replacing the fuel pump, which was done in this case. As for the result specifically in terms of the operation of the motor and its power characteristics, everything is excellent here too. Now the car drives very quickly, there are no dips or slowdowns when pressing the gas pedal. As surprising as it may sound, fuel consumption also returned to normal both at idle and when driving.
Increased fuel pressure viburnum
Hi all!
A little background. At the end of summer, I began to notice that the car periodically jerks when accelerating sharply, and my agility has diminished... For about a month I gathered my thoughts to assemble a pressure gauge for the fuel system) During this month, I checked the tightness of the injectors in the following way: - We pull out the ramp with the injectors; — We pump up the pressure in the fuel line by turning the ignition on and off several times; — We monitor the nozzles so that nothing drips or oozes anywhere.
News
Reviews about Autocompas.ru and the work of the staff
A review section has been introduced on the site, using the latest technologies, now each client can write a review from their personal account.
Read completely
Automation of Returns
A completely new and intuitive returns system.
Read completely
Delivery across Russia
Global update of the “Delivery” section! Track numbers in your personal account and convenient cargo tracking.
Read completely
Updated VIN form
An updated form for creating an application for an expert to select spare parts using the vehicle’s VIN code.
Read completely
Video review of a dying fuel pump on Kalina
If you don’t want to read everything written above, then you can watch this video, in which everything was clearly demonstrated.
If you have any questions, ask them below in the comments or discuss them on the channel under the video.
The fuel pressure regulator is a diaphragm valve. Fuel presses against it at one end, and the intake manifold spring presses against it at the other. At lower speeds, the valve opens, accompanied by the draining of residual fuel from the engine into the tank. The next time fuel is supplied, the pump starts, drawing the liquid through the filter. There is a special stabilizer on the fuel rail, whose task is to maintain optimal pressure in the system.
If this component breaks down, the engine power of the machine drops and uneven operation of the engine is felt. To protect yourself from this, you need to systematically check the regulator and promptly respond to symptoms of damage to the device.
How to replace the fuel pump on a VAZ 1117-VAZ 1119?
Note! The fuel pump can be changed either separately from all other parts, or it can be completely replaced with a module; replacing the entire module with the entire module will be more expensive because the new module will have a Fuel Level Sensor, a pressure regulator and many other parts (Just why would you change them if they you are already in normal condition, most likely, if your sensor has become unusable and the regulator is still acting up, then change everything together), and separately, if you replace the fuel pump, then this is only one new part, and all the others will remain in place, if If you decide to replace the fuel pump separately, then in this case, after removing the pump itself, read the article entitled: “Repairing the fuel pump” in which everything is described!
Removal: 1) At the very beginning of the operation, fold back the rear seat cushion so that it does not interfere, this is done very simply, by hand pull out the hinges from under the inside of the seat (see photo 1) and then by pulling these loops, the rear seat cushion reclines like this shown in the figure under number 2, this gives you access to the fuel pump hatch and to the pump itself. As soon as access opens, fold the standard carpet to the side (it will be cut there specifically for the fuel pump, see photo 3 for more details) and remove the four screws which secure the hatch that closes the pump itself (see photo 4) and then remove it.
2) Now disconnect the block of wires from the pump itself, this is done by hand, that is, the latch that holds the block is pressed by hand and then the block is disconnected (see small photo below), then disconnect the two fuel pipes, to do this, press the latch with one screwdriver fastening one of the tubes, and with the other, slide the tube along the fitting and thereby disconnect it (see large photo), carry out exactly the same operation with the other tube and most importantly, after disconnecting them, do not confuse the tubes with each other, because they must be connected strictly in their places and if you connect them the other way around, the car simply won’t start, by the way, on some models (Depending on the year of manufacture of the car), the fuel pipes are secured not using plastic clamps on which you need to press and remove the tubes, but using metal spring clamps, So, if you have metal clamps, then you will need to wring them out and then disconnect all the tubes.
Note! Before disconnecting the pipes, do not forget to relieve the fuel pressure, this can be done in several ways, one of them is to remove the fuse that goes to the fuel pump (This fuse is not located in the mounting block where all the others are located, but under the cover which is located next to the gearshift knob, you can lift this cover with a screwdriver and the pump fuse is located in the very middle) and start the car and let it run until it stalls, the second method is described in detail in the article entitled: “Bleeding the pressure in the fuel rail on a VAZ”, well the last third method (Actually there are a little more of them, but these are the most basic of them) is very simple, disconnect the wire block as shown in the small photo above and start the car in the same way and wait until it stalls, when it stalls you can again just in case, start it up and the pressure in the power system after these procedures will be 100%!bled (The time you spend on bleeding off the pressure is a little more than one minute, but not everyone does this, but in vain, it’s safety first thing, just if you don’t bleed off the pressure in system, when the fuel pipes are disconnected, a little gasoline will flow out of them and your car will get dirty due to this, in addition, if a spark gets on the gasoline, then this will already ignite, which will not lead to anything good)!
3) Then, using two screwdrivers, rotate the plate that holds the fuel pump in one place counterclockwise until its cutouts align with the protrusions on the flange (see small photo below), once aligned, remove the plate and put it aside, and then After that, remove the fuel pump itself from the tank, but only remove it carefully without damaging the Fuel Level Sensor (The sensor just has a float, so you will have to carefully remove this float from the tank), by the way, as soon as the fuel pump is removed from the tank, look in that place where it was attached with a plate, a sealing rubber ring, if it is damaged in any way (compressed, everything is in cracks, for example, or even torn in some place), then in this case replace the ring with a new one because this ring is responsible for the tightness and if it will be damaged, then when driving over strong bumps, gasoline will flow out little by little (drop by drop) through this ring to the outside.
Installation: The new fuel pump is installed in its place in the reverse order of removal, the plate that secures the fuel pump during installation will need to be tightened a little more with light blows of a hammer through a drift and something else, there is an arrow on the fuel pump (you will see it right away), so install the new pump on its place so that this arrow points clearly to the rear of the car.
We recommend: Polishing the windshield with your own hands: maintaining visibility for a long time
Additional video: You can briefly see the process of replacing the fuel pump with a new one in the video below, everything is shown there in pictures and in descriptions.
Note! If you want a live video clip, and not pictures, then in this case watch another video in which the fuel pump is removed using the example of a VAZ 2110 car (On Kalina it is removed a little differently and it is not secured by a plate but by nuts , but you have to look at everything so that you at least know approximately how to replace the fuel pump on a car)!
In order to get to the location of the fuel pump on the Lada Kalina, you must first recline the rear seats and remove the insulating trim on the floor.
We find the lace between the rear seat belt buckles and pull it up, raising both seats. Below I will tell you what tools may be needed for this repair:
- Phillips and flathead screwdrivers
- Hammer
- Pliers
How does the Lada Kalina gasoline vapor recovery system work?
The EVAP system in question was created to prevent the release of harmful gasoline vapors into the surrounding atmosphere resulting from fuel evaporation; it includes:
- fuel shut-off valve;
- adsorber;
- solenoid valve for purging the absorbent element;
- connecting pipelines.
The most important component in the system is the adsorber (also called a carbon filter), the basis of which is activated non-edible carbon, enclosed in a plastic housing. The resulting gasoline vapors are absorbed by the carbon of the absorbent element, gradually accumulating in it. When the engine starts, the canister purge valve (KPA) is turned on, and due to the vacuum, all accumulated vapors enter the intake manifold and then burn out.
On the Lada Kalina, the adsorber is located in the gas tank area, and getting to it is very difficult. To dismantle this EVAP element, it is necessary to remove the fuel tank, but the control unit is located in an accessible place - the valve is located in the engine compartment, in close proximity to the battery, on the rear wall of the air filter housing. It should be noted that for turbocharged engines, a vacuum is not created in the intake manifold, and in order to force the vapors in the desired direction, an additional two-way valve is included in the circuit.
What's the result?
Taking into account the above information, it becomes clear that if the stove does not heat or the engine overheats, the Kalina thermostat is not always the cause of the problems. Of course, when such symptoms appear on Kalina, the thermostat and coolant level should be checked first. However, it often happens that the thermostat is working, as well as the antifreeze level is normal.
We also recommend reading the article on how to replace the cabin filter on a Lada Kalina with your own hands. From this article you will learn when and why it is necessary to replace the cabin filter on Kalina, as well as how this procedure is performed, which cabin filter to choose, etc.
In this case, the cause is precisely air locks. Moreover, attempts to “expel” air from the engine cooling system using standard methods often do not yield results. For this reason, improvements to the system itself are necessary to eliminate the possibility of an air lock forming in the future.
Finally, we note that the only disadvantage of the method of improving the Kalina SOD discussed above is that the engine may take longer to warm up. Moreover, against the background of the problems that arise when the standard system is aired (overheating of the internal combustion engine, cold stove, etc.), such a drawback practically does not manifest itself at all, even in the cold season.
Symptoms of the need for replacement
- Reduced sensitivity when pressing the gas pedal . There is a feeling that the car is holding something. Dynamics may appear, but this happens periodically.
- Floating engine speed at idle.
- If the filter is heavily clogged, the car may stall in neutral gear.
- The occurrence of periodic failures .
- Increased fuel consumption.
The Lada Kalina inherited the principle of fuel filtration from the “ tenth ” family. This principle allows you to carry out the work of replacing elements yourself.
The photo shows how dirty the fuel pump mesh can be.
The following two tabs change content below.
- About the author:
- Latest articles:
I am the editor-in-chief of the site. In our editorial office: Hyundai Accent, Hyundai Solaris, Hyundai Santa FE (turbo-diesel 2015). I now have a Lada Kalina LUX (98 horses). A car fanatic, he has owned both left and right hand drive cars. Robots, CVTs, mechanics. The only thing missing was DSG. But it will be soon.
Similar materials
Tags: Lada Kalina
Features of checking the fuel regulator
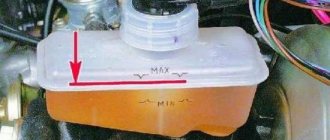
To solve the problem, it is important to know how to check the fuel regulator. This can be done using a regular pressure gauge. Everything is simple here. The device is mounted in the space between the fitting and the fuel pipe. To take measurements, the vacuum hose must be disconnected.
In this case, measurements should be made in four different modes:
- When the ignition is turned on. The nominal parameter is “three” atmospheres;
- when measured at idle – 2.5 atmospheres;
- in case of squeezing of the return flow hose - 7 atmospheres;
- with the hose removed from the pressure regulator - 3.3 atmospheres.
If the measured parameter does not correspond to the specified data or does not increase at all, then the device is faulty. In such a situation, it is enough to figure out how to change the fuel pressure regulator and perform the replacement.
Be attentive to your car, promptly respond to problems that arise, carry out diagnostics and make repairs. This is the only way to extend the life of your VAZ car and protect yourself from high costs in the future. Good luck on the roads and of course no breakdowns.
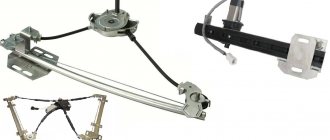
Replacing the electric window
If the window lift cable on a Lada Kalina car has become unusable or the motor has burned out, the ESP must be changed. We carry out the replacement operation in the following order:
- dismantle the power window control unit;
- remove the door trim;
- to disconnect the window regulator from the glass, the latter must be raised all the way up;
- unscrew the four bolts that secure the glass to the ESP (two in the front and two in the back). The glass is held on by seals, but it can also be secured so that it does not fall down;
- unscrew the black metal strip (three screws);
- unscrew the eleven window regulator fasteners (10 bolts), disconnect the power plug from the electric motor;
- We begin to remove the power window from the rear, first removing one half of it;
- then we take out the front part along with the motor from the door cavity;
A burnt-out electric motor on a lift can be easily replaced. For this:
- unscrew the three studs on the mechanism body, then four more screws;
- dismantle the motor, holding the cable spool with your hand, install a new part;
- We install the window regulator in the door, connect it to the glass guides, and put the trim in place.
Lada Kalina engine repair, valve grinding, cylinder head repair, pistons replacement
The mileage of the Lada Kalina car is 100 thousand km. in eight years. The car has an HBO. The viburnum engine has become less dynamic, the response is not the same.
And one more thing - I didn’t like the clattering noise in the viburnum engine.
Missing the third cylinder, trimming, Brains of HBO Alpha-S.
I decided to disassemble and evaluate the condition of the crank mechanism. We removed the cylinder head and pumped the pistons. It turns out they are very worn, but the rings are in good condition. So you need to repair the Lada Kalina engine
cylinder block 8 valve engine Lada Kalina 1118
Condition of the cylinder block between the first and second, as well as between the second and third cylinders
I immediately noticed a slight burnout (carbon deposits) on the cylinder head of the viburnum fret between the second and third combustion chambers of the cylinders. Most likely the cylinder head gasket is loose
cylinder head of 8 valve engine 1118
Piston sizes are different! .On one piston the inscription G-B2
. As far as we know, this means a group
IN
, and the “finger” marking is 2.
The connecting rods, bearings and valve guides were within normal limits. We bought a piston 2110 D=82mm E3 with rings and pins assembled. Group D was not found, so we took E. The fitting showed that everything fits perfectly.
What surprised me was the condition of the insides after using Lukoil oil 5w40 in winter and 10w40 in summer. I thought there would be a lot of soot and deposits, I expected to see a terrible picture. Alas, and for the better, my expectations were not met)))
Troubleshooting
No pressure in the fuel rail? Causes:
- Clogged fuel filter;
- Clogged fuel pump filter;
- Fuel pump malfunction;
- Malfunction of the fuel pressure regulator (FPR). And with high blood pressure too.
If the pressure in the fuel rail gradually drops, the cause may be:
- leaking fuel pump connections;
- leaking injectors;
- fuel pump malfunction.
Let's check it like this. We clamp the leading rubber hose of the fuel rail:
- the pressure has become stable - the fuel module is leaking or the pump is faulty;
- the pressure drops - the injector(s) are leaking.
Checking the RTD. Connect the pressure gauge hose to the outlet fitting of the fuel pump and turn on the ignition:
- the pressure is low but stable - this means the RTD is faulty and is releasing pressure too intensely.
If the pressure in the fuel rail is within normal limits, we look for the causes of engine malfunctions elsewhere.
Keywords: power system Lada Granta | power supply system for Lada Kalina | power supply system for Lada Priora | power supply system for Lada Largus | 4x4 power system | power supply system for Lada Vesta | power system lada xray | Lada Granta engine | Lada Kalina engine | Lada Priora engine | Lada Largus engine | 4x4 engine | Lada Vesta engine | lada xray engine | Niva power system | Niva engine | universal article
+10
Share on social networks:
Found an error? Select it and press Ctrl+Enter..
Replacing the adsorber purge valve on Kalina
If the check shows that the Evap-Solenoid is faulty, the part must be replaced (catalog number - 11181164200). There is no point in repairing the device:
- the price of the valve is in the range of 400-800 rubles;
- You can buy the device in almost any store that sells VAZ spare parts;
- changing the KPA is very easy and simple.
But before making a replacement, it would be a good idea to check the control circuit; quite often the valve does not work due to a break in the wires going to it. To complete the work, you will not need a pit or a lift, and the procedure itself will take no more than one to two hours, even if the operation is performed by an inexperienced worker without metalworking skills.
We change the valve as follows:
- turn off the ignition, raise the hood;
- find Evap-Soleno />
- We dismantle the valve together with the tube, and the disassembly is almost complete.
Replacing the purge valve could be considered a very simple task, if not for one “but” - it is very difficult to remove the plastic tube from the CPA without damaging it, and it does not come with the new valve. There are two options here:
- try to carefully heat the connection with a hairdryer and pull off the pipe;
- cut the tube at the connections, and instead buy an ordinary fuel hose with a diameter of 8 mm and two clamps.
Having measured the required length of the hose, cut it, connect it to the valve and connector, we get approximately the same design as in the figure below.
We install everything in place, start the engine, and test the car on the move.
Selecting new filter elements
To purchase fuel purification system parts for VAZ 1117-19 models, you need to know what they look like:
- The coarse filter is a flat mesh bag made of chemically resistant plastic that captures large particles of 80-100 microns. In the center of the element there is a plastic fitting that fits onto the counterpart of the gasoline pump.
The mesh element is equipped with a pipe that fits onto the fuel pump fitting - The fine filter is made in the form of a cylinder with two fittings at the ends. The body is made of metal or special plastic - polyamide, and there is filter paper inside it. It traps particles measuring 15-50 microns. The pipes are equipped with clamps for fastening fuel hoses.
The element is equipped with clamps for fastening fuel line connections
All modifications of the Lada Kalina, including the second generation, are equipped with absolutely identical filter elements - a “barrel” and a mesh catcher. The dimensions of the spare parts are also identical.
There are no tricks in choosing a coarse mesh - the parts are made according to a single sample and cost from 30 to 45 rubles. The only caution: in order not to purchase a low-quality product or a fake, contact well-established stores. Although the fuel pump mesh costs a penny, it plays an important role in the fuel system: it catches large debris that can quickly clog the filter paper of the next cleaning element.
In operation, the plastic case is not inferior to the metal one in terms of reliability.
Operating principle of the element
The regulator (RDT) is a conventional diaphragm valve, whose task is to maintain constant gasoline pressure in the line running from the tank to the fuel rail. Whatever mode the engine is operating in, its value should be in the range from 3.7 to 3.9 bar.
When the upper pressure threshold is exceeded, the valve begins to dump excess fuel directly into the internal volume of the tank. If the fuel pressure is insufficient, the regulator is not able to increase it, but if it breaks down, it can itself cause a decrease in pressure. How Kalina’s power system works is well reflected in the diagram above.
To correctly diagnose a diaphragm valve malfunction, you need to understand the algorithm by which the fuel system operates:
- When the ignition of the Lada Kalina car is turned on, the fuel pump (item 6) starts working, creating the necessary pressure in the fuel rail (item 2). If after a few seconds the starter is not started, the controller will automatically turn off the pump.
- Gasoline passes through coarse and fine filters (item 7) and enters the RTD, and from there along the line (item 4) to the ramp and injectors (item 3).
- After starting, the engine begins to consume fuel to varying degrees, depending on the driving style.
- At idle speed, the fuel pressure regulator dumps most of the fuel back into the tank (item 5), since its consumption is low, and the fuel pump constantly operates in one mode.
- At high speeds, the engine needs a lot of gasoline and the valve resets almost nothing.
There are 2 types of regulator malfunctions, characterized by a decrease in fuel pressure or, conversely, its excessive increase. The element cannot be repaired and must be replaced if broken.
How often is replacement done?
There are clear regulations for replacing consumables, which include fuel filters. According to the requirements of the machine's operating instructions, they must be changed every 30 thousand kilometers. But given the different quality of fuel at gas stations and the operating conditions of the car, experienced auto mechanics recommend reducing the maximum interval to the following values:
- for a fine filter - 20 thousand km;
- for coarse mesh - 70 thousand km;
- when operating in northern regions, the service life is reduced by half from the regulations, that is, it is 15 and 35 thousand km, respectively.
Some motorists who carefully care for their Kalina offer their own replacement intervals. The principle is as follows: all consumables are updated simultaneously, along with the addition of fresh oil. With such a scheme, the interval is reduced to 7-15 thousand km, depending on the quality of the engine lubrication.
Compared to its predecessors, the Lada Kalina has a more modern and complex design. But the gasoline filtration scheme, inherited from the “tenth” VAZ family, remained unchanged. Thanks to this, it remains possible to change the cleaning elements yourself and not pay money for car service services.
- Author: ratico19
Rate this article: (20 votes, average: 4.5 out of 5)
We expel air from the cooling system
The cooling system can become airy for various reasons, and first of all, the heater in the cabin stops blowing warm air, the temperature rises, and the antifreeze boils. If you squeeze the upper and lower radiator hoses, you feel that they are empty, there is no coolant in them. Often, “airing” occurs after replacing the heater radiator, and it is sometimes very difficult to remove air from the system. Alternatively, you can install an additional tee on the lower heater pipe under the hood, and lead the new hose into the expansion tank from above; a plug should be placed in the lower pipe from the tank to the lower radiator pipe.