Issues discussed in the material:
- What is the working principle of a vacuum brake booster?
- How to check the operation of the vacuum brake booster
- How to adjust and repair VUT
One of the most important parts in a car's brake system is the vacuum booster. Its operation allows reducing the effort exerted by the driver when pressing the brake pedal. The efficiency of the braking system remains unchanged. Like any other machine part, the vacuum brake booster (VBR) is subject to wear and tear, which means it can fail during long-term use. Therefore, it is necessary to periodically check the VUT. We will tell you how to check the vacuum brake booster below.
What is VUT and why is it needed?
To determine the malfunction of the VUT, it makes sense to describe its purpose, operating principle, as well as the effect of the vacuum booster on engine operation. So, the main task of the “vacuum man” is to increase the physical force (usually 3...5 times) applied by the driver to the car’s brake pedal. This is vital because even a very strong person is not able to create enough force in the hydraulic brake system so that all the brake pads are compressed to the required value at the critical moment. This force is created due to rarefaction of air, and the area in the engine intake manifold is used as its source or is pumped by an additional pump.
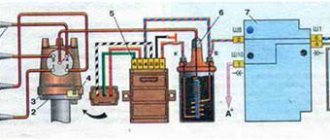
Structurally, the VUT consists of two chambers - atmospheric (on the driver’s side) and vacuum (on the engine side). The vacuum chamber is connected to the intake manifold using an appropriate pipeline. When you press the brake pedal, the vacuum chamber is connected to the atmospheric chamber using a pusher, which has a so-called tracking valve. Next, the diaphragm is connected to the rod and brake fluid is pumped to the brake cylinders. If there is no force on the brake pedal, then under the influence of the return spring the diaphragm returns to its place, the pressure on the brake fluid weakens, which is why the brake pads move apart and braking stops.
VUT device
In the simplest case, the vacuum brake booster takes vacuum from the intake manifold. To do this, it is connected to it by an appropriate pipeline. However, in many modern cars there are separate vacuum pumps for the vacuum pump. They come in two types. The first is mechanical, it is driven by the engine camshaft. The second is electric and is driven by a separate electric motor. The use of additional pumps not only increases the comfort of using the braking system, but also increases its reliability (for example, in the event of damage and/or depressurization). But still, the pump is only an auxiliary element, and the main vacuum is taken from the intake manifold.
This is interesting: How does the traction control system work?
Design and principle of operation of the vacuum amplifier
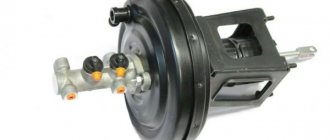
A vacuum booster (or VUT) is the most common type of mechanism for boosting brakes. It operates on the principle of reducing pressure or simply vacuuming. Structurally, it forms a single whole with the main cylinder and includes several important components:
- a housing divided by a diaphragm into 2 parts - a vacuum and an atmospheric chamber;
- a valve that closes the bridge between the parts of the vacuum chamber;
- a mechanical (or electric) pump necessary to ensure uninterrupted operation as the main or additional source of vacuum (may not be present on some gasoline cars);
- return type spring - needed to move the diaphragm to its initial position after pressing the brake pedal.
Some VUT models are also equipped with an electromagnetic drive. This is an additional element for emergency braking.
The operation of a vacuum unit is based on the vacuum or difference in air pressure in both chambers. In the initial position it is the same, but after pressing the brake, the channel connecting both halves of the VUT is blocked. In this case, air begins to flow into the atmospheric section, where the vacuum decreases. This creates a force on the diaphragm, which moves the master cylinder piston against the spring force.
Signs of VUT malfunction
Partial output of the vacuum brake booster will certainly manifest itself, and from the worst side and quite clearly. So, symptoms of a malfunctioning amplifier include:
- Significant effort when pressing the brake pedal . To feel this for yourself, you can press the pedal four or five times with a known good vacuum seal and the engine turned off. At the last squeeze, the force on the pedal will increase significantly. Sometimes the opposite situation occurs - the pedal is too soft. This indicates “airing” of the brake system.
- The influence of the vacuum booster on engine operation . Since the VUT takes vacuum from the intake manifold, the engine can change its operating mode during braking (although this should not happen in normal mode). This happens because excess air is sucked into the manifold, affecting the composition of the air-fuel mixture.
- The vacuum brake booster hisses . In particular, hissing occurs when the pedal is depressed. A hissing sound clearly indicates the presence of depressurization either in the vacuum amplifier itself (for example, when the diaphragm ruptures), or in its pipeline or in the check valve (for example, when its rubber seals are significantly worn).
- Vacuum pumps knocking . If a mechanical vacuum pump fails, the usual sign of this is a hum emitted by its drive rod (error p1479 may also appear). If an electric vacuum pump is installed on a car, then motorists often experience overheating of its drive motor.
- Knocking noise when braking hard . Moreover, the sound is inertial in nature, since it is caused by the membrane fastening becoming loose.
Accordingly, the occurrence of one or more signs directly indicates to the car owner that it is necessary to check the vacuum brake booster and its components.
Error p1479
In modern cars equipped with an electronic control unit (ECU), an error code p1479 is often generated in the device’s memory - “Brake booster vacuum system mechanical malfunction.” Owners of a wide variety of cars encounter it - Audi, Volkswagen (Touareg, Passat), Ford and others. The cause of an error in the control unit can be very different. For example, when air is sucked in the hose between the intake manifold and the vacuum brake booster itself.
Another common option is the result of measuring the vacuum value with a vacuum sensor. In particular, it occurs if moisture appears inside the vacuum booster and/or its tubes. The solution is to clean and dry the tubes, and in rare cases, replace the sensor itself.
It also makes sense to check the integrity of the fuse going from the control to the sensor. Each machine will have its own electrical circuit, so it is impossible to provide specific information within the framework of this material.
Another option is the performance of the electric vacuum pump. In particular, its electric motor, impeller, bearings, fastenings, connection blocks, as well as relays and fuses.
How to troubleshoot
It makes sense to repair the vacuum brake booster system only in the event of partial failure of the booster pipeline, its check valve, or the valve seal. If replacing the listed elements does not produce results, then it is necessary to replace the entire VUT, since its design is non-separable and cannot be repaired.
Replacing a pipeline with mounting clamps makes sense for several reasons:
- low price of materials;
- difficulty in localizing the location of depressurization;
- Difficulty in repairing cracks or other damage in the pipeline.
Replacing the pipeline itself is not difficult, and even a novice car enthusiast can easily handle it. The main thing is to buy a new set of pipes, clamps and appropriate gaskets from the auto store. Next, using plumbing tools, simply change one tube for another.
Repair of auxiliary pumps
As mentioned above, when a mechanical vacuum pump partially fails, some car enthusiasts simply remove their rod, thereby turning them off and eliminating the knocking noise that occurs when the pump operates. In this case, the brake booster will work, but not as effectively, which will result in a harder pedal. Some car enthusiasts get out of the situation by turning the rod 180 degrees. Sometimes this helps because it is only present on one part of them.
As for electric vacuum pumps, these units are usually irreparable; accordingly, they are simply replaced with new ones.
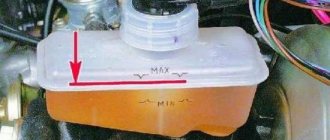
Checking the membrane and chamber tightness
There are several ways to check the serviceability of the vacuum brake booster (VBS), but to ensure that it is 100% operational, it is better to use them all. First of all, press the brake pedal several times with the engine off. When pressed for the first time, the pedal will lower with a fairly insignificant force by about 1/3 of the full stroke, with each subsequent press it should become tighter and the stroke should decrease. If this does not happen, the VUT is most likely faulty, and diagnostics of the vacuum brake booster is required. Next, we will tell you how to check the vacuum brake booster on Kalina.
If VUT diagnostics have shown ambiguous results and it is difficult to determine the difference in pedal stroke and pedal stiffness, you can try another method. Press the brake pedal two or three times and start the engine without removing your foot. There are several options for the development of events:
- If the pedal goes deeper a few centimeters, the vacuum brake booster is working properly. You can finally verify this by turning off the engine and not releasing the brake pedal for 30 seconds.
- If the pedal starts to rise, this indicates a leak in the vacuum chamber.
Amplifier testing methods
If checking the connections and hose does not show anything, we go directly to the vacuum brake booster. The easiest diagnostic method is to work with the brake pedal.
- Start the engine for 2-3 minutes and turn it off. Press the brake pedal four times and continue to keep your foot on the pedal. Start the engine. When starting, the pedal should gradually move down. Turn off the engine.
- Press the brake pedal several times with the engine off. If after the second and third press the pedal rises higher, this indicates that the vacuum brake booster is working.
- Start the engine and after idling for a while, press the brake pedal and stop the engine. The brake pedal must be kept pressed for 30 seconds after stopping the engine. It must be in the specified position. If the pedal fails, there is a leak in the hose, valve, brake booster or intake manifold.
Methods for diagnosing VUT
If one of the above symptoms is detected, you should immediately check the vacuum brake booster for functionality without removing it from the car. Diagnosis is simple:
- Start and warm up the engine.
- Leaving the engine idling, use your hand or pliers to press down the vacuum outlet pipe leading from the manifold. Another option is to disconnect it from the fitting and plug the latter with a wooden wedge.
- Constant behavior of the motor indicates the tightness of the system. The serviceability of the air valve is checked in another way, described below.
- If the speed of the power unit has stabilized or increased, air is leaking through the VUT or supply hose.
Having determined that the amplifier is faulty, exclude the vacuum transmission hose from the list of “suspects”. Disconnect the pipe and inspect for cracks and tears. Check the condition of the clamps, install new clamps if necessary.
If sealing the pipe does not produce results, proceed to checking the “vacuum tank” itself:
- Without starting the engine, sit in the driver's seat and apply the brake 3-5 times. The first presses will be light, but on the last ones the stroke will be greatly reduced. In this case, the diaphragm draws air through the hose and pumps it inside the housing; a check valve prevents it from coming out. Remember, the atmospheric channel is closed.
- Having completed the last movement, hold the pedal depressed and start the engine.
- After starting the engine, the pedal should go down about halfway.
This brake booster test identifies problems with the check valve or air valve.
If the first one is faulty, then it will not be possible to pump air into the housing - the pedal will sag all the way. A worn air valve will not open the air passage while the engine is running and the pedal lever will remain in the up position or drop very slowly. The tightness of the VUT housing is checked as follows:
- Start the power unit.
- Squeeze the brake all the way.
- Without releasing the pedal, turn off the engine.
If the amplifier housing or diaphragm does not allow air to pass through, the pedal lever will remain depressed. Otherwise, it will return to its original position under the action of the spring. Then you need to remove the mechanism and replace it with a new one. Repairing a VUT in a garage is a rather difficult task, since the body of the element is held together by factory rolling.
How to check VUT
In reality, checking the correct operation of a vacuum device is quite simple , which even a beginner can handle. We will give three ways to check the vacuum seal for serviceability.
Option 1
- Start your car and let it idle for about 7 minutes.
- Stop the engine and fully depress the brake pedal to create a vacuum in the brake system.
- First release the pedal and then press it again.
If the vacuum brake device fails, then the second time you press the pedal, you will feel a significant reduction in its travel (compared to the first press). This occurs because airless space can no longer be created. But if when you press again you do not feel a difference, then this indicates that the brake system is working normally . Let's move on to the second verification option.
Option 2
- With the car engine turned off, press the “brake” 6-8 times.
- Depress the brake pedal to the maximum and start the engine.
If there are no problems in the vacuum brake device , airless space begins to create in the system. For this reason, the diaphragm begins to press on the rod, which will pull the pusher connected to the pedal. And the brake pedal (even when it is fully depressed) will go down a little.
If this does not happen after starting the power unit, it means that there is no vacuum in the brake system. And, this means that there are malfunctions that impede this process.
Option 3
This vacuum brake test helps determine if there are air leaks.
- Start the engine.
- Depress the brake pedal all the way and immediately turn off the engine.
The depressed pedal should remain in this position for approximately 30 seconds. This shows that there are no problems . But if it begins to move to its original position, it means that the pressure in the working chamber increases. This indicates problems with the mechanism.
Checking the vacuum booster
This is interesting: How to check the support bearing of a shock absorber strut
Why does the VUT fail?
If the VUT breaks down, the brake system remains operational, but it is difficult to depress the pedal. There are two typical reasons for mechanism failure: loss of tightness of chambers/tubes and damage to the check valve.
A special hose connects the vacuum unit to the vehicle’s intake manifold, from which in most cases it receives a vacuum. Some amplifier models are equipped with an additional pump. But still, the VUT takes the main part of its energy from the collector. Therefore, if the tube breaks or its connections become loose, the mechanism stops working.
What are the signs to identify a faulty VUT?
During the operation of a vehicle in which a vacuum brake booster is installed, one should not ignore the tightness of the structure of the booster itself and the hoses leading to it. Here are some signs of a malfunction that will help the driver always keep the situation under control:
- the driver has a need to apply more effort when braking in order to achieve the same efficiency;
- reducing the brake pedal travel;
- the car continues to brake even after the brake pedal is returned to its original position;
- there is a “suction” in the vacuum hose, and therefore there is unevenness in the speed of the power unit;
- when braking, extraneous sounds like hissing are heard;
- VUT completely “refuses” to work;
- fuel consumption increases when operating the vehicle in normal mode;
- the car suddenly begins to “tweak”;
- Candles don't work.
VUT
Sometimes a brake booster malfunction may manifest itself in a slightly different way, but if you feel one of the mentioned symptoms, then this becomes a reason to check the brake system.
Replacing mechanisms
To start replacing the vacuum booster, you first need to arm yourself with the necessary tools and materials:
- Screwdriver and pliers.
- Keys 13 and 17.
- Brake fluid.
- Rubber caps and special plugs.
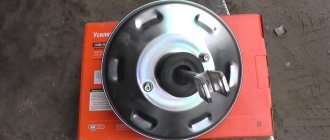
Removing the brake master cylinder
In some cases, dismantling the vacuum booster is not necessary. It will be enough just to replace the master cylinder.
Note. We can say this: if the brake pedal on a car with a vacuum booster becomes softer, and pumping out air pockets from the entire system does not lead to anything, the master cylinder will need to be replaced.
So:
- The block with wires is disconnected from the brake fluid level regulator.
- We take the key 10 and begin to unscrew the fittings from the master cylinder one by one.
- We put plugs on the brake pipes and cylinder.
We put plugs
Note. Plugs make it possible to avoid air penetration into the brake system, so as not to pump out the plugs later, which is not so easy.
- We take a 17mm wrench and unscrew the two nuts that secure the cylinder to the vacuum booster.
- Remove the cylinder.
- We install a new one.
Amplifier replacement
So:
- We again disconnect the block with wires from the regulator.
- We remove the fittings.
Replacing the vacuum booster on a VAZ 2115
Note. The brake master cylinder may not be removed. It will be enough just to disconnect the fittings on the left. Then you will need to move the cylinder to the side.
- Disconnect the hose from the valve.
- We remove the bracket from the interior side that locks the brake pedal pin.
- We remove the finger.
- We take a 13mm spanner and unscrew the 4 nuts that secure the vacuum booster to the car body. We dismantle the old amplifier.
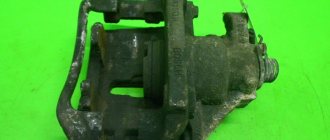
Removed brake booster
Note. In the process of this work you will have to suffer a lot, since this is not the most convenient work.
- We screw the mounting frame onto the new VU using a 17 key.
- We carry out the assembly, remembering that it is recommended to first connect the brake pedal and the VU using a special pin, and only then screw it in completely.
Replacing the vacuum booster in a VAZ 2115
Advice. It is better to immediately change the vacuum hose, since with prolonged use it loses its elasticity and flexibility. As a result, cracks and even fractures occur.
Add a commentAdd a comment We recommend readingVAZ 2110: replacing a car's vacuum boosterVAZ 2109: replacing brake fluid and some nuancesReplacing the rear brake pipe of a VAZ 2109 and all about itVAZ 2109: how to bleed the brakes with a partner
What to do with a faulty device?
As usual, there are two options: repair and replacement . Their choice depends on the degree of damage to the VUT. To eliminate them, you need to know the amplifier well and have a repair kit suitable for the specific model of the device in your garage.
If the vacuum booster fails, you will have to spend more effort to brake, and the response of the braking system will be very slow. In some situations, this can lead to an accident, so if signs of failure of the VUT are observed, it should be replaced. Note that at home there is no point in trying to get the amplifier into working condition without a special set of spare parts and tools.
Cost and how to spot a fake
If we talk about the VAZ-2109, a vacuum brake booster costs from 1.2 to 1.5 thousand rubles. You can buy it in any store or online. A VAZ-2110 vacuum brake booster will cost exactly the same. The exception is the yellow “Sport” amplifier. It is sold for 2.3 thousand rubles. We also note that the amplifiers are interchangeable on VAZs. For example, the vacuum seal from the “eight” is ideally installed on the “nine”, 13, 14 and 99 models. The amplifier for the “ten” is also suitable for “Lada” 11th and 12th models. If we talk about manufacturers, Pekar and DAAZ have proven themselves well. The so-called sports amplifier works in the same way as regular factory ones. Therefore, there is no point in overpaying money for it.
When purchasing, it is important to pay attention to the packaging. It should be made of corrugated cardboard. There is always a label on the box that says:
Engine misfire (misfire) when pressing the brake pedal
An air leak through the brake booster can cause misfires while the engine is running. Damage to the diaphragm or internal valve leads to the fact that the optimal ratio of air and fuel is disrupted. Misfire usually occurs when you press the brake pedal while idling.
If checking the vacuum hose, connections and check valve does not reveal anything, you need to perform the following check:
- start the engine at idle speed;
- tighten the handbrake;
- ask another person to press the brake pedal;
- pinch the vacuum hose using pliers (do not forget to place a rag so as not to damage the hose);
- If the engine does not stall and its operation stabilizes, the vacuum brake booster is the culprit for misfires.
Checking engine vacuum using a vacuum gauge
Sometimes the VUT copes well with its tasks, but the motorist still has certain doubts that it is fully operational. If the amplifier on your car did not pass or barely passed the previous tests, you need to make sure that there is enough vacuum. Such diagnostics are performed using a vacuum gauge.
- Disconnect the vacuum hose from the brake booster and connect it through a tee so that you can use a vacuum gauge.
- Start the power unit.
- The sensor should display approximately 400-540 mmHg. Art. If you see a lower value, there is a vacuum leak through the intake manifold (gaskets or crack), hose, engine (cylinder head gasket, etc.) or other components.
How to check when purchasing
Before purchasing a new spare part, its quality can be assessed visually - there should be no obvious damage to the elements: body, boots, casings, protruding parts of the pusher and rod. If it is sold with a fitting and a check valve, then we check it for leaks (valve). To do this, you need to blow into the fitting from the hose connection side; if air does not come out on the other side, then the valve is working. You can also use a rubber bulb - squeeze the air out of it, insert it into the fitting on the vacuum connection side; if the bulb remains compressed, the valve holds.
In the same way we check the mechanism itself. For this you will need a soap solution and compressed air. We carry out this test in a garage environment, so after purchasing an amplifier, be sure to take a receipt from the store so that you can return it if it is found to be faulty.
In the garage we wash the place where the two halves of the mechanism are rolled, the boots, the cuffs, all the places where there may be air leaks. We take out the fitting. We direct compressed air from the compressor into the resulting hole and observe. Where bubbles appear, the seal is broken, the vacuum amplifier is defective.