is engaged in a comprehensive supply of car accessories, such as: car radios and everything that is necessary for high-quality sound, alarm systems, xenon kits, navigators, recorders and much more.
Today we will talk about the CORRECT installation of the xenon kit, which you can do yourself and with the help of our specialists.
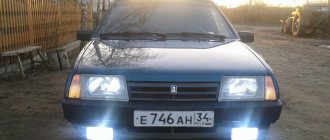
| Our company's specialists will help you install xenon lamps. Installation cost 300 rubles. If you want to do this yourself, use the instructions: Xenon headlights provide bright and efficient illumination of the roadway. It is believed that this is the most reliable, economical and progressive type of automotive optics.
|
Design and operating principle of xenon optics
To install xenon in headlights with your own hands, you need to know the principle of its operation. A xenon lamp is a small bulb with two electrodes made of quartz glass. The flask is filled with chlorides of several metals and xenon, an inert gas that emits a bright glow when current is passed through it.
In order for the lamp to light, according to the technology, a current of 25,000 V must be passed through the xenon, then it is enough to maintain a voltage of 80 V and higher. But standard equipment cannot provide such conditions. Therefore, when switching to xenon, the installation of a special pre-start unit is required. The new rules also require the installation of headlight range control and washer.
If you entrust the connection to professionals
By entrusting the installation of xenon to car service technicians, you can avoid breakdowns of expensive equipment and injuries that are possible due to errors in independent work.
It is permissible to connect xenon to warranty vehicles by certified specialists.
How to find a good service?
Many car service stations charge higher fees for xenon installation. To prevent financial losses, you need to analyze the prices for the corresponding installation work of car services in your region. Reviews of car owners who have installed xenon in a certain workshop will help you find a good service.
Estimated cost of work
Installation of xenon on various car models takes from 40 minutes to 2 hours, and the price varies accordingly.
It depends on the design features of the vehicle.
The estimated cost of installing xenon in head lighting and fog lights in some cities is shown in the tables:
Types of xenon lamps
It is not very difficult to install xenon yourself, but it is important to choose suitable optics. Xenon lamp sockets differ and are suitable for headlights of certain car models. The most commonly used lamps are H1, H4, H7, HB4 sockets. To find out which base the headlights are equipped with, you need to contact the service center. But you can check the headlights yourself by simply comparing the standard base with the table presented here.
The color temperature of different xenon lamps also differs. The color and brightness of the light emitted by car headlights depends on this parameter.
Externally, blue xenon looks the most impressive, but light that is as close as possible to daylight is provided by white lamps with a color temperature of 5 to 5.5 thousand K. They are considered the most gentle on the eyes and best illuminate the road in fog. This must be taken into account when installing xenon in fog lights.
Types of xenon
The brightness and color shade of the lamp depends on a parameter such as temperature. The color range of xenon varies from yellow to violet. Temperature is measured in degrees Kelvin. More saturated colors are rarely used by car enthusiasts; most often they install white xenon, it looks more like daylight. The yellow color of the headlights will be at 4050 K. And the white color is equal to a value of 5000 K. The blue tint is obtained at 6000 K, and the purple tint at 18000 K.
Also, every car enthusiast needs to know that pseudo-xenon is available for sale. It has nothing to do with xenon lamps. These are ordinary halogen lamps, tinted blue with a higher wattage. So when buying xenon you need to be very careful.
Xenon Manufacturers
Before we tell you how to install xenon in headlights yourself, we offer an overview of manufacturers of pre-start units and gas-discharge lamps:
- The best ignition units are Osram, Hella, Philips. Products from Bosch and Matsushita are almost as good as them, and they are also easier to install. PIAA blocks are of high quality, but are more expensive than others.
- Xenon lamps from Osram and Philips are considered the most reliable (xenon replacement is extremely rare), but the choice of bases from these manufacturers is limited. Korean companies Eagleye, Alpha Optima, ZZX Pro, Berus produce high-quality lamps with any sockets.
Which xenon is better
Firstly, you should understand that the most expensive xenon will not necessarily work the best . The cost of well-advertised products includes the cost of advertising, so there is no point in overpaying.
Also, in order not to overpay, you should select an ignition unit that matches the functions of your car. For example, if the car does not have a module installed that controls the voltage of the lamps, then there is no point in buying xenon with so-called “false lights”. This will save money and not lose quality.
There is also no point in buying thin “slim” ignition units if you have enough space under the hood to install a standard unit. Good slim blocks are more expensive, and very cheap ones often have low quality materials and workmanship.
The most popular manufacturers of xenon lamps:
- SHO-ME;
- APP Digital Ultra Slim;
- XENOTEX;
- MTF;
- MITSUMI.
Before purchasing xenon lamps, it is important to clarify which socket is used in your headlights. It will be frustrating if you are unable to install lamps due to an unsuitable base.
Self-installation of xenon low beam
Complete replacement of standard optics with xenon is not cheap. Therefore, many install gas-discharge lamps only in low beam. This is not difficult, and the instructions for installing xenon yourself will allow you to install it correctly:
- So, you need to purchase a suitable xenon kit.
- Fold down or completely remove the front bumper.
- Unscrew and disassemble the standard headlight.
- Remove the old lamp.
- If the base of the gas-discharge lamp is slightly different, you can use a special adapter (sometimes adapters are included in the xenon kit).
- Next, we install the xenon ourselves (we place a lamp with an adapter in the headlight and press it with a spring).
- Then you need to press the lamp with a rubber band.
- Place the rubber plug through the lamp wires.
- Install the ignition unit in a suitable location.
- Insert the wires from the xenon unit into the standard low beam connector.
- To prevent the wires from falling out over time, they can be additionally secured with electrical tape.
- Xenon installed.
The fundamental difference between the installation process of Bixenon and Xenon lamps
For bi-xenon lamps, the connection diagram is a little more complicated due to the presence of an additional high beam mode.
Since the latter is activated not by igniting the second filament, but by moving the metal screen, the lamp control algorithm is slightly adjusted by additional wiring (Note: you can read about the specifics of connecting Xenon lamps here). In a more approximate format, the feature of the scheme is as follows:
- “+” and “–” are sent to the ignition unit when the low beam is turned on;
- When the high beam lighting is activated, “+” is sent to a device that changes the focus of the light.
The connection can be made according to one of two scenarios, the choice of which determines the type of kit:
- with a relay for each lamp or without an electronic key at all;
- with one common relay for two lamps.
Self-installation of xenon high beam
To install high beam, you will need a separate xenon kit. And it’s easy to install gas-discharge lamps; below we describe how to install xenon yourself:
- First you need to remove the bumper and headlights.
- Disassemble the headlight and remove the halogen bulb.
- Install the xenon lamp and replace the sealed headlight plug. First you need to make suitable holes for the wires in it.
- Install xenon in the second headlight.
- Select a location for installing the ignition units.
- Connect the wires and secure both headlights.
- After installation, you need to adjust the xenon.
Video “Illustrative example of xenon installation”
The video below provides detailed and visual instructions for installing xenon lighting using the example of a Hyundai Accent car (the author of the video is the Parking channel).
Similar articles
Legal xenon - myth and reality: recommendations of the servants of Themis
Xenon in fog lights without deprivation of rights and a fine: when you can’t, but really want to
Low beam lamps are the most important element of automotive lighting
Optima xenon lamps on the automotive lighting market: what should you know?
How to install a xenon ignition unit with your own hands?
The ignition unit is a device that ensures the start of a xenon lamp by creating high-voltage pulses (up to 30 thousand volts). Pre-start units (for both headlights) are included in each xenon kit.
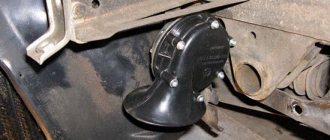
There are no strict requirements for the placement of ballasts, but it must be taken into account that high humidity is the main cause of breakdowns and repairs of xenon units. Most often, the devices are installed in the engine compartment, near the headlights:
- In this example, one unit is installed under the lower bumper booster mount, and the second is attached to the rib behind the washer reservoir.
- You can also extend the wires and secure the blocks in more suitable places.
- For Bosch and Matsushita ignition units, the high-voltage part (ignitor) is located outside the device itself. It attaches directly to the headlight.
Subtleties of choosing xenon
Before buying a set of xenon optics, you should determine the type of lamps that are installed in the car by the manufacturer. First of all, you need to pay attention to the base. When choosing xenon, you should take into account the designation of this part of the light bulb. When choosing a color palette, many are guided by their preferences or cost. A description of all the factors for each shade can be found on the Internet.
The standard package of purchased xenon usually includes the following elements:
- two xenon lamps;
- a pair of fuses;
- ignition unit for each light bulb;
- fasteners;
- electric wires;
- instructions for use and installation, where there is a connection diagram;
Most car enthusiasts will want to save a little when purchasing. However, the purchase of cheap optics is fraught with the rapid failure of any element of the lighting system. It is better to overpay a certain amount of money, but buy a high-quality xenon kit that has an official guarantee from the manufacturer.
What is bi-xenon?
Many cars have separate optics, in which xenon can be installed in any light (low or high beam). To fully equip the headlight with xenon, you need two different kits.
But some models have only one lamp, which works in both modes (low and high beam). The best option for such headlights is to install bi-xenon.
Bi-xenon is a lighting equipment that can switch between these modes. A change in the light spectrum is ensured by the design of the bi-xenon lamp.
The bi-xenon lens includes a gas discharge lamp, a reflector and a metal shutter that creates a clear “step” of light output. This design eliminates the appearance of parasitic light that blinds drivers of oncoming cars.
Many people are interested in how to make bi-xenon on their own. This is not difficult, but we must take into account that bi-xenon lamps can only be installed in H4 (the most common), HB-1, HB-5, H13 sockets.
General information about xenon
Before you independently install xenon on your own car, you need to have a general understanding of xenon optics. Xenon is an inert gas that is currently actively used in the production of automobile headlights. While in Europe there are certain restrictions on the use of such optics, in Russia any type of xenon lamps can be installed.
What xenon headlights are is explained in the video:
Using xenon provides several advantages:
- Increased lighting efficiency, significantly superior to traditional halogen headlights.
- High power, while in order to protect against dazzling oncoming drivers, headlights must be installed at a certain angle of inclination together with correctors that change the angle of inclination of the optics when driving on uneven areas.
- Duration of operation. On average, xenon lamps have ten times longer service life compared to halogen lamps.
DIY bi-xenon installation
Instead of two sets of xenon, you can install bi-xenon. If the car has a standard ignition unit, installation will be quite simple, but modifications to the headlight itself will be required. So, we install the bi-xenon ourselves:
- First you need to completely remove the front bumper or at least bend it (the lower fasteners do not need to be unscrewed).
- Disassemble the headlights.
- Remove all springs and brackets.
- Break off two protrusions (there is no need to touch the seat under the lamp).
- Scrape out all the standard sealant (you can warm it up slightly with a hairdryer). Next, you just need to drill a hole on the deflector for the wiring. This hole is located behind the standard curtain, and after installing the lenses in the headlights it will not be visible.
- Insert the lamp, pull the wires through the hole (the bi-xenon installation instructions have a detailed diagram).
- Align the lens and secure with the nut on the reverse side. Pour special hot-melt adhesive into the gap between the lamp seat and the washer and glue the lampshade and headlight together with sealant.
- After completing the installation of the bi-xenon, you can install the front bumper.
Example of step-by-step installation of bi-xenon lamps
Installing bi-xenon is most relevant for owners of old cars. The installation process on a Lada 2108 export 1.6i turbo is as follows.
- You should unpack the box and check that all the necessary components are present - usually a pair of lamps, two ignition units and connecting wires;
Check the completeness on site!
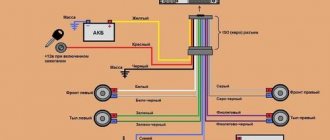
- In accordance with the connection diagram, it is necessary to connect the electrical wiring and the bi-xenon kit itself: brown wire - negative;
- white - near;
- blue - distant.
Use the diagram when connecting
Xenon connection diagram
The hole should not be too large
All that remains is to install the ignition units
Ignition units may be sold separately
In the example, a place for the block was found at the washer reservoir
Much better than standard optics
It is important to remember to fine-tune the type of lighting in question. If you do not have such experience, you should contact specialists at a car service center. In most cases, the necessary actions are simply impossible to carry out without special measuring scales. If possible, you should carefully read the video before installation.
How to connect yourself: video tutorial
How to make xenon foglights with your own hands?
To ensure that your car's fog lights provide better visibility in bad weather and provide good illumination of the roadsides, it is advisable to equip them with xenon. And xenon PTFs look much more impressive than standard headlights. So, to install xenon, you need to:
- Remove the standard lamp (on some models xenon is installed without removing the fog lamp).
- Take a xenon lamp from the kit.
- Insert it into the headlight in place of the standard one.
- To complete the installation of xenon in the fog lights with your own hands, you need to place two ignition blocks (from the left and right headlights).
- If xenon was previously installed in the low and high beams, finding space for additional units is not so easy, but there is a good option. You need to take the ignition block and screw the iron fasteners to it with electrical tape.
- Then use a drill to drill a hole to mount the block somewhere near the headlights.
- Carefully screw on the pre-start block.
- The wiring is easy to install and there is simply no way to connect anything wrong.
- The second headlight is equipped with xenon using the same principle. Finally, you need to install the fog lights (if they were removed).
Auto parts and service stations
The popularity of xenon gas-discharge bulbs for cars is due to their better efficiency compared to other lighting sources. It is possible to connect xenon both in a car service center and independently.How to choose a good xenon kit?
The selection of a suitable xenon lighting source for a car should be based on two factors: the popularity and reliability of the manufacturer and the required brightness of the lamps.
What should a xenon kit consist of?
The complete set of gas-discharge bulbs for headlights or fog lights includes:
- lighting sources designed for a certain power and with specific markings;
- ignition device;
- a set of wires and elements for connecting and fixing lamps.
The ignition unit is a module designed to supply a certain amount of voltage required for activation to light sources. More expensive units have a more complex design, which allows them to control a larger number of processes. If the device is of high quality, it will be able to ensure long-term and uninterrupted operation of the light elements. This is due to the fact that when igniting the lamps, the basic technical parameters are observed within the required range.
How to connect xenon
Xenon lamps for car headlights work on a different principle than conventional halogen lamps. They do not have a filament. The glow occurs not as a result of its heating, but due to the burning of an electric arc. For it to occur, it is necessary to change the voltage characteristics of the car's on-board network, so the xenon connection diagram involves making some changes to the standard wiring of the car.
The inert gas, which fills the lamp bulb under high pressure (about 25 ATM), prevents the burnout of its electrodes. Thanks to this, the service life of the lighting device increases to 3000 hours (versus 600 hours for a halogen lamp). The electric arc also provides a higher intensity of luminous flux than the glow of a heated coil. Due to these two advantages, some car enthusiasts are interested in replacing conventional halogen lamps with xenon lamps.
How to choose xenon lamps
Lamps are selected according to several component criteria.
HID lamps are manufactured according to standards. To replace halogen lights H7, H11 or any others, you must purchase products with the same markings.
In halogen lamps with sockets H4, HB5, H13, different filaments are used for high and low beam. Similar gas-discharge ones are called bi-xenon. In them, the change of operating modes occurs due to changes in the positions of the bulb or reflective curtain using electromagnets.
By glow temperature and power consumption
Xenon lamps indicate the so-called color or spectrophotometric temperature (in degrees Kelvin). By its value, you can determine in advance how comfortable driving will be in the dark. In natural daylight, the color temperature is from 6000K.
You can get an idea of what the light from headlights with lamps of different color temperatures will look like from the following image.
When choosing xenon for fog lights, it is better to give preference to lamps with a temperature of 4000 - 4300K. The closer the emission spectrum is to yellow, the less the effect of a light wall in front of the car that occurs in fog. For low and high beam headlights, xenon lamps with a temperature of 4300 - 6000K are closer to natural light.
Lamps also differ in power consumption - it can be 35 and 50 W. As a rule, drivers prefer 35 W lamps - they “load” the car’s on-board network less and do not heat up the headlights as much.
Most popular manufacturers
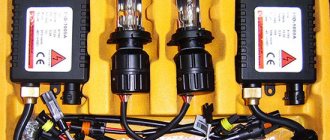
To ignite an electric arc, a voltage of about 25,000 volts must be applied to the electrodes. To maintain combustion, 50-80 Volts are sufficient. To ensure compliance with these operating conditions, a xenon ignition unit is required. When installing xenon for the first time, you need to purchase the entire kit - lamps, ignition unit and wires. The kit must be accompanied by instructions with a connection diagram. In the future, individual components can be purchased separately - as they fail.
Such well-known manufacturers of lighting products as Hella, Osram and Philips do not produce kits for self-installation of xenon. On sale you can only find lamps made by them or Chinese counterfeits.
Among others, kits of the following brands are in demand among Russian car enthusiasts:
- MTF-Light Slim Line.
- Optima.
- Sho me.
Each of these manufacturers produces xenon, as they say, in an assortment - with various lamps and modifications of ignition units.
Installation procedure
Next - a little about how to connect xenon with your own hands.
Preparation
The amount of preparatory work depends on the layout of the vehicle. Sometimes it is possible to get to the fog lamps only with the front bumper removed. But the most important thing is to successfully place the ignition blocks. In this case, it is desirable to reduce the length of the wires from them to the headlights as much as possible. It should be taken into account that by unnecessarily “hiding” blocks, you will thereby limit access to them. This will make troubleshooting difficult.
To connect the wires to the lamps, you will most likely have to drill holes in the headlight covers that cover the hatches. The connection kit contains special rubber seals and the drill should be selected in accordance with their size. In cases where the headlight caps are made of rubber, it is enough to make holes in them.
The choice of method for attaching the ignition units is not of fundamental importance. They can be fixed to the body parts using the brackets included in the kit or simply by gluing them to double-sided tape.
Connection diagram options
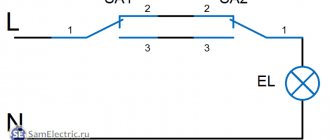
The easiest way to connect an HID lamp looks like this.
The principle of operation is simple: when the light switch is turned on, voltage is supplied to the ignition unit, a high voltage is generated in it, which is supplied to the electrodes of the gas-discharge lamp. It is impossible to mix up positive and negative wires when connecting - their connectors are incompatible with each other.
Due to the fact that the voltage of the on-board network can be significantly “drained” at the moment of ignition of the arc, it is preferable to connect xenon through a relay.
As you can see, it’s also nothing complicated. The winding of a conventional light relay (contacts 85 and 86) is supplied with voltage, which in the standard circuit was supplied to the halogen contacts. As a result, contacts 87 and 30 of the relay are closed, which are used as a switch “embedded” in the positive wire coming directly from the battery. This eliminates voltage losses supplied to the ignition unit and makes it easier to “start” the xenon lamp - the circuit becomes practically autonomous. This method is ideal not only for connecting xenon to fog lights, but also for converting the main headlights.
With bi-xenon the situation is somewhat more complicated. The simplest option to improve the operation of switching lamps when changing the “far/close” modes is to install a diode between the “positive” terminals, which prevents the control electromagnet from “sticking”.
Complete wiring diagram for bi-xenon H4.
Although HID lamps have significant advantages over halogen lamps, you should consider the possible adverse consequences of installing them yourself:
- The design of some headlights makes it impossible to correctly adjust the light beam with non-original lamps. Therefore, “collective farm” xenon often blinds other drivers.
- Making changes to the design of headlights is prohibited by the Rules.
If you modify your fog lights yourself, you will not have such problems. Setting them up correctly will significantly improve visibility during fog.
Sources: avtozam.com, tolkavto.ru.
Also read: Details about xenon and connection
Self-installation of xenon in reversing lights
Xenon is often used for tuning rear optics. To equip reversing lights with gas-discharge lamps, you must:
- Buy a suitable xenon kit.
- Remove both reversing lights.
- Cut off the connector from the standard lamp and solder it to the xenon lamp.
- To insert a xenon lamp into the lampshade, you may need to grind off the hole in the lampshade and wrap electrical tape (so that the lamp does not fall deeper).
- Instead of electrical tape, you can use sealant.
- Connect the negative wire from the pre-start unit to the common negative.
- It is advisable to use a round terminal, then the installation will be more accurate.
- Connect the positive wire from the unit to the red wire (you can also use suitable terminals here).
- Insulate the area where the wires are connected.
- Pass the wire that goes from the pre-starting unit to the xenon lamp through a special rubber band (it can be cut if necessary).
- Wrap the new wiring with electrical tape.
- Excess holes can be filled with glue.
- Install the rear lights.
Bi-xenon connection diagram with a common relay for two lamps
Having such a kit, it is advisable to carry out the mechanical part of the installation process for both headlights at once. Electrical work should be carried out in full accordance with the drawings developed for this option.
Analyzing the connection diagram of this bi-xenon kit, it is easy to identify the main element - the common relay. This is where the electrification procedure should begin:
- secure the positive terminal to the battery;
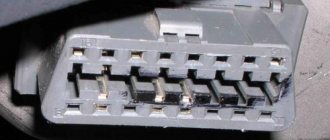
- connect the three-pin connector to one of the standard power sockets for H4 halogen lamps;
- The 12 V voltage supply blocks coming from the relay are connected to the corresponding connectors on the ignition unit.
The following procedures are carried out in relation to each lamp:
- connecting high-voltage contacts coming from the ignition unit;
- connecting the screen position control connector output from the relay;
- securing the negative terminals to ensure the closure of the screen magnet control circuit.
Safety precautions when installing xenon yourself
When installing or repairing xenon, you must be careful:
- Do not carry out installation with oily or wet hands, or touch lamps, high-voltage wires and pre-starting blocks after switching on.
- All electrical connections of the xenon kit must be properly insulated, since during oxidation they will heat up and the electrical wiring may catch fire.
- You should not look at working xenon headlights without tinted glasses, otherwise you may injure your eyesight.
Preparing tools and materials for work
Before installing xenon on a car, the car enthusiast will have to collect a certain list of tools and materials. This set is easy to find among many motorists. To work you will need:
- purchased xenon kit;
- a pair of relay wires;
- screwdriver or electric drill;
- self-tapping screws with a diameter of 3.5 mm;
- drills for metal with a thickness of 3-3.2 mm;
- electrical tape, plastic clamps, sealant;
- plumbing tools (screwdriver, pliers, wire cutters).
How to adjust xenon headlights with your own hands?
After installing xenon headlights, they need to be adjusted. Then the bright light of gas-discharge lamps will not create discomfort for other drivers and will provide the best illumination of the road. To adjust the headlights you need to:
- Select a flat wall and place the car so that the distance between the “screen” and the headlights is 5 m. Measure the distance from the centers of the car headlights to the ground and draw a horizontal line at that height (line 1). Step back 75 mm and draw another line parallel to it (line 2). Draw a vertical line, at the same distance from it, draw two more lines (A and B), indicating the centers of the headlights.
- Turn on the headlights (adjustment is made in low beam mode). Cover one headlight with a piece of plywood and adjust the second, then vice versa. To adjust the headlights, the design provides adjusting screws with plastic heads.
- To adjust the low beam of car headlights in the vertical plane, you need to tighten screw A, and in the horizontal plane - screw B.
- The headlights are considered to be adjusted correctly if the upper boundaries of the light spots coincide with the bottom line, and the bend in the light beam occurs where the vertical line (A or B) passes.
Adjusting the fog lights is done in approximately the same way:
- Place the machine at a distance of 5 m from a flat wall. Measure the distance from the centers of the fog lights to the ground and draw a horizontal line at the same height. Step back 50 mm and draw a line.
- When you rotate the adjusting screws of the fog lights, the inclination of the light beams will change. Thus, you need to adjust first one and then the other headlight.
- You need to ensure that the upper edges of the light spots coincide with the bottom line. In this position, the fog lights will be able to illuminate the roadside well, but will not dazzle other drivers.
Xenon connection technology
To implement xenon optics into the vehicle's on-board network, you will have to spend several hours. But if you carefully study the installation instructions, the installation time will be significantly reduced. In addition, this document usually includes a diagram for connecting xenon to a car.
- The work begins by removing the protective covers from the rear of the headlights (under the hood).
- Then the electrical wiring terminal is removed from the light bulb, the spring is pressed out and the halogen is removed.
- Similar preparatory work is carried out on fog lamps.
- Before installing new optics, it is better to do a fitting, and then mark the places where you will have to make additional holes.
- Using a drill or a screwdriver with a drill, holes are made through which the wiring will pass. But first, rubber seals in the form of a ring are placed in the holes.
- Xenon lamps are installed on the halogen lamp seats. The new lighting fixture must be securely mounted in the base. During the installation process, do not touch the lamp bulb with unprotected hands.
- When installing xenon devices of the D2R or D2S type, you will have to make additional holes in the protective caps to allow the electrical wire to pass through from the D2 unit.
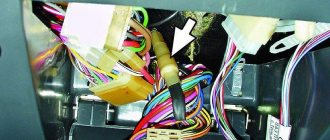
- The ignition unit is installed in the most convenient place under the hood of the car. First, the wire coming from the light bulb is connected to the block. Using the second wire, the old connector and the ignition unit are connected. The motorist should make the connection so that the wires are not too tight. In this case, it will not be superfluous to look again at the electrical connection diagram.
- At this stage, you should check that the installation is correct. To do this, the car engine starts and the headlights turn on. If all the work is done correctly, the headlights will emit an even white-blue glow (there may be a different shade depending on the type of xenon purchased).
- After checking the functionality, the junctions of the wiring are wrapped with electrical tape, protective caps are installed, and the holes made are sealed with polyethylene or sealant.
Bixenon
Installing bi-xenon has some nuances. Let's take a closer look at the connection process.
1. We connect the wires from the bi-xenon lamps to the ignition unit.
2. We connect the controller wires to the same block. He is responsible for stabilizing the voltage throughout the wiring.
3. The bi-xenon lamp has an additional wire responsible for the electromagnet. It should also be connected to the controller.
4. We connect the controller to the battery.