Replacing the fuel filter Niva 2131 injector
How often to change the fuel filter? – According to the regulations, replacement must be carried out every 30 thousand km.
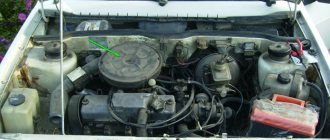
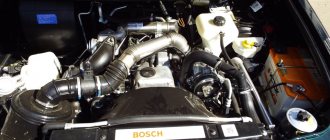
mileage However, if the car is operated in dusty conditions or low-quality fuel is used, then replacement must be done more often. Where is the fuel filter located? – If the filter meets Euro-2 toxicity standards, then it is installed in the engine compartment on the left front mudguard under the spare wheel.
– If the filter meets Euro-3 toxicity standards, then it is installed under the bottom of the car, in a recess, above the additional muffler.
We carry out the work on a cold engine.
You mean that the fuel in the power system (with the ignition on, as well as for some time after) is under pressure. Therefore, before replacing the fuel filter, the pressure must be relieved. If the car’s ignition has not been turned on for more than 3 hours, then there is usually no pressure in the fuel system. You can check the pressure by unscrewing the cap of the fuel rail fitting and pressing the spool rod. (see here)
You also need to keep in mind that the filter is located below the level of the fuel tank and when it is removed, fuel can flow out of the tank through a tube disconnected from the filter. Therefore, you need to have a container to collect fuel.
We disconnect the connectors connecting the wiring harness of the engine management system and the rear wiring harness.
We start the engine and let it idle until the fuel runs out. Then turn on the starter for 2-3 seconds. After this, the pressure in the power system will be released.
Disconnect the negative cable from the battery.
To remove the filter under the bottom (Euro-3)
To remove the filter under the hood (Euro-2)
Remove the spare wheel support bracket.
Holding the filter with a 19mm wrench, use a 17mm wrench to unscrew the fuel pipe fitting, gradually bleeding the gasoline into the substituted container.
We remove the fuel pipe from the filter. Similarly, disconnect the fitting of the second tube.
Each tube has a rubber O-ring, which we replace with a new one if damaged.
Use a 10mm wrench to loosen the clamp bolt.
. and remove the fuel filter.
Install the filter in reverse order.
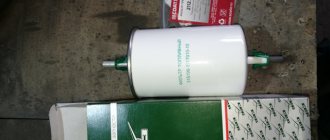
The arrow on the new fuel filter should point toward the rear of the vehicle (in the direction of fuel flow).
Having installed the new filter, we connect the connection block between the engine management system wiring harness and the rear wiring harness.
We check the tightness of the connections with the engine running.
Video
Reg.: 04/05/2009 Messages: 419 From: Taganrog Age: 55 Car: Jeep, VAZ 21214M 2009
Reg.: 08/31/2010 Messages: 50 From: Kuznetsk Age: 32 Car: 21214 2007, VAZ21063, Izh-27175-40, bmw523i,
Name: Ilya Reg.: 12/20/2009 Messages: 456 From: RB Ufa Age: 30 Car: VAZ 21214-020-046 November 2009
Done according to regulations or in case of failure. In terms of time, it takes from 30 minutes (if suspended) and up to 4 hours if changed by removing the tank.
The cost of replacing a VAZ 2131 fuel filter depends on its installation and the complexity of the work. The easiest way is to change an element installed in the engine compartment or an outboard element embedded in the highway.
NIVA CLUB
International Niva Club
- List of forumsAuto - EquipmentConsumables and expenses.
- Search
- Links
- Unanswered topics
- Search
- Online store "NIVA SHOP"
Active topics
Fine fuel filter
Fine fuel filter
Post by elwolk » Aug 27, 2012, 10:15 pm
The fuel filter often gets clogged; gasoline in the region is excellent. (niva injection) I opened a couple of filters of different brands with a hacksaw, inside there is a completely different device. In one there was a piece of paper stupidly across, and with a little effort it stood along the O_o filter, so it became end-to-end. The filter of another brand had a completely different device, which was incomprehensibly metal.
What filters should you give preference to, what do you think?
Re: Fine fuel filter
Post by doc Brown » Aug 28, 2012 00:52
Re: Fine fuel filter
Post by senin » 08 Oct 2012, 20:31
Re: Fine fuel filter
Post by Chukot53 » Jan 18, 2013, 6:02 pm
Re: Fine fuel filter
Post by senin » Jan 18, 2013, 7:15 pm
Re: Fine fuel filter
Post by doc Brown » Jan 28, 2013 10:24 pm
Not such a good thing, as it turned out. I had it in front of the gas pump for about a year; the actual mileage on gasoline during this time was five thousand.
In winter. In addition to warming up before switching to propane, I had to travel on more gasoline, because in Murmansk there was no gas at gas stations for a month and a half. Therefore, I took a closer look at the gasoline power system. During the New Year holidays, I set out to finish up the secondary chamber of my carburetor. It overfills it with gasoline when opening it, and therefore, instead of the expected acceleration, a “dulling” is observed. But now we are not talking about the selection of jets. When opening the carburetor, rust was found in the float chamber, which made me very upset.
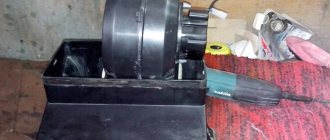
The filter was temporarily replaced with a regular plastic sump and mercilessly sawed apart.
A similar filter, which had been standing for two years on a heavily used Opel Vectra, was also sawn apart. It turned out to be clean inside. This hardly says anything about its filtering abilities. Rather, it’s about the fact that the tanks on Opels don’t rust (the car is from 1992).
After driving for a week with a plastic filter, I again found traces of rust in the float chamber. But this filter was not expected to be particularly impenetrable. Based on the experience of my old cars, the best way to combat rust is by weight, not size. Therefore, after the fuel pump, I installed a fine filter from an old Volga, with a deeper sump.
The experiment is not over yet. The process of selecting jets continues, so I’ll look into the carburetor again. If necessary, I will install a ZiLovsky coarse settling filter. Its effectiveness in fighting off rust is very difficult to overestimate.
Re: Fine fuel filter
Posted by bearthe » May 13, 2013, 11:39 am
Option 1 is correct. 1. Drain the fuel from the tank 2. Remove the tank After this: 1. Visually check the tank for rust. if there is, clean it. You may have to fill the tank with water and boil the holes. DO NOT COOK EMPTY UNDER ANY CASE! 2. Unscrew the fuel intake, shine an LED flashlight inside, and be horrified by the layer of dirt. 3. Wash everything thoroughly, “unscrew” the tank, or use a drain plug (I don’t recommend it - then you won’t screw it tightly for anything. The tank is old - it’s ruined by metal). 4. Place the heel on the fuel intake (coarse filter - does not allow water and dirt to pass through). Buy a normal one, check it directly on the market. 5. Completely replace the fuel line. Place the filter vertically - supply from below, intake from above. (the arrow should point up) 6. Install a new normal coarse filter. (and change it every 5,000 - 7,000 thousand) 7. Install a new normal air filter - for example, a zero filter (but you will have to take a corrugation, a turtle for it and sculpt a pan yourself - without it it’s not comme il faut.) and impregnation for it. Service it once a week. 8. Completely disassemble and wash the carburetor with carbcleaner, replace the coarse filter in the carburetor intake, check the jets and float. The fuel system is ready for operation.
Option 2 is incorrect. Temporary solution.
1. Place the heel on the fuel intake of the gas tank (coarse filter - does not allow water and dirt to pass through). Buy a normal one, check it directly on the market. 2. Unscrew the line from the tank, the other end from the filter in the engine compartment, point it in the direction “somewhere so that it doesn’t get on anyone,” ask a friend to hold it. 3. Take the compressor and blow out the line (a fair amount of Mr. will fly out of it), first at a pressure of 4 atm, then at 8 atm. 4. Install a new normal coarse filter. (and change it every 3000 - 5000 thousand) 5. Completely disassemble and wash the carburetor with carbcleaner, replace the coarse filter in the carburetor intake, check the jets and float. You can somehow drive.
From your photos - in the third photo you can see how much Mr. has settled on the filter (I can imagine how much there is in the line and in the tank). So, what went into the carb is what the filter couldn’t cope with, because... was already clogged and had lost its permissible capacity. Otherwise it would be in the carb, as it will be now when you installed a plastic filter. I went through this and I don’t recommend it to you. Better
and do option 1. Sincerely,
Price:
| 75 posts on previous pages |
| Service | Price |
| Hanging element | 800 rub. |
| Immersion element | 1200 rub. |
| Removing/installing the gas tank | from 4000 rub. |
Car services in St. Petersburg:
Kupchino
– 245-34-84
Citizen
– 603-55-05
Bolsheviks
–
WhatAapp/Viber: 8-911-766-42-33
If it is installed in the gas tank, then there are two replacement options. If there is a service hatch under the rear seat, that's good. If there is no hatch, then you can either cut it out or replace it by removing/installing the fuel tank.
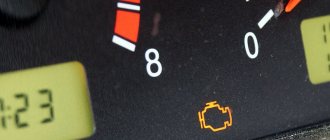
The main signs of a TF malfunction:
– fuel consumption has increased sharply; – the car began to stall at idle; – the engine is running rough, the ignition system is in the room; – car jerking when going uphill.
If necessary, we can also change the fuel pump and measure the pressure in the rail.
Diagnostics of the fuel system during repairs with us is free!
Addresses in St. Petersburg: Service station on Bolshevikov: st. Voroshilova, house 7, from 10 to 18, t. 8 (812) 701-02-01, Sat, Sun – closed. Service station on Grazhdansky: st. Uchitelskaya, building 23, from 9.30 to 21.00, t. 8 (812) 603-55-05, seven days a week. Service station on Kupchino: st. Dimitrova, building 1, from 10 to 20.00, t. 8 (812) 245-34-84, seven days a week.
Source
Preparing for replacement
Work should only be carried out when there is no pressure in the fuel system. It automatically decreases 6–7 hours after the last ignition.
Important. Before you start replacing the filter, be sure to check the pressure. To do this, unscrew the cap of the fuel rail fitting and press on the main part of the spool.
No time to wait? It is possible to reduce blood pressure artificially.
- In the passenger compartment, install the rear seat cushion vertically. Find the soundproofing underneath and unscrew it.
- Under the sound insulation there is a cover with two screws. Unscrew them and remove the cover.
- At the bottom there are blocks with wires that come from the fuel module. To relieve pressure, disengage the pad clamps and start the engine. Let it run until it stops automatically. That's it, you can change the filter.
Replacing the fuel filter (injection engine)
How often to change the fuel filter? — According to the regulations, replacement must be carried out every 30 thousand km. mileage However, if the car is operated in dusty conditions or low-quality fuel is used, then replacement must be done more often.
Where is the fuel filter located? — If the filter meets Euro-2 toxicity standards, then it is installed in the engine compartment on the left front mudguard under the spare wheel.
— If the filter meets Euro-3 toxicity standards, then it is installed under the bottom of the car, in a recess, above the additional muffler.
We carry out the work on a cold engine.
You mean that the fuel in the power system (with the ignition on, as well as for some time after) is under pressure. Therefore, before replacing the fuel filter, the pressure must be relieved. If the car’s ignition has not been turned on for more than 3 hours, then there is usually no pressure in the fuel system. You can check the pressure by unscrewing the cap of the fuel rail fitting and pressing the spool rod. (see here)
You also need to keep in mind that the filter is located below the level of the fuel tank and when it is removed, fuel can flow out of the tank through a tube disconnected from the filter. Therefore, you need to have a container to collect fuel.
We disconnect the connectors connecting the wiring harness of the engine management system and the rear wiring harness.
We start the engine and let it idle until the fuel runs out. Then turn on the starter for 2-3 seconds. After this, the pressure in the power system will be released.
Disconnect the negative cable from the battery.
To remove the filter under the bottom (Euro-3)
To remove the filter under the hood (Euro-2)
Remove the spare wheel support bracket.
| Holding the filter with a 19mm wrench, use a 17mm wrench to unscrew the fuel pipe fitting, gradually bleeding the gasoline into the substituted container. |
We remove the fuel pipe from the filter. Similarly, disconnect the fitting of the second tube.
Each tube has a rubber O-ring, which we replace with a new one if damaged.
| Use a 10mm wrench to loosen the clamp bolt. |
| . and remove the fuel filter. |
Install the filter in reverse order.
The arrow on the new fuel filter should point toward the rear of the vehicle (in the direction of fuel flow).
Having installed the new filter, we connect the connection block between the engine management system wiring harness and the rear wiring harness.
We check the tightness of the connections with the engine running.
Video
Source
Filter selection
Every car owner should know how to choose the right filter for their car. An original part is best; you can also choose from a special catalog the available types of filters with parameters suitable for the VAZ 21214 Niva.
You should choose the right cleaning device, so before purchasing it is recommended to look under the hood of the car and check what it looks like and what its number is.
Replacing the fuel filter Lada 2131 (VAZ 2131)
How often to change the fuel filter? — According to the regulations, replacement must be carried out every 30 thousand km. mileage However, if the car is operated in dusty conditions or low-quality fuel is used, then replacement must be done more often.
Where is the fuel filter located? — If the filter meets Euro-2 toxicity standards, then it is installed in the engine compartment on the left front mudguard under the spare wheel. If the filter meets Euro-3 toxicity standards, then it is installed under the bottom of the car, in a recess, above the additional muffler.
We carry out the work on a cold engine.
You mean that the fuel in the power system (with the ignition on, as well as for some time after) is under pressure. Therefore, before replacing the fuel filter, the pressure must be relieved. If the car’s ignition has not been turned on for more than 3 hours, then there is usually no pressure in the fuel system. You can check the pressure by unscrewing the cap of the fuel rail fitting and pressing the spool rod. (see here)
You also need to keep in mind that the filter is located below the level of the fuel tank and when it is removed, fuel can flow out of the tank through a tube disconnected from the filter. Therefore, you need to have a container to collect fuel.
To relieve pressure in the system, remove the lining of the left front sidewall (see here).
We disconnect the connectors connecting the wiring harness of the engine management system and the rear wiring harness. We start the engine and let it idle until the fuel runs out. Then turn on the starter for 2-3 seconds. After this, the pressure in the power system will be released.
Disconnect the negative cable from the battery.
To remove the filter under the bottom (Euro-3)
To remove the filter under the hood (Euro-2)
Remove the spare wheel support bracket.
Holding the filter with a 19mm wrench, use a 17mm wrench to unscrew the fuel pipe fitting, gradually bleeding the gasoline into the substituted container.
We remove the fuel pipe from the filter. Similarly, disconnect the fitting of the second tube.
Each tube has a rubber O-ring, which we replace with a new one if damaged.
Use a 10mm wrench to loosen the clamp bolt.
and remove the fuel filter.
Install the filter in reverse order.
The arrow on the new fuel filter should point toward the rear of the vehicle (in the direction of fuel flow).
Having installed the new filter, we connect the connection block between the engine management system wiring harness and the rear wiring harness. We check the tightness of the connections with the engine running.
The fuel filter on a VAZ 2121 and Niva 2131 with an injection engine is removed to replace it with a new one if it becomes clogged. The main sign indicating a filter malfunction is the appearance of interruptions in engine operation in different operating modes. Prepare a standard set of tools, and then perform the following sequence of actions:
At this point, the repair work on removing and replacing the fuel filter on the injection engine of the VAZ 2121 and Niva 2131 has been completed.
We remove the fuel filter of the injection engine on the Niva 2121 and 2131 to replace it with a new one. Prepare a standard set of tools, and then perform the following sequence of actions:
At this point, the repair work to replace the fuel filter Niva 2121 and 2131 with an injection engine has been completed.
Source
What increases gasoline consumption on Niva series cars
Fuel consumption for the Niva 2131 is 16.5 liters in urban conditions, 12.1 liters for the mixed version and 9.7 liters for the highway. This figure can hardly be significantly reduced, and it easily increases due to improper operation of any vehicle, including:
Fuel consumption can be increased if the engine, for example, on 21214, operates outside the operating temperature. This could be a problem with the cooling system, including the thermostat, fan, cooling sensors, or coolant. It will be relatively cheap for “nivovods” to replace the thermostat, which costs about 350 rubles. The operation is performed independently, since all you need is a Phillips screwdriver.
To replace the part, you need to drain the antifreeze, then unscrew all the bolts on the pipes from the thermostat clamps, remove the pipes and remove the element from under the hood. Using a ratchet handle and a socket on “13”, you can easily change the VAZ 2121 radiator fan by unscrewing just three mounting bolts. Thus, it is possible to adjust the ventilation system without extra costs so that operating temperatures in the engine do not exceed the required 98-102 degrees Celsius.
Work and consumables can be much more expensive if the problem of increased fuel consumption is associated with poor operation of the SBU, which is based on incorrect sensor readings. In this case, problems may arise with the lambda probe, mass air flow sensor, throttle position sensors, and temperature sensors. In this case, it is better to go to the stand at the service station.
How much oil is in the Niva 21214 engine
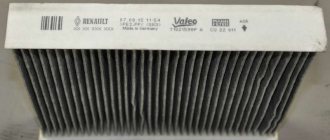
The filter is an important component of the fuel system of a vehicle - the life and service life of the power unit and adjacent vehicle systems directly depends on the quality of purification of the incoming fuel.
That is why it is necessary to change the fuel filter in a timely manner, adhering to the conditions of scheduled maintenance and the car manufacturer’s regulations.
As is correct, when replacing an old filter, drivers choose foreign-made options - the original filter on the Niva has a short lifespan and quickly becomes clogged.
The most popular fuel filter models for Niva are presented in the table below. All parts comply with the stated standards of the official manufacturer.
| Manufacturer | Country of Origin | Part number | Approximate cost, rub. |
| Romania | ASAM | 30524 | 260 |
| Romania | ASAM | 30543 | 275 |
| Italy | STARLINE | SF PF7012 | 350 |
| Italy | STARLINE | SF PF7043 | 370 |
| France | PURFLUX | EP163 | 370 |
According to the automaker's regulations, the fuel filter on the Niva must be changed every 30,000 km. However, the need to replace the part may arise much earlier - if low-quality fuel is poured into the car or the car is driven on dusty or dirt roads, then the filter needs to be changed every 15,000 km.
Remember, the service life of the engine depends on the timely replacement of this element; a clogged filter significantly speeds up the production of engine components.
Note! It is strictly not recommended to install a fine filter on a car, especially when refueling the vehicle with low-octane fuel. The fine filter does not provide adequate filtration quality, as a result of which small abrasive elements and chips can get into the internal combustion chambers of the engine, which will reduce the service life of the engine. This type of tuning is not compatible with the domestic auto industry!
Recommendations for choosing and replacing engine oil in the engine of the Niva VAZ 21214 car
To refuel and service a domestic VAZ SUV, you need to know the filling capacities of the VAZ 21213 Niva and its modifications, the VAZ 21214. Some numbers need to be known by heart, for example, the capacity of the tank and engine crankcase.
The rest should be written down in a notepad, which is stored in the glove compartment of the cabin. And it doesn’t matter that you are not going to do the maintenance of the car yourself, the specialists at the service station may also not know the refueling volumes of your car.
| Refillable system | Volume, l |
| Fuel tank (including reserve) | 42 (65*) |
| Engine cooling system (including interior heating system) | 10,7 |
| Engine lubrication system (including oil filter) | 3,75 |
| Gearbox housing | 1,6 |
| Rear axle housing | 1,3 |
| Steering gear housing | 0,18 |
| Transfer case housing | 0,79 |
| Front axle housing | 1,15 |
| Hydraulic clutch system | 0,2 |
| Hydraulic brake system | 0,535 |
| Windshield and headlight washer reservoir | 2,8 |
| Rear window washer reservoir | 2,0 |
| Power steering reservoir | 1,7 |
* For VAZ-2131 cars and its modifications.
Also interesting: Moving the generator to the top of 21214
*For vehicles with fuel injection system equipped with an exhaust gas converter
December 28, 2021 LadaOnline 3,328
AvtoVAZ recommends undergoing maintenance (MOT) of the Niva (VAZ 2121 and VAZ 2131) every 12 months or 10,000 km, whichever comes first. If you order some spare parts and consumables (oil, filters, etc.) yourself, then you will need article numbers for original consumables and analogues for each specific service.
Name Catalog number or name Quantity or volumes Replacement instructions
Factory recommendations: ROSNEFT Premium or ROSNEFT Maximum 5W-40 or 10W-40. Or Lukoil Genesis RN 5W-40
(Recommendations for selection)
(Recommendations for selection)
(Recommendations for selection)
ps the table will be updated as new data becomes available. Anything to add/change? Write in x!
Let us remind you that we published the maintenance schedule (maintenance schedule) earlier. You will find other spare parts numbers in the complete parts catalogue.
Found an error? Select it and press Ctrl Enter..
The requirements for an SUV engine at the time of design were:
The engine uses a crankshaft with a “long” crank radius and 82 mm cylinders. If the gas distribution mechanism drive breaks, it bends the valves, but at 3000 rpm the torque is 126 Nm, and the power is increased to 81 hp. With. Factory tuning used a modernized attachment - a Solex carburetor, and increased volumes of combustion chambers.
bearing cap – 68 – 84 Nm (main) and 43 – 53 (rod)
cylinder head – three stages 20 Nm, 69 – 85 Nm 90° 90°
Taking into account the year of manufacture (1994) and the low compression ratio (9.3 units), users filled in 92 gasoline, and the engine manufacturer recommended AI 91 - 93. Compliance with the environmental protocol has not yet been discussed, so the engine is considered Euro-0.
To refuel and service a domestic VAZ SUV, you need to know the filling capacities of the VAZ 21213 Niva and its modifications, the VAZ 21214. Some numbers need to be known by heart, for example, the capacity of the tank and engine crankcase. The rest should be written down in a notepad, which is stored in the glove compartment of the cabin.
It is believed that the basis of the ICE 21214 was the previous version 21213. In fact, ¾ of the parts in the engine
Also interesting: Boring a Niva engine
How to replace a fuel filter with your own hands: step-by-step instructions
The algorithm for replacing the fuel filter on a Niva is carried out according to an intuitive scenario - all consumable components in the domestic automotive industry can be easily replaced with your own hands without outside help. To service the fuel system, you will need a set of wrenches, a rag for wiping, and a canister for draining remaining fuel. To replace the fuel filter you must:
It must be remembered that replacing the fuel filter should only be done when the engine is not warmed up.
After replacing the fuel filter, it is imperative to check the tightness of the system when starting the power unit - with the engine running, there should be no air leaks through the main pipes or the contact points of the filter with the hoses.
How to change
- In the inspection hole or on the overpass, unscrew the fastenings of the protective casing. To do this, use a 10 key. Remove the casing.
Removing the filter protection
We take out the fuel filter
Video: replacing the fuel filter on a restyled car
Recommendations for choosing and replacing engine oil in the engine of the Niva VAZ 21214 car
Motor lubricant performs the following functions:
Therefore, choosing the right oil is very important.
When choosing engine oil, consider the following. You should look for the API designation on every canister you decide to purchase. It will consist of a rating for gasoline cars (starting with S), and diesel engines (starting with C). These letters are followed by the corresponding letter depending on the age of the oil and the standards to which it meets.
More detailed information about which engine oil to use for the VAZ 21214 engine was found in the manual for the maintenance, operation and repair of the Niva 21213 car and its modifications (Kosarev, Yametov, Volgin, Kozlov). This edition contains the following titles:
And also interesting: Chevrolet Niva air conditioning - installation and repair The leaders among oils for Niva are:
Changing engine oil is an essential component of proper operation of any car. Timely replacement of the working fluid and oil filter allows you to maintain the engine in optimal condition, ensuring its long-term and trouble-free operation. Therefore, the owners of this domestically produced SUV have a logical question about what kind of oil to pour into the Niva 21214 with an injector, how much is required, and how to carry out the replacement procedure yourself.
Selecting oil for Niva 21214 is not so difficult. But here you need to know some nuances in order to avoid common mistakes. Let's start with the time of year. Not every car owner knows what kind of oil to pour into the engine of his Niva if it’s summer or winter outside. In summer the weather is hot, so passenger car engines get very hot under such conditions.
“Niva 21214” is an all-wheel drive SUV, and its engine warms up even more. That’s why many people make the same mistake, filling in mineral or semi-synthetic oil for the summer. To ensure that the engine runs efficiently and does not overheat, experts recommend using high-quality synthetics.
If the lubricating fluid in the power unit has an insignificant percentage of viscosity, you should not expect the expected effect from it. When the cylinder block heats up, such oils have a consistency similar to ordinary water and their temperature rises rapidly. Therefore, the lubricant will no longer take heat from the engine, performing a cooling function, and will also not be able to create the required pressure. Operating in this mode will lead to rapid jamming of the crankshaft.
Therefore, the manufacturer and experienced car owners themselves advise filling the Niva engine, as well as the Chevy Niva (Chevrolet) engines, with motor oils with a viscosity of 20W40, but not higher than 25W50. These are the optimal viscosity parameters at which the crankshaft can function normally and not create unnecessary load.
Avoid semi-synthetic oils. Yes, such mixtures can be expensive and have similar characteristics to synthetics. But even the high price and identical labels on the packaging do not allow semi-synthetics to obtain the same properties that synthetic oils have.
The Niva SUV, in all modifications, is very popular in Russian spaces. This is due to good maintainability, low price and excellent maneuverability. To ensure reliable operation, you should undergo all maintenance on time, in particular, change the engine oil.
The VAZ 21214 engine lubrication system is designed to protect against premature wear of moving parts. It completely copes with its task, you just need to follow all the manufacturer’s recommendations.
The VAZ 21214 engine was conceived as the first injection engine for a domestic SUV. The Niva was not particularly popular in the USSR, but was exported to Asia, the UK, Europe, Latin America and the USA. During production since 1994, there have been several improvements and modifications of the internal combustion engine from Euro-0 to Euro-5 (export).
Signs that replacement is needed
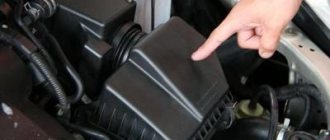
The main function of the air filter is to clean the air entering the engine from dirt and dust. The grains of sand entering with the air settle on the corrugations of the cleaning element, clean air enters the cylinders, and the engine operates at full power. The cleaning device also performs the function of muffling the noise from a running car engine.
If too much dirt accumulates on the corrugations, the air supply to the engine noticeably deteriorates due to increasing resistance, and the functions of the air filter are not fully performed. There are signs that it needs to be replaced. The signs do not differ on different VAZ models; they are the same on both VAZ 21214 and VAZ 21213, etc.
When a filter needs to be replaced, the car owner may notice the following signs:
- reduction in car engine power;
- exhaust pollution;
- increased fuel consumption;
- contamination or damage to the filter element.
Transmission
The Niva 4x4 transmission system has the following filling volumes:
As stated in the operating instructions, transmission lubricants need to be changed once every 30 thousand km. mileage At the same time, replacement is not provided for in the steering mechanism housing, only an addition through the top plug. The “native” oil for Zhiguli transmission units is considered to be TAD17I.
Transmission oils have good penetrating ability. Therefore, poorly clamped plugs and worn gaskets of units begin to gradually leak lubricant. In such situations, it is allowed to add oil of the same viscosity class and, preferably, the same manufacturer. If you do not top up during a leak, the lubricant level in the unit will decrease, which will lead to accelerated wear of expensive mechanisms.