July 29, 2015 Lada.Online 195 104 21
Some owners of modern Lada cars (Priors, Grants or Kalinas) experience a whistling sound in the door area when driving at speeds above 80 km/h. Others complain about water and dust getting into the cabin. All these shortcomings can be eliminated with the help of modifications, which involve installing an additional door seal.
You will need: D-profile seal with dimensions 14*12 mm, degreaser, RKI-19 (article 000017504293020), RGI-135 (1118-6107028).
Lada Priora Sedan White squall › Logbook › Replacing door seals
Good day to all readers.
I decided to change the door seals; their condition left much to be desired. The ones on the driver's door were clearly torn, the others were crushed and flattened.
I went to the car market this morning and bought a set of seals. Sold on Fortuna, he said that they were original, of course he was lying, but I couldn’t find any differences.
I drove away from the market and decided to change it right away, unpacked the seals and laid them out to bask in the sun.
I started the replacement from the rear left door, for which I unscrewed the plastic sill trim and pulled off the old seal.
Under the old seal it was dirty and in some places even damp, although it had rained a day ago. The good news is that at least there is no rust. I wiped off all the dirt with wet wipes, dried it for 5 minutes (the morning was very hot, the sun was burning!) and then installed a new seal.
Having installed it on the back door, I visually compared it with the front door, where the old one stood. Of course there are differences. that the new one is more “complete”, and the old one
.The door began to close and open more elastically, the seal slightly pushes it away.
There were also losses in the form of abrasions on the rear right door
Then I installed it on the three remaining doors in the same way.
The rib on which the seal is placed on all doors was cleaned of dirt and dried.
The purpose of this operation was to get rid of annoying noises and whistles at high speed, but, alas, it was only partially achieved.
I am generally satisfied with the work done, the noise has become less, by 30-40 percent, I’m thinking about what to do with it next.
source
How to properly install an additional door seal on Lada Priora, Granta and Kalina
Some owners of modern Lada cars (Priors, Grants or Kalinas) experience a whistling sound in the door area when driving at speeds above 80 km/h. Others complain about water and dust getting into the cabin. All these shortcomings can be eliminated with the help of modifications, which involve installing an additional door seal.
You will need: D-profile seal with dimensions 14*12 mm, degreaser, RKI-19 (article 000017504293020), RGI-135 (1118-6107028).
Comparison of foreign cars and Lada Priora
First you need to figure out why you need to install door seals. The sound insulation of any foreign car and the Lada Priora has a large number of differences. First of all, it is necessary to note the fact that a foreign-made car has a better designed shape and structure of the car and the seals are installed much better. It is the desire to get a car with good sound insulation that forces car owners to additionally install seals on the Priora.
There is another significant difference in the design of the doorways of the Lada Priora car compared to cars manufactured by foreign manufacturers. This difference is the doorway gap; on foreign cars it, as a rule, does not exceed 2 mm, but on the Lada Priora this gap is several times larger, which creates an additional noise effect. That is why it is worth considering installing additional door sealing material.
Additional seal on the car door
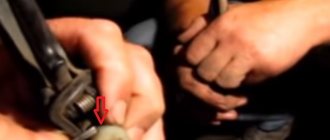
We remove dirt and then degrease the edge of the car door. We glue the seal along the edge of the door, as shown in the photo.
All that remains is to close the gap with the seal between the doors (front and rear). Owners of Lada Granta/Kalina install additional seals of the RKI-19 type:
RKI-19 is not suitable for Lada Priora, because... the distance from the body to the doors on the Priora is significantly greater. It would be more correct to use a Z-shaped seal and install it on the edge of the rear door as follows:
Select vehicle modification to search for door seal
- Lada Priora 2171 2171 Station wagon 1.6 82 hp id10564 Engine: volume - 1.6 liters, power - 82 hp, type - petrol, model - BA3 21703. Drive: front-wheel drive. Year of manufacture: 2009-present time
- Lada Priora 2171 2171 Station wagon 1.6 98 hp id5207 Engine: volume - 1.6 liters, power - 98 hp, type - petrol, model - VAZ-21126. Drive: front. Year of manufacture: 2009-present time
- Lada Priora 2171 2171 Station wagon 1.6 106 hp id114457 Engine: volume - 1.6 liters, power - 106 hp, type - petrol, model - VAZ-21127. Drive: front. Year of release: 2014-present time
In the next step, for an expanded selection, you can enter the vehicle's Vin code to go to illustrated catalogs, where you can find the layout of parts down to the bolt and duplicates that are not in the catalog of analogues.
Additional seal for the car body
Owners of Lada Granta/Kalina can use the RGI-135 seal:
Universal method: We begin installing the rubber seals from the bottom corner of the windshield. We glue the seal onto the gutter seal, and glue part of the seal onto the plastic intakes of the windshield. Make sure there are no gaps between the doors and the body.
We go to the end of the back door and go down. We glue the lower seal onto the plastic threshold, and not above it. Otherwise, it will be of no use.
Instead of a construction D-shaped seal, you can use a seal from UAZ Patriot:
After installing all the additional seals, the doors will be noticeably more difficult to close in the first days of operation. After a week, the seal will take the desired shape and the doors will close as before.
There are several positive effects after such modification. The seal plays the role of sound insulation, whistling while driving will disappear, and road noise will decrease. In addition, less dust will enter the car interior, and the doors will close noticeably quieter with a pleasant sound.
In the survey we determine which method of installing an additional seal is the best. Along with the installation of additional sealing, it is recommended to install additional sound insulation of the doors.
source
To prevent the wind from blowing and dirt from flying, we install additional door seals. Kalina, Granta, Priora
Greetings, All readers.
Today I want to tell you how a friend bought a Priora and decided to install additional door seals on it, they are also suitable for Grant and Chevrolet Niva cars, and some people also install them on foreign cars.
I called for help, I’ll go around the room and write to you how it happened.
They are useful in that they will reduce noise transmission from the doors, cold air will blow less, dust and dirt remain on the thresholds, but all this should not happen.
Before installation, we need to degrease the surface of the places where we will glue the seals, take a rag, wet it and go ahead
We will need the seals themselves; we will attach them to the bottom of the doors.
We will also need RKI 19 four sets, two in each package.
And the seal is Z-shaped, three meters long.
That's where we'll start.
Glue on the back of the door. The door immediately began to close so tightly, the seal closed the entire gap.
Now glue the RKI -19 brand seal onto the inner, upper part of the door.
Pasted it on, it comes out just perfect.
Even the sound of the door closing changed.
We put glue on the bottom, or rather we attach a seal to the clips and one door is completely ready.
And so we smoothly move to the back door.
Well, the second door is ready.
Now let's go to the other side.
And we repeat all the previous steps.
With such tight closure, do not forget to check the interior ventilation valves. Otherwise, the glued glass may fall out.
My subjective opinion is this basin, no matter how much you do it, there is still something to do.
R.S There will be many more different homemade products, alterations and various life hacks for car enthusiasts, like and subscribe. I look forward to seeing you in the next articles.
Source
Installation of additional door seals on Priora
| The sound insulation of foreign-made cars has always been different from domestic ones, and one of the reasons for this is the competent design of the body and the successful location of door seals. Let's figure out where and how you can install additional seals on the Priora. |
The maximum effect will be noticeable if the additional Priora seal is installed in the correct place and in combination on the car body and doors:
Additional Priora seal between the front and rear doors
The noise and whistle of the wind at speed is familiar to many; to reduce it, the gap between the front and rear doors should be eliminated. RKI-19 was a good fit for the Lada Kalina as such a seal and there were no difficulties with its installation. However, the distance from the edges of the doors to the Priora pillar is greater than that of the Kalina. Therefore, instead of RKI-19, you will need to find a larger seal.
Advantages:
- Reduction of aerodynamic noise (sound insulation).
- Protection against contamination of the front door lock area and rear door hinges.
- Additional sealing (thermal insulation) of the car interior.
Disadvantages: None found.
Additional seals on Priora doors
Seals for Priora doors can be purchased at a hardware store. This D-shaped seal is self-adhesive, so you don’t need to buy additional glue. You can install an additional seal on the Priora door in different ways. The photo shows one of the options, which, according to the majority, is the most advantageous.
We also install a seal at the bottom of the door (photo by author). They are installed on special clips that come complete with the lower seals:
Advantages:
- Reduction of aerodynamic noise (sound insulation).
- Protection of the interior and sills from dirt.
- Additional sealing (thermal insulation) of the car interior.
- More silent/pleasant door closing.
Disadvantages: if you do not take care of the lower door seal, then over time it begins to rust and rot under the rubber bands.
Functions of the door seal on the VAZ 2110 and its independent replacement
If even the owners of the new “ten” noted insufficient noise and wind insulation of the door rubbers, then what can we say about well-used cars. The door seals of the VAZ 2110, worn down by time and use, no longer meet even the minimum requirements that are imposed on them by not so demanding consumers of AvtoVAZ products.
Not only can you hear every creaking and rustling sound outside the cabin, but the driver’s left side and knee are “frozen,” and the passenger’s right is “frozen” by the headwind, which freely penetrates through loosely fitting doors and sagging rubber bands. To complete the picture, you should also add raindrops penetrating into the interior.
Door seal per meter
And yet, undoubtedly, any seals wear out, especially at the bottom, in the threshold area. Therefore, the isolation of the interior from external influences can be saved either by replacement or significant modification.
Selection of replacement
You won’t find any kind of advice for naive and gullible car owners on the Internet. Some suggest installing window seals on the VAZ 2110 instead of rubber bands intended for this model, others suggest inserting tubes from droppers inside. In general, there is no limit to skillful imagination.
We will try to focus on the most acceptable options, with proven effectiveness in practice.
So, to replace rubber bands you can use:
- a ready-made set from the manufacturer - designed specifically for the VAZ 2110. These are mass-produced rubber bands that fit perfectly on all doors. They are double-circuit and allow for additional sealing;
- measured VAZ rubber bands. That is, on sale you can find both ready-made, “soldered” rubber bands for each door, and a rubber band per meter for the same purpose;
- seals for Priora - according to experts, they are even better. Firstly, they are three-chambered, with a steel strip for fixation. Secondly, they are of higher quality, “hold” their shape longer, and do not wrinkle as much; Priorovsky door seal
- It is also possible to install rubber bands from GAZelle.
Tip: Before choosing a seal, you need to very carefully measure the internal length of the rubber bands on the front and rear doors. It’s better to take a little more if you’re not using a “native” set, because shortening is always easier than sharpening.
In addition, if you plan to modify it for tighter insulation, you will also need a tube for additional door sealing, about 8 mm in diameter made of silicone or polyurethane.
For fixation, disposable pins and glue are used.
Dismantling
After purchasing everything you need, you can first begin dismantling and then installing a new seal. The first stage is removing the plastic facing panel from the threshold. This is done using a regular flat-head screwdriver. Just try to do everything carefully, without damaging the plastic clips that secure the panel.
This is followed by the removal of old rubber bands. This is done by tearing it off, then removing the residue using available tools. If you need to remove the remaining glue or small debris, use a solvent (be careful that it does not dissolve the paintwork of the car).
Next, you need to clean the entire doorway from dust and various contaminants, paying special attention to the lower parts. You can do dry cleaning with a brush and vacuum cleaner. If you still need to wash it, let the surface dry thoroughly before installing the rubber bands.
Additional seal
If you have completely replaced old rubber bands with new ones in all doors, then no additional insulation is needed. But in cases where you do not want or do not have the opportunity to do this immediately, and the old rubber bands have become crushed and worn out, you can install additional VAZ 2110 door seals as a temporary measure.
Additional seals for the Priora body
After the door seal is installed, we move on to the body. There are two “sides of the coin”: horizontal and vertical compaction. We install horizontal rubber bands at the top and bottom of the body:
And vertical ones for the rear door:
Thus, additional Priora seals will significantly reduce wind noise, eliminate dust and make the car interior warmer. Here is a general picture of the work done:
The issue price is 50 rubles/meter, no more than 10 meters will be required.
By the way, in order to maximize the effect of the door seals, it is recommended to soundproof the Priora doors.
source
Suitable
So which ones to put? In no case should you buy the first copy you come across, since each car model is suitable for a certain sealing rubber. Let's summarize the reviews from Priora drivers:
- Standard ones from VAZ-2110. They have hard rubber, so the door with such a seal closes tightly. Its U-shaped profile allows dirt to accumulate in it. Plugs on drainage holes make it difficult for moisture to drain away.
- Brands RKI-19 for VAZ-1117 (Kalina). Despite the assurances of the sellers, it is not suitable for installation on Priora. First, it is smaller in size, so it only covers part of the gap at the front of the door. Secondly, it is also made of fairly hard rubber.
- The best recommendations were received by foreign kits (K-FLEX and others) that have a tubular (or double-tubular), trapezoidal or Z-shaped profile. They are made of soft rubber, which ensures their tight fit to parts of the car.
What is noteworthy is that owners of Daewoo Nexia cars tune their car with seals from VAZ Priora.
Installation
And now about what Lada Priora door seals are and their installation. Installation options can be very different:
- putting on the bottom of the door;
- installation with double-sided tape;
- gluing with sealant or glue.
Before gluing, the surfaces must be degreased. Usually the footage of the kit is enough to glue the door openings and the gaps between them and the wings.
As a conclusion, I would like to recommend washing the areas behind the rubber seals from dirt more often (and checking for rust). The lower parts require special attention.
source
Dismantling
After purchasing everything you need, you can first begin dismantling and then installing a new seal. The first stage is removing the plastic facing panel from the threshold. This is done using a regular flat-head screwdriver. Just try to do everything carefully, without damaging the plastic clips that secure the panel.
This is followed by the removal of old rubber bands. This is done by tearing it off, then removing the residue using available tools. If you need to remove the remaining glue or small debris, use a solvent (be careful that it does not dissolve the paintwork of the car).
Next, you need to clean the entire doorway from dust and various contaminants, paying special attention to the lower parts. You can do dry cleaning with a brush and vacuum cleaner. If you still need to wash it, let the surface dry thoroughly before installing the rubber bands.
It will be useful: Replacing valve stem seals on a VAZ 2109: DIY video instructions
Lada 2110 Autobiography › Logbook › Door seals from Priora
Good day to all. Everyone knows the problem with factory door seals. Up to a speed of 110, it was more acceptable in the cabin, but after that you could already hear the wind breaking into the cabin, and after 140 it was generally felt like it was walking around the cabin) And in winter there was quite a bit of cold air blowing in, and the cabin cooled down very quickly. I started looking for solutions on the drive, forums, asked other owners of the tenth family how they dealt with this problem, etc. And here opinions were divided. Some said that the prior seals were awesome, others said that it was all garbage (supposedly it blows in even more, the rubber bands don’t cover the ceiling, they don’t fit well, they slide and a lot of other things), the third that you should install three-chamber ones from Viburnum, and the fourth generally advised from Chevrolet fields After all these conversations, I gave up on this problem a little, and I didn’t like the price of the factory seals, but in the end the whistling and blowing wind in the cabin got to me. I went to the market and looked and felt all the seals and decided that I needed to take the Priora factory seals (precisely the factory seals that are soldered!). As it turned out, two companies supply these seals to the conveyor: Balakovo and the Ural RTI plant. Well, Balakovo costs 100 rubles cheaper and the sealing rubber itself, which is in contact with the door, is a little narrower, and the seller assured me that the Ural ones are better. After thinking about it, I took the Ural ones, having agreed with the seller that if suddenly something went wrong, he would exchange them for me in Balakovo. At the same time I also bought a trunk seal (300 rubles).
The installation took about an hour and a half. After removing the old seals, I removed the remaining sealant from the openings, washed them and dried them, after which I put on the new one. First I put it on by hand, then I tapped it along the entire length with a hammer so that the seal would fit better on the door and would not move out later. During installation, one problem arises, since the seal is welded, it turns out to be a hump. In order to easily remove it when putting on the seal, firstly we compress it, and secondly we place it well in the corners of the opening. But if there is still a hump, you need to divide it into several small ones in different places of the opening and use a hammer to seat them. No need to cut anything!
To say that I am pleased with the result is to say nothing. If earlier even at a speed of 110 you had to raise your voice, now even at 140 you can calmly talk without straining. The noise from the cabin is gone, the wind is no longer blowing)
Now the next step is the glass seals and velvet covers from Priora, so that it would be generally quiet))
Regarding those who told me that the prior seals are garbage, I will say the following: They installed counterfeit seals that are split. Factory seals must be welded! As they say, the miser pays twice.
source
Removal
When you have purchased the required number of seals, you can begin to work.
Article on the topic: Do-it-yourself noise insulation of VAZ 2110 (Video)
The first step is to remove the old rubber elements, after which the installation of new parts begins.
Let's tell you more about the dismantling procedure.
- Remove the plastic trim panels installed on your vehicle's door sills. To do this you will need a thick screwdriver. Remove carefully, being careful not to damage the plastic caps. But it’s better to buy new ones in advance if you can’t carefully dismantle the threshold.
- Now remove the old pieces of rubber from the seats. Simply tear off the sections that are torn off by hand.
- Remaining rubber can be cleaned off with any available tool. Only be careful with sharp objects so as not to damage the metal and paint layer.
- Very small residues and traces of glue are removed using solvents. Make sure that the solvent you choose will not damage your paintwork.
- Go over the doorway with a vacuum cleaner, remove all dust and dirt. Take special care to clean the bottom part. If wet cleaning was used, wait until everything is thoroughly dry.
Upcoming work
Installation
This process cannot be called complicated. You are not required to have any special training or extensive experience. Although you should at least be able to handle glue.
Working with the back door
Each stage is performed consistently and carefully to achieve the desired result and create comfort inside the cabin.
- Even if you have already measured the required length of the seals for your doors, we advise you to do it again. Anything can happen.
- Cut the required length, plus leave a couple of centimeters of reserve. Although if we are talking about a ready-made set of rubber bands, you won’t have to cut or leave anything. Skip the first two points.
- Insert a tube made of silicone or polymer inside the sealing tape. They are sold everywhere, so there should be no problems finding them.
- The length of the tube must match the length of the rubber. This tube will serve to create the necessary elasticity and allow the elastic to press more tightly to the door. This way, ventilation gaps will not appear, and the cabin will become much quieter.
- A shaped side rubber seal is glued to the bottom.
- If the tape is solid, you can start putting it on from either side, as is more convenient for you.
- If it is a measuring rubber band, then start from a point between the door overhangs, or 30 centimeters from the bottom of the threshold. Moving up or down is a personal choice for each master. There is no difference here.
- Push the figured profile all the way down. To do this you will need a rubber or wooden hammer. He's a mallet.
- When the seal is installed around the entire perimeter, an extra piece will be revealed. Cut the tube straight and end-to-end, and make the elastic itself seem slightly deformed. It's like you tore it off by hand. This will avoid the unpleasant phenomenon of siphoning through the joint.
- Replace the pistons; if some were damaged during removal, replace them with new, intact ones.
- Replace the plastic cladding removed from the threshold.
- The second contour of the seal is glued along the edges carefully, but as tightly as possible, after which time is given for the glue to dry completely.
Article on the topic: Self-replacement of the crankshaft oil seal on a VAZ 2114
Almost immediately you will feel the difference between the old and new seal. This is a useful exercise that allows you to get rid of unpleasant sounds, knocking, whistling and cold air flowing directly onto your feet.
Lada Priora Hatchback ☁️White smoke › Logbook › 17. Additional door seals
When driving more than 70-80 km/h. the wind begins to blow from all the cracks, a roar from the road is heard, passengers look around trying to find an open door, the driver-owner accordingly has an unpleasant feeling for his car, it’s all due to the “wild” gaps in the doors and not only that are present on a car with the plant itself. Many people solve this problem by gluing various seals on the doors, hood, sills, etc. I went the same way:
Consumed: -Z-shaped seal 2.5 m. Could not be found in stores, so I had to order from AliExpress. Price: 350₽ 3 m. -D-shaped seal about 3 meters. As for this sealant, they are available in any hardware store. 120₽ m. -Gasoline/Galoshes 50 gr. As a surface degreaser I use only this or industrial alcohol, since they are less dangerous for paintwork.
The noise and air blowing into the cabin has decreased by about 60%, then I also plan to stick a D-shaped seal around the entire perimeter of the doors or use a seal from some foreign car (to be continued in the same post), who will advise?
Doors Lada Priora
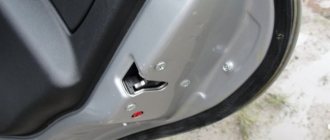
If we talk about Priora doors, it is worth noting that the doors have a rather problematic design. First of all, this relates directly to the door fastening itself, which becomes loose during operation, and an unpleasant sound appears when it is closed. To fix these problems, the Priora needs to remove the trim and double the clips installed on the door.
A common problem is an unpleasant sound when the door lock is activated. To eliminate it, you will need to put special rubber pads on the lock levers.