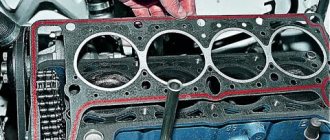
Main types of cylinder head gaskets.
Asbestos - can withstand high temperatures and are quite elastic. For strength, the holes can be additionally reinforced with metal rings. The advantage of asbestos gaskets is their low price, but they are not resistant to vibration and are subject to rapid aging and deterioration of their sealing properties.
Non-asbestos
- a common type of gaskets, which often have a higher price than asbestos, but have better resistance to deformation and are designed for a longer service life.
Metal (bimetallic) - consist of several layers of metal or metal with a sealing elastomer. Multilayer steel cylinder head gaskets (MLS gaskets for short) are most often found in modern cars.
In modern engines, the cylinder head gasket not only performs a sealing function, but also ensures load distribution
Packaging and equipment
For convenient use and storage, sealants are packaged in small tubes. The packaging ensures long-term preservation of the valve cover sealant. Most manufacturers produce products in compact tubes, up to one hundred grams. To make it convenient to apply the sealant to the oil pan, the tubes are equipped with caps with dispensers, which has undeniable advantages:
- Fixed amount of composition.
- Uniform distribution on parts.
- Preservation of qualities and properties for a long time.
To use the gasket sealant again, it is enough to remove some of the dried product from the dispenser with a sharp, thin object before repairing the engine. Professional compounds for service stations and repair shops are produced in bulk packaging, and the products are applied with a pistol.
Basic rules when replacing the cylinder head gasket
Replacing the cylinder head gasket entails draining fluids and dismantling components; it is not recommended to reuse the old gasket and bolts, even if they look quite normal.
After removing the old gasket and cleaning the surface of seal marks, you need to check the flatness of the cylinder head.
You can check the geometry using a straight edge and feeler gauges. The ruler is placed with a knife support in the longitudinal and transverse directions.
For cylinder head gaskets made of multilayer steel, the following maximum clearances are allowed: less than 0.5 mm at a distance of 400 millimeters and less than 0.3 mm at a distance of 100 millimeters.
If after checking the gasket remains within tolerance, then the plane is in order and further preparation is reduced only to degreasing the surface. If the gap is more than 0.5 mm, we recommend grinding or milling the surface.
Preparation and installation of the cylinder head gasket
When we are convinced that the surface is smooth and the block is intact and does not contain cracks or cavities, we can begin installing the gasket.
All technological openings are thoroughly cleaned and blown with compressed air to remove possible deposits and dust. The surface is degreased.
Next, install a new gasket. For reliability, gasket manufacturers apply an elastomeric compound around the holes, which during installation fills all the smallest irregularities in the block. When reinstalled, the elastomeric coating no longer has the same sealing properties.
But even a new gasket will not provide a 100% guarantee of sealing quality for the entire service life of the engine. To achieve 100% sealing and increase the time until the next cylinder head gasket replacement, Permatex. Inc has developed its own compositions for sealing cylinder head gaskets.
Back in 1915, Constant A. Benoit (the founder of the company) used his experimental composition on the car of racer Ralph de Palma in a 24-hour race at the Sheepshead Bay track. The racer's mechanic contacted Mr. Benoit after the gasket blew for the fourth time.
After treating the gasket with the composition developed by Mr. Benoit, the car went further without problems with the gasket.
Today, Permatex Company products are specified in the OEM specifications of all major manufacturers of not only civilian automotive equipment, but also has certificates for the supply of its developments to the US Army.
Available to you and you can use:
The composition is universal - in addition to sealing gaskets, it can be used
as a sealant for pipe fittings or a bead sealant for tubeless tires.
You can also use Permatex® High Tack™
as protection of metal or electrical connectors from corrosion.
If you apply the sealant under pressure, this allows you to create a thin continuous layer of sealant on the gasket. And the permanent residual tack of the sealant helps to accurately position and hold in place even heavy multi-layer metal gaskets.
The copper filler in this seal helps the steel gasket move excess heat away from the combustion chamber more quickly. The sealant composition is designed for constant contact with any fuel and any engine temperature.
If there is no guarantee that you bought a high-quality gasket, then perhaps our sealant will help it.
And also, if it’s really tight, it’s possible to save the old gasket using our seals. Video below. (But you do this procedure only at your own peril and risk). Video from youtube, author Demon_Bull_Ch
Source
Removing camshafts and replacing valve lifters
We carry out work to replace camshafts and valve lifters.
Remove the plastic engine cover. Using a Phillips screwdriver, loosen the clamp securing the main crankcase ventilation hose... ...and remove the hose from the cylinder head cover fitting. We remove the intake pipe (see “Removing the intake pipe”) and cover the channels in the cylinder head with a rag to prevent objects from getting into the engine. We remove the ignition coils (see “Checking the condition and replacing spark plugs”). Use a Phillips screwdriver to loosen the clamp securing the crankcase ventilation idle circuit hose...
...and remove the hose from the cylinder head cover fitting.
Using a 10mm socket, unscrew the bolt securing the block bracket for the wiring harness of the engine management system... ...and remove the bracket with the blocks from the cylinder head cover. Squeezing the petals of the plastic holder of the engine management system wiring harness with pliers...
...remove the wire harness holder from the bracket secured to the cylinder head cover. Using a “8” socket, unscrew the 15 bolts securing the cylinder head cover.
Location of the cylinder head cover bolts The cover is installed on a sealant, so...
... use a screwdriver to pry the lid off the tide...
...and remove it. To check the serviceability of the hydraulic pusher...
... use a screwdriver to press on the hydraulic pusher (when checking, the camshaft cam corresponding to the hydraulic pusher should be facing the pusher with the “back of the head”, that is, do not put pressure on the pusher). In normal condition, the hydraulic tappet should move in the cylinder head socket with significant force, compressing the valve spring. If the hydraulic pusher itself is pressed with little force, then it must be replaced. We check other hydraulic pushers in the same way. Remove the camshaft gear pulleys (see “Replacing camshaft seals”). We disconnect the wire block from the sensor for the low (emergency) oil pressure warning light in the engine (see “Removing the low oil pressure warning light sensor”). Using the “8” head, unscrew the 20 bolts securing the camshaft bearing housing.
Location of the camshaft bearing housing bolts
Remove the camshaft bearing housing (A - housing alignment pins). In order to remove the camshafts from the supports in the cylinder head, you do not need to remove the rear timing belt cover, but only unscrew the three upper bolts securing the cover (see “Removing the coolant pump”). By pressing the rear timing belt cover...
...we take out the camshafts with oil seals.
To distinguish the shafts, a belt is made on the intake valve camshaft near its first neck.
Remove the two plugs from the cylinder head and the camshaft bearing housings. To remove the hydraulic pusher from the cylinder head socket, wipe the end of the pusher with a rag...
…and using a suction cup (you can use a suction cup to attach car accessories to the windshield)…
...take out the hydraulic pusher. When removing the hydraulic pusher, it is better not to use a magnet to avoid magnetization of the pusher parts and “sticking” of iron-containing wear products to them. Before assembly, we clean the mating surfaces of the cylinder head, bearing housing and cylinder head cover from the remains of old sealant and oil. Lubricate the bearing journals and cams of the camshafts with engine oil and place the shafts in the cylinder head supports. On the mating surface of the shaft bearing housing, mating with the cylinder head, we apply flange sealant of the Loctite type No. 574 with a bead about 2 mm thick.
Places for applying sealant to the bearing housing
We install the bearing housing along the centering pins and evenly tighten the fastening bolts crosswise, starting from the middle supports. We press in new camshaft oil seals (see “Replacing camshaft oil seals”). On the other side of the cylinder head, we press in the plugs using a mandrel. We carry out further assembly in reverse order. Before installing the cylinder head cover, apply Loctite No. 574 flange sealant to its surface mating with the bearing housing.
Places for applying sealant to the cylinder head cover
Is it correct to apply sealant to the cylinder head plate? with vase 16 valve engine
Updated 1 week ago
What a FUCKING 21124 gasket on the engine.
Santa82
An interesting topic, relevant to today’s experience... just like the guy in the photo stands. syringe Be healthy!
Mad Urobax
installing the cylinder head of a VAZ 2112 -16 valves There is a strong wind today, tell me, did I buy black or white concrete? Wait, and judging by experience, I don’t remember.. Probabil for sure..)
Car Godenez
This is definitely a sealant called Lactide, complete bullshit! Enough for 1 year and the oil will definitely go back into the well, it’s best to buy special rings, they are certainly sold in a bi-bi store, they cost about 70 rubles!
Is it possible to seal the cylinder head gasket with sealant?
In the previous article (How and why to grind the valve | Lapping paste) we described the process of disassembling the cylinder head (hereinafter referred to as the cylinder head) of the GREAT WALL Hover car and showed the process of grinding in the valves.
Today we will look at the following questions:
1.) How to choose a cylinder head gasket,
2.) How to determine that the gasket has failed,
3.) Why use copper spray sealant when installing the cylinder head gasket,
4.) How to apply copper spray sealant for ABRO gaskets to the cylinder head gasket.
Why do you need a cylinder head gasket?
The cylinder head gasket, although not the most expensive element, nevertheless carries key functions and heavy loads.
Firstly, it is designed to seal the connection between the block and the head. The engine is constantly exposed to severe temperature loads, and the metal may begin to deform. The purpose of the gasket is to prevent depressurization and local overheating of the engine.
Secondly, with its help, optimal pressure is achieved in the oil system, engine cooling system, as well as the compression ratio in the cylinders.
BUBLS-64 › Blog › Everyday work No. 7 or Search for oil pressure in the VAZ 16V engine continued.
In this part, I will tell you about the main mistakes of the young “motorist” and why I don’t like ZaRublem magazine. Let's start the debriefing. 1.
To begin with, I’ll tell you about the lubrication system of cylinder head 2112, 21124, 21126. Oil for lubrication of the camshaft journals is supplied through channels made in the “bed” of the cylinder head, and then through grooves in the upper bearing caps.
The lower part of the bearings is made in the cylinder head housing and does not have grooves for lubrication.
When these two parts are assembled, a sliding bearing is obtained in the center of which there is a camshaft journal. Naturally, the clearance in these bearings is strictly regulated and should not exceed 0.2mm. This threatens that oil will begin to leak through the gap between the camshaft journal and the bearing. And there will be no pressure in the engine lubrication system. What kind of clearance and what kind of sliding can we talk about with such camshaft journals?))
2.
Cleanliness of the cylinder head assembly and again about the gaps.
And so I told you what would happen if the clearance in the plain bearings increases due to wear on the camshafts. What happens if you assemble the cylinder head using a sealant that is not intended for this purpose, and even without cleaning the old sealant? And this is what will happen. Since the “bed” is the top cover of all camshaft bearings, an increase in the gap between the “bed” and the cylinder head itself leads to an increase in the clearances in the bearings. What leads to an increase in the gap is a too thick layer of sealant, sealants not intended for assembling the VAZ cylinder head (gasket sealants), poorly cleaned surfaces of the “bed” and cylinder head from remnants of old sealant. Everyone’s favorite red ABRO sealant-gasket on D2 is in no way suitable for assembling a 16-valve VAZ cylinder head. Continue to coat the cooling system pipes with it, but don’t even think about assembling the cylinder head on it. For VAZ cylinder head, it is best to use Loctite No. 574 sealant. 3.
Applying sealant. Another danger is the incorrect sealant application pattern. Lately many people have been trying to smear the entire surface of the bed. There is no need to do this. This way, the sealant can be squeezed into the oil channel and partially or even completely block it.
The cylinder head gasket has blown - how to find out?
A breakdown of the cylinder head gasket leads to such unpleasant consequences as engine overheating, poor operation of the stove, the appearance of exhaust gases from under the hood of the car, the appearance of an emulsion in the engine oil, the appearance of white smoke from the exhaust pipe and some others. If the above symptoms or one of them appear, you need to check the cylinder head gasket. There are several ways to do this. Next, we will look at why the cylinder head gasket breaks, what consequences this leads to, and what to do if this trouble happens to your car’s engine.
Signs that the cylinder head gasket has blown
The purpose of the cylinder head gasket is to ensure tightness and prevent gases from penetrating from the cylinders back up into the engine compartment, as well as mixing coolant, engine oil and fuel with each other. In a situation where the cylinder head gasket is punctured, the seal of the block is compromised. The following signs will tell the car owner about this:
Signs of a burnt cylinder head gasket
Emulsion from under the expansion tank cap
Foam in the expansion tank
A clear sign of engine overheating is the presence of condensation on its surface. This is also an indirect sign of a burnt-out cylinder head gasket or a crack in the cylinder block. First of all, it is necessary to conduct computer diagnostics of the engine. The presence of errors will indicate the direction and possible additional faults. As a rule, these errors are associated with problems in the ignition system.
Antifreeze in the cylinder
Let's look again at mixing antifreeze and oil. As mentioned above, as a result of mixing them, an emulsion of a yellowish (most often) color is formed. If it appears, then simply replacing the cylinder head gasket will not be enough to repair. It is imperative to flush the system of this composition. Including pan and oil channels. And this may cost you additional costs, sometimes comparable to a major engine overhaul.
We have dealt with the symptoms that occur when the cylinder head gasket is broken. Next, let's move on to considering the reasons why its burnout can occur.
Why does the cylinder head gasket break?
In most cases, the reason why problems arise with the cylinder head gasket is simple overheating . Because of it, the block cover may “lead”, and the plane along which the gasket adheres to two contacting surfaces will be disrupted. As a result, depressurization of the internal cavity occurs with all the ensuing consequences. It is mainly aluminum heads that change their geometry. Cast iron is not subject to such malfunctions; they are more likely to crack than to bend, and only in the most extreme cases.
Scheme for pulling cylinder head bolts on VAZ “classics”
Also, due to overheating, the gasket can heat up to temperatures at which it changes its geometry. Naturally, in this case depressurization will also occur. This is especially true for iron-asbestos gaskets.
Another reason is a violation of the bolt tightening torque . Both very large and small torque values have a detrimental effect. In the first case, the gasket may collapse, especially if it is made of low-quality materials. And in the second, exhaust gases pass out without obstructing them. In this case, gases together with atmospheric air will have a detrimental effect on the gasket material, gradually destroying it. Ideally, the bolts should be tightened using a dynamometer that shows the torque value; in addition, the sequence of their tightening should be observed. Help information about this can be found in the manual.
As a rule, the tightening sequence is to tighten the central bolts first, and then the rest diagonally. In this case, twisting occurs in stages. In particular, in VAZ cars of “classic” models, the torque step is 3 kgf. That is, all bolts in the specified sequence are tightened to 3 kgf, after that they are tightened to 6 kgf, and to 9...10 kgf.
According to statistics, in about 80% of cases when the gasket failed, the reason for this was incorrect tightening torques or non-compliance with its sequence (diagram).
And the most obvious reason is the low quality of the material from which the gasket is made. Everything is simple here. Try to buy products from trusted stores. When choosing, you must be guided by the “golden mean” rule. The gasket, of course, is inexpensive, so you shouldn’t overpay, nor should you buy downright cheap garbage. The main thing is that you are confident in the store where you are making a purchase.
It is also possible that the head gasket simply burned out due to wear and tear of the material , because everything has its own service life.
Lada Priora Sedan Cosmos › Logbook › Sealing the Camshaft Bed
Hello everyone! I haven’t been here for a long time, I decided to write about the next repair of my car). covers, drove around for a while and decided to go to the garage and fix the problem. Morning. Saturday. I waved coffee and went to the store to buy everything I needed, it was purchased: Receiver gaskets, camshaft seals, plugs, rings for injectors, oil filler cap, and so on. basically that's it) I arrived in the garage and away we go)
First, remove the terminal, remove the cover, unscrew the air vent with the corrugation, all the hoses that go to the receiver, and another hose that goes to the canister valve, you will see there, it goes to the receiver and to the valve) Next, we remove the receiver itself, for this, I unscrewed the top bolt of the generator, and loosened the bottom one, but did not unscrew it, of course this is on the removed generator belt)) the generator moved towards itself, and there we see from left to right bolt-nut-nut- nut-bolt, all on 13) when you take out the nuts, there are washers under them - I couldn’t get some of them with my fingers, when I moved the receiver, they fell on the protection, and I just collected them. So, unscrew these bolts and nuts, I unscrewed the bolt to the right of the generator with a long adapter with a small cardan, and removed the rest with a ratchet. Next, we unscrew the dipstick, it is there on a screw for a Phillips screwdriver, we pull the probe out. On top of the receiver, unscrew the 2 nuts of 10, and pull out the receiver. I pulled it out like this: I pulled it towards myself a little, raised the left edge so that it wouldn’t catch on the injectors, and pulled it out ) there’s nothing complicated there, you’ll understand everything yourself when you shoot.
Unscrew the strips on the side where the connectors for the injectors and coils are attached, move the wiring to the side so it doesn’t get in the way, remove the valve cover itself
Next, we unscrew the camshaft gears, the head 18 helped me with this) We unscrew the bed itself, only in order, or at least crosswise, remove it, take out the shafts, I inserted the camshaft seals into the grooves in their original places so that the oil does not drip. valve cover and the next day I took it to work, there I cleaned everything and washed it as best I could.
By the way, I forgot, I also purchased an oil deflector separator ring, I also replaced it, everything is simple, unscrew 6 bolts and remove it entirely from the cover
pull out the plastic sleeve and change the ring
Source
Main types of cylinder head gaskets.
Asbestos - can withstand high temperatures and are quite elastic. For strength, the holes can be additionally reinforced with metal rings. The advantage of asbestos gaskets is their low price, but they are not resistant to vibration and are subject to rapid aging and deterioration of their sealing properties.
- a common type of gaskets, which often have a higher price than asbestos, but have better resistance to deformation and are designed for a longer service life.
Metal (bimetallic) - consist of several layers of metal or metal with a sealing elastomer. Multilayer steel cylinder head gaskets (MLS gaskets for short) are most often found in modern cars.
In modern engines, the cylinder head gasket not only performs a sealing function, but also ensures load distribution
Review of popular sealants
A review of valve cover sealants will help car owners decide on which brand to choose, since there are currently a lot of such products available in stores and car markets. And only reviews after actual use can fully answer which sealant is better. Being extra careful when choosing will help protect you from purchasing counterfeit goods.
Black Heat Resistant DoneDeal
This is one of the highest quality sealants made in the USA. Designed to operate in the temperature range from -70°C to +345°C. In addition to the valve cover, the product can also be used when installing engine and transmission oil pans, intake manifolds, water pumps, thermostat housings, and engine covers. It has low volatility, so it can be used in engines with oxygen sensors. The sealant composition is resistant to oil, water, antifreeze, lubricants, including motor and transmission oils.
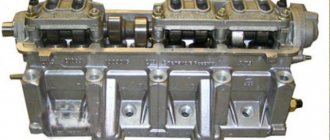
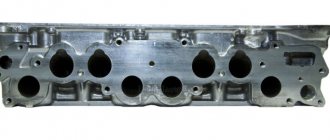
Cylinder head gasket: what is it and what types are there?
Let's figure out what the cylinder head gasket is? Cylinder head gaskets are divided into metal and non-metal. Virtually all pads are disposable. And if the gasket was removed from the block, then you need to buy a new one.
Metal cylinder head gaskets are the most common due to their properties. The advantages of these gaskets include high durability and wear resistance. They are made from thin sheet steel or copper. Copper gaskets are less common as they are more expensive to manufacture. As a rule, on such cylinder head gaskets, a thin layer of polymer material is applied at the holes and along the edges, which ensures a tight fit of the parts. When installing the sealing product and tightening the bolts, the gasket takes the shape of adjacent parts.
Interesting! The manufacturer of each machine suggests tightening the bolts in a specific sequence. This allows you to install the block gasket without damage, as well as create the most airtight connection.
Non-metallic cylinder head gaskets, in turn, are divided into two more types: asbestos and non-asbestos. In the first and second cases, in the places of the holes and along the edges there will be a reinforcing layer consisting of metal or polymer materials. Paronite gaskets, which are reinforced with metal and polymer additives, have also become quite widespread. The latter material is slightly inferior in wear resistance and durability to metal products.
It is worth remembering that the cylinder head gasket is a disposable thing and, having removed it, it will not be possible to install it in the same way, and this will break the tightness of the cylinder block.
Consequences of untimely replacement
It is undesirable to operate a car with a worn or burned out cylinder head gasket, as this can lead to serious consequences. For example, oil will get into the cooling system, causing its operation to be disrupted. The motor will not be able to cool as needed. The engine power may also decrease, it will begin to stall, and sometimes not start at all.
If antifreeze gets into the cooling system, the properties of the oil will change, which will lead to a decrease in the efficiency of lubrication of engine parts. In turn, this will lead to increased wear of rubbing parts. Driving a car with a damaged gasket will certainly lead to engine failure, the repair of which will cost much more than replacing the seal.
Signs of a blown cylinder head gasket
You can see the burnt gasket, the cylinder head gasket is broken
The importance and complexity of the sealed interface between the cylinder head and the cylinder block is that when fixing the heads it is necessary to isolate:
This can be accomplished by installing a gasket with complex hole configurations. As a rule, it is made of reinforced paronite with shrinkage edging around each of the holes. Additionally, the gasket may be made of thin sheet metal depending on the engine model.
White emulsion in the engine due to burnout of the cylinder head
No matter what material the sealing gasket is made of, there is always a danger of it burning out.
However, if seal failure is diagnosed early, costly repairs can easily be avoided.
Early stage
In the early stages of depressurization, the engine may not show any signs of malfunction.
This is especially typical for engines after repair, when the cylinder head was installed in violation of the technology, namely:
Thus, to identify gasket problems in the early stages, simply inspect the engine carefully after replacing the gasket or other repairs that involve removing the head.
Signs of oil leakage
At the first signs of oil leakage from under the head, it is better to try to tighten the mounting bolts using a torque wrench and a bolt tightening diagram. It is quite possible that the gasket simply sagged and after tightening, the tightness of the connection will be restored and oil leakage will stop.
If this is not done, it is quite possible that you will have to deal with other signs of a broken gasket.
The nuances of using valve cover sealant
Each of the listed sealants has its own characteristics. Accordingly, you will find precise information on their use only in the instructions supplied with the product. However, in most cases there are a number of general rules and simply useful tips that should be followed. In particular:
Review of popular automotive high-temperature sealants
- The sealant is completely vulcanized only after a few hours . You will find the exact information in the instructions or on the packaging. Accordingly, after applying it, the car cannot be used, and even just start the engine at idle until the composition has completely dried. Otherwise, the sealant will not perform its intended tasks.
- Before applying the product, working surfaces must not only be degreased, but also cleaned of dirt and other small elements . For degreasing, you can use various solvents (not white spirit). It is better to clean it with a metal brush or sandpaper (depending on the degree of contamination and the elements being cleaned). The main thing is not to overdo it.
- When reinstalling, it is advisable to tighten the bolts with a torque wrench, following a certain sequence provided by the manufacturer. Moreover, this procedure is performed in two stages - preliminary tightening, and then full.
- The amount of sealant should be average . If there is a lot of it, then when tightening it can get into the engine, if there is not enough, then the effectiveness of its use is reduced to zero. Also, do not cover the entire surface of the gasket with sealant!
- The sealant must be placed in the groove of the cover and wait about 10 minutes , and only then can the gasket be installed. This procedure provides greater comfort and effectiveness of protection.
- If you are not using an original gasket, then using a sealant is highly advisable (although not necessary), since its geometric dimensions and shape may differ. And even a slight deviation will lead to depressurization of the system.
Draw your own conclusions...
Each car enthusiast must decide whether or not to use sealant. However, if you are not using an original gasket , or there is a leak from under it, you can use a sealant. However, it must be remembered that if the gasket is completely out of order, then using sealant alone may not be enough. But for prevention, you can still apply sealant when replacing the gasket (remember the dosage!).
As for the choice of a particular sealant, it is necessary to proceed from its performance characteristics. You can find out about them in the corresponding instructions. This data is written either directly on the sealant packaging body or in the separately supplied documentation. If you buy a product through an online store, then, as a rule, such information is duplicated in the catalog. Also, the choice should be made based on price, packaging volume and ease of use.