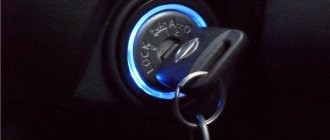
Ignition relay VAZ 2107, 2105, 2104
An ignition relay is installed in the ignition system of VAZ 2107, 2105, 2104 cars.
Ignition relay for VAZ 2107, 2105, 2104 cars
— Purpose of the ignition relay
The ignition relay is designed to reduce the current flowing through the low-voltage part of the ignition system. This prevents burning of the ignition switch contacts and their premature failure.
Because of this, the ignition relay is also called a unloading relay.
— Where is the ignition relay located on a VAZ 2107, 2105, 2104?
The ignition relay on VAZ 2107, 2105, 2104 cars is installed under the instrument panel, next to the ignition switch, to which it is connected by wires.
— How does the ignition relay work?
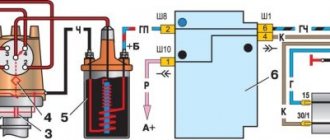
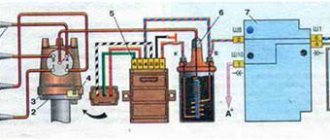
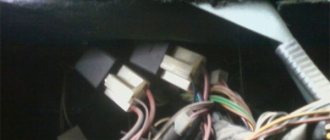
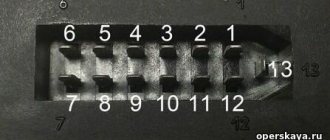
The ignition relay for VAZ 2107, 2105, 2104 cars is electromagnetic. It consists of an electromagnet (core with a winding) and contacts that close when voltage is applied to it. The relay has four terminals. Relay input is contact “86”, output is “87”, constantly energized “30”, ground is “85”. From above, the entire system is closed by a housing. The body has a bracket (eyelet) for fastening.
Relay 113.3747-10 (ignition relay), device
— How does the ignition relay work for VAZ 2107, 2105, 2107?
When voltage is applied from terminal “15/1” of the ignition switch (turning the key) to terminal “86” of the relay, its electromagnet is activated, the moving and fixed contacts are closed inside, electric current begins to flow through them from terminal “30” to terminal “87” and then through the mounting block to terminal “B” (“C”) of the ignition coil (primary winding). The coil is charged and ready for use. The ignition relay contacts will be in the closed state while the ignition system is operating (ignition is on). This is a continuous relay. After de-energizing, the relay contacts open.
Diagnostics of VAZ 2107 starter faults
The VAZ 2107 starter can fail for various reasons.
The starter hums, but the engine does not start
The reasons for the situation when the starter hums, but the engine does not start, may be the following points.
- Over time, the teeth of the starter gear stop engaging (or do not engage well) with the flywheel. This usually occurs when the wrong engine lubricant is used. If you pour thick oil into the engine in winter, the starter will have difficulty cranking the crankshaft.
- The gear that meshes with the flywheel may be misaligned. As a result, the teeth engage with the flywheel ring with only one edge. This is usually due to a failure of the Bendix damper system. Externally, this manifests itself in the form of a characteristic hum or grinding noise and results in broken flywheel or drive teeth.
- There have been disturbances in the power supply system to the starter (brushes are worn out, terminals are oxidized, etc.). Insufficient voltage does not allow the starter to accelerate the flywheel to the required speed. At the same time, the starter rotates unstably, a hum and buzzing appears.
- The pusher fork, which brings the starter teeth to the flywheel crown and removes them after the engine starts, has failed. If this fork is warped, the relay may operate but the drive gear will not engage. As a result, the starter hums, but the engine does not start.
The starter clicks but does not turn over
Sometimes the VAZ 2107 starter clicks, but does not spin. This may happen for the following reasons.
- There are problems with the power supply (the battery is discharged, the battery terminals are loose or the ground is disconnected). The battery should be recharged, the terminals should be tightened, demining should be carried out, etc.
- The fastening of the solenoid relay to the starter housing is loose. This usually happens when driving on bad roads or as a result of over-tightening the mounting bolts, which simply break while driving.
- A short circuit occurred in the traction relay and the contacts burned out.
- The positive cable going to the starter has burned out. It is also possible that this cable may become loose. In the latter case, it is enough to tighten the fastening nut.
- As a result of wear on the bushings, the starter armature became jammed. In such a situation, replacement of the bushings is necessary (removal and disassembly of the starter will be required). A short circuit or break in the armature windings can also lead to a similar result.
- Bendix is deformed. Most often, its teeth are damaged.
Video: VAZ 2107 starter clicks, but does not turn
Crackling sound when starting the starter
Sometimes when you turn the ignition key, a cracking and grinding sound is heard from the starter. This may occur as a result of the following faults.
- The nuts securing the starter to the body have become loose. Rotation of the starter causes strong vibration.
- The starter gears are worn. When starting, the overrunning clutch (Bendix) begins to make a cracking noise.
- Due to the lack or absence of lubrication, the bendix began to move along the shaft with difficulty. The assembly should be lubricated with any engine oil.
- Flywheel teeth damaged as a result of wear no longer engage with the starter gear.
- The timing drive pulley has come loose. In this case, a crackling noise is heard when the engine starts and disappears after warming up.
Starter won't start
If the starter does not respond at all to turning the ignition key, the following situations are possible:
- The starter is faulty.
- The starter relay has failed.
- The starter power supply circuit is faulty.
- The starter fuse has blown.
- The ignition switch is faulty.
It happened once to start the engine in winter, when the starter flatly refused to rotate through the ignition switch. I stopped the car at the lake where I went fishing. When I was putting it back together, the starting device was inactive. There's no one around. I did this: I found the control relay, removed the wire from it connecting the system to the ignition switch. Next, I took a long 40 cm screwdriver (I found one in my bag) and closed two starter bolts and one retractor bolt. The starter started working - it turned out that sometimes this happens with these devices due to cold and dirt. It is necessary to apply current directly to make the electric motor work.
Replacing the ignition relay for a VAZ 2107
The VAZ 2107 ignition relay is used to turn on the power to the ignition system on carburetor and injection modifications of the “Seven”. Sometimes this part causes the machine to malfunction and has to be replaced. You can localize and fix the problem yourself, without resorting to the services of specialized service stations. This will require a minimum of tools and knowledge of where the relay is located and how to change it correctly.
Examination
The easiest way to test a switch is to try replacing it with a known good one. But this can only be done if a working switch is at hand. It is not advisable to buy a new unit just to test the operation of the old one. There is a cheaper and not particularly complicated way. To test the switch, you only need a standard set of keys and a test lamp. This is enough to verify the presence or absence of pulses supplied to the ignition coil. Before checking the switch, make sure that “plus” is supplied to it and the ignition coil. Also check the connection contacts of the Hall sensor and the functionality of the sensor itself. Checking the VAZ 2107 ignition switch is performed as follows:
- turn off the ignition;
- unscrew the nut on the ignition coil and disconnect the brown wire marked “K” (the wire goes to connector “1” on the switch);
- connect a test lamp to the gap between the wire terminal and the coil terminal;
- turn on the ignition;
- turn the key and start the starter.
A flashing light indicates a working switch. If the lamp does not light, the switch needs to be replaced.
Replacing a VAZ 2107 switch
To replace the switch, you must complete the following steps:
- turn off the ignition;
- disconnect the wire block from the switch connector;
- unscrew the fastening nuts;
- remove the old switch and put a new one in its place;
- tighten the fastening nuts;
- connect the wire block to the connector.
Purpose of the VAZ 2107 ignition relay (injector and carburetor)
The first VAZ models were not equipped with a separate relay for turning on the ignition. Current was supplied to the coil directly through the contact group of the ignition switch. This decision had certain inconveniences. The ignition system of the VAZ 2107 consumes a lot of current. In addition, when the ignition is turned on, other consumers may simultaneously turn on, increasing the load on the contact group. As a result, the contacts either quickly oxidize and fail. Alternatively, due to heating, the plastic base of the contact group is deformed, which leads to its inoperability. Installing a VAZ 2107 ignition relay (carburetor and injector) reduced the load on the contact group. Only current passes through the contacts on the steering column, feeding the electromagnetic coil of the relay. The main power supply is switched by a relay contact group designed to operate under high current. The presence of the VAZ 2107 ignition relay (injector and carburetor) increased the reliability of the electrical circuit and the service life of the ignition switch contact groups.
Where is the ignition relay for VAZ 2107
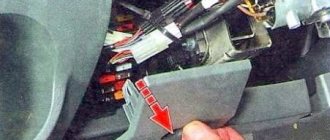
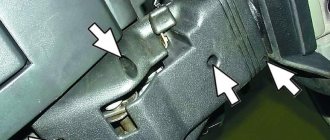
Before checking the performance of a part, it is necessary to find out its location. Many owners of “sevens” do not know where the VAZ 2107 ignition relay is located. Together with the alarm relay, it is attached under the “dashboard” behind the instrument panel. Therefore, in order to see it, check and change it, you will have to work a little with a screwdriver to remove the VAZ 2107 instrument cluster.
How to check and replace the ignition relay on a VAZ 2107
To check and replace the ignition relay, you will need:
You need to start by dismantling the instrument panel. Before starting work, disconnect the negative cable from the battery. To remove the instrument panel, you must perform the following steps:
The ignition relay is mounted on a bracket located under the instrument panel. To remove the relay, you need to use a 10 mm wrench to unscrew the nut that attracts it to the bracket. To check the functionality of the relay, you need a multimeter or an indicator lamp. You can test the operation of the relay directly on the car or by powering it from an autonomous 12 volt source. When voltage is applied to pins 85 and 86 of the relay, the contacts between pins 30 and 87 should close. If this does not happen, the VAZ 2107 ignition relay needs to be replaced. This is done like this:
After replacing the relay, you need to reinstall the dashboard. To do this, follow these steps:
This completes the replacement of the VAZ 2107 ignition relay. You can connect the ground wire to the battery and check the functionality of the ignition system.
Source
Replacing a starter on a VAZ-2107 - photos and videos, main faults and price
SmotriAvto VAZ 2114 starter does not turn
A car starter is the main element of the engine starting system, and is designed to start it by cranking the crankshaft.
Essentially, it is a direct current electric motor driven by closing an electrical circuit by turning the ignition key. The autostarter consists of a stator, an armature (rotor), a brush holder with brushes, as well as a traction relay and a drive.
In all VAZ classic models, incl. and in the “seven”, it is located at the bottom of the engine, and is attached to the clutch housing.
Malfunctions
Considering that the starter is a complex electrical device, malfunctions in it can occur quite often, but most of them can be eliminated through repair. Malfunctions that cannot be repaired and require replacement of the entire assembly include:
- damage to the commutator due to brush wear or other reasons;
- short circuit or break in the stator winding;
- short circuit or break in the armature winding;
- complete wear of the armature bearing bushings.
If the above faults are detected, it is better to replace the starter with a new one. Otherwise, your car will either not start at all, or serious problems may occur in the on-board electrical circuit of the car.
https://youtube.com/watch?v=mZu24DzhXns
Price
The catalog number of the original “seven” starter is 2107.3708010-01. Its price is approximately 2500-3000 rubles. You can also purchase improved models - starters with a built-in gearbox, which are very popular today.
Their advantage is that even if the battery is partially discharged, the starter, due to the gearbox, provides a sufficient number of flywheel revolutions to start the engine. The price for such models starts from 3,500 rubles. The cost of replacing a starter at a service station averages 500-600 rubles.
Replacement
Tool:
- socket wrench 10;
- socket wrench with extension 13;
- screwdriver.
Work order
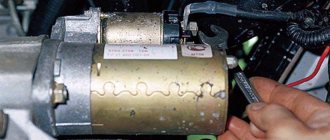
- We place the car on a viewing hole or overpass and secure it with the parking brake.
- Open the hood and disconnect the ground wire from the battery.
- Using a 10mm socket, unscrew the bolt of the lower fastening of the starter heat shield.
- We dismantle the air filter housing and the warm air supply hose (for injection units, remove the fastenings of the intake pipeline).
- Using a socket wrench with a 13 mm extension, unscrew the 3 bolts securing the starter housing. It is better to unscrew the bottom bolt from the inspection hole.
- Using a 13mm wrench, unscrew the nut (on the injection engine there are two nuts) securing the starter shield. Let's take it out.
- Using a socket wrench with a 13 mm extension, unscrew the 3 bolts securing the starter housing. It is better to unscrew the bottom bolt from the inspection hole.
- Using the same tool, unscrew the nut securing the tip of the wire going to the “+” battery.
- Disconnect the start relay wire.
- We remove the starter from the rear wall of the engine compartment.
- We install a new starter in its place.
- We carry out installation work in reverse order.
After installing the new starter, turn on the ignition and start the engine. There should be no extraneous sounds. The starter should turn on when the solenoid relay clicks and stop working when the ignition key is turned back.
Ignition relay VAZ 2107
The very first versions of the VAZ did not have a fuse and relay block, that is, power was supplied to the coil through the ignition switch itself. Such a motor starting system “ate up” a lot of electricity, and the contacts quickly oxidized and stopped functioning normally.
The VAZ 2107 is equipped with a modern ignition relay. Its main function is to reduce the load on the contacts when turning on the device, since the relay turns off some electrical circuits at the moment of startup. The ignition relay is used in both carburetor and injection VAZ 2107 models.
Principle of operation
The ignition relay is one of the elements of the entire ignition system. This system consists of:
Removal and Replacement Guide
Fuse and relay block VAZ 2107
If you do not know how to remove and disassemble the mounting device or safety elements and how to replace the old unit with a new one, then we will consider each instruction in turn.
Changing fuses yourself
Before you begin replacing the safety devices located in the main unit, you must turn off the ignition and battery terminals under the hood.
The replacement procedure is carried out as follows:
- Find the installation location of the device. There are latches on the plastic cover of the block; press them. After removing the cover, you will be able to see a diagram printed on the reverse side, which indicates the location and purpose of all used elements.
- Then you need to identify which device has failed and needs to be replaced. Sometimes a breakdown can be determined visually - the component itself may be burnt out, sometimes a broken thread is clearly visible in it.
- Under the cover of the device you will see tweezers, which can be used to remove the device. If you don't have tweezers, you can use pliers.
- Remove the burnt out element and replace it with a new one, then replace the cover and connect the battery terminals (video filmed and published by the AVTOCLUB_22 channel).
Replacing fog lamp fuses
If the fog optics break down, you should first diagnose the operation of the device. The component is located inside the car.
To check and replace, follow these steps:
- First you will need a Phillips screwdriver, use it to remove the two switches located in the middle of the console, near the audio system.
- Using a screwdriver, you will need to press out two fasteners.
- Then remove the plastic insert.
- You can now remove the fuse housing. Remove the protective cover of the device and replace the part with a new one.
1. Remove the two switches with a screwdriver.
2. Press on the pad fasteners.
3. Remove the insert and remove the device.
Changing the fuse box
Removing and replacing the block with components is done as follows:
- First, open the engine compartment of your car and remove the air filter housing. Unscrew the nuts that secure the housing using a Phillips screwdriver.
- Then under the device you will be able to see a plug with cables connected to the device, you need to unplug it. The product body itself is marked in colors; it corresponds to the color of the connected connectors. By taking these plugs into account, the need to label cables can be avoided.
- After this, you should climb into the vehicle interior and remove the shelf, which is located under the control panel. After this, unscrew the bolts that hold the glove box housing.
- Next, disconnect the plug with cables connected to the connectors directly on the device. Once you do this, you will be able to see the color coding.
- Using a wrench, remove the bolts that secure the block itself. Please note that the outermost screw on the case is hidden, so you will not be able to see it immediately.
- At the end, remove the block with the devices, now the device can be replaced. Installation of a new device, as well as assembly of components, is carried out in the reverse order.
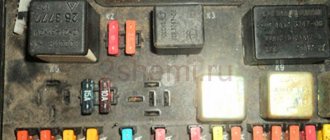
The mounting fuse block contains some electrical control elements of a VAZ car and most fuses that protect electrical circuits from short circuits and overloads. It is located in the engine compartment on the left side, immediately on the metal partition between the engine compartment and the cabin. Here is the photo (top left):
How to check the ignition relay on the "seven"
You can check the ignition relay directly on the car, so you can carry out this procedure yourself in two to three minutes. However, for accuracy of work, it is recommended to arm yourself with a multimeter or at least a regular indicator light. Next, you need to proceed according to the following algorithm:
After applying power to the relay, it is necessary to measure the voltage that the device produces. If there is no short circuit when current is applied to terminals 85 and 86, then the relay is faulty. The functionality of the relay is determined by the closure of the contacts between pins 30 and 87. The numbering of the terminals is indicated on the relay itself on the reverse side.
Video: checking the relay yourself
Replacing the ignition relay on a VAZ 2107
To replace the ignition relay yourself, you do not need any special tools. You can easily get by with the devices that any driver has in their kit:
If the relay stops working, it is impossible to restore it, since the original design of this part does not imply repair work. Therefore, if there are problems with the relay, you can only replace it with a new one.
The operating procedure for both injection and carburetor VAZ 2107 models will be the same. To create safe conditions during replacement, it is recommended to remove the negative cable from the machine’s battery before starting work. Then proceed according to the scheme: