Quite often, drivers wonder how door locks are adjusted on Priora, 2107, 2110 and 2112. This is a fairly common job.
The bodies of domestic cars have never been of particular quality. The problem arises due to misalignment of parts; wear of the elements of the lock itself can also affect it; this is usually observed on fairly old cars. In any case, adjustments will need to be made. Otherwise, the door will either open while moving or not close at all. This will, at a minimum, cause you inconvenience, and at a maximum, it may turn out to be unsafe. Adjusting door locks on Priora, 2107, 2110 and 2112 does not require special skills. Even a beginner can handle this job. Such repairs do not require a large number of tools. Everything you need can be found in any garage.
Adjusting and replacing the lock on 2107
First, you need to identify the reason for the poor functioning of the lock. In some cases, the problem is sagging hinges. Because of this, the door sag and, accordingly, the lock does not coincide with the latch. You can check this by measuring the gaps between the door and the body. This figure can range from 3 to 7 millimeters. It is important that it is completely uniform. If the indicator is different, then you need to adjust the position of the loop. In some cases, this may save you from further manipulations with the lock.
The lock is adjusted in the following order:
- The position of the latch is outlined directly on the car. To do this, you can use a marker;
- If the door closes with just 1 click or just closes tightly. You need to unscrew the lock and move it to the sides of the outer part of the body;
- The door closes, but the gap remains, you need to loosen the latch, and then move it inside the body.
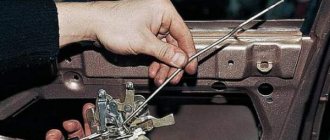
Sometimes, drivers experience problems opening the car from the inside. This occurs due to the door handle being misaligned. To fix it, you need to unscrew the screws securing the handle, move it to the optimal position and secure it. Replacing a lock is also not a difficult task. This option is used when other methods no longer help. Installation of the new mechanism is carried out in the following order:
- First, remove the armrest, window regulator, dismantle the trim;
- Unscrew the button that turns off the lock. The manufacturer recommends using a slotted screwdriver to disconnect the switch rod from the locking mechanism, but in practice you can do without it;
- From the end of the door, unscrew two screws securing the groove;
- Remove the tongue from the groove, while the gutter moves away, this happens together with the seal;
- Unscrew the 2 screws securing the inner handle. It must be pushed inside the door;
- Unscrew 3 screws securing the locking mechanism to the door;
- All that remains is to remove the lock from the door. This is done together with the rod and the internal handle.
Reassembly should not be difficult for you. The hardest part is installing the inside handle. It should be installed together with the lock and rod. The difficulty lies in inserting the handle into the groove intended for it. Don't forget to lubricate the mechanism when installing it. This will extend its service life.
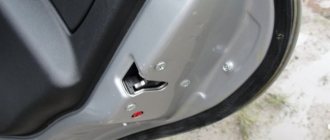
How to remove door trim
The door trims on the Lada Priora car are attached in the same places as on the tenth family, but the removal procedure will still be different. So, they generally have to be removed for various reasons:
- to replace the casing itself due to damage, etc.
- for replacing door cylinders, locks or glass
- installation of acoustics (front speakers)
- when soundproofing doors
If for any of these reasons you need to remove the front door card, then below is a list of the necessary tools:
- Torx bit t20
- Bit holder and adapter
- Phillips screwdriver
The procedure for removing and installing casings on Priora
First of all, you need to open the car door, and then unscrew the three screws securing the trim from the bottom. This is clearly shown in the photo.
After this, again using a Phillips screwdriver, unscrew the screw from the recess of the door opening handle.
Now we unscrew the locking cap itself by hand, as shown in the photo below.
Now, using a T20 Torx bit, unscrew two screws in the recess of the door handle.
Having pryed this pocket open and freed it from the latches along the edges, we take it out. It is assembled with a control unit for power windows and mirrors. In order to remove it, you need to disconnect the block with the power wires. There is nothing complicated about this.
Next, we slightly pry up the corner of the skin, trying to carefully free it from the clips on at least one side.
Replacing the ignition lock cylinder of a VAZ 2109 and the entire lock
Next, we slowly move up and, as if in a circle, we try to “tear” the casing from the fastenings.
When you have already released it from all sides, you can carefully disengage the opening handle and remove the upholstery completely, as is clearly shown.
I think that it is possible to show the result that is obtained in the end.
Now you can carry out all the necessary actions, for the sake of which this part was dismantled in the first place. After completing the necessary work, you can perform the installation in the reverse order.
If the clips securing the upholstery to the door were damaged during removal, the broken ones must be replaced with new ones. The cost of a set of plastic parts for the entire Priora car is no more than 250 rubles.
I think that to make the presented material more accessible, you can show a video review prepared specifically for this article.
If you still have any questions on this topic, you can discuss it on the website below, or on the channel in x. Happy renovation!
Replacing and adjusting locks on VAZ 2110 and 2112
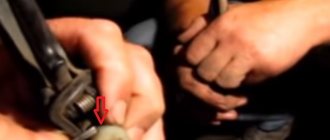
Often, the reason for a poorly closing door is the displacement of the main part of the lock relative to the receiving part. In this case, you simply need to adjust the position of the latch. To do this, use a Phillips screwdriver to loosen the screws securing the clamp. This will allow you to move it in the desired direction. Tighten the screws and check the door operation.
If you cannot adjust the lock, then perhaps its parts are simply worn out. In this case, you will have to replace it. This is done in the following order:
- First you need to remove the casing, it’s not difficult, so we won’t focus on this;
- The outer door handle rod is disconnected from the lock;
- The lock lever is disconnected from the lock cylinder rod;
- The lock handle (inside) is removed from the rod;
- Use a Phillips screwdriver to unscrew the screws securing the outer part of the lock, after which it can be removed;
- The inner part of the lock is removed together with the blocking rod, as well as the handle rod;
- Disconnect the locking rod. To do this, remove the plastic rod holder. Be careful. It can be easily broken;
- The outer handle rod is disconnected by removing the lock washer.
Assembly is carried out in reverse order. If necessary, adjust the length of the rods; this is done by unscrewing or twisting their tips. When assembling, do not forget to lubricate the lock mechanism.
Elimination of sagging doors of Lada Priora
Ever since new the car had trouble closing the right front door. Despite the loose and alarming driver's side, the latter closes better than anyone else. But the passenger seat doesn’t hang out, but it’s not lower than expected either. Still, I decided to fix this issue until the door began to rub against the back door.
The solution to the problem was quite simple, but it turned out to be painful. First, the lower hinge of the door was unscrewed, then the following insert from a 1.8 mm galvanized plate was cut to size:
How to adjust the doors of a VAZ 2110 with your own hands
But the door lifted up by 6-7 mm and it was clearly too much. After this, the torment began with adjusting the thickness, 2 more such plates of different thicknesses were cut out... As a result, the required insert turned out to be 0.6 mm thick and after that the door stood up as it should.
As a result, the door now closes without any extra effort and slams clearly with one click.
The so-called silent Volgov lock has been installed on the driver's door for two weeks now. Of course, the feelings are only positive. I just can’t buy other locks like this yet...
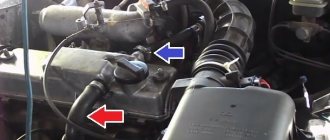
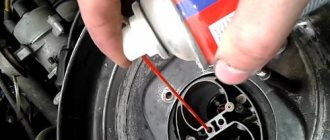
Replacing the reservoir and windshield washer pump in Lada Priora
After installing the windshield washer fan nozzles, I decided to completely solve the problem with the washer, so
Source
Adjustment on Kalina
Typically, it is necessary to adjust the operation of the lock on this model if there is excessive noise that occurs when closing the doors. It rarely gets to the point where the locking device works poorly. To work, you need a Phillips screwdriver, a wrench and a screwdriver with an asterisk. The work is carried out in the following order:
- Using a screwdriver, loosen the screws securing the clamp. It is secured with two Phillips screws and one sprocket;
- We make adjustments. The shift here is made up or down;
- Tighten the screws in the selected position.
To reduce noise, you can put a silicone cap on the clamp. If this procedure does not help, then it makes sense to tighten the screws securing the door hinges.
Removing the lock on Kalina
Sometimes adjustments don't help. This indicates wear of this mechanism; this often happens when the machine is used intensively. To continue normal operation of the car, it is necessary to change the lock. This is done in the following order:
- The door trim is dismantled;
- Using a Phillips screwdriver, remove the screw securing the base of the handle (inside). After this, carefully remove it from the guide pin;
- The insulating material located in the door is removed;
- The rod is disconnected from the cylinder mechanisms. To do this, press it out using a slotted screwdriver;
- The rod coming from the external handle is disconnected in the same way;
- Using the “8” head, the outer handle is detached;
- The outer handle is removed from the car;
- The lock itself is secured with 3 screws. Older machines use Phillips screws. On newer ones you can find stars;
- The locking drive block retainer moves upward. After that, disconnect the block with wires;
- Using a screwdriver, we disconnect the rod clamp; at the same time, it must be carefully rotated around its own axis. This way you can remove the handle rod (internal);
- The locking mechanism is removed from the door.
Assembly is carried out in reverse order.
Before installing the new lock, be sure to lubricate it. This will extend the life of the mechanism. Conclusion
. As a rule, car doors sag somewhat over time. This leads to some problems in operating the machine. To eliminate the problem, the door locks on Priora, 2107, 2110 and 2112 are adjusted. This work is not difficult, even a beginner should not have any problems. But sometimes this doesn't help. In this case, you will have to replace the entire lock. For each model, this work is slightly different, but usually, difficulties arise to a minimum.
Classification of hood and trunk shock absorbers
Like any other suspension parts, shock absorbers also have their own classification. The main classification of hood and trunk lid shock absorbers is listed below.
According to the damping principle
In this case, the damping is hydraulic and occurs by slowing down the movement as quickly as possible. The rod of the device must look down without fail
In this case, it does not matter at all in which direction the special rod of the device will be directed. The basic principle of the shock absorber in this case is the smooth opening and closing of the body element
According to the substance inside the shock absorber
All shock absorbers differ individually in the mounting method. After all, a certain shape and rigidity of the hood is developed for a specific car model. With this in mind, special holes or brackets are made in it, which provide for the installation of additional devices for holding the hood or trunk. Therefore, when choosing a shock absorber, do not forget to indicate to the seller the make of the car. Most likely, he knows what you need.
In fact, mechanisms such as hood and trunk shock absorbers are very durable devices. With proper use, they can last quite a long time, which is why they need to be looked after as often as possible and treated with care when using them.
How to change the lock on the trunk of a VAZ 2113, 2114, 2115
This is how a shock absorber is selected for the hood, trunk lid or rear door of a car. This process is not labor-intensive and will only require you to be attentive and one hour to think. After this, you can safely go to the store and make the appropriate choice.
Video
For a method of adjusting the trunk lock on a Lada Granta, see the following video:
Lada Granta. Adjusting the trunk lock.
Unscrew the bolts
We take out the lever
The parts need to be well lubricated.
Is the trunk difficult to close or are the gaps between the trunk lid and the bumper too large/small? These are signs of an out of adjustment lock. Its adjustment on all modern LADA cars (XRAY, Vesta, Largus, Granta, Priora, Kalina Niva 4x4) is carried out in the same way. There are no fundamental differences.
Malfunctions that owners of LADA cars (and other car brands) encounter when the trunk lock is not adjusted:
- the trunk does not close properly (you have to slam the trunk lid several times);
- the trunk does not open;
- large trunk gaps;
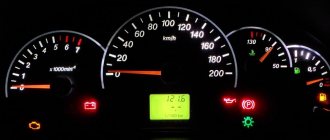
- The trunk closing sensor does not work (the indicator on the instrument panel is on);
- During driving, extraneous noises appear (rattling, whistling, etc.).
Required
: 10mm wrench, Phillips screwdriver or Torx T40.
How to adjust the trunk lock
:
- Remove the plastic cover by unscrewing a couple of fastening screws (on some models, for example, Lada XRAY).
- Mark the position of the loop for a possible return to the original state.
- Loosen the two bolts securing the lock hinge.
- We move the hinge (forward/backward, up/down), achieving an easy and tight closure of the trunk.
- Upon completion of the adjustment, tighten the screws securing the lock hinge with a torque of 22 Nm.
Lada Largus has two tailgates. Not only the bracket on the body can be adjusted, but also the lock latches on the doors themselves. The process is similar: loosen the mounting screws, move the latch or bracket, tighten the screws:
Have you ever had to adjust the door locks yourself? Let us remind you that in order to extend the life of locks and seals, they should be lubricated regularly. By the way, do you know how to make the trunk lid of a sedan (Grant or Priora) or station wagon/hatchback open automatically?
Source
MAJOR BREAKAGES AND INCONSISTENCES IN THE PRIORA TRUNK
Technically, these faults only appear due to three main reasons:
- Mechanical damage to the trunk lid (door).
- Body corrosion.
- Wear of the Priora trunk lid seal.
We need to make a reservation right away. The first two reasons are not worth considering closely in this topic. These jobs are the responsibility of bodywork specialists and require not only special skills, but also many special tools and equipment, not to mention materials. Therefore, you should only contact them if corrosion or damage is detected.
A separate issue is the problematic opening of the trunk. There are two possibilities here:
- Poor adjustment or worn hinges.
- The lock is broken or the trunk lock is misaligned.
This malfunction (loops) can already be eliminated independently. Therefore, the issue will be briefly considered.
PRIORA TRUNK DEVICE
The compartment at the back of the car is called the trunk. The Priora has a sedan body and is isolated from the passenger compartment. At the same time, on station wagon and hatchback bodies, the trunk is combined with the interior space.
However, this part, in the mentioned body models, is called not a lid, but a “door”. This is due to the fact that both the station wagon and the hatchback have a glazed window in this “door”. Otherwise, all these cars have a similar device. This system includes:
- Directly the “door” (trunk lid).
- Locking device.
- Fastening loops.
- Recliner springs (shock absorbers for station wagon and hatchback)
- Wiring.
- Electric lock activator.
- Seal.
On a new car, all the parts fit perfectly, and therefore there are no questions about them. But over time, those same suspicious noises appear, and there is moisture on things left in the trunk.
WEAR OR MIS-ADJUSTMENT OF HINGES
This malfunction causes the appearance of unpleasant sounds. The trunk rattles. It is the tight connection of the trunk surface to the Priora body that makes it possible to avoid rattling while driving. Indeed, at this moment, the vibration intensifies, willy-nilly. And accordingly, if the loops are weak, “beating” begins.
Determination of malfunction: Open the lid and simply shake it on its hinges. The play will be immediately noticeable.
Remedy: As a rule, in this case, faulty Priora hinges are simply replaced. The cover (door) is removed with hinges, and new ones are installed.
TRUNK LOCK AND ITS DRIVE
With this malfunction, the luggage compartment usually does not close. But in the case of an electric activator, it does not open. That is, if the mechanical part of the device is faulty, then when you try to close the compartment, the lid does not lock. And if the fault is in the electrical component, then when you press the activation button, automatic opening does not occur.
Well, there's only one piece of advice. The easiest way is to go to the service center. Or read a separate article - Priora trunk lock.