Advantages of an acoustic shelf
Acoustic shelves VAZ 2107 ready-made version
About 30 years ago, music in the car was considered a luxury and rarely did anyone have it in their car. Music, however, with a lot of distortion, wheezing and interference flowed from the antediluvian radio, but in those days it was fashionable. Today, car audio is a real culture and a special field in which art, beauty and high technology are amazingly combined. One of the most popular and cheapest methods of improving car audio is installing an acoustic trunk shelf. In the factory configuration, instead of a real shelf, there is a decorative, standard one. It is not capable of providing the required performance and the speakers that can be placed here are very small to reproduce powerful musical chords. In addition, a weak acoustic shelf cannot provide stability, improve sound quality, enhance interior aesthetics, etc.
How to install
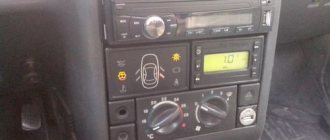
When choosing a radio, it is recommended to pay attention to products manufactured under the Pioneer brand. It is characterized by high performance characteristics and can last for a long period. Install
You can use the radio to improve the quality of music as follows:
- In the car, the radio
is fixed using a standard ISO connector. This international standard has become widespread. - When choosing a radio, you should consider its size. If they do not fit, installation will become more difficult. The seat can be changed in the machine.
- There are no problems with updating the radio if the seat has the required dimensions. All cables are fixed into a rectangular block.
- If the contacts do not fit, you can use a special adapter.
READ Replacing front springs Renault Megane 2
Install
The radio tape recorder is correct, because in most cases it has standard sizes. For cars, it is recommended to purchase appropriate wires that are well insulated.
What should an acoustic shelf be like?
Before we move on to the process of making the shelf, let's find out its structure. Any shelf must meet the following requirements in order to be called acoustic:
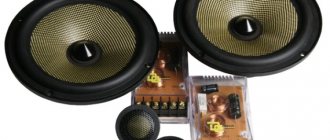
- Have sufficient rigidity of the panels to eliminate the occurrence of resonance phenomena and to firmly fix the speakers (see How to choose speakers for a car radio on your own), which sometimes have a fairly large mass;
- Ensure sufficient tightness to exclude the occurrence of an acoustic short circuit, which significantly reduces the volume level and sound quality;
- Be properly designed to minimize various resonance phenomena and eliminate rattling.
Rear acoustics VAZ 2107
Note. The last point is achieved through the use of fairly thick material (mainly plywood) with stiffening ribs. In addition, the design of the acoustic shelf should not have large flat surfaces.
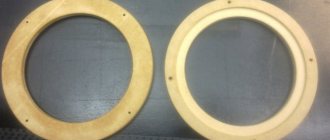
A typical acoustic shelf, either home-made or purchased, is a wooden panel (MDF/plywood) 20-25 mm thick.
Note. In some cases, shelves are made of carbon or carbon fiber.
The dimensions and shape of the acoustic shelf must follow the lines of the standard VAZ 2107 shelf to ensure accuracy and tightness of installation. In addition, the shelf must be covered with textile material (carpet), which provides an aesthetic role.
Varieties
- As a rule, an acoustic shelf is installed on the VAZ 2107 - a single panel. This is installed on all sedans, but this design is especially popular on domestic VAZ “classic” cars. The single panel is a simple shelf with holes into which the speakers are installed;
- In station wagons and hatchbacks, a prefabricated shelf is installed, consisting of 3 parts: a folding part and two side ones. The folding part is removed or raised if you need to put something in the trunk.
Acoustic shelf for hatchback
Note. Thanks to the wooden structure, it is possible to cut holes in the shelves for any speakers. This refers not only to size, but also to shape. In addition, acoustic shelves make it possible to install speakers in an open design (on the outside) or in a hidden version (on the inside). The second option involves preserving the shelf sheathing covering the holes. Acoustically, the casing is considered “transparent” and does not affect the sound quality in any way.
Shelf installation
In principle, the process of installing a shelf and interior is not complicated. But we present it too, just in case. We do the following:
- We try to ensure the tightest possible fixation, avoiding a loose fit;
- We tighten the shelf with self-tapping screws;
- We close all the cracks with sealant;
- We install the speakers during the process of making the shelf, although in a particular case it is possible to put them in after installation;
- It is better to line the inner surface of the trunk with some sound-absorbing material. This will give the best results. Ordinary foam rubber is also suitable as a material, although today many special materials that provide sound and vibration-absorbing effects are sold at quite affordable prices.
Trunk soundproofing material
Note. Working with soundproofing materials is very simple - all you need to do is cut a piece of the desired shape and size, peel off the protective film of the trunk wall, apply the adhesive part of the material and press.
An acoustic shelf made on your own, its competent and durable installation, sound insulation of the trunk - all this together will give excellent results. During the work process, it is highly advisable to watch a thematic video review, high-quality photos - materials, diagrams and drawings.
Product delivery options
Note! Below are the shipping methods available specifically for this product. Payment options may vary depending on the shipping method. Detailed information can be found on the “Delivery and Payment” page.
Parcel by Russian Post
Available payment methods:
- Cash on delivery (payment upon receipt)
- Using cards Sberbank, VTB, Post Bank, Tinkoff
- Yandex money
- QIWI
- ROBOKASSA
Shipping throughout Russia. Delivery time is from 5 to 12 days.
Parcel by Russian Post 1st class
Available payment methods:
- Cash on delivery (payment upon receipt)
- Using cards Sberbank, VTB, Post Bank, Tinkoff
- Yandex money
- QIWI
- ROBOKASSA
Shipping throughout Russia. Delivery time – from 2 to 5 days. More expensive than regular delivery by Russian Post, approximately 50%. Parcel weight up to 2.5 kg
Express Parcel EMS
Available payment methods:
- Cash on delivery (payment upon receipt)
- Using cards Sberbank, VTB, Post Bank, Tinkoff
- Yandex money
- QIWI
- ROBOKASSA
Shipping throughout Russia. Delivery time – from 3 to 7 days. More expensive than regular delivery by Russian Post, approximately 100%.
Transport companies
Available payment methods:
- Using cards Sberbank, VTB, Post Bank, Tinkoff
- Yandex money
- QIWI
- ROBOKASSA
Delivery is possible to any locality where there is a representative office of the transport company. Delivery time – from 2 to 10 days. Sending large parcels is approximately 50% more profitable than by Russian Post.
Courier delivery in Togliatti
Available payment methods:
- Cash upon receipt
- Using cards Sberbank, VTB, Post Bank, Tinkoff
- Yandex money
- QIWI
- ROBOKASSA
Delivery time from 1 to 12 hours.
Installation of good budget acoustics (speakers, radio) in VAZ 2107, 2106, 2101
Car audio, installation of good budget car acoustics - speakers (speakers), head unit (radio tape recorder) in the classic VAZ 2106.
Without a good sound system, tuning a VAZ 2106 is like a sandwich without butter. The first thing I advise you to do is soundproofing (soundproofing). Even a non-professional one significantly reduces the noise inside the car, therefore the quality of car sound improves. At the same time, spray all creaking joints of parts with liquid silicone. I did this right away - the squeaks and various rattles are very annoying...
Next, but equally important: think carefully about whether you can do everything yourself - your hands should grow at least two to three centimeters from your butt (not closer!) Budget option - 4 columns: 2 in the front doors (plus 2 beepers on top - included or not) and 2 ovals in the rear parcel shelf. In the front doors: 10 cm (4 inches), 13 cm (5.25 inches), 16 cm (6.5 inches) Rear shelf - ovals 15 * 23 cm (6 * 9 inches) In principle, you can choose it yourself - the seller will advise depending on your wallet, but there are two rules:
- Sound quality is only as good as the weakest link. Therefore, it is worth buying a head unit (radio tape recorder), speakers (speakers), etc. same price range. There is no point in buying an expensive head unit (radio tape recorder) and cheap speakers.
- It is better to take all devices from one manufacturer. They are usually played well and suit each other best.
I won’t recommend a specific brand - no one pays me for advertising radio tape recorders. Buy in a store - there is no ice on the market... A normal system can be found for 6-8 kilo rubles. Installation location of the front speakers in the VAZ 2106. Remove the door trim, having previously purchased fasteners (some will break). There are three places where it is easiest to install the speakers:
1. I haven’t tried it, although it is possible.
2. by 10, 13 cm. Any one can stand up without any problems, I set it to 16cm - it’s difficult to stand up, it’s a tight fit. I had to saw off a little bit from the bottom rim of the speaker. That is, you must first try on the diameter of the magnet and the height of the speaker. You can bend the iron of the door a little, then it will definitely fit.
In terms of sound quality, the stage is very low, there is no bass at all, when getting out of the car we hit the speaker with our foot.
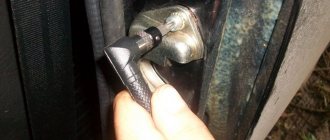
3. (with glass 07.05 it will not work) After installing the ESP, a problem arose - during installation the speaker (2) rested against the ESP rail. I had to look for another place. After much testing, I found an unexpected place - under the door handle (3). 10 cm, 13 cm will fit without problems, 16 cm fits tightly (in the picture without protection). In order for the hand to fit into the handle, the speaker protection must be flatter, so I removed the ring (in the picture below right), leaving only the left grille with the plastic.
The auto audio has become much better (the stage has risen). Why bother, the sound has become cooler. Bass appeared, and if you lowered your head, it was a complete blast. Before cutting a hole, we carefully try it on, placing the speaker on the door where the hole should be (if you’re not sure, you haven’t drunk, measure seven times and cut once, bad luck). Included with the speakers is a round piece with its dimensions (speakers), which we cut out of a piece of paper, apply to the fiberboard door (trimming) and cut a hole. I knocked out the perimeter with a chisel and hammer.