Symptoms of a faulty camshaft position sensor
The electronics that control the operation of a modern car engine receive information from a group of meters that record air flow, temperature, exhaust gas composition, and so on. In the latest generation of cars, the number of measuring elements has increased - an electromagnetic camshaft position sensor (abbreviated as DPRV) has appeared. Car enthusiasts who prefer to diagnose malfunctions on their own should familiarize themselves with the symptoms of malfunctions of the specified device and how to check it.
Meter design and location
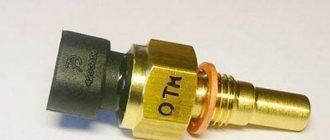
The operating principle of the DPRV is based on the Hall effect - the sensor reacts to the approach of a metal mass by changing the voltage on the signal wire. The design of the device is similar to another element - the crankshaft position detector. Inside the plastic case there is a coil where the 12 V on-board voltage is constantly supplied.
The meter is installed on the engine cylinder head in close proximity to the camshaft. The latter is equipped with a special plate or gear, whose rotation affects the DPRV. The work algorithm looks like this:
- After turning on the ignition and starting the engine, a supply voltage of 12 V is supplied to the sensor. Through the third signal wire, the element supplies the controller with a voltage of 90–95% of the original one.
- When the protrusion on the rotating part of the camshaft passes next to the DPRV housing, the voltage at the signal contact drops to 0.2–0.4 volts, depending on the design of the device and the vehicle model.
- When the voltage drops, the electronic unit clearly “sees” the valve timing, promptly supplies the fuel mixture to the engine cylinders and directs the spark discharge to the desired spark plug.
Note. On cars with 16-valve engines, 2 sensors are installed - one for each camshaft.
When the meter is faulty, the electronics are unable to control the operation of the gas distribution mechanism. In such cases, the control unit goes into error and is guided by the signals of other meters. Spark generation and fuel supply are adjusted according to the programmed program, which affects the operation of the power unit.
Characteristic symptoms of the problem
Practice shows that a malfunction of the camshaft position sensor does not lead to engine failure and immobilization of the vehicle. The engine continues to operate with some deviations that interfere with the normal operation of the car. Symptoms of DPRV failure are quite vague and similar to problems with other measuring elements:
- Unstable engine operation at idle and while driving.
- Instead of dynamic acceleration, after pressing the gas pedal, there is a series of small jerks and a sluggish increase in speed.
- The power of the power unit decreases. The effect becomes noticeable when the load increases - on a hill, sharp acceleration, while towing a trailer.
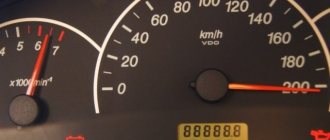
- The Check Engine light on the dashboard does not always come on. But many drivers note that if the meter is faulty, the display flashes after the crankshaft speed increases to 3000 rpm or more.
- Fuel consumption is naturally increasing.
If the measuring element is faulty, the control unit prepares and supplies an enriched air-fuel mixture to the cylinders.
This results in an increase in gasoline consumption and unstable idling. Jerks and drops in power are caused by untimely supply of a spark - the controller “does not see” the end of the compression stroke in the cylinder and cannot clearly determine the ignition timing. On various car models, additional symptoms of a malfunctioning camshaft sensor are noted:
- the engine suddenly stalls while driving, but starts without problems;
- cold starting of the engine becomes difficult;
- on cars equipped with a robotic gearbox, difficulties arise with automatic gear shifting;
- the engine “troits” - skipping ignition cycles is heard, sometimes popping sounds are observed in the exhaust manifold;
- On some cars, the power plant fails due to lack of sparking.
Reference. The service life of the element is quite long. On domestically produced cars, the resource reaches 80–100 thousand km, on imported cars – 150 thousand km. When searching for the causes of a malfunction, you can focus on the specified periods.
Driving with a broken air pressure sensor is acceptable for a short period. Jerking, rich fuel mixture and electronic errors accelerate the wear of spark plugs and engine parts. After detecting the listed symptoms, you should send the car for diagnostics or find the source of the problem yourself.
Camshaft sensor VAZ 2115: where is it located, replacement
The main purpose of the camshaft position sensor is to collect information and transmit data to the engine control unit - based on the obtained indicators, the system calculates the ignition timing and also forms the optimal air-fuel mixture ratio for injection.
The camshaft sensor on the VAZ 2115 is the main control and measuring device, without which the proper functioning of the power unit is impossible.
If the camshaft sensor stops working correctly, the engine may either not start completely, or the fuel intake system will begin to transfer mixture to 2 cylinders simultaneously.
In any case, this negatively affects the resource of the power unit, therefore, after initial signs of malfunction of this element appear, the sensor must be sent for diagnostics or completely replaced.
Typical malfunctions of the camshaft position indicator are as follows:
- There is a significant increase in fuel consumption;
- The engine idle speed is not self-regulated; the speed fluctuates noticeably;
- The dynamics of the power unit decreases, the speed increase time increases;
- The engine self-diagnosis mode does not work;
- After starting the power unit, a check mark lights up on the dashboard and disappears after a few seconds.
Note! A camshaft position sensor for a VAZ 2115 costs no more than 450 rubles. Do not neglect to replace a part if it has problems with its performance - timely replacement of the indicating device will prevent premature engine wear, as well as protect against damage to the engine electronic system and reduce fuel consumption.
How to make sure the DPRV is working?
The easiest way to check the camshaft sensor is to connect a car scanner or a computer with an installed program corresponding to the make of the car to the diagnostic connector of the car. If the element is faulty, then after starting the engine the device will display the following error codes:
- P0340 – there is no signal from the camshaft position detector;
- P0341 – valve timing does not coincide with the compression/intake strokes of the cylinder-piston group;
- P0342 – the signal level in the electrical circuit of the DPRV is too low;
- P0343 – the signal level from the meter exceeds the norm;
- P0339 – an intermittent signal is received from the sensor.
Since the vast majority of car enthusiasts do not have scanners and laptops with software at their disposal, a more affordable method is practiced - checking with a digital multimeter. Diagnostics is carried out in 3 stages:
- Visual inspection of the wiring and continuity of the circuit for breaks.
- Measuring the outgoing current at the control contact of the DPRV.
- Testing functionality by approaching a metal object.
At the first stage, you need to ensure the integrity of the wiring and reliable contact of the connecting block. Carefully inspect the supply cables for kinks, cracks and melted insulation. Testing the current-carrying conductors and searching for a break is performed with the same multimeter. Don't forget to clean the connector contacts from oxidation.
After checking the electrical wiring, proceed to diagnosing the camshaft sensor itself. Instead of standard alligator clips on the tester, you need to use wires with needles so that you don’t have to be tricky with connecting to the connecting block. Diagnostic work is carried out in the following order:
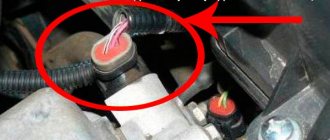
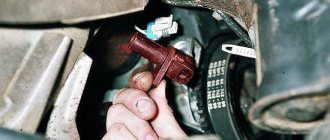
- Open the hood and look for the DPRV on the cylinder head. Usually the element is placed on the end of the engine or the side wall of the cylinder head next to it.
- Using the vehicle's electrical diagram or data for a specific sensor model, determine the location of the two power contacts and the third wire going to the controller.
- Turn on the ignition and measure the voltage between the vehicle ground and the control contact of the element (on VAZ cars this is the middle wire, marked “C”). Normal multimeter readings are at least 90% of the supply voltage, that is, 12 * 0.9 = 10.8 V.
- If the obtained values are below normal, the sensor is faulty and must be replaced. Otherwise, perform the third stage of verification.
For final diagnostics, the part will have to be removed from the engine.
Typically, the element is inserted into a hole in the cylinder head and secured with one bolt. Unscrew it, remove the DPRV and wipe off the engine oil. Do not disconnect the block with wires. After connecting the multimeter to the middle contact and ground of the car, turn on the ignition again. Bring a steel object (for example, an open-end wrench) close to the end of the element, monitoring the display readings. A working sensor should respond to the approach of metal with a voltage drop to 0.2–0.4 V.
If checking the camshaft sensor with an iron object does not change the tester readings, the DPRV should definitely be changed. When purchasing a new part, keep one thing in mind: even original spare parts can be sold without a thin O-ring. You will have to find and buy it separately or use an old seal, provided that the material is not cracked or “dull.”
Purpose of the camshaft position sensor
The basis of the sensor for determining the position of the camshaft is the Hall effect. For this reason, the DPRV is also called a Hall sensor. The magnetic field in such a sensor changes at the moment when the magnetic gap closes.
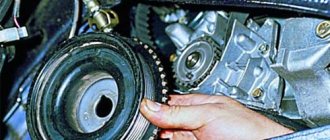
The specified gap is closed using a special steel tooth. Such a tooth (reference point) can be located on the camshaft gear. Another location for this element is the drive disk, which is mounted on the shaft.
When a tooth passes near the camshaft position sensor, voltage appears in the sensor and a signal is generated. The specified signal is sent to the ECU.
This position means that the piston is at TDC (top dead center at the end of the compression stroke). This solution allows for timely fuel injection and subsequent formation of a spark by the spark plug to ignite the working mixture.
Engines with a variable valve timing system can be equipped with Hall sensors on both the intake and exhaust camshafts. In this case, the DPRV controls the specified system.
Design and principle of operation of the camshaft position sensor
Modern engines have a rather complex design and are controlled by an electronic control unit based on sensor signals. Each sensor monitors certain parameters characterizing the operation of the motor at the current time and transmits information to the ECU. In this article we will look at one of the most important elements of the engine management system - the camshaft position sensor (CPS).
Where is the camshaft position sensor located?
On most cars, the DPRV is located in the area of the cylinder head . To find it, you need to focus on the position of the camshaft. It can be located on the left or right side of the engine. The location of the camshaft sensor varies depending on the make and model. It can usually be found near the top of the belt location or in protected parts of the wiring located at the front of the engine. Also, sometimes DPRV is installed in the rear of the cylinder head. And some automakers put it in a special compartment under the hood (an example is General Motors cars).
Below are several examples of the location of the DPRV on different machines.
DPRV for Opel AstraDPRV for VAZ 2114DPRV for VW Polo
Working principle of the camshaft position sensor
Camshaft position sensor The DF is supplied with a voltage that excites a magnetic field by the sensor coil. The setting mark, falling into this field, creates an abrupt change in it, which is perceived by the sensor and converted into an electrical impulse sent to the electronic control unit (“brains”) of the engine. The functioning of the camshaft sensor is based on the Hall effect. Devices of this type are called Hall sensors and are widely used in modern technology - chainsaws, scythes, etc.
The absence of moving parts makes them several times more reliable than, say, the use of contact ignition systems. A similar device reads the crankshaft rotation angle. The signals from both are processed by the ECU according to a given program. The camshaft sensor is responsible for promptly supplying voltage to the fuel injectors. On gasoline engines, a mark is usually made indicating the timing phase, corresponding to the location of the piston of the first cylinder at top dead center.
Camshaft sensor on a diesel engine
On a diesel engine, the camshaft position sensor works differently compared to its gasoline counterpart. Pulses from the sensor record the position of the piston at TDC not in the 1st cylinder, but in all. This solution makes it possible to achieve the most accurate determination of the position of the camshaft in relation to the crankshaft. In a diesel engine, the DPRV is responsible for the starting efficiency and stability of the power unit of this type in different operating modes.
In a diesel engine, certain design changes are present on the master disk. The teeth on this element are made for each cylinder of the internal combustion engine and are installed at a certain distance. As an example, consider a diesel engine that has 4 cylinders. In such a motor, the drive disk has 7 teeth (4 main teeth, located at an angle of 90 degrees relative to each other). There are also an additional 3 teeth to help identify the cylinders individually. These teeth are located at a certain distance from the main ones in order to accurately determine the position of the piston in each individual cylinder.
What is camshaft position sensor (camshaft position sensor)?
The cylinder head of the power unit contains 1-2 camshafts. They are equipped with special blades responsible for controlling the intake and exhaust valves. The block also contains a crankshaft, which drives the camshaft through gears, a timing belt, or a timing chain.
To determine the working cylinder, the engine ECU analyzes the rotating position of the camshaft in relation to the current position of the crankshaft. This is exactly the information that the DPRV reports. The control unit uses the received data to correct the operation of the fuel injectors and spark formation. This means that fuel economy, engine efficiency and the level of harmful emissions depend on the performance of the camshaft sensor.
Today, cars are equipped with two types of DPRVs - electromagnetic (inductive) and Hall sensors. Sensors are used to transmit a signal to the engine control unit.
The inductive sensor produces an AC signal and is easily identified by its two wires. But the Hall sensor needs additional power to create a signal, so another wire goes to it (three in total).
Self check
A common malfunction of an internal combustion engine with electronic injection is a malfunction of the camshaft position sensor. The list of signs indicating problems with the sensor includes:
- difficult starting;
- unstable engine operation;
- the engine shakes and runs intermittently;
- “check” light may light up on the instrument panel;
- The first step is to locate the DPRV mounting socket, which is installed in the cylinder head area. You must find a special O-ring at the installation site. This ring must be inspected, since damage to its integrity and other deformations can lead to sensor malfunctions.
- Additionally, you will need to inspect the sensor housing itself, as well as the gear rotor. The presence of damage or the presence of metal shavings also indicates a sensor failure.
- Next you need to examine the connector itself. Such a connector must have contacts: positive contact, negative ground, contact for signal transmission.
- Then you need to turn on the ignition, after which a voltmeter is used to measure the voltage at the positive contact of the camshaft position sensor. The tester ground must be connected to the engine ground. This voltage measurement should be similar to the voltage at the battery terminals. If there are deviations in the voltage readings compared to the power supply, we can conclude that there is a malfunction in the electrical power supply circuit of the camshaft position sensor.
- The voltage at the sensor ground is measured in a similar way. The voltage at the specified contact should be zero.
- Then you need to connect the positive and negative wires of the sensor. The middle contact of the sensor is connected through the tester. It turns out that one voltmeter probe is applied to the signal terminal of the sensor, and the other is powered to the input of the control system. To solve this problem, it is not uncommon for the signal wire to be cut and the multimeter probe to be applied to the exposed wires.
- The engine is then cranked by the starter. The working sensor will show voltage, which can range from 0.4 to 5 volts. Deviations from the specified values indicate the need to replace the DPRV.
To replace the camshaft position sensor yourself, you will need to disconnect the leads from it, remove the fasteners and remove the device from its seat. Connecting a working element is carried out in the reverse order.
The main signs by which you can determine problems with the DPKV crankshaft position sensor. Causes of failures, breakdowns, self-check.
Reasons for difficulty starting a cold engine. List of faults. What needs to be checked to diagnose and more accurately determine the problem.
The car does not start after replacing the timing belt, timing chain or performing other work on the timing mechanism drive. Main reasons, recommendations.
Operating principle of the VVT variable valve timing system. Hydraulic clutch, step control VVTL-i, VTEC. Electromagnetic timing drive.
Why does the low oil pressure warning light come on at idle or while driving? Diagnosis of the malfunction, checking the oil pressure sensor.
Purpose of the camshaft in the timing structure. Camshaft drive, valve timing. Timing belt with one or two camshafts.
What does the performance of the DPRV depend on?
The performance of the DPRV depends on the temperature conditions. Overheating will damage it. The sensor will not work if the wires through which it transmits and receives the signal are faulty, or the reference point is broken. Damage or contamination of the sensor itself plays an important role. Also, under difficult operating conditions (off-road driving, cargo transportation), the sensor may move or, even worse, a short circuit may occur. In order to eliminate sensor failure at the most inopportune moment, diagnose it and replace it after 4-5 years.
Main sensor malfunctions and their causes
The main symptoms of a malfunctioning camshaft sensor:
- the “check engine” signal comes on and driving dynamics deteriorate;
- the number of revolutions increases or decreases independently;
- a warm engine is unstable at idle speed;
- under dynamic loads, detonation occurs in the power plant;
- higher fuel consumption;
- The engine does not start.
If you notice such symptoms, check how the camshaft sensor is working. It may have failed and needs to be replaced. The causes of sensor malfunction can be: failure of the disk with reference points, displacement of the DPRV installation, short circuit inside the device, overheating of the motor.
How to check the camshaft sensor
Before checking the camshaft sensor with a tester, you need to visually inspect the sensor housing and gear rotor for damage or the presence of metal shavings. This may also be the reason for its malfunction.
Diagnostic tool
To check the camshaft sensor you will need: a multimeter/tester, pliers and a screwdriver. The multimeter/tester will guide you to perform a detailed test of the device. It will show exactly what is wrong with the sensor itself or the wiring.
Test scheme
Before starting to diagnose the sensor, examine the connector which should have: positive, negative contacts and a contact for signal transmission.
1. Turn the ignition on and check the camshaft sensor with a multimeter. Connect the tester ground to the engine ground. The measurement must correspond to the voltage readings at the battery terminals. If the readings do not match, then the sensor's power supply circuit has failed.
2. After this, measure the voltage at the sensor ground in a similar way. The voltage should be zero.
3. Connect the positive and negative wires of the camshaft sensor. Connect the middle contact through the tester. Thus, we connect one wire of the multimeter to the signal terminal of our sensor, the other needs to be powered to the input to the control system.
4. After this, crank the engine with the starter. If the sensor is working, it will show a voltage from 0.4 to 5 volts. If the values are different, the sensor should be replaced.
If, after checking, you find the cause of the breakdown in the sensor itself, do not delay replacing it. Without it, the engine will work, but in emergency mode, fuel consumption will increase significantly, since fuel is now supplied to all cylinders simultaneously.
Checking the camshaft sensor
Checking the camshaft sensor (DPRV) allows you not only to verify its functionality, but also to make sure that in engines with phased (sequential) injection, fuel is supplied in exactly the required sequence. Another name for the device is a phase sensor (it is often used by owners of domestic VAZs). The test can be performed using a multimeter in voltmeter mode and/or an oscilloscope. Checking the camshaft position sensor is simple in nature, and even a novice car enthusiast can handle it.
Cost and replacement of the camshaft sensor
If the test results finally convince you that the DPRV is faulty, it must be replaced. On many cars, changing the sensor is very simple. It all comes down to disconnecting the electrical connector, unscrewing just one mounting bolt, removing the old one and installing a new sensor. On other cars, you have to remove several engine components at the same time, otherwise you will not be able to gain access to the sensor. To assess the possibility of replacing the DPRV yourself, we advise you to study the corresponding paragraph in the repair manual for a specific car. The cost of a camshaft sensor usually ranges from $30-$100.
What is a camshaft sensor
Before moving on to the question of checking the camshaft position sensor, you need to find out what kind of device it is, what it is needed for and on what principle it works. This will help clarify the details of the audit in the future.
A camshaft sensor is a device that records the angular position of a specified shaft at a specific point in time. The information obtained with its help is transmitted to the electronic engine control unit (ECU), and on its basis this control element issues commands for fuel injection and ignition of the air-fuel mixture in each cylinder at a specific point in time.
The operation of the camshaft position sensor is based on the Hall effect. So, directly on the camshaft there is a metal tooth, which, when the shaft rotates, changes the magnetic field in a nearby sensor. This tooth is called rapper. The sensor detects a change in the magnetic field, which is converted into a low voltage electrical signal. This signal is sent to the electronic control unit.
In fact, the camshaft position sensor only registers one position, corresponding to the position of the piston of the first cylinder at top dead center. Next, phased fuel injection is performed in the firing sequence of the cylinders. Typically this is a 1-3-4-2 system.
If the camshaft sensor fails (the electronic control unit receives incorrect information from it or does not receive it at all), then it is programmed to switch to emergency mode. It involves the use of pairwise-parallel (group) fuel supply to the engine. This leads to two negative consequences:
- A slight loss of engine power, especially when driving in critical modes (acceleration, driving under load).
- Increase in fuel consumption by approximately 10...20% (depending on engine power, its design features, as well as operating conditions).
As for diesel engines, camshaft position sensors are designed similarly, but there is one difference. It lies in the fact that the sensor records the position of not only the first cylinder, but all of them. This is done due to the fact that the drive disk has a separate tooth for each cylinder.
Troubleshooting Camshaft Sensor (CMP)
If your car’s computer has detected a sensor error and turned on the “Check Engine” icon on the dashboard, then you can easily find out the “error code” yourself, which led to the appearance of the light indication on the dashboard. To do this, we advise each driver to purchase an inexpensive set of diagnostic equipment specifically for computer diagnostics. If you cannot afford to purchase this diagnostic scanner for your car, then contact any inexpensive car service center to diagnose your car, where they will read the “error code” from your car’s computer.
Once you know from the "error code" that your car has a faulty camshaft sensor or related components, you should do a few simple tests. Please remember, friends, that a fault “code” indicating a potential failure of the camshaft position sensor will not necessarily mean that the CMP sensor itself has failed on the car. After all, it is possible that the cause of the malfunction is not in the sensor itself, but in the sensor connector, or there is damage to the wires connected to it, or perhaps the components directly connected to it have failed.
True, you need to remember the following for yourself, in order to more accurately determine whether the camshaft sensor is functioning normally, you will need to carry out (possibly) quite a lot of diagnostics. It is especially necessary to take into account the following in order to check the effectiveness of the CMR sensor signal itself; in some cases, this may require special equipment, without which it will be difficult to determine the cause of the malfunction.
However, you can do a few simple checks yourself using a digital multimeter (DMM).
First, check the electrical connector at the camshaft sensor and the condition of the wires themselves. Disconnect the connector itself and check for signs of rust or dirt. For example, the same fuel. All this can interfere with good contact for the transmission of electricity.
Next, check for damage to the wires, namely, whether the wires are torn or showing signs of melting from nearby hot surfaces.
In addition, please make sure that the camshaft sensor wires do not touch the spark plugs or ignition coils, which could cause interference and prevent the sensor from transmitting the correct signal.
After the above checks, use a digital multimeter that can test alternating current (AC) voltage or direct current (DC), depending on the specific type of camshaft sensor used in your vehicle.
Also, before testing, you need to set the correct electrical parameters on the multimeter for a specific type of CPM sensor. Typically, such information is indicated in the vehicle repair and maintenance manual.
Some camshaft sensors allow you to create a splitter for the electrical circuit of the CMR sensor; this is done primarily in order to read the signal directly from the sensor itself during its operation in the car.
If the type of your sensor does not allow you to connect the multimeter wires to it, then you can simply disconnect the connector from the sensor and attach a copper wire to it, thus inserting it into each sensor connector.
You can then connect this connector back to the sensor, being careful not to short the wires themselves during testing. If you use (apply) this method, do not forget to first insulate the wires with electrical tape.
Signs of DPRV failure
There are several typical signs that indicate that the camshaft position sensor has failed. It is immediately necessary to clarify that the symptoms listed below may indicate completely different malfunctions. Therefore, it makes sense to perform additional diagnostics. So, signs of a DPRV breakdown:
- Problems with starting the engine, under any conditions - “cold”, “hot” and in other modes. This usually results in having to crank the starter longer.
- Unstable engine operation, “floating” operating and idle engine speeds.
- “Dips” in the movement of the car; when you press the accelerator pedal, it does not respond immediately, the dynamic characteristics of the car are lost (it accelerates poorly, does not pull, especially when loaded and when moving uphill).
- When the accelerator pedal is released, the engine stalls.
- Increased fuel consumption (by 10...20%).
- The Check Engine warning light on the instrument panel activates. It is necessary to perform additional diagnostics using an electronic scanner (for example, an ELM 327 device or its equivalent). In this case, typical errors regarding the operation of the sensor are numbers P0340, P0342, P0343.
In fact, the camshaft position sensor is a fairly simple and reliable device, so it rarely fails. More often, its wiring is damaged - the wires fray, the insulation on them is damaged, the so-called “chip”, the place where the sensor is connected to the car circuit, fails.
However, for cars that run on gasoline, the problems described above are not so clearly expressed. But a failed camshaft position sensor will cause many problems for owners of cars equipped with gas equipment, in particular the fourth generation. The malfunctions and problems described above can appear on such machines “in all their glory.” Therefore, owners of cars equipped with HBO are strongly recommended to diagnose and replace the sensor as quickly as possible if it is suspected of being faulty.
Location of the DPRV on the engine
To check the camshaft position sensor, you need to know where it is located. As a rule, on eight-valve engines the DPRV is usually mounted at the end of the cylinder head. On sixteen-valve engines it is also mounted on the cylinder head, usually in close proximity to the first cylinder.
As for popular domestic VAZ cars, their owners call such units phase sensors. Their location in these motors is similar. So, on eight-valve engines, the sensor is located on the left side of the cylinder head (when viewed in the direction of travel of the car). On sixteen-valve engines - on the right front part of the engine. In the latter case, the sensor is not directly visible visually; its location can only be assessed by the signal and power wires suitable for it. The VAZ 2114 phase sensor is fixed in close proximity to the air filter, near the cylinder head.
We check the camshaft sensor on a VAZ-2114 using a tester or multimeter
Many motorists have encountered the fact that the camshaft sensor, or in other words, the VAZ-2114 phase sensor, has failed.
There can be many reasons for this phenomenon, but as a rule it is wear and tear. Not all car enthusiasts are able to diagnose this sensor, although there is nothing complicated or abstruse in the process itself. Video review of the symptoms of a camshaft sensor failure on a VAZ-2114:
Methods for checking the camshaft sensor
Before testing the sensor using a multimeter or other electronic tools, you must check its mechanical integrity. In particular, it is installed in a housing with an O-ring, ensuring its secure fastening. We need to check its condition. It would also be useful to check the integrity of the sensor body, whether there are cracks or other damage on it. It is advisable to check the drive disk to see if the teeth are damaged or if there are metal shavings on the sensor body or nearby.
On the Internet you can find information that supposedly the DPRV can be determined to work by simply checking its magnetic properties. In particular, bring a small metal part to its end (the working sensitive part), which should “stick” to the sensor. In fact, this is not the case , and a non-working DPRV may or may not have magnetic properties. Accordingly, verification must be performed using other methods.
There are two main ways to test the camshaft position sensor - using an electronic multimeter and using an oscilloscope. The first method is simpler and faster, but the second is more accurate and provides more diagnostic information.
Checking the camshaft sensor with a multimeter
To check the DPRV, dismantling is necessary. This is not difficult to do; you just need to disconnect the contact group of wires from it and unscrew the fastening bolt. You will also need a small metal object (ferrous metal so that it is magnetic) to test.
Connection diagram for checking phase sensor 21110-3706040
Connection diagram for checking phase sensor 21120-3706040
The algorithm for checking the sensor with a multimeter is as follows:
- Take a multimeter and switch it to the DC voltage measurement mode in the range up to 20 V (depending on the specific multimeter model).
- Disconnect the “chip” from the sensor by unclipping the latch.
- Remove the sensor from its mounting location.
- On the “chip” of the sensor 21110-3706040 of a VAZ car (and on many others), contact “A” corresponds to ground, contact “C” is the positive wire, comes from the control relay, contact “B” is the signal wire (middle). For sensor chip 21120-3706040, contact “A” corresponds to ground, contact “B” is the positive wire from the control relay, contact “C” is the signal wire.
- Check the presence of power on the chips. To do this, you need to turn on the ignition on the car (but do not start the engine) and do this with a multimeter. If there is no power to the chips, then you need to look for the reason. This could be faulty wiring (insulation damage, broken wires), failure of the control relay, or a glitch in the electronic control system (ECU).
- Next, you need to connect the sensors for testing according to the diagrams shown in the figure.
- Apply a voltage of 13.5±0.5V to the sensor (although less is allowed, for example, 12...12.5 Volts from the battery).
- If, when power is applied to the sensor, the voltmeter detects a lack of voltage on the sensor, then this indicates either a breakdown of the sensor itself, the test can be completed and you can prepare to replace the sensor with a new one.
- Measure the voltage between the positive and signal contacts. It must be equal to at least 90% of the supply voltage (that is, if the supply voltage is 12 Volts, then the voltage at the signal contact must be at least 10.8 Volts).
- Bring a metal object prepared in advance to the end of the sensor (its signal part). Re-measure the voltage at the signal contact. It should be no more than 0.4 Volts. Remove the plate - the voltage value should be restored to 90.100% of the supply. If there are any deviations during the verification process, it means that the sensor has failed and must be replaced.
Checking the DPRV using an oscilloscope
An electronic oscilloscope helps to understand how the camshaft position sensor works and whether it produces pulses at all. Usually they use a so-called electronic oscilloscope, that is, simply a simulator program installed on a laptop or other similar device. You need to connect to the camshaft sensor and take an oscillogram from it. Ideally, there should be a smooth comb diagram with one drop-out peak that corresponds to the rapper passing through the sensor. If the oscillogram has a different shape, additional verification is needed.
When diagnosing the camshaft sensor of Nissan cars (in particular, Nissan Almera) with an oscilloscope, the shape of the oscillogram will be different. It will not be smooth, but in the form of 3 impulses, then a space, then 4 impulses - a space, 2 impulses - a space and one impulse - a space. For engines from this automaker, this feature is the norm.
How to check the crankshaft sensor
Before you start checking the synchronization sensor with instruments, you must mark its initial position on the engine. After removing the electronic device, inspect it for external damage. If the sensor is dirty, it is necessary to clean it, including removing corrosion from the contacts, if any, using gasoline or alcohol. If there is no external damage to the sensor, you can begin to diagnose it using instruments.
Checking the crankshaft sensor for resistance
The simplest, but also least reliable, way to check the crankshaft sensor is to measure its resistance. The test is carried out using an ohmmeter, which is found in a modern multimeter. Based on the test results, it is possible to determine the resistance of the sensor inductor.
To check with a multimeter, you need to connect its probes to the sensor terminals. Having measured the resistance of the inductor in this way, you need to compare it with the ideal values for a sensor of a specific car brand. If such data could not be detected, it is generally accepted that the sensor is working if its resistance is in the range from 550 to 750 Ohms.
Checking the key parameters of the crankshaft sensor
The second method of diagnosing a crankshaft sensor involves measuring several of its parameters using a number of instruments:
- Ohmmeter. Resistance is measured in the same way as described in the instructions above, and the result obtained should be in the range from 550 to 750 Ohms;
- Inductance meter. With its help, you will need to check the inductance of the sensor, which on a working device should be at a level from 200 to 400 mH;
- Voltmeter and megohmmeter. With their help, the insulation resistance is measured, which at a voltage of 500 Volts should not exceed 20 MOhm.
Please note that to take ideal readings, it is necessary to carry out the procedure in a room where the temperature is in the range of 20 to 22 degrees.
Important: If during repair or diagnostics of the sensor the synchronization disk was accidentally magnetized, it can be demagnetized using a network transformer.
Checking the crankshaft sensor with an oscilloscope
In service centers, to diagnose the parameters of the synchronization sensor, they use an oscilloscope, which allows you to measure the stability of the characteristics. In the final diagrams, you can clearly see dips in signal reception, which indicate problems with the sensor or breakdown of the synchrodisk teeth.
When installing the sensor after diagnostics, it is important to use the marks that were removed when dismantling it. You should also remember the distance of 0.5-1.5 mm between its core and the synchronization disk.
Related Posts
Oil pressure sensor: operating principle and how to check
Oil pressure is on: the main reasons for the sensor to operate, diagnostics, solution to the problem
The brake light on the instrument panel is on: causes, diagnosis, solution to the problem
- Peugeot
- Car accessories
- Battery
- Knowledge base
- VAZ
- Generator
- Sensors Oil pressure sensor
- Mass air flow sensor
- Shock sensors
- Other sensors
- Engine
- Automatic
- Brake lights
- Indicators
- Antifreeze
- Gas tank
- Engine
#OkayDrive © 2021 A car is simple, and we will prove it. Articles on car repair and operation, as well as useful tips for car enthusiasts.
Unauthorized use of materials posted on the site is prohibited by copyright law. Using materials reference to the site is obligatory. Cookie Policy Personal Data Processing Policy
Good afternoon everyone! We check the camshaft position sensor (CPR).
Disconnect the connector, turn on the ignition, check the circuit.
We connect the DPRV directly to the battery. We connect the tester to the idle contact.
We check the DPRV. We bring a metal object to the DPRV magnet.
The value on the tester should change. In our case it does not change. Diagnosis: DPRV is dead (presumed).
Consequences of DPRV malfunction:
1. Difficulty starting the engine, errors p0340, p0341.
2. With further operation, transmission errors appear (codes are not saved), traction disappears (the car goes into a limited but not emergency mode of operation).
3. When resetting errors - return to point 1, traction appears.
PS The material is provided for thought (this is not dogma). The DPRV had not been replaced with a working one at the time of submission of the material. Confirmations or refutations of this material will be provided later. Anyone who wishes can check it themselves: on a working car, disconnect the DPRV from the on-board network and operate the car.
Hall testing by testers is original! God will provide food, right? Stop creating insanity here, seriously. P0314 in the case of Bosch EDC16C39 DOES NOT RECORD when the camshaft sensors are faulty. Registration conditions are DIFFERENT. I should at least read the manual, writer