24.12.2012
DPKV
DPKV is one of the most important car sensors, because Without it, the car simply won’t start.
Let me remind you that the Crankshaft Position Sensor (CPS) transmits the received current pulse to the controller, which in turn regulates engine operation. Read more about DPKV in the article: DPKV on VAZ. Operating principle, signs of malfunction.
The sensor is a simple mechanism, so there is nothing to break there. But nevertheless, nothing lasts forever, and the sensor fails.
How to repair DPKV?
Unfortunately, DPKV cannot be repaired, BUT! Most often, the fault occurs not in the sensor itself, but in the sensor circuit. In other words, if the DPKV is broken, then it needs to be replaced with a new one, but before replacing it, you need to check the wiring suitable for the sensor.
If the sensor is faulty, the on-board computer or diagnostics generates the following errors:
- Error 0335 - incorrect DPKV signal.
- Error 0336 – Crankshaft position sensor signal error.
- Most often, wires break in the connector area. Moreover, the insulation remains unharmed, so it will not be possible to determine a wire break by eye. In this case, we do the following: remove the wiring block from the sensor, and try to pull out the wires one by one, applying a little force. If a break occurs, you will tear the insulation and pull out a piece of the broken wire.
- DMRV malfunction. Yes, Yes, That's it! If the mass air flow sensor is faulty, error (0335) of the crankshaft position sensor appears when the ignition is turned on. The fact is that when we turn the ignition key, the DPKV diagnostic process starts using the air flow signal.
- Also, error 0335 can occur as a result of pulse noise created by the generator wiring.
- The damper rubber on the pulley, or the pulley itself, has worn out. In this case, the pulley will rotate in a figure eight.
- The teeth on the pulley have broken, so the sensor receives an impulse that is incompatible with engine operation.
- Malfunction of the sensor itself - check the DPKV (How to check and replace the DPKV?).
On a VAZ 2114, error P0335 indicates that there is a problem in the crankshaft position sensor circuit, as a result of which it sends an incorrect signal to the computer.
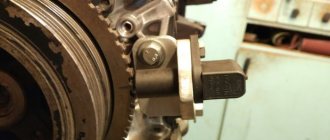
The crankshaft position sensor (CPS) is located in the timing belt area, next to the crankshaft pulley and is bolted to the oil pump cover. The crankshaft sensor transmits information to the engine control unit about the position of the crankshaft at any time. This information is used by the electronics to determine when to turn on the spark plugs and deliver fuel to the rail in the required quantity and time. In this article, you will learn what causes this error, what problems arise due to a malfunctioning measuring device, and how to troubleshoot error 0335.
In the picture: 1) fastening bolt, 2) PCV sensor.
How to Troubleshoot or Reset Trouble Code P0335
Some suggested steps to troubleshoot and fix error code P0335:
- Visually inspect the electrical wires and connectors of the crankshaft and camshaft position sensors.
- Check the level, condition and viscosity of the engine oil.
- Read all stored data and error codes using an OBD-II scanner. To determine when and under what circumstances the error occurred.
- Clear the error codes from the ECM and test drive the vehicle to see if the P0335 code appears again.
- Inspect drives, belts or timing chains for wear.
- If no problem is found, continue diagnosing by following the vehicle manufacturer's procedure.
[stextbox When diagnosing and eliminating this error, you must follow the recommendations of the car manufacturer. Failure to do so may result in severe engine damage and may result in hasty replacement of faulty components.
What does P0335 mean?
Error P0335 on a VAZ 2114 indicates that there is a malfunction in the crankshaft position sensor (CPS) circuit, as a result of which the computer receives an erroneous signal. The consequence of this error may be the untimely appearance of the spark, which leads to misfire.
- Error 8 on VAZ 2114 (8 valves) - what it means, symptoms, solutions
If the sensor is faulty, the following problems may occur:
- sparking is disrupted, a spark does not occur or occurs late;
- fuel is not supplied in a timely manner, or is not supplied at all;
- engine operation is disrupted.
Crankshaft and camshaft
- code 0335
indicates a malfunction of the crankshaft position sensor.
Therefore, when you see 0335
, you need to check whether the signal is coming from this sensor.
If you find that the signal is weak, you can help by changing the air flow if it is excessive (above the maximum). After this, error 0335
should disappear; - When you see error 0340, you know that the camshaft position sensor is most likely faulty. Although in fact, even if 0340 is displayed, the camshaft itself may be in good condition, the car is working as usual. But when the numbers 0340 do not disappear while the engine is running, this unit should be carefully inspected. Crankshaft position sensor
Causes of error P0335
If the rubber on the pulley is worn out, dampening unwanted vibrations, or the pulley itself is deformed, then it will rotate, making a figure eight, and creating excess vibration. DPKV calculates the teeth on the pulley, forming 58 impulses, and therefore broken teeth are also sources of unwanted impulses and vibrations.
Slipping or breaking of the timing belt is also a consequence of an error.
Code 0335 appears when the resistance in the DPKV changes, which in turn can change with increasing temperature. The error is also caused by electrical impulse noise generated in the generator wires.
Very rarely, an error code appears due to a faulty ECU. Therefore, the electronic control unit is checked when it is ensured that all systems are working properly, but the error continues to be displayed.
To find out the cause of error 0335 in a VAZ 2114, you need to have a special diagnostic scanner and a digital multimeter to check the electrical circuit in the DPKV and the sensor itself.
Possible reasons for the check function to light up
The “CHECK” signal is located in the very center of the instrument cluster, where the driver can quickly pay attention to it.
This function is responsible for the operation of the engine and if it signals, then there may be problems in the operation of this particular unit. Of course, this is scary for any motorist, because repairing the power unit is complex and expensive. But don’t immediately get scared and panic, the reason may be petty.
So, let’s look at what are the reasons why the “CHECK” function on the Lada Grant came on:
- If the indicator lights up when you start the engine, then don’t worry, everything works.
- If the “CHECK” lights up and signals for a long time, then, first of all, it is necessary to make a diagnosis, and only then worry.
- If “CHECK” is heard while driving, this may mean that there is insufficient oil level in the engine ( p0523 - error when the oil pressure sensor is faulty ).
- The “CHECK” function is on - it’s worth checking the engine for signs of depressurization or oil leakage.
- If the above reasons do not work, but the “CHECK” is lit, then this may be a signal that the spark plug has failed or low-quality fuel has been filled.
When the “CHECK” function lights up, it indicates that something is wrong with the engine and it is worth carrying out diagnostics before taking other actions.
Elimination methods
Let's consider some options for eliminating the causes of the “CHECK” function fire on the Lada Grant:
- Bad fuel. The elimination method is quite simple - drain the low-quality fuel and fill in new one. Let the engine run a little and turn it off. If everything is normal, then upon startup, the signal will disappear. AvtoVAZ recommends refueling with 95 gasoline, but it often causes errors and complaints about its quality. What kind of gasoline do you fill up with, 92 or 95?
- Spark plugs and high-voltage wires. Unscrew all spark plugs and check the gaps and the presence of a spark. Replace faulty spark plugs and wires.
Engine 21116 (high-voltage wires, oil dipstick)
4 bolts securing the plastic fuel pump cover under the rear seat
The faults that you can fix yourself are indicated, but if nothing works, you should contact a car service.
Underwater rocks
If the “CHECK” light comes on on the Lada Grant, then do not panic. Often on cars the signal is supplied from a common ECU, which, like any computer, can malfunction. This may be caused by a short circuit or replacement of electrical circuit components. Therefore, errors occur in the electronic control unit, which can serve as a “CHECK” signal.
The ECU in Grant is not located very well, and if your check light came on during or after rain, then water could have gotten into it due to design features.
This problem can be treated quite simply. The ECU itself needs to be connected to a software laptop and errors in the system should be corrected or outdated firmware changed. It is best to entrust this operation to specialists who know how it is done.
Resetting an error without using an adapter (collective farm method)
If you are sure that the check engine light is “temporary”, that is, the quality of gasoline is poor, or the spark plug was faulty, which has already been replaced with a working one, then the check engine light can be reset manually without using an adapter; there are two ways.
- To do this, disconnect the terminal for five minutes , the memory in the electronic engine control unit (ECU) will be reset, and the on-board computer readings will also be reset.
- There is a second way, you just need to remove the cigarette lighter fuse ; Grant's design engineers installed an immobilizer on it.
How to fix P0335?
Inspect the flywheel teeth and timing belt. Replace it if necessary.
Disconnect the harness and inspect all wires connected to the DPKV for damage, make sure that all connections are intact. Test the wires with a multimeter. To do this, first turn on the ignition, but do not start the engine. Touch the black wire of the multimeter to the body of the machine, and examine the connector pins one by one with the red wire. There should be a voltage of 5 V on one of the connectors. If you do not find such a connector, then the harness is damaged.
- VAZ 2114: error P0300 - what it means, causes, symptoms and solutions
The DPKV itself fails rarely. Typically, code 0335 indicates a malfunction not in the sensor itself, but in the circuit associated with it. But if it fails, it cannot be repaired. Unscrew the single bolt and pull out the device. Inspect it for metal shavings and other damage. The sensor may have failed and needs to be replaced.
If the device is externally intact, check it with a multimeter, having previously set the ohmmeter mode. Infinity will indicate a break in the network, and 0 indicates a short circuit. The ohmmeter readings must correspond to those indicated in the technical passport. If there are deviations, then the sensor has a problem.
If error 0335 is not corrected in time, it can lead to more serious problems in the engine. And in order not to end up with a stalled engine somewhere where there are no emergency services, it is necessary, when information about a DPKV error appears, to diagnose the car yourself, or go to a car service center, where the faults will be eliminated quickly and professionally.
Code P0335 indicates a faulty crankshaft position sensor (bank 1) circuit. This is one of the most important sensors in many engines. The malfunction may affect the firing timing of the spark plug, and thus may lead to misfire.
Correcting the P0335 trouble code is very important and should be done as quickly as possible. Read below to learn how to diagnose and fix this trouble code.
Content
Symptoms of malfunction
The main driver symptom of P0335 is the MIL (Malfunction Indicator Light). It is also called Check engine or simply “check light”.
They can also appear as:
- The “Check engine” warning light on the control panel will light up.
- The motor can operate, but with reduced performance (drop in power).
- The engine may crank but will not start.
- The car stalls or has difficulty starting.
- Jerking/misfire at idle or under load.
- Increased fuel consumption.
How to Diagnose Code P0335
Required Tools
- Diagnostic scanner or adapter ELM327 with Torque program.
- Digital multimeter.
Step-by-step instruction
- If the engine starts, use the OBD2 scan tool to check if you are getting an RPM reading.
- Inspect the harness and all wires connected to the crankshaft sensor for damage. Make sure all connections are in order.
- Check the ring gear and timing chain (belt) for damage. Replace or repair as necessary.
- Remove the DPKV and inspect the tip for metal shavings or other damage. You may be able to remove metal shavings, but if the sensor is severely damaged, it should be replaced.
- Check the sensor wiring with a digital multimeter set to constant voltage. To do this, disconnect the connector. Turn on the ignition without starting the engine and touch the black lead of the multimeter to the body. Touch the red wire to the pins on the connector one by one. One of them should usually have a reference voltage of 5 volts. If not, the wiring harness is damaged.
- If the wiring is ok, use a multimeter to check the sensor. Leave the connector disconnected and remove the sensor. Set the multimeter to “Ohm” and measure the resistance of the DPKV. Infinity indicates an open, and zero indicates a short circuit.
- Check the resistance of the crankshaft position sensor. The car repair manual states within what limits the resistance should be. If the reading is outside the range, the sensor is faulty.
Contents: 1. Diagnostics1.1 Self-diagnosis of VAZ 21141.2 Check using diagnostic equipment2. Main error codes VAZ 2114 injector: decoding 2.1 Exhaust system - 00002.2 Air line defects - 01002.3 Error codes related to fuel supply - 0200 2.4 On-board computer error codes indicating breakdowns in the ignition system - 03002.5 Additional attachment that does not have a direct effect on motor – 04002.6 Failure, malfunctions in the speed control system SU – 05002.7 On-board network of auxiliary or main equipment – 06002.8 Auxiliary systems – 10003 How to fix the breakdown4. Bottom line
The Russian automaker VAZ produces a sufficient range of cars. Brand models are in great demand among domestic car enthusiasts and in the CIS countries. The popularity is due to the moderate cost and cheap repair of cars. However, problems happen with any vehicle and the plant’s products are no exception. Error codes for the VAZ 2114 injector can guide the motorist regarding the area of the breakdown and help in troubleshooting the problems.
Diagnosis and problem solving
Begin your diagnosis by visually inspecting all system-related wiring harnesses and connectors. Inspect electrical circuits, sensors, and connectors that are contaminated with engine oil, coolant, or power steering fluid.
Petroleum-based liquids are known to corrode the protective insulation of wires and cause short circuits or open circuits. This may cause the P0335 code to appear.
Multimeter test
Then connect the scanner to the vehicle's diagnostic port and get all the stored trouble codes. After this, continue testing the voltage and ground signals. Most models use five volt power. Also check the ground signal and the third wire, the control circuit, should be sending a signal to the PCM.
Disconnect the electrical connector from the CKP sensor and test it according to the manufacturer's recommendations using a multimeter. Replace the sensor if resistance values do not meet manufacturer specifications. If all CKP circuit resistance values are within specifications, proceed to the next step.
Checking with an oscilloscope
Connect the positive test lead of the oscilloscope to the signal lead of the CKP harness, and connect the negative lead to the CKP ground circuit. Select the appropriate voltage setting on the oscilloscope and turn it on.
With the transmission in park or neutral and the engine idling, observe the waveform on an oscilloscope. Focus on unexpected spikes or glitches in the waveform pattern.
If you notice any spikes or glitches, gently move the wiring harness and connector while looking at the waveform diagram. You are trying to determine whether the problem is a weak connection or a faulty CKP.
Notice the voltage blocks in the waveform pattern. If some of them are missing, this indicates a broken or worn toothed ring. Also check the CKP magnetic tip for excessive metal debris and clean if necessary. If the waveform is normal, proceed to the next step.
Now reconnect the oscilloscope test leads to the same circuits near the PCM connector and observe the waveform pattern. If an abnormality is detected, there is most likely an open or short circuit between the CKP connector and the PCM connector.
If no open or shorted circuits are found, the P0335 code may be due to a faulty PCM or its programming.
Diagnostics
There are two ways to set error codes for VAZ 2114 injector 8 valves. However, each method has unique advantages and disadvantages.
Self-diagnosis of VAZ 2114: error codes and their interpretation
The self-diagnosis method does not require the driver to have complex instruments or additional units. To complete the procedure, the car itself is enough.
The standard sequence of actions looks like this.
- Press the odometer reset button.
- Turn the ignition key to position No. 1 (turn on the on-board electrics).
- Release the mileage reset button. After this, the instrument arrows will make a full revolution and return to their place.
- Press the reset button a second time and release. The command displays the firmware version indicator.
- Repeat step No. 4 - this will display error codes on the on-board computer.
If the sequence of actions is performed correctly, all indicators will light up and the display will show a two-digit fault code.
Note!
A failure signal may be a lack of response from the indicator. In this case, it is necessary to check the circuit coming from the device.
The most common error codes for the VAZ 2114 panel, occurring in 90% of cases:
- 1 – microprocessor failure, flashing required;
- 2 – error code 2 VAZ 2114 indicates that there is an interruption or disruption in the wiring of the float sensor inside the gas tank;
- 4 – electrical wiring short circuit, voltage limit exceeded;
- 8 – error code 8 on the VAZ 2114 indicates a drop in voltage in the network, the battery may have run out;
- 12 – in the VAZ 2114, error code 12 indicates that the warning lamp is not functioning properly;
- 13 – open circuit of the oxygen sensor;
- 14 – error code 14 on the VAZ 2114 warns the driver that the engine has overheated or the antifreeze temperature sensor has shorted;
- 15 – short circuit or DTOZh has failed;
- 16 – exceeding the permissible voltage limit of the on-board network;
- 17 – BS voltage has dropped critically, battery discharge is allowed;
- 19 – DPKV does not respond or there is a short circuit on the line;
- 21-22 – incorrect response of the TPS, possible short circuit or wiring break;
- 23/25 – short circuit of the throttle position sensor;
- 24 – speedometer failure, power cords may be broken;
- 27/28 – CO sensor worn out or broken;
- 33/34 – problems with the mass air flow sensor, possible power loss or short circuit;
- 35 – IAC sensor has failed, can only be treated by complete replacement;
- 41 – incorrect phase distribution covered or shorted;
- 42 – the circuit has failed or the wires of the electronic ignition unit have been broken;
- 43 – mixture detonation sensor is faulty;
- 44/45 – there is a violation of the fuel supply to the engine, the system may trip, jerks appear during acceleration, and it picks up speed poorly;
- 51 – ROM is acting up;
- 52 – similar for RAM;
- 53 – potentiometer failure;
- 54 – break in wiring for octane corrector;
- 55 – excessive leanness of the mixture during acceleration;
- 61 – interruptions in the operation of the lambda probe.
In some cases, errors may be superimposed on each other if the failure is similar. For example, if errors 1 and 4 intersect, the panel will indicate "5".
It is important to know that after viewing, VAZ 2114/2115 error codes do not disappear on their own after repairs are performed. They need to be forced reset. To complete the work you will need a simple sequence of actions:
- turn on the car ignition;
- remove the terminals from the battery;
- wait 20-30 seconds;
- return the clamps to their place.
This also needs to be done if you are planning a trip to a service station. Having discovered the instructions from the on-board computer, the technicians will correct these problems, which will definitely be more expensive.
The disadvantages of an independent procedure include the low accuracy of the data. On-board diagnostics only show the general direction vector where the fault should be looked for.
Check using diagnostic equipment
You can identify error codes for VAZ 2115 and 2114 using a laptop with a special program. The tool is connected to the vehicle's test socket through a set of adapters. The wizard configures the software, and after diagnostics, one or more faults will be displayed on the computer screen in the form of a five-digit code.
The first part is the letter:
- B – damage to body panels;
- C – chassis or suspension malfunction;
- P – electrical, engine or transmission disorder;
- U – damage to the terminal for information exchange.
The second part is a single digit:
- 0 – typical indicator according to the SAE standard;
- 1/2 – conveyor failure code;
- 3 – reserve.
The next element is the breakdown group indicator:
- 1/2 – defect in the fuel/air line;
- 3 – ignition and related elements;
- 4 – catalyst;
- 5 – XO of the power plant;
- 6 – ECM and related wiring;
- 7/8 – transmission blocks.
The final two numbers point directly to the problem itself.
Basic error codes for VAZ 2114 injector: decoding
Note!
The table is also relevant for version 2115.
Exhaust system – 0000
- 30 – open circuit of the oxygen sensor heater to the catalytic converter;
- 31 – also with a short circuit to the car body;
- 32 – similar with a short circuit to 12V;
- 36-38 – the same value as 30 only for the output sensor.
Air line defects – 0100
- 102/103 – Mass air flow sensor open circuit or signal violation;
- 112/113 – sensor lines t˚ overboard, impulse violation;
- 116 – engine overheating;
- 117/118 – damage to the DTOZH circuit;
- 122/123 – TPS line, short circuit or insulation failure;
- 130 – failure of the oxygen sensor in front of the catalyst;
- 131/132 – similar element, signal level violation;
- 133 – slow response of DK1 to commands;
- 134 – break in the power cable DK1;
- 136 – DK2 is broken;
- 137/138 – short circuit or violation of wiring DK2;
- 140 – fuse DK2 burned out;
- 141 – the heater of the same device is broken or damaged;
- 171/172 – excessively lean or enriched fuel mixture.
Error codes VAZ 2114 1.6 liters related to fuel supply - 0200
- 201/204 – break in the injector control line for all injectors in series;
- 217 – motor overheating;
- 230 – the fuel pump has failed or the corresponding relay has burned out;
- 261/264/267/270 – short circuit of the injector control circuit at +12 V, respectively, for each insert;
- 263/266/269/272 – failure or defect of the injector driver for each in series;
- 262/265/268/271 – Short circuit of highways to the car body.
Error codes on the VAZ 2114 on-board computer indicating a breakdown in the ignition system - 0300
- 300 – there are misfires;
- 301-304 – similarly for each cylinder, respectively;
- 326-328 – DDS is broken or there is no signal;
- 335-338 – failure, short circuit or interruption of the DPKV wiring;
- 342/343/346 – malfunction of the phase distribution sensor;
- 351-354 – open circuit for all pistons in series;
- 363 – the mixture in the cylinders does not ignite, emergency fuel supply cut-off.
Additional attachment that does not have a direct effect on the motor – 0400
- 422 – the catalyst may have clogged or the exhaust gas flow rate has dropped critically;
- 441 – failure of power supply to the adsorber purge valve;
- 444 – power failure above the specified element;
- 445 – short circuit of the gearbox to the car body;
- 480 – power wires to the main radiator cooler are damaged;
- 481 – failure of the coolant fan control circuit No. 2.
Failure, malfunctions in the SU speed control system – 0500
- 500 – speedometer sensor is broken;
- 506/507 – low or high speed of the vehicle;
- 511 – XX regulator – lines from the relay and ECU are interrupted;
- 560 – the battery is low or the power cable is broken.
- 562/563 – Short circuit on on-board wiring.
On-board network of auxiliary or main equipment – 0600
- 601 – ECM, ROM error;
- 615 – secondary starter relay, wiring damage;
- 616/617 – also with short circuit to ground or 12V;
- 627 – fuel pump control relay, possible line break;
- 628/629 – similar with a short circuit to the body or on-board system;
- 645-647 – compressor clutch, damage to the wiring with contact with the housing or other cables;
- 650 – the “Check Engine” lamp is broken, check the engine, there may be damage to the wiring;
- 654 – tachometer failed;
- 685-687 – malfunction of the main engine control relay, complete replacement of the part is required;
- 691/692 – problems with the main cooling fan relay.
Auxiliary systems – 1000
- 102 – breakdown of heater DK1;
- 115 – failure or malfunction of the above device;
- 123/124 – violation, too rich/lean mixture at idle;
- 127/128 – similar, only for partial load on the internal combustion engine;
- 135 – rupture of heating line DK1;
- 136/137 – incorrect fuel supply at low engine load, the throttle drive may be malfunctioning;
- 140 – discrepancy between measured and actual load;
- 141 – failure of heater DK2;
- 171/172 – incorrect information comes from the potentiometer;
- 301-304 – the ignition in the cylinder does not work correctly, consistently for all combustion chambers;
- 386 – incorrect sequence of testing the detonation channel;
- 410/425/426 – wiring of the canister purge flap, short circuit or line damage;
- 500 – the fuel pump relay line is damaged;
- 501/502 – similarly with a short circuit to the body or wiring;
- 509/513/514 – control center of the XX regulator, open or short circuit on board or 12V;
- 541 – damage to the wire of the BN relay, possible oxidation of the terminal;
- 570 – break in immobilizer control cables;
- 602 – no power to the ECM, oxidation of the pads is allowed;
- 606 – the bump sensor is broken, the part needs to be replaced;
- 616/617 – similarly with a change in signal level, there may be a short circuit inside the device;
- 2301/2303/2305/2307 - the ignition coils are shorted to 12 volts, in series for each piston.
Important!
Only the most popular error codes for the dashboard of the VAZ 2114 and similar models are listed here. There are other indices, but due to their low prevalence they are not mentioned.
How to fix the problem
After diagnosis, the problem should be repaired. When reading a signal, it is necessary to check the circuit and devices following it. The most accurate method is to replace the damaged part with a known good one (new). This will eliminate the possibility of incorrect repairs. If the device is in working condition, the lines are checked; usually a primitive test is sufficient. However, if the control unit or relay fails, you will need a special tester and the ability to use it.
Separately, it is necessary to take into account that factory terminals and blocks become loose and oxidize over time. If the contact on the hitch deteriorates, the on-board computer or laptop program will say that the part is damaged, even if it is not.
You can prevent this from happening in the following way.
- Check the condition of the connectors once every 5000 km. The pads should sit in place tightly, without play. If necessary, elements must be replaced with new ones.
- Check plug connectors two to three times a year for oxidation. Oxides reduce the flow of electricity through on-board wiring, which leads to incorrect display of information.
- Experts recommend purchasing and using oil for electrical terminals. The liquid is similar in composition to transformer lubricants. The formula prevents water and oxygen from reaching metals, which prevents them from rusting.
Important!
You can diagnose VAZ 2114 error codes on the instrument panel and ECU yourself, only if you understand the essence of the process. If you don’t have confidence in your own abilities, it is recommended to contact a qualified technician.
Error 8 VAZ 2110
Error codes/test on instrument cluster (Kalina/Priora)
- The ignition is turned off. Battery included.
- Press the “Reset” control button and, holding it pressed, turn on the ignition. All positions of the familiar areas (segments) should light up on the LCD—LCD control.
- Press any of the control buttons. The LCD should display the program version (Ver 1.0).
- Press any of the control buttons. The following error codes (if any) should be displayed on the positions of the first and second lines of the LCD.
- Press the “Reset” control button and hold it for no more than 3 seconds. (maybe a typo, I need more than 3c). Error codes should clear to zero.
- Press any of the control buttons. All positions of the familiar areas (segments) should light up on the LCD—LCD control.
- 2-increased voltage of the on-board network;
- 3-fuel level sensor error (if a break in the sensor circuit is detected within 20s);
- 4-error of the coolant temperature sensor (if an open circuit of the sensor is detected within 20s);
- 5-outside temperature sensor error (if there are no sensor readings within 20s, indication on the LCD is “-C”);
- 6-engine overheating (the criterion for triggering the acoustic alarm has been met);
- 7-emergency oil pressure (the criterion for triggering the acoustic alarm is met);
- 8-defect of the brake system (the criterion for triggering the acoustic alarm is met);
- The 9-battery is discharged (the criterion for triggering the acoustic alarm is met);
- E-determination of an error in a data packet stored in EEPROM.
From yourself if you do not press any control buttons for about 15-30 seconds. the panel enters the operating state. “Reset” is the one that resets the daily mileage.
Let us remind you that you can read engine errors without the help of specialists; you just need to install an on-board computer.
