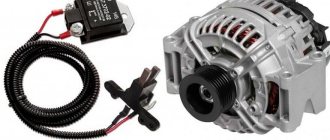
Probably, many owners of domestic cars are not satisfied with the performance reserve of car generators. And, unfortunately, one of the most popular cars, the VAZ-2110, was no exception and ended up on the so-called black list. Therefore, many car owners are concerned about an important question: how can you independently increase the voltage of the VAZ-2110 generator and how labor-intensive is this process?
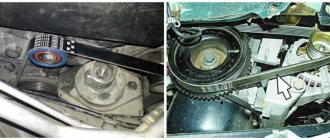
Modification of the VAZ 2110 generator
Refinement of the VAZ 2110 generator is considered a very useful improvement of the VAZ 2110, especially if you take into account the fact that many motorists, in recent times, are inclined to install additional units that consume electricity on their cars.
You can increase the voltage at the generator output in a variety of ways. Here, as they say, who is on what is much. For example, you can purchase and install a new, more powerful generator. Modification of the VAZ 2110 generator can be solved in another way. It is, of course, cheaper, although you will still have to spend a little, but it is also more labor-intensive. The charging voltage of the VAZ 2110 generator must correspond to that stated in the instructions and be 13.9 - 14.4 volts. To increase the efficiency of the generator, you can, for example, install a KD202V diode or a 2D219B diode in it, but it must be taken into account that the breakdown voltage must correspond to 20V, and the current must not be lower than 5A.
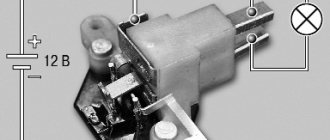
To modify the generator of a VAZ 2110 car, you can use the installation of a regulator from a foreign car with a voltage of 14.5V on the standard voltage regulator. It is necessary to remove the “pill” from the standard voltage regulator and install a “pill” from a foreign car in its place. All the work consists of proper installation and connection. It is necessary to carefully solder the output contacts of the “pill” of the foreign car to the standard body of the voltage regulator. I think you know how to do this as well as we do, but the conclusions will have to be adjusted a little. Then, you need to screw the tablet to the regulator body. All metal connections must be “sealed” with paint (screws, nuts) so that the structure does not fall apart during the vibration of the generator.
As a result of this modification of the VAZ 2110 generator, we increased its charging voltage to 14.5V. There are probably other methods of modifying the generator, for example installing an additional generator. But we'll talk about this next time.
Electrical diagrams and indicators
To increase the voltage even more, at least to 14 volts, it is necessary to install a diode in circuit D, the voltage regulator. Any diode with a breakdown voltage of 20V and a current of at least 5A is suitable. The voltage drop is preferably no more than 0.6-0.7V. The 2D219B diode is excellent.
| 2D219A | 15 | 10 | 0.6(10A) | 20 (15V) | KD-11 |
| 2D219B | 20 | 10 | 0.6(10A) | 20 (20V) | KD-11 |
| 2D219V | 15 | 10 | 0.45(10A) | 20 (15V) | KD-11 |
| 2D219G | 20 | 10 | 0.45(10A) | 20 (20V) | KD-11 |
Let's look at the circuit diagrams of diodes:
Modification of the VAZ 2110 generator (installation of a diode). When there is something to do
Installing additional equipment on a car requires increasing the on-board voltage, so modifying the VAZ 2110 generator (installing a diode) will be of interest to many.
Modern domestic cars are increasingly equipped with additional equipment with each model. If the first VAZ models had generators providing a current of 40 amperes, today 80, 90, or even 100 amperes are becoming insufficient. Many owners independently install additional power consumers, such as car subwoofers, fog lights and the like.
A few important points
If during the operation of the car the owner sees that the above actions did not give the desired result, then an additional device will have to be installed. Using the latter, you can restore normal operation of automotive electrical systems. An additional unit is most often required by those owners who often prefer to go on holiday outside the city or spend a lot of time behind the wheel of a car, using various electrical appliances.
How to increase the voltage of a standard VAZ-2110 generator or install an additional device can be seen in numerous videos offered by professionals and car repair technicians. The process of upgrading a generator is completely simple, and if desired, every car owner can carry it out correctly, saving a lot of money, taking into account the above recommendations and advice.
Source: ladaautos.ru
A few words about its structure
The generator set of this car is a fairly reliable device that can withstand vibration loads and temperature changes in the engine compartment. She is also not afraid of moisture and dirt getting in while driving. Its performance should be stable at any engine speed.
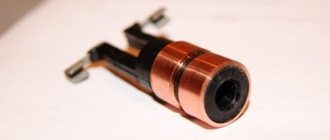
The main component of this device is the stator, which generates electrical voltage. It is installed between the halves of the body, front and rear. A rotor with an excitation winding rotates in a housing on bearings. Voltage is supplied to this winding through copper rings on the rotor shaft, and it is supplied to them through a brush assembly mounted on the back cover.
About possible improvements
. Today, lovers of additional consumers of electric current in a car have two ways to increase the battery charging voltage. Let's look at them.
Features of a car generator
After turning the ignition key, current flows into the field winding. Here it is controlled by a voltage stabilizer, which is powered by the rectifier section.
A car generator produces alternating current, which, after rectification by a diode bridge, becomes constant. Thus, such a unit belongs to the group of DC valve generators.
Its distinctive feature is maintaining voltage within a narrow range of values. A special regulator, which is popularly called “tablet”, “chocolate”, “brushes”, is responsible for the voltage of the generator.
These devices increase the voltage to 13.6 Volts.
Today they are connected according to two main schemes. The older version is reliable, works stably, maintaining voltage at approximately a constant level. The updated scheme has many disadvantages.
The uniqueness of the automobile unit is that it generates electricity by converting the mechanical energy of the rotating engine crankshaft, which is connected to the generator pulley by a belt. At the same time, the engine speed is not a constant value.
Thus, the main task of this electrical unit is to charge the battery and supply all car consumers with stabilized voltage.
In this case, regardless of engine speed, the voltage should always remain within approximately 14 Volts. Otherwise, it will negatively affect both the battery and the electrical circuit. Overcharging and undercharging will have a detrimental effect on the battery.
How to increase the voltage of a VAZ-2110 generator: increasing power
As you know, additional equipment is often installed on a car, which draws additional voltage from the on-board network. Thus, the voltage indicator on a VAZ-2110 can drop to a critical level of 11 volts. If you also install additional air conditioning or heated seats, this may result in the starter not having enough power to start the engine. How to fix the problem? Make sure that the voltage in the on-board network increases.
Video about increasing the voltage in the on-board network on VAZ cars:
Final voltage measurements and results
After the installation was completed and the entire electrical circuit was working, voltage measurements were made at idle speed of the running engine. The results surpassed themselves; the voltage in the entire electrical circuit increased.
Let's consider a table of the results of the measurements obtained:
| Load | Voltage up to | Voltage after |
| without load | 14.2 | 14.45 |
| +dimensions | 13.8 | 14.45 |
| +PTF | 13.7 | 14.4 |
| +neighbor | 13.6 | 14.35 |
| +heater | 13.5 | 14.3 |
| +Fan | 13.4 | 14.2 |
| +far | 13.2 | 14.1 |
| + heating | 13.1 | 14.0 |
| +heater max | 12.9 | 13.95 |
We increase the voltage - all options for solving the problem
So, many motorists may decide that the way out of this situation is to install a high-power generator, but at the same time they will have to replace the battery with a more capacitive one. This is done in order not to “kill” the battery that is installed on the car, since a voltage overload will lead to the destruction of the internal cells. This option is not suitable because it is too expensive.
The second option is to install an additional diode from another diode bridge or marked KD202V. This is much cheaper than changing the generator and battery, but you will have to tinker a little.
To begin with, it is recommended to study automobile electrical circuits and the operation of the generator, as well as the charging circuit.
Is it worth increasing generator performance at all?
It is quite easy to verify that the generator has a small performance reserve, because if an additional device that is not included in the basic package is installed in the machine, the part will begin to work intermittently. You can give an example. In the summer heat with the air conditioning, low headlights and car radio on, the battery may not be able to withstand heavy loads, which will lead to the generator malfunctioning.
There are two ways to solve this problem:
- Buy a new unit.
- Increase the voltage yourself.
Purchasing a new device will require a considerable amount of personal savings, and money will also be needed for installation and connection.
But if you modernize the unit yourself, the financial savings are obvious, especially since this process is carried out quite simply if the car owner adheres to effective recommendations.
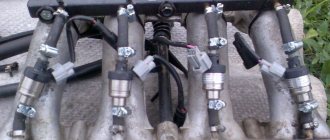
Manufacturing and installation of a diode in a VAZ-2114 generator
Now that everything is ready, we install an additional diode, more powerful than the previous one. You will need half a meter of wire 2*0.75mm. We solder the ends to the female and male terminals No. 4. We dress them in cambric, or better yet, in heat shrink. By the way, the old one must be removed from the system. Let's take action:
- Now, solder the following circuit to the diode: mother to the cathode, folder to the anode.
- We insulate the diode. For example, we take a film container.
- We remove the “minus terminal” from the battery.
- We unscrew the “+” wires from the generator, disconnect the “D” wire to the tidy.
- Remove the generator cover.
- Through the slots in the cover, we connect the “mother” to the LV, the “father” to the standard wire.
- We carry out the assembly.
Now, everything is ready for the final check and measurements.
Modification of the relay regulator
For any modification of the generator set, you need to have at least a little knowledge in the field of electronics. To modify the “relay” for an increased battery charging voltage, you need to purchase the same relay from a foreign car with an output voltage of 14.5 volts, it is indicated on the top cover. The further order will be as follows:
- You need to disconnect the original “pill” from the domestic relay. You need to use a heated soldering iron and tweezers;
- The same procedure is carried out with imported “things”;
- After this, an imported relay must be installed on the domestic brush assembly. Here you will have to work hard, since the pins do not match and they need to be bent and soldered correctly;
- After this, it is securely fastened with screws to the body, having previously been treated with a special heat-shrink paste.
- That's it, you can install the relay regulator on the generator and test it in action, it should produce a voltage equal to 14.5 volts.
How to correctly replace the generator diode bridge on a VAZ 2110?
As you know, a car generator is designed to provide power to all electrical equipment in the car when the engine is running. This unit in domestic “tens” consists of many elements that ensure its optimal operation. One such device is a diode bridge. What functions does it perform, what do you need to know about its malfunctions, and how is the diode bridge of the VAZ 2110 generator replaced? You can find answers to these and other questions below.
How to increase on-board voltage
Where and how is a diode placed in the LV circuit on the generator in order to increase the voltage in the car network and better charge the battery? Here I propose a simple solution, raising the on-board voltage, without going anywhere in the car and its circuits.
I searched in my archives and did not find the material from which I read this decision. “Structurally, voltage regulators have an upper limit of 13.6V. This is due to the “old” connection diagram, from which the new one was copied and “successfully improved”. In it, the necessary voltage from the on-board network, supplied to the regulator for comparison, passed through a chain of wires. On them it dropped to normal. According to the new scheme, we have a chronic undercharge of the battery. Which, with the arrival of winter, makes starting the engine in the cold quite problematic. But if you install a pre-heater, starting the engine will be much easier.
It should also be noted that the battery begins to absorb energy (charge) only when its temperature is above zero. Therefore, in winter, if you make short runs and the battery does not have time to warm up under the hood to at least zero (plus charging time), it will be constantly discharged. And soon it will die... It is believed that after starting the engine, in order for the battery to recover, you need to drive for at least 20 minutes. Just go, and not stand in traffic jams! How to increase the voltage in the network?
Description of the diode bridge on the “Ten”
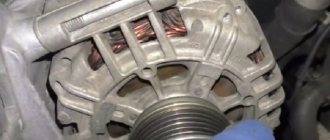
How is the diode modified and installed in the device? For what reasons can a bridge fail? To begin with, we suggest that you familiarize yourself with the description of the part. If you dismantle the generator assembly from the car and remove the cover, you will be able to see the diode bridge (DM), which is located immediately behind it.
Purpose and functions
What functions does the DM perform:
- The primary task of the device is to convert alternating current into direct current.
- The DM also performs the function of blocking current from entering the stator winding. In this case, the device actually performs the one-way valve option.
- In addition, the DM is designed to increase the safety margin of the generator unit. It allows you to protect the mechanism from the effects of adverse factors and contamination on the device, and this, in turn, can negatively affect the functionality of the mechanism as a whole.
Device
As for the device, in the factory configuration the DM for the “tenth” generator is a monolithic structure. This design, as a rule, is quite strong and reliable, is characterized by its small size, as well as a relatively low price. The only drawback characteristic of factory-made DMs is that if one of the diode elements burns out, local replacement of the damage will not be possible. That is, the car owner will have to completely change the factory axle with his own hands.
As for the design features itself, the DM consists of:
- two aluminum plates;
- spacers made of plastic;
- as well as nine diodes, which are connected to each other by soldering into one structure, that is, a bridge.
How to install an additional diode?
This is another way to modify the generator set to increase the battery charging voltage. This method is somewhat more complicated, since it will require complete disassembly of the generator. The modification consists of changing the connection of terminal D of the relay regulator.
The diagram in red indicates an additional diode that needs to be installed. 2D219B device is well suited for such a semiconductor device.
, but you can choose a similar one with similar parameters.
You need to find about half a meter more of two-core wire, two terminals “male” and “female” number 4, as well as a heat-shrinkable casing. At one end of the wire, terminals are soldered and insulated with heat shrink. The free ends of the wire must be soldered to the diode, the “mother” is soldered to the cathode, and the “male” is intended for the anode. Now you need to connect the “mother” to the RN
, and the standard wire is connected to the “male”. At this point the modification is completed, all that remains is to assemble the device, install it on the car and carry out tests.
As you can see, the alteration is not so difficult. Modification of the VAZ 2110 generator (installation of a diode) will allow fans of loud music and additional lighting effects not to think that the battery is not charging enough.
Possible malfunctions: signs and causes
As stated above, the purpose of diode elements is to convert alternating voltage to direct voltage. If one of the diode elements fails, then its malfunction may be indicated by such a sign as a decrease in the voltage level, as well as power in the vehicle electrical network.
For what reasons may problems occur in the operation of the DM:
- Manufacturing defects. As practice shows, many modern DM manufacturers use aluminum shells of fairly low quality in their production. Accordingly, this affects their reliability as a whole. That is why it is recommended to use DM equipped with steel shells, since this directly affects the service life.
- Moisture gets inside the device. Regular exposure to moisture can cause oxidation, in particular, on the surface between the device body and diode elements.
- Engine fluid getting into the unit is one of the most common causes. Exposure to lubricant can lead to disruption of the functionality of the device as a whole, especially if it gets inside the generator unit, directly on the DM.
- Another reason why DMs on “tens” often fail is the polarity of the battery is reversed. If you connect the battery to a charger or accidentally reverse the polarity while “lighting up” the car, this will most likely cause the motor to burn out. Therefore, you should always remember that plus is connected to plus, and minus is connected to minus.
- Regular operation of a vehicle with a weak battery. If the battery does not pull the load and constantly operates under conditions of reduced charge, then the reason may be the inoperability of the DM.
Causes of problems
As practice shows, the main cause of problems is mainly factory. If the shell is made of aluminum, then it is better to refuse such a unit. If it is steel, then this option should be taken. It is more reliable and durable. If the seller does not provide a guarantee, then this also makes it clear that you should not trust his product.
In addition, the causes of breakdowns may be:
- moisture ingress, which causes the space between the diode and the housing to oxidize;
- ingress of oil or other liquids;
- if the polarity of the battery is reversed when lighting a cigarette.
If the diode bridge cannot be repaired, which happens if it has worn out over the years or has completely failed, then it is necessary to resort to the last resort - replacing this unit.
Diagnostics
The diagnostic procedure must be carried out on a dismantled generator device, so the unit must first be removed. When the mechanism is dismantled, the plastic cover is removed from it, as mentioned above, the DM is located immediately behind it (the author of the video about self-diagnosis with a multimeter is Ramil Abdullin).
For diagnostics you will need a tester - a multimeter - the test is carried out as follows:
- First, the multimeter should be activated in ohmmeter mode. Having done this, the positive probe of the tester must be connected to the diode bus.
- In the same way, connect the negative probe of the tester to the corresponding contact on the diode bridge.
- Next, you need to monitor the tester readings. If the diode bridge is in working condition, then the tester display will show values close to infinity. If there are no such values, then most likely the DM is inoperative and should be replaced. But the diagnosis does not end there.
- Next, you will need to swap the location of the probes, that is, the negative contact is connected to the positive one and vice versa. Having done this, again look at the multimeter reading on the display. If there are no failures in the operation of the DM and the device as a whole is functioning normally, then a value of several hundred Ohms should appear on the tester screen.
- If the DM is equipped with an additional diode, then you can check it too. In this case, the diagnostic procedure is performed in a similar way; you just need to repeat all the steps.
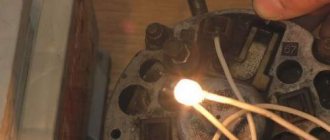
Photo gallery “Self performance test”
More details about replacement
Of course, this procedure can easily be performed by a technician at the nearest service station. However, many car enthusiasts prefer to repair or change parts on their car themselves. If you have knowledge and experience in this matter, then follow this algorithm:
- At the very beginning, you should turn off the power to the VAZ-2110.
- Next you need to disconnect the battery.
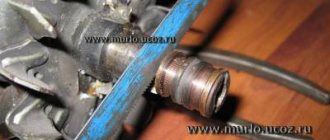
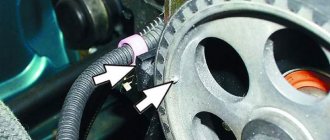
- Then pull out the pink wire that turns on the generator. To do this, unscrew the nut from the positive bolt.
- Then you need to loosen the upper and lower nuts and remove the tension bolt. After all this, you need to remove the belt.
- Next, the generator is turned 90 degrees, removing the lower mounting bolt.
- Then all connections need to be cleaned, including the rectifier housing.
- The upper part must be cleaned especially carefully.
- After this, the mechanism is replaced, and all connections are assembled in the reverse order.
- Finally, you need to check how the generator works.
When purchasing a new mechanism, you need to know that it must come with a warranty card. That is why you should buy only in specialized stores. If you find it difficult to replace the diode bridge yourself, then it is better to entrust this work to specialists from the technical service. They will easily perform the replacement, without removing the generator and with a guarantee.
DIY replacement instructions
In the event of a breakdown, the repair of the DM consists of its replacement, which is done as follows:
- First you need to turn off the ignition, open the hood and turn off the power to the on-board network; to do this, disconnect the battery.
- Once the battery terminal is reset, you will need to disconnect the pink cable responsible for activating the generator assembly. The wire itself is fixed with a bolt and nut; the nut itself will need to be unscrewed.
- Now you need to slightly loosen the tension on the top as well as the bottom nuts. Unscrew the tension screws and remove the strap. Inspect it - if the belt shows signs of damage - cracks, delamination - then it is better to change it immediately. If the strap is intact, set it aside.
- After completing these steps, you need to rotate the generator mechanism 90 degrees, this is done so that you can access the lower mounting screw. Unscrew it.
- Next, carefully inspect the body of the dismantled unit. Clean if necessary - there should be no dirt, especially on the connections. Dirt getting inside the generator housing can also lead to its incorrect operation and even failure. Bend the fasteners and remove the cover.
- Next, you need to clean the inside of the rings as carefully, but most effectively as possible.
- After this, all you have to do is dismantle the failed DM and replace it with a working part. When the installation is completed, the structure is assembled in the reverse order. Do not forget to tighten the strap, just make sure that it is not too tight, this is important. Having done this, you will need to start the engine of your car and diagnose the operation of the new DM.
conclusions
Increasing the voltage of the VAZ-2114 generator with your own hands is real and quite simple. At the same time, the cost amounted to 500 rubles. It is worth noting separately that if you do not have the necessary skills or abilities to work with automotive electronics, then you should contact a car service center, where everything will be done quickly and efficiently, and of course, at the expense of the car enthusiast.
If you find an error, please select a piece of text and press Ctrl+Enter.
Today, many car enthusiasts install various additional equipment on their cars. This can negatively affect the charging of the generator, as well as the on-board voltage of the vehicle.
The question arises: how to increase charging on the VAZ 2114 generator? This may require a lot of effort, but there is nothing overly complicated about it.
The first thing to do is determine the level of additional voltage on the on-board network. Most often, problems arise due to some additional equipment. In some cases, the voltage reading may drop to 11 V. This is extremely low.
If after this you install heated seats or install a new powerful air conditioner, then the starter will not have enough power to start the engine. In order to fix this problem, you need to somehow increase the voltage in the car's on-board network.
Unsustainable breakdown - hurry up with repairs!
It would seem that there is something wrong here - there is not enough tension. The car runs on gasoline, not electricity. However, a lack of current power leads to an increase in fuel consumption, a decrease in engine power, and some electrical appliances stop working altogether and will require replacement in the future. This is especially noticeable in the dark, when many power supply devices are used.
You can deal with this problem easily and quickly by charging it properly. However, sometimes this doesn't help. Look under the hood - the battery terminals may be loose or oxidized. If in a parking lot the current still maintains a constant voltage, then during driving, due to vibration, the terminals may move away, opening the circuit. To fix the problem, you need to thoroughly lubricate the fasteners and tighten the bolts; sometimes only replacing the old terminals with new ones will help.
Removing the generator from the car
When the generator is not working, operating the car is not particularly possible, since the battery charge will not be enough for a long time to power the on-board network. Therefore, if problems arise with this unit, it is necessary to diagnose and troubleshoot the components of the generator, and for this it must be removed from the car.
The technology for dismantling the device is not particularly complicated and consists of the following steps:
- Disconnect the negative terminal from the battery;
- Loosen the clamping nut that secures the generator in the adjusting bar. Move the assembly towards the motor as far as it will go and remove the drive belt;
- Remove the protective cover;
- We disconnect the wires (one is removed from the terminals, to remove the other you need to unscrew the nuts);
- Unscrew the nut on the lower fastening;
- Unscrew the nut securing the adjusting bar to the motor;
- We remove the lower mounting bolt and take out the generator;
Installation of the unit is performed in the reverse order, but after installation it is necessary to adjust the drive tension.
The design of the unit installed on the Oka is such that only the voltage regulator and capacitor can be reached from the outside. Therefore, if the generator brushes are inspected for wear or the regulator is checked by replacing it with a known good one, then it is not necessary to dismantle the unit from the engine; you can get to the specified parts without removing the generator. But you can check the condition of the remaining parts only by disassembling the unit.
What generator malfunctions can a car owner encounter?
- The pulley is worn out or damaged;
- Current collecting brushes wear out;
- The collector wears out;
- The voltage regulator is damaged;
- The bearing is worn out or damaged;
- The rectifier (diode bridge) is damaged;
- The charging circuit wiring is damaged.
List of the most common battery faults:
- The occurrence of short ignition of electrodes or plates;
- The battery plates are mechanically or chemically damaged;
- The geometry of the battery cells is disrupted - cracks appear on the housing due to mechanical damage or incorrect installation.
- The battery terminals are oxidized.
These malfunctions arise due to gross violations of operating rules, as well as manufacturing defects and expiration of service life. The number of generator set malfunctions is much greater, since the design of the generator is more complex than that of the battery. In order to avoid being deceived in the service if any malfunction of electrical equipment occurs, every car owner should know about the main causes of generator malfunction and a possible way to eliminate it.
To prevent unexpected breakdowns, it is necessary to carry out quarterly inspection of the vehicle's electrical systems.
There are two types of generators: AC and DC. In a modern passenger vehicle there is a generator operating as alternating current, into which a rectifier is built in. The consequences of a burned out diode bridge can be disastrous. It converts alternating current into direct current, which is necessary for the operation of electrical consumers of the car. The surface of the cover and housing of the generator set is where the diode bridge is located.
The amount of operating current depends on the voltage required for the operation of all electrical consumers of the car. The operating voltage value is usually in the range from 13.8 to 14.7 V. The operation of the generator set directly depends on the crankshaft speed, since the drive element is the belt. The relay regulator smoothes and regulates the current at the output of the generator. It stabilizes and prevents surges and dips in operating voltage. Modern generators have built-in integrated voltage regulators, popularly called “Tablets”.
Diode introduction
Observe polarity. There is no crime here, it’s just that if the polarity is not observed, charging will not happen. The diode must be designed for a current of at least 5 A. By the way, it will get very hot, so it is better to install it on a radiator. What should you consider when selecting the type of diode? Voltage drop on diodes: germanium - 0.3...0.7 V, silicon - 0.8...1.2 V. I.e. This is the voltage by which your on-board network will increase. Therefore, by selection we can achieve the “right” voltage in our network.”
Checking status
Checking the diode bridge is quite simple, even on your own. There is no need to go to a service station.
All you need is a multimeter.
We connect the positive probe of the multimeter to the diode bus. Similarly, we connect the negative probe to the negative terminal of the diode bridge. Now let's look at the device readings. If all is well with the rectifier, then you will see readings close to infinity on your multimeter. If none appear, then there are problems with the device and you will have to change it. But that's not all
Now the probes should be swapped, that is, the minus should be connected to the plus, and the plus to the minus. Let's look at our multimeter again. What do you see there? If several hundred ohms, the unit of measurement for resistance, are displayed, then the unit is operating normally and is in good working order. To check the additional diode, if any, repeat the same steps described above in our instructions.
Article on the topic: Choosing covers for the VAZ 2114
Device and design features
Automotive generators perform the same function, operate on the same principle, but differ from each other in size, design of the assembly parts, pulley dimensions, characteristics of rectifiers and voltage regulator, and the presence of cooling (liquid or air are often used on diesel engines). The generator consists of:
- housings (front and back cover);
- stator;
- rotor;
- diode bridge;
- pulley;
- brush assembly;
- voltage regulator.
Frame
The vast majority of generators have a housing consisting of two covers, which are connected to each other with studs and tightened with nuts. The part is made of light alloy aluminum, which has good heat dissipation and is not magnetized. The case has ventilation holes that provide heat exchange.
Stator
It has a ring shape and is installed inside the housing. It is one of the main parts that serves to create alternating current due to the magnetic field of the rotor. The stator consists of a core, which is assembled from 36 plates. In the grooves of the core there is a copper winding, which serves to generate current. Most often the winding is three-phase, according to the type of connection:
- star - the ends of the winding are connected to each other;
- triangle - the ends of the winding are brought out separately.
Rotor
Rotating, the axis of which rotates on closed ball bearings. An excitation winding is installed on the shaft, which serves to create a magnetic field for the stator. To ensure the correct direction of the magnetic field, two pole cores with six teeth each are installed above the winding. The rotor shaft is also equipped with two copper rings, sometimes brass or steel, through which current flows from the battery to the excitation coil.
Diode bridge/ rectifier block
It is also one of the main components whose task is to convert alternating current into direct current, ensuring a stable charge of the car battery. The diode bridge consists of a positive and negative radiator strip, as well as diodes. The diodes are hermetically sealed into the bridge.
Current is supplied to the diode bridge from the stator winding, rectified and supplied to the battery through the output contact in the rear cover.
Pulley
The pulley, through a drive belt, transmits torque to the generator from the crankshaft. The size of the pulley determines the gear ratio; the larger its diameter, the less energy is needed to rotate the generator. Modern cars are switching to an overrunning clutch, the purpose of which is to smooth out vibrations in the rotation of the pulley, maintaining the tension and integrity of the belt.
Brush unit
On modern cars, the brushes are combined into one unit with a voltage regulator; they are replaced only as an assembly, since their service life is quite long. The brushes serve to transmit voltage to the slip rings of the rotor shaft. Graphite brushes are pressed by springs.
Voltage regulator
The semiconductor regulator ensures that the required voltage is maintained within the specified parameters. It is located on the brush holder block or can be output separately.