Design and principle of operation
The design of the cigarette lighter is quite simple. Inside the metal cartridge is a nichrome spiral that heats up. The cartridge is inserted into the cigarette lighter socket, located in different places in the cabin. When you press the handle, the contacts close, as a result of which the spiral begins to heat up. After the heating has reached its maximum point, the thermal relay is activated and the device snaps back to its original position.
The circuit voltage is 12 volts. Therefore, it is not recommended to connect more powerful devices to the cigarette lighter socket. This will cause overheating and blown fuse.
The device itself comes with three wires:
- black – minus or mass that comes to the car body;
- red – responsible for the voltage of the heating element, connected to the positive terminal of the battery through a fuse;
- yellow – backlight wire.
Connection diagram
Connecting the cigarette lighter is not difficult. The device is connected to the on-board network with only three wires.
- Black wire - the ground of the car is connected to the cigarette lighter body.
- Red wire – power is attached to a terminal at the end of the housing. This threaded clamp also serves as a fastening for the heater retainer, so power is supplied to it as well.
- Yellow wire – power supply for instrument lighting is connected to the lamp socket. Ground, which is supplied through its contact with the cigarette lighter body.
VAZ 2104-07
Functions
In modern society, it is not so much the cigarette lighter that is important, but its socket itself. It is into this hole that other electrical devices are inserted, without which many car enthusiasts simply cannot do without. In simple terms, a socket is a so-called socket, but not in a house, but in a car. With it, you can charge your cell phone, connect navigators and radars, and also use a mobile car wash. Every year the market is replenished with newer, more diverse car accessories and gadgets that run on electricity.
The cigarette lighter is a simple device, but even in its operation, incidents and malfunctions can occur. This article describes all possible problems with the cigarette lighter, as well as troubleshooting methods for different car brands.
Basic faults
The cigarette lighter has never been a completely reliable electrical connection. This was not provided for by its design itself - it is not designed for long-term switching of large currents. Only an increase in the number of presser feet can ensure good fixation of the consumer plug in the cigarette lighter socket. But alas, there is no uniform standard for such a connection today.
In reality, aftermarket forks only have a spring-loaded center contact and a pair of weight clamps. The location of the central contact area in the socket may or may not be quite deep. The location of the presser foot slots may not be where they are located on the fork. To switch large currents, the cross-section of the contacts themselves is not enough.
Due to various shocks and vibrations while driving, the plug and socket of the cigarette lighter lose reliable contact, the connection may spark, and there may also be a short circuit. Since in modern cars the cigarette lighter socket is usually used as a socket for connecting a large number of other devices, all kinds of tees and splitters are used here, which also cannot by themselves add reliability to the device.
Let's summarize and say that trouble-free operation of a car cigarette lighter is only possible if the use of the latter is reduced to its intended purpose - heating the insert spiral and lighting cigarettes. Otherwise, sooner or later you will encounter one of the malfunctions that we will discuss below.
The head does not fit into the cigarette lighter socket
It often happens that drivers complain about poor fixation of the cigarette lighter in the socket. Agree, holding the cigarette lighter in the socket until it is completely warmed up is quite tedious and unsafe, especially if you are driving a car. The reason for this malfunction lies in the “wearing out” of the antennae in the socket, after which they simply no longer hold the cigarette lighter. This problem can be resolved quite easily: you need to bend the antennae a little.
Cigarette lighter head coil burnt out
The reason that the cigarette lighter has stopped working may be a burnt-out coil on the cigarette lighter itself. In this case, replacing the cigarette lighter head with a new one will help solve the problem. If you cannot find the part you need, you can carry out a simple repair yourself - clean the head spiral from carbon deposits and soot.
This is interesting: Reasons for the appearance of oil on spark plugs, solutions
If you follow the rules, the spiral of a standard cigarette lighter should heat up to red and snap out 20 seconds after switching on. If it does it faster or slower, you can adjust the time by bending or bending the cigarette lighter contacts. If the adjustment does not produce results, you can solve the problem by replacing the part.
Cigarette lighter fuse blown
A fuse blown often occurs due to the fault of the motorist himself, who likes to connect many additional devices via a splitter. Thus, an increased load is placed on the cigarette lighter, and since, by its characteristics, this device is designed exclusively for a certain power, as well as only for short-term switching on, and not for systematic use, the fuse simply cannot withstand the heavy load and burns out.
This problem has a solution, although it is not without risks: you can use a more powerful fuse, but this may lead to the burning of the entire socket. To prevent the fuse from blowing, as well as the cigarette lighter socket, experts do not recommend connecting many devices to it through splitters, and it is strictly forbidden to connect devices to the cigarette lighter whose plugs are not assembled tightly or are loose - in this case, a short circuit may occur and many additional problems may arise.
Broken wiring
Another malfunction in which the operation of the device will be disrupted is a break in the wiring. As a rule, the wire may fray in some place or get pinched, as a result there is no contact and the cigarette lighter does not work. You can check for this malfunction (open circuit in the wiring) using a digital multimeter that has a wiring test function.
Only replacing the wiring can solve the problem. In order to avoid problems with electrical wiring in the future, you need to remember some simple rules. Firstly, in no case should you connect a radio or similar power devices to the cigarette lighter - they must be connected directly to the battery. Secondly, ensure high-quality insulation of all wires, since sparks due to poor insulation can lead to a car fire. Be extremely careful and attentive!
How to improve the cigarette lighter?
Based on the above, experienced auto mechanics strongly advise against connecting various compressors and chargers for phones and laptops to the car connector. The safest devices are considered to be cigarette lighters themselves and various portable lighting devices. For all other cases, it is necessary to connect the devices directly to the car battery. For this purpose, “crocodile” type wires are used and connected to the contacts of the device.
The same conclusions can be drawn from the cigarette lighter wires, which are removed and its wires are cut. Try not to reverse the polarity of the wires. The middle wire from the cigarette lighter is “plus” (red), and the side wire is “minus”. The yellow wire located above the cigarette lighter is responsible for illuminating the connector at night. Additional wires with “crocodiles” are connected to the ends of the two wires. The places where the wires are connected must be insulated to prevent the possibility of short circuits.
The above method is not the most convenient, so those who often use powerful electrical appliances in the car can use another, more complex, but convenient method of converting the connector. To do this, all wires related to the cigarette lighter are disconnected and pulled out, and thicker analogues are installed in their place. Additionally, you can make an additional connector that you can place almost anywhere. The only difference between such a cigarette lighter is that it is connected directly to the battery and has a fuse in the gap, rated for a current of 20 Amps.
Let us remind you once again that such a cigarette lighter can be placed in any part of the cabin, however, this item has its limitations. The active metal parts of the connector must not come into contact with other wires of the vehicle's electrical system. Simply put, touching other wires of the case is prohibited. This prohibition is due to the fact that when using a cigarette lighter, its body heats up and in some cases can reach quite high temperatures. The wire that was touching the housing at this moment may turn out to be the “plus” of another device and, under the influence of high temperature, will lose its insulation. This usually also causes a short circuit.
Other problems at work
Unfortunately, there are a number of other reasons why the cigarette lighter in a car does not work. They are all different and each car brand may have its own.
Many Dodge Caliber owners also face the problem of a non-working cigarette lighter. Most often, the device breaks down while another device is working in it, and smoke begins to appear from the panel. This happens due to overvoltage generated by more powerful devices connected to the connector. In this model, such a breakdown can lead to problems in the operation of other devices, since the burnt wire is located in the common harness of others. You won’t be able to solve this problem on your own, because you will have to remove the entire front console. Such a breakdown can occur repeatedly, so it would be best to install a fuse in the cigarette lighter itself.
On domestic brands of cars, incidents in the operation of the cigarette lighter also often occur. Of course, most often fuses blow due to improper use of the device connector. It is quite simple to check why the cigarette lighter on a VAZ 2110 does not work. Turn on the stove fan - if it does not work, then the reason is fuse F18. The fact is that these two devices operate from one fuse and its blowing leads to the failure of two devices at once. To replace it, you do not need to go under the hood; it is located to the left of the steering wheel in the fuse box. However, if the fan is working, then you should not immediately blame the wiring. You need to check the fuse, which is designated F6. Few people know, but it also affects the operation of the device and perhaps the reason is precisely its burnout.
Reasons for cigarette lighter failure
Currently, thousands of accessories have been developed for the car that can be easily connected to the cigarette lighter. However, the power for which the connectors are designed may differ markedly in different cars. Drivers rarely take this parameter into account and plug in various electrical appliances into the cigarette lighter socket, the power of which it is not at all designed for.
Under heavy overloads, both the cigarette lighter contacts, its connector, and the fuse, which protects the circuit from short circuits and reacts to high temperatures, burn out. In other cases, the fault may be that the cross-sectional area of the wires is too low, however, this can happen in extremely rare cases, since the manufacturer calculates the cross-section of the wires in advance so that this does not happen. Therefore, if the cigarette lighter or fuse is blown, they are replaced.
Speaking of fuses. If the fuse is blown, do not rush to change it. First of all, figure out what caused it to fail. The fuse trips when the network has been overloaded or short-circuited. A short circuit looks like a connection between “plus” and “minus” even before connecting to the connector. In this case, the circuit resistance decreases, the current increases and the temperature of the conductors increases. This phenomenon causes the insulation to melt and can lead to a fire.
If no short circuit is detected, and the cause of the burnout is a simple overload, then only then can the fuse be replaced. In addition, it is prohibited to install fuses designed for higher currents or not to use them at all.
The last point should be observed not only when using a cigarette lighter, since connecting electrical appliances without protection devices can lead to fires.
Diagnostic measures
Situations where cigarette lighters do not work on cars are not as common now as they used to be. But still, such a breakdown is quite likely.
In this situation, you need to understand the reason why the malfunction occurred. Depending on the diagnostic results, the motorist will have to carry out the appropriate work to correct the problem.
Diagnostics may include the following activities:
- First, you should carefully check all connections and make sure that no wires have burned out. Here you will have to perform partial dismantling of the unit.
- Check for damage to the wiring on the cigarette lighter body and how firmly they are connected.
- Be sure to open the fuse box where the element responsible for the cigarette lighter is located. It must have a corresponding label or inscription.
- Make sure there are no signs of burning or signs of clogging of the socket itself or its contacts. Quite often, when foreign objects enter, the system’s performance is disrupted.
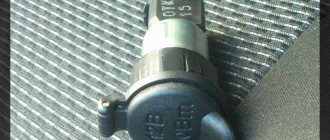
- Assess the current condition of the socket plug.
One of the most common problems is a blown fuse. On many cars, this is responsible for several systems simultaneously, including the cigarette lighter.
This means only one thing. If the fuse element is blown, then power will not be supplied not only to the cigarette lighter, but also to other systems with which it is connected. The simultaneous failure of several systems in a car most likely indicates problems with the fuse.
This is interesting: Symptoms of a malfunctioning throttle position sensor and how to check
But fuses don't just blow. Therefore, it is also worth understanding why the burnout occurred and how to avoid repeating a similar situation in the future.
Checking with a multimeter (or tester)
This means that they can test both fuses that have already been removed and those installed in the machine block.
The multimeter has a sound test mode. When you turn it on, if you close the probes, you will hear a squeak, which means there is contact.
So - you can remove the fuse, if you do not have a transparent case, just install the probes on the fuse contacts! If we hear a squeak, it means it’s working; if there’s no sound, it means it’s burned out. But again, pulling out each one and checking it is extremely inconvenient!
Therefore, the manufacturers took care of us, on the top of the fuses there are open “points” from the contacts, you just need to insert the probes from the multimeter into them, and you can check a large number of elements without removing them. Personally, I can check almost the entire block in a couple of minutes! You can see this in the video below.
This is exactly how they test at service stations, because often they lost the book with the circuit, and it takes a long time to find where it is, but a multimeter is usually always at hand.
Physical examination
At the moment, all fuses are made with a transparent plastic case, that is, the “thread” located inside is visible to the naked eye. If the fuse is blown, simply pull it out of the connector and check, this is the “visual method”!
Why is it complicated and not always used - yes, because there are dozens of fuses in modern cars (can reach up to 30 - 40), and the cooler the car, the more there are. And it’s visually impossible to figure out which one burned out!
They are installed in sockets and only the back is visible. Here you need to combine a diagram (the first method) and a physical examination. But there is a much faster and fairly easy method of checking, we use a multimeter if you have one.
Schematic check
What it is? If any device does not work for you, for example a cigarette lighter, there is a high probability that it is the safety element that has burned out. For each car, there are diagrams that indicate what and which one is responsible for. You need to find the number or location and check it, often this is enough. The check could be like this: we simply install a new one, if it works, then that’s the problem.
Step-by-step instruction
• Checking the consumer device. Test your gadgets first by connecting to other available sockets. If you notice that the device is not charging from the cigarette lighter, you need to make sure that it is charging from other power sources. Connect the device to a different cigarette lighter socket or to a wall charger. If the charging process continues, it means that the cigarette lighter is not working.
• Finding the cigarette lighter fuse. Look in the fuse box and find the one that controls the cigarette lighter. It can be located in the cabin or in the engine compartment. Look for information about this in the vehicle's owner's manual.
The instructions always provide a diagram of the location of the fuses. Each of them is designated by a specific number. After you have found in the diagram the one that is responsible for powering the cigarette lighter, check its actual presence in the fuse block.
• Check the fuse. Pick up a multimeter and set the continuity or continuity test mode (a symbol consisting of several parallel arcs). Connect the black lead of the multimeter to one side of the fuse and the red lead to the other side. You should hear the multimeter beep. If it is there, it means the fuse is intact. Once again, make sure that you checked the fuse that is responsible for the cigarette lighter. If you are sure that this is the fuse you are testing and the multimeter beeps, the problem is not the fuse.
If the multimeter does not beep, this is a sign of a faulty fuse, so you just need to replace it.
• Replace the blown fuse. If the fuse is faulty (it is the source of problems with the cigarette lighter in 90% of cases), it must be replaced. Take a puller and carefully pull out the faulty element. Typically, you will see black marks on the fuse body. This is a clear sign that the element has burned out. Get a new fuse, but remember that it must meet certain requirements. This can be found in the vehicle's owner's manual. In most cases, 15 amp fuses are used. Install the new element in the place from which the old fuse was removed. Gently press it down until it fits snugly into the connector.
• Checking to see if replacing the fuse helped. Turn on the ignition. Connect the gadget to the cigarette lighter socket and make sure it works. If yes, then congratulations! If not, you will have to move on to the next steps to check for other possible problems.
Worth remembering before work
You need to remember that fuses are in the electrical circuit, so you need to take precautions:
- The car must be turned off
- The ignition must be turned off
- The battery must be installed and the terminals must be connected, otherwise there will be no “power” to the electrical circuit
- Do not bridge the contacts of one fuse with another using a multimeter.
What I would like to add in conclusion, guys - the first two methods are available to everyone, that is, it’s trivial to pull it out and look, but the third one with a tester... buy it, it’s a really useful thing in the car, if you decide to figure it out yourself, we just can’t replace it!
Step-by-step guide to replacement and setup
Below you will find information on how to remove the cigarette lighter, how to understand its circuit, perform installation, and also how to disassemble the cigarette lighter.
Tools and materials
Installing and replacing the cigarette lighter requires the presence of some tools:
- pliers;
- file;
- Screwdriver Set;
- soldering iron
You can learn how to connect a cigarette lighter from the author of the video, Dmitry Maznitsyn.
Troubleshooting Methods
If the cigarette lighter stops working, it is necessary to carry out proper diagnostics. For this operation, you only need a multimeter set in tester mode, or a homemade device constructed from a lamp and several wires.
For the most part, this device is located in the mounting block in a special compartment of the machine. To get to this device, you will have to open the hood and in the mounting block - in the black box, which is located in the far corner, find a fuse, which can be called either F4, F7, and sometimes 20 A - it all depends on the maximum current for which the fuse is designed .
In order to diagnose the fuse, you need to remove it and connect it to a multimeter to test the contacts. If the lamp on a homemade tester lights up, or the device emits a sound alert indicating that the fuse is intact, then the problem lies elsewhere.
This is interesting: Why do hydraulic compensators knock when cold or hot?
Important: you should not install the rated current next to the fuse, because this will lead to irreversible consequences, possibly even a fire.
One of the causes of the malfunction may be the driver’s inattention when working with auxiliary devices. For example, after recently cleaning the car interior using electrical equipment, the cigarette lighter in the car does not work - this means the problem is in the fuse. To avoid these problems in the future, you need to carefully control the current supply.
Sometimes, if the cigarette lighter and the radio are not working at the same time, you may not find any connection, but it is there. After all, it also happens in everyday life when a driver connects the radio contacts to this device, because it’s easier than going the other way and connecting to the car’s battery. Thus, when it burns out, the stereo in the car stops working at the same time. In this case, it is better not to self-medicate, but to go to an auto center and consult a qualified specialist.
It happens that drivers install a lot of equipment in the car, although it is more correct to connect it to the battery.
If the methods described above do not solve the problem, all that remains is to check the wiring for corrosion.
- Particular attention should be paid to connecting the positive wire and ground wire to the device.
- Inspect all connections and, if contacts are loose somewhere, restore them.
- Check the contacts of the wire block on the mounting block.
- If there is a break in the wire from the block, it is necessary to replace it locally, or replace the entire harness.
Work sequence
You can learn how to change the cigarette lighter from the instructions described below.
- Disassemble the system only after de-energizing the vehicle. If the driver pulled out the cigarette lighter while the wires were connected, this could lead to a short circuit and even a fire, then the installation will not seem easy.
- When removing the device, you must be careful. When working, you need to use a small flat-head screwdriver. It is placed inside the part. Use the end of a screwdriver to press on the green latch and unscrew the sleeve. Then remove the glass part.
- Remove the device and carry out repairs. The installed device is placed in its original place. When connecting contacts, correct polarity must be observed to prevent short circuits.
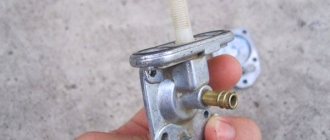
Detail on a car dashboard
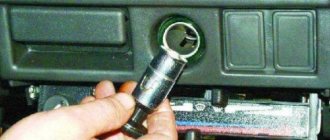
How to remove the cigarette lighter
If you have found the cause of the cigarette lighter failure and prepared the necessary equipment, proceed to disassemble the part. The dismantling process involves the following steps:
- First you need to open the hood and remove the negative terminal from the battery.
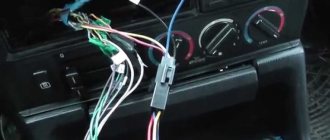
- Next, you need to disassemble the facing panel to gain access to the socket connection connector.
- Then you can unscrew the screws and disconnect the block.
- The next step is to dismantle the metal cigarette lighter tube using a screwdriver.
- After removing the part, you must turn off the backlight.
A serviceable element can be repaired, but a burnt-out element will have to be replaced.
Car cigarette lighter button repair
Often the device stops working due to damage to the power button.
The problem is solved by dismantling the failed key and then restoring or replacing it.
The repair process does not take much time and is done with your own hands.
Cigarette lighter head repair
In some cases, it is necessary to perform partial repairs of the car cigarette lighter. To do this, the element is dismantled according to simple instructions and checked for defects under the housing. Inside the part there is a miniature mica plate, which acts as a semiconductor and often fails. The product must be removed, repaired, and then put back.
Why doesn't the cigarette lighter in the car work?
There are several reasons that explain the loss of functionality of a car cigarette lighter. Among the most common are:
- Burnout of the socket.
- A foreign object has entered the socket and is preventing connection.
- Loosening or deformation of the “antennae” of the socket.
- Damage to the fuse in the block.
The last element is considered the most vulnerable to breakdowns. It often fails due to overload when the driver connects powerful electrical appliances, including:
- Car refrigerator.
- Compressor.
- Mattresses.
- Pumps.
- And others.
Removable devices are able to work with low-power gadgets (laptops, smartphones, tablets). If you expect to connect “heavy” devices, it is better to connect them directly to the battery. This process may seem complicated, but the main thing is to install the terminals correctly, observing the polarity.
In addition to problems with the fuse, the following causes of malfunction are distinguished:
- Short circuit in the wiring. If the product frequently burns out or is exposed to extreme heat, you should check the wiring. Before this, you need to remove the part from the socket and evaluate the condition of the contacts. A multitester and a detailed wiring diagram are used for testing. In the event of a cable break, the fuse will trip.
- Poor contact. During operation, the sockets wear out or oxidize. As a result, the device stops heating and the current supply is suspended. To restore functionality, do a simple cleaning of the device.
- Damage to the nichrome spiral. The heating element also burns out. If this problem occurs, you will have to purchase and replace the part yourself.