How to restore generator slip rings
Wear of the generator slip rings is the most common rotor malfunction in which it is necessary to replace a rotor that is quite suitable in other respects, since it is not always possible to find new rings and not for all rotors. Wear of the copper rotor rings occurs due to many factors, the main of which is the introduction of copper particles into the material of the brushes and the further work of copper on copper. You can often notice the following picture: when replacing brushes and a new rotor, a squeaking sound occurs at the first revolution of the rotor, and if you make several revolutions and then remove the brushes, one or more spots of copper inclusions will be visible on them, and a clearly visible torn strip on the ring. If everything is left as is, this rotor won't last long. Grinding in and soaking the brushes in oil helps. I didn’t make a reservation, the impregnated brush lasts much longer, and wears out the ring less. For some unclear reasons, many instructions recommend wiping oily rings and brushes with gasoline, as the oil allegedly breaks contact. Practice shows the opposite; when testing on a bench, no difference between dry and oiled brushes was noticed, neither the current nor the voltage on the brushes changed. The experiment went like this: when working under a load with dry brushes and measuring all possible parameters, a few drops of oil were applied to the rings and the devices did not react in any way, although one could expect hydroplaning of the brush and anything else. Therefore, an oiled brush cannot do any harm.
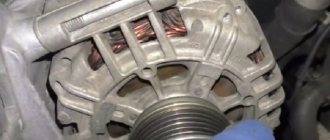
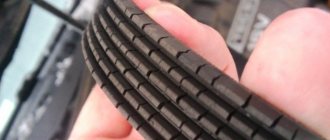
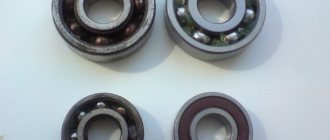
This is what worn rings look like.
After preliminary grooving and cleaning. The lower ring shows wear down to the insulator; the generator was removed due to an unacceptable drop in current output.
How to replace slip rings on an old-style generator rotor.
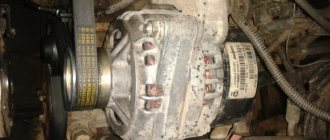
Generator repair
engine ZMZ-409 UAZ Bukhanka 2009 mileage 140 thousand km, for only 220 rubles (bearing 50 rubles and cont.
We fill new contact rings carefully so that they do not become distorted, otherwise during operation of the generator the brushes will fall apart or they will wear out quickly. It is better to stuff through a wooden container.
Having installed new rings, we secure the wires going to the excitation coil. It’s better, of course, to solder them, it will be more reliable.
Don't forget to install a new protective washer.
This is where we finish with the armature and move on to the stator.
Steel rings.
There is no point in installing copper rings, they are too unreliable, they can go all the way to the end of the machine, or they can wear out to holes after 10 clicks. The coefficient of friction of graphite on steel is much less than on copper, so steel rings practically do not wear out and brushes wear out much less than on copper ones. In terms of electrical indicators, no difference was noticed between copper and steel rings; the resistance of a graphite brush is immeasurably greater than the resistance of steel. I have been installing steel rings for many years and have had no complaints about them.
Steel rings are machined to the worn dimensions with a small allowance on the outer diameter and with a gap of 0.15 mm on the inner diameter, relative to the preliminary turning of the remains of the old rings.
Brazed steel rings.
Before soldering, the rings must be tinned using an active flux, for example, “soldering acid” (zinc chloride) and washed with soda. The remains of copper rings are tinned with rosin. Now, having heated the rings with a soldering iron until the solder melts, they will fit freely onto the remains of the old ones and, after cooling, will be soldered quite firmly. Now all that remains is to sharpen and polish the rings.
It is better to base the machine on the rear bearing fixed in the steady rest, so there will be the smallest displacement of the rings relative to the rotor axis, which will eliminate the possibility of the brush coming off the ring and breaking the chain at high speeds.
Rings after running 35k. This generator was removed to repair the diode bridge.
Here is a steel and copper ring after three years, the mileage is unknown. The brushes were soaked in oil. The generator was removed to replace the front bearing.
Due to poor charging, it was decided to remove a couple of layers from the rotor slip rings.
Scores appeared on the rings and the brushes developed a channel on the rings due to which there was poor contact and led to damage to the brushes.
Can you tell me if your charging is bad because of the voltage regulator or diode bridge? Alas, the regulator is also in working order.
Let's get started on how this can be done very easily: 1) Take a file with a fine notch 2) Not very coarse sandpaper 3) And fine sandpaper (Zero)
I had to turn the rotor myself without a drill, etc. to do this, halve the generator as in the photo! It took me about an hour if you count the fact that I was looking for sandpaper)
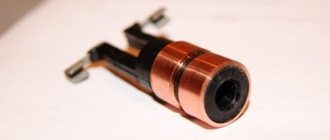
Thanks to a system of two such parts, the generated energy is transferred to the brushes, and then to the regulating part of the entire circuit.
Alternator slip rings
Accelerated wear of these components is likely as a consequence of technical fluids getting onto the surface (motor oil and antifreeze) from the engine. At the same time, wear of the copper-graphite brushes will occur.
Copper rings can also wear out due to the adhesion of particles of the same metal to the brushes, which over time develop grooves in the base material, thereby provoking sparking and additional destruction of the integrity of the ring (generally their service life is more than 150 thousand km).
Alternator slip rings wear
As for the steel analogues of this element, (despite the forecasts of skeptics), practice proves their full resistance to wear. This is due to the low coefficient of friction of steel, as well as its density (not produced since about the 80s of the last century, found on old Japanese cars). Defects that cause generator slip rings to fail can only be identified after a visual inspection. The remaining characteristic symptoms can be caused (with the same probability) by damage to other parts of the unit.
Do-it-yourself repair of generator slip rings
Repair and restoration of generator collector rings.
The situation is as follows: with a mileage of my bosom Volks of more than 700,000 km. The collector rings of the Bosh generator have become unusable. The output is such that it has already rubbed down to the plastic shell of the roller (naturally, the brushes were resoldered several times):
I couldn’t find repair kits for rings anywhere, the price of a new generator is “not entirely satisfactory”, looking for a used one is a chore, there is an option to take it somewhere 300 km away. to regional centers and it is not known how long to wait for repairs. In short, no options.
After much deliberation, it was decided to use the collective farm method of repair on our own. The sequence is approximately as follows:
1. First, the generator was dismantled, the dimensions were studied, and a domestic generator with approximately suitable ring parameters was selected. I got it for free, I don’t know why. Almost new. 2. First, the rings were sawed off from the donor, closer to the metal of the rotor (so that the whiskers remained longer on the rings). 3. Next, after praying, I sawed off the rings from the original generator, closer to the rings, so that the whiskers on the rotor would remain longer. Well, something like this:
4. Remember the position of the rings (it’s better to measure and sketch) relative to the end of the shaft. Sawed-off rings can be easily removed with any puller. For example, like this:
ATTENTION HERE!
Now, before the rings are completely removed from the generator being repaired, you need to use a tester (who doesn’t have a tester with a light bulb) to check which ring “goes” where on the armature winding, and mark it with a marker. For example, the first ring (from the anchor) goes to such and such a core of the anchor, we mark this core on the anchor itself. I don’t know what will happen if, when installing new rings, the ring-core connections are mixed up, but it is better to immediately provide the opportunity to install everything in its place. Well, if you accidentally mixed it up, and after assembly it turns out that the generator is working somehow wrong, you can, I suppose, re-solder the brushes in places in the regulator.
Next, we get the following picture:
5. We clean the remaining antennae on the donor rings and the rotor from plastic, and tin these antennae with tin. If necessary, we modify the mounting hole on the new rings (I had to drill the hole a little). The main thing is not to sag, and to remove a very thin layer, so that the rings can then fit tightly onto the axle, but very tightly, since the rings can split during seating, especially if they are not pressed on but driven in with a hammer. We combine the antennae of the rings with the antennae we need on the anchor. Do not forget that the rings must be installed in accordance with the previously marked veins.
6. I don’t see any point in describing the process of pressing and soldering, and everything is clear.
7. Next, if desired or to improve the aesthetic appearance, fill the torn piece between the rings and the thickening of the armature shaft with high-quality epoxy. To get an even fill, I fitted a piece of paper covered with some kind of film and tied it with thread.
Replacing the slip rings of the VAZ 2110 generator on your own
Replacing the slip rings of the VAZ 2110 generator is necessary if there are various types of defects on their surface. Because of them, the rings cannot efficiently perform their most important function - tightly connecting the parts to each other so that contact occurs between them. Very often, individual parts of the generator break. If you change it completely, you will have to spend a considerable amount of money. Therefore, you can repair it by replacing broken parts. On a VAZ 2110, replacing the slip rings of the generator is a simple procedure and you can handle it yourself.
Replacing rings
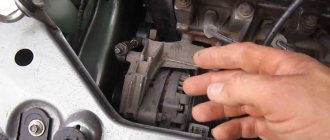
Disassembling the generator
This partial disassembly of the generating device is sufficient to replace the slip rings and the bearing on the shaft (armature bearing).
Method for replacing ring block 1
Further actions:
- the anchor is clamped in a vice;
- the bearing is pressed out;
- then use a knife to remove the plastic contact protection, which is located directly under the bearing;
- after this, you need to open the bracket of the contact block and tear out the soldered wires so that you can remove the old slip rings (again, you can use a knife).
Further:
- a new block with rings is put on the shaft (a spacer and light blows from above on the block with a hammer - the main thing is that the tails of the block accurately hit the seats);
- the wires are tucked into the proper places and sealed.
Note. During the soldering process, it is recommended not to use soldering acid (if used incorrectly, liquid can easily get inside the winding). After this, crimp the soldered contacts with pliers.
Next comes the assembly process:
- put the contact protection back on (it should fit tightly);
- then a new bearing is installed.
Steel rings and their advantages
Replacing slip rings on a VAZ 2110 generator
There is no point in installing copper rings, as they wear out very quickly. Therefore, it is better to opt for steel rings, which have a number of advantages:
- They hardly wear out, so the brushes remain in almost perfect condition for a long time.
- They are easy to install.
Note: by the way, for more reliable fixation, they are first lubricated with a flux solution, and then washed with soda.
- Once installed, they are securely fixed, remaining motionless in all situations.
Replacing the rotor with rings
Replacement on the VAZ 2110 generator
Sometimes it is not possible to replace the rings separately. The rotor also has to be replaced. This situation occurs when the rings reliably “stick” to the rotor. But you can try to restore the rings by placing them in a sulfuric acid solution. They cannot be kept in solution for a long time, as whole particles may disintegrate. To replace the rotor and rings, you must:
- Place markings on the covers of the generator (to make it easier to assemble them later, otherwise you can confuse their location).
- Remove the plastic casing. This is easier to do after the three latches securing it are bent away.
Note: you need to bend them very carefully, as they are quite delicate. Moving too quickly can cause them to break.
- Remove the two screws that secure the electronic voltage regulator.
- After this, you will have access to the generator relay. It must be removed, otherwise it will interfere with the work process.
- Remove all fastenings of the unit and condenser.
- Then unhook the three winding tips coming from the stator.
- Remove the block and capacitor. If you need to replace the capacitor, you need to unscrew the nut that secures it. Then remove the washer along with the bushing. Now it’s the turn of the wires that attach the capacitor to the contact bolt. After this, you can remove and replace the capacitor itself.
- Unscrew the generator coupling bolts. There are four of them in total. There are usually flat washers and spring washers underneath the screw heads. They are very small, but perform an important function. You can’t lose them, otherwise you’ll have to buy new ones, but finding them on sale is not easy.
- Remove the generator cover from the side where the slip rings are located. In this case, you can help slightly with a screwdriver, as if pulling the lid towards you.
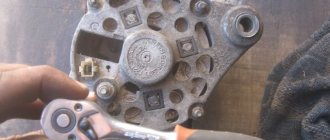
Disassembling the generating device
It is noteworthy that generators come in two types: old and new. The differences between them are in the diameter of the shaft. A 15 mm shaft is installed on old generators, 17 mm on new ones. This means that different bearings should be selected for replacement. The 302nd is suitable for a 15mm shaft, and the 303rd for a 17mm shaft. As for the rear bearing, it goes with all generators and is marked as 202.
So, disassembling the generator begins:
- First, remove the plastic cover;
- then the diode bridge is dismantled;
- remove the tablet (regulator with brushes);
- To unscrew the pulley nut, you will have to clamp the generator in a vice, and then use a 24mm socket.
Ring contact protection
Article on the topic: Checking the operation of the air conditioner in a car
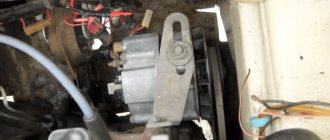
Advice. The gene must be clamped in a vice very carefully so as not to damage its parts. To avoid damage, the pulley is clamped using rubber gaskets.
Further:
- the relative position of the covers of the generating device is marked;
- then the tightening screws are unscrewed.
Note. The fastening screws are tightened very tightly. They are made of soft metal, so the usual methods of turning out oxidized bolts will not work. Here you will need an impact screwdriver or a shaped one, but with a large tip. Fasteners must be pre-treated with WD-40 or brake fluid and wait a little.
It is also recommended to treat the joints of the covers with the device body with WD-40.
Let's continue:
- take a mounting spatula or an ordinary, but flat screwdriver, and halve the gene.
What causes rings to wear off?
Alternator rings for VAZ 2110
The following generator parts can cause slip ring failure.
Stator
- On its inside there should be no traces from the rotor that would appear during its operation. Otherwise you will have to change it.
Note: You also need to check the bearings, as this problem often appears when they are broken. Sometimes even the generator cover can also get broken. This problem urgently needs to be fixed by replacing the damaged part with a new one.
- After this, you should check whether there is a break in the stator winding. It needs to be checked in the same way as the rotor.
Generator VAZ 2110
Of course, if you are sure that the stator is completely intact, then you should not carry out such manipulation. But if there is even the slightest suspicion that it is malfunctioning, then it is better to check it. A faulty stator can lead to rotor failure again.
Bearing
- See if the generator bearing located on the rotor rotates correctly. It should rotate freely on the slip ring side without jamming.
- If it dangles too much or, on the contrary, is very tightly clamped, then it needs to be compressed.
Lid
- The generator cover on the slip ring side may have damage, cracks or other defects.
- In this case, it needs to be replaced, otherwise it will have a bad effect on the contact rings, leading to their abrasion.
Replacing worn alternator rings
VAZ 2109 on a generator
When using a generator, sooner or later some of its components wear out. Of course, it’s as easy as shelling pears to buy a new mechanism, but why spend your money if you can fix the generator yourself? This does not require much experience or the use of special tools. The generator of the VAZ 2109 car may fail for some reasons, which are indicated in the repair book. There you can also find instructions for disassembling the device. The most common cause of generator failure is the wear of its rings:
- First you need to purchase new rings from a special store.
- The generator is removed from the engine compartment.
- Use a large open-end wrench to press on the mechanism bearing. The rotor is clamped in a vertical position, after which the outer ring of the bearing is removed using the lower horn. If you cannot perform such manipulations, then you need to try to pick up this bearing with a flat-head screwdriver. The part is removed so that it does not warp when moving.
VAZ 2109 generators
- When the bearing is removed, you can immediately see a plastic plug in the shape of a cross; this is also removed. Under the plug there are two contacts that need to be bent, releasing the outputs of the rotor winding. For these actions it is better to use a screwdriver or pliers.
- The present contacts are broken off and the old shank is removed.
- As a rule, purchased rings will not fit right away; they need to be hammered in with a small hammer. If necessary, they can be processed with a file. In rare situations, new rings turn out to be short, so to solve the problem you need to put a plastic bushing on the shaft that will prevent distortion. Otherwise, the brushes will wear out much faster.
- The contacts are bent as tightly as possible; they can even be soldered to the winding itself, which is covered on top with a plastic casing. Only after this is the bearing mounted. Before installing the generator in its place, you need to lubricate its rings; such measures will help reduce the likelihood of their wear during the grinding process.
- As a result, the generator resource should last for at least two years.
- After installing the bearing, it is necessary to evaluate the ease of its operation on the part of the replaced slip rings. If there is play, rolling or jamming, the bearing will need to be replaced.
- The generator cover, placed on top of the rings, must be completely intact; cracks, holes or other damage are not allowed. If such defects are still present, the cover is replaced.
Recommendations
Replacing rings
When operating your car, it is recommended to often pay attention to the voltmeter, which indicates the battery charge. If the indicator goes beyond the red limit line, this means that the generator is not supplying enough voltage or stops working altogether. In such situations, you must immediately turn off all additional energy consuming devices and go to the place of repair.
In fact, changing the slip rings of the generator is not so difficult, there are videos and photos, but it is much more difficult to identify faults. To do this, you need to understand at least a little about the topic. Today, the Internet provides an excellent opportunity for non-professionals who want to save money on repairing their car to do the repairs themselves. Of course, you will need detailed instructions, which are also provided online, and spare parts, the price of which will directly depend on the chosen manufacturer.