Tuning the carburetor VAZ 2107
The VAZ 2107 car is a classic of Soviet engineering. It was created on the basis of the 2105, which, in turn, was developed on the basis of the Fiat 124. The “seven” was conceived as a family car. Therefore, there are no special characteristics in the car.
But modern car enthusiasts do not agree with this state of affairs and strive to add some of their own unique touches to the “Seven”. This applies not only to styling, but also to hardware tuning. In this article we will talk about how to improve the dynamic characteristics of a car by working with its carburetor. You can achieve the desired result in various ways. Some experts recommend working on the engine. Installing lightweight components (pistons and connecting rods), along with grinding the manifolds, allows you to improve the acceleration dynamics of the VAZ 2107.
All this work requires the participation of professionals and specialized equipment. But often, the owners of the “Seven” prefer to do everything with their own hands. This allows you to avoid unnecessary costs. Therefore, it is worth considering the option of modifying the carburetor. This path is not so expensive and does not require special qualifications. And best of all, you don't even need a garage. As a result, you can significantly improve the performance characteristics of the VAZ 2107 and spend less money on modifications. In addition, the positive effect will appear immediately.
All methods of carburetor tuning. Working methods
Alexander Rastorguev [razborkazapzap]
02.09.2019,
Until now, cars with carburetor engines roam the expanses of the countries of the former USSR. Most of these cars are classic VAZ and front-wheel drive “chisels”. Due to the high cost of engine tuning, even by switching to an injector, I will talk about how to effectively increase power by tuning the carburetor.
First of all, about the disadvantages of the carburetor, or why it is better to switch to an injector.
- The main disadvantage of the carburetor is the uneven distribution of the fuel-air mixture and the inability to prepare a reference mixture for each operating mode and each type of load.
- The carburetor has a starting device, an idle system, as well as parts responsible for transient conditions. The idle mode operates up to 1000 rpm, after which, in the range of 1000-2000/2500, the mode operates on one throttle valve, and after 2500 rpm the second throttle opens.
- The stepwise transition between modes creates dips when you sharply press the gas pedal, despite the presence of an accelerator pump.
- The carburetor distributes the mixture unevenly among the cylinders, since the length of the channels differs significantly from each other.
About upgrading the carburetor
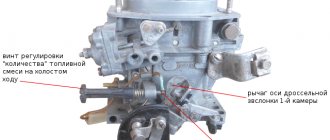
Using the example of an OZONE carburetor with a mechanical drive of the second chamber, I will talk about tuning methods. The result of the adjustment should be uniform and maximum standard preparation and supply of the mixture to the engine cylinders. The idle speed screws are responsible for the quality and quantity of the mixture. For other modes, a selection of jets is required, as well as boring of diffusers. Our task is to ensure that transition modes are smooth without failures, and that stable power is provided from medium to maximum speeds.
Disassembly and modification of the carburetor
First of all, if you have a pneumatic drive for opening the second chamber, we install a mechanical drive from another model of the Ozone carburetor. This is necessary so that when you press the gas pedal, the second chamber opens immediately, and not with a delay.
The second point is the modification of the throttle valve drive. In Ozone, the drive from the gas pedal is driven through tie rods on ball joints, which means extra play and delay when pressing the accelerator pedal. To install a cable drive, you will need a gas pedal from an injection VAZ 2107, a throttle cable from it and a throttle sector from Solex. How to properly install the entire system, I will leave a link with step-by-step instructions that I relied on. The effect was not long in coming - a clear increase in dynamics is achieved due to the complete absence of backlash.
About jets
High-quality filling of the cylinder is the main task of the carburetor. It will be necessary to resolve the issue of the direction of the air flow and its supply to the carburetor. In addition to the fact that I bored out the channels for 36x36 diffusers, I also replaced the 3.5 diffusers with 4.5 ones. This allowed for more airflow. The accelerator pump also requires modernization. Here either the addition of a “spout” from the Solex accelerator, or a change in the direction of the standard UN. Changing the direction is simple: I solved this issue by boring the seat at such an angle that the sprayed fuel would not break against the walls of the diffuser, but would be sprayed exactly in the center.
Selecting air and fuel jets is a delicate job that requires a lot of time. I had to take several sets of jets and select them each in turn, observing a uniform increase in engine speed and car behavior. The process takes about an hour, but you can use a sign with the standard ratio of fuel jets to air. At this point, carburetor tuning can be completed, since other aspects such as adjusting the idle speed and the level of the float chamber are carried out strictly according to the instructions.
Modification of the intake manifold
All efforts may be in vain if the collector is not modified. The modification consists of grinding the channels so that their diameter coincides with the diameter of the cylinder head inlet channel without a transition step. You will also need to align the manifold plane adjacent to the cylinder head.
Ignition settings
Any adjustment and tuning of the carburetor is carried out in parallel with the ignition adjustment. Otherwise, all efforts may also be in vain. I definitely change spark plugs, high-voltage wires, and the ignition system is definitely contactless. A tuning carburetor, in any case, will supply more fuel, but the voltage of the standard ignition system will not be enough to effectively ignite the mixture. The non-contact ignition system is 50% more powerful than the standard one, which means that in tandem with new spark plugs and wires, this will give a significant increase not only in engine power, but also in elasticity.
So, regarding my experience. A VAZ 2106 car with a 1.5 engine and an Ozone 2105 carburetor. Acceleration with a standard carburetor and ignition to 100 km/h was 18 seconds. After carrying out the above manipulations, the acceleration was reduced to 14.5 seconds, without interfering with other systems.
By the way, I strongly do not advise you to install a zero resistance filter. The fact is that the air “pan” is made by the factory so that the air flow comes with a certain resistance, otherwise the rich mixture will simply flood the cylinders. It is enough to install a high-quality filter and not cut the standard air filter housing. By the way, fuel consumption increased by 1 liter, but due to the fact that just by adjusting the carburetor and installing the BSZ it was possible to reduce acceleration by 4-4.5 seconds, this is a good indicator.
Options for tuning the “Seven” carburetor
So, if you decide to try your hand at improving the performance of your car, it is advisable for you to start by improving the performance of the carburetor.
First of all, this will allow you to fill your hand, and also make sure that all actions were not carried out in vain. The maneuverability of the vehicle is significantly improved, and fuel consumption is reduced.
How could this not impress some car enthusiast? Probably, every owner of not only a “Seven”, but any car, only dreams of increased performance, and the need to spend money on refueling less and less often.
Although you should set yourself up for this option, when the performance characteristics of the car improve along with a slight increase in fuel resources.
There are several options based on which you can tune the VAZ-2107 carburetor with your own hands. The first is to refine the carburetor design, and the second is to improve the mechanism by introducing a new repair kit.
Finalization of the design
The structural modification of the VAZ-2107 factory carburetor is aimed at eliminating the problem, as a result of which it is not possible to fully provide full power at which it could reach the engine speed declared directly by the manufacturer.
So, first find and release the spring, which is located between the pump and the damper. Now feel free to remove it, you won’t need it anymore. Unfortunately, fuel consumption may increase slightly for this reason, by approximately half a liter for every hundred kilometers.
However, compared to other changes that improve the performance of your car, such additional fuel consumption will not worry you much.
Also remove the spring using the same principle from the secondary chamber flap. Next, from ordinary thin wire, make a drive that directly connects the lever itself and the damper.
In the primary chamber you can easily find a diffuser with a size of 3.5; experts strongly recommend replacing it with a slightly larger size of 4.5.
Next, in order to increase the starting acceleration of your “Seven”, we set the value of the accelerator pump nozzle to o. Most of you will immediately react that this could lead to an increase in fuel consumption. This is indeed true, but the increase itself will be relatively small, within the same 0.5 liters per hundred kilometers, so you should not be afraid of such actions.
Now you have to work with the jets, despite the fact that you have heard that it is better not to have anything to do with them. In fact, if you do everything slowly, controlling your every step, then problems will definitely bypass you.
Initially, install the 162 jet, then test the performance of your “seven”, listen to the operation of the engine. If desired, you can continue tuning the VAZ-2107 carburetor, carrying out actions to constructively transform the primary chamber, installing nozzles 13 or 135.
It should be remembered that increasing the size of the jets must be done gradually so as not to provoke a technical problem when gasoline simply floods your carburetor due to a mismatch between the engine power and the size of the jets.
On the Internet you can also come across such a “rationalization” proposal, when “masters” recommend putting a hose on the air intake. It is quite difficult to call such actions reasonable. They will not bring a single benefit, but they will create a rather large problem.
Due to the fact that the filter will not be able to fully cope with air purification, the engine will gradually become clogged, and accordingly, its service life will be significantly reduced. Instead of improvement, you will only get worse; certainly, no one needs such tuning of the VAZ-2107 carburetor. Avoid such unfortunate offers, take only those actions that are recommended by many car enthusiasts, since they have already passed practical tests.
Tuning using a repair kit
This tuning is suitable for those owners of the “Seven” who do not want to put up with sluggish power delivery and the same sluggish response of the car when pressing the gas pedal.
It will be possible to solve such a technical deficiency if you replace the repair kit. To do this, you first need to visit the car market or auto store to purchase a repair kit for DAAZ.
After the acquisition is completely successful, you can begin the practical part of the action. Initially, completely disassemble the carburetor, then the main diffusers are located in the middle part of the carburetor, find and concentrate on them. They should be sanded with sandpaper, which will significantly reduce aerodynamic losses.
Refinement of the OZONE carburetor
In my opinion, one of the main disadvantages of the OZONE carburetor is the pneumatic drive of the second chamber. Very often there is a phenomenon when, under a layer of dust and dirt, it stops opening altogether. And, as I already said, it’s a pneumatic drive, which means there’s a diaphragm there that tends to tear. And this leads to incomplete opening of the second chamber, a decrease in power and acceleration dynamics, which can play a bad joke on you on the road...
The OZON carburetor is a conversion from the DAAZ 2101 carburetor. But the changes were minor, the biggest was the introduction of a pneumatic drive instead of a mechanical one. And most articles about tuning an OZONE carburetor come down to altering the drive.
I would like to talk about minor improvements :). By the way, I found an interesting article about the modification of ozone, you can see it here. Well, let's begin! First way. I read a lot of advice on modifications and very often heard this advice - throw the spring out of the pneumatic drive. I would not advise you to do this.
Why? But because the second chamber must open at a certain opening of the first chamber. This spring regulates the moment and amount of opening of the damper. By removing it, you will not be able to guarantee stable mixture formation by the carburetor, because the second chamber will open earlier than necessary. Trust my experience.
The second method was described in the magazine “Behind the Wheel” and consists of modifying the shutter lever of the second camera. This is a return to the Italian version of the carburetor. To begin with, the following were removed:
- Diaphragm rod.
- Intermediate damper lever.
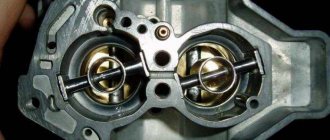
Then a neatly cut piece of 3mm thick steel was welded to the lever of the damper axis. (see picture)
The author also recommended installing a GVZ marked 170 or 190 in the second chamber. Also, in case of failure, it is necessary to install the accelerator pump spout marked 50.
Third way. Its essence is to make a lever on your own. Here is the drawing:
The fourth method is to install a ready-made lever from Weber (DAAZ 2101), which fits without modifications. The lever from the OZONE carburetor, which was installed in Moskvichi (DAAZ 2140-1107010-70), is also suitable. You can also look for the lever from the DAAZ 2106-1107010-10 carburetor.
Within the scope of this article, I will not discuss here the various combinations of jets that can be used; this will be discussed in a separate article. Good luck with tuning your OZONES!
Modification of the OZONE
4 carburetor — Ratings: 84
Installing a compressor on a VAZ 2107 carburetor
Installing a compressor on the seven is an opportunity to increase the efficiency of pumping hot mixture and accordingly increase engine power. The most popular compressor that car enthusiasts and craftsmen install on the VAZ 2107 is the PK05D
which will be discussed.
Why him?
It’s just that its characteristics meet the most optimal ones, namely: excess air pressure is only 0.5 bar and this is achieved at 6200 rpm. In addition to this decisive characteristic, there is another fact in favor of this compressor - when installing it, you do not need to interfere with the design of the piston group, which means that installation is extremely simple.
Installing a compressor on a VAZ 2107 carburetor with your own hands
is quite possible without the intervention of specialized craftsmen. Naturally, first, you should familiarize yourself with some of the features of this procedure, as well as know the sequence and order of actions. If you are worried about the benefits of a compressor, then believe me, it has been used for these purposes in sevens for a long time and during this time it has undergone several significant improvements that have made it even better and naturally more efficient. The latest innovation is a significant reduction in the noise characteristics of the unit, so the supercharger operates almost silently.
PK05D
consists of two main elements that deserve your attention and concept.
The first is a centrifugal device
, and the second is
a high-speed multiplier
. A special feature of the compressor is that there is no need to service it, and the mechanism is driven by a poly-V-type belt from the engine crankshaft.
In designs of this kind, the multiplier is made on the basis of bearings, which should be replaced after a run of about 50 thousand kilometers. The same goes for the belt, because it is also subject to a certain amount of wear and tear, which goes without saying. It is important to understand that for normal operation of the compressor on a VAZ 2107, the carburetor
, you need to ensure
the supply of antifreeze
(antifreeze) or
engine oil
. We have already said above that there is no need to change the design of the power unit, but you still need to replace the generator shaft, crank pulley and water pump. The fact is that now they will use a serpentine belt, rather than a regular one. Where can I get such a strap? Experiments have shown that the Chevrolet Niva is quite suitable. We took measurements, and after installing the compressor, the increase in car power was about 50 percent.
Procedure for installing a compressor on a VAZ 2107 carburetor:
1. Remove the standard alternator belt and dismantle its fastening 2. Remove the air filter 3. Install pulleys from the Niva Chevrolet instead of the factory pulleys 4. Mount the compressor mounting bracket, as well as the compressor itself and the alternator belt according to the diagram below. (the bushings from the kit must be put on the studs between the mount and the compressor) 5. Place the corrugated pipe on the inlet of the compressor and install the filter. 6. We install pipes on the outlet of the compressor (they must be connected by a special pipe with a diameter of 60 mm and a length of 50 mm.) 7. We connect a 60 mm pipe with the valve, install a coupling, as well as a supply flange in the carburetor. 8. Use a blue hose to connect the compressor fitting and the carburetor fitting. 9. Disconnect the hose for crankcase ventilation, and secure all other connections with clamps. 10. The last point is adjusting the tension of the generator belt.
DIY repair
If your carburetor suddenly becomes unusable, do not throw it away. Repairing this important “organ” of the car involves replacing faulty parts as quickly as possible. In order to determine which parts need to be replaced, you should disassemble, clean the carburetor and carefully inspect the component mechanisms.
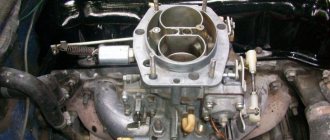
How to remove a carburetor
The carburetor is removed if a malfunction is detected in it, but there is no way to do this by partial disassembly. The carburetor is also removed to replace, adjust and clean it.
It is removed as follows:
- To begin with, all kinds of hinged parts and damper drive cables are removed.
- The air filter housing is removed from the studs. To do this, you need to unscrew all the nuts that secure it to the carburetor. The clamping nut is pulled back and the choke cable sheath is pulled out from the mounting bracket.
- The outer surface of the parts is cleaned of dirt.
- The choke drive cable is loosened and the fuel supply and crankcase gas exhaust hoses are removed.
- The hose between the economizer and the pneumatic valve and the hose of the vacuum ignition distributor are disconnected.
- Then the nuts that secure the carburetor to the intake manifold are unscrewed.
- The carburetor body is removed and the intake manifold hole is plugged with a clean rag to avoid clogging.
Don't forget to check the integrity of the sealing gasket, which is located between the carburetor and the intake manifold. Replace it if necessary.
Photo gallery: removing the carburetor from a VAZ
How to clean a carburetor
Before you start cleaning the carburetor, you need to carefully prepare: buy a special aerosol cleaner at a car shop, arm yourself with smooth, dry cloths, a tire inflator, remove the carburetor and disassemble it.
Cleaning the jets
Jets—fuel and gas supply channels—are cleaned with compressed air or a liquid cleaner under pressure. Mechanical cleaning with any fleecy or metal objects is prohibited.
When cleaning the jets with compressed air (you can use a tire pump for this), the body of the idle jets, the main metering system (air and fuel), then the valves and channels of the pump sprayer are blown out.
In case of severe contamination, the jets are placed in acetone so that the deposits soften or completely dissolve. Then they should be blown out.
Table: jet calibration values
| Hole diameter, mm | First camera | Second camera |
| Main fuel jet | 1,35 | 1,25 |
| Air jet | 1,70 | 1,90 |
| Idle fuel jet | 0,45 | 0,60 |
| Idle air jet | 1,80 | 0,70 |
| Accelerator pump nozzle | 0,50 | — |
| Accelerator pump bypass jet | 0,40 | — |
| Fuel nozzle of enrichment device | — | 1,50 |
| Emulsion nozzle of the enrichment device | — | 1,70 |
| Air jet of enrichment device | 0,70 | — |
Flushing the float system
To get to the carburetor float system, you must:
- Remove the air filter and fuel hose clamps.
- Disconnect the cable that controls the starting device.
- Remove the electrical connector on the solenoid valve.
- Then unscrew the fastening bolts and, without turning over, remove the carburetor cover.
It is best to clean the float compartment with a rubber bulb, carefully drawing out any remaining fuel from the chamber. You should not use fluffy rags - they can accidentally clog the jets.
To complete the cleaning, you can wipe the bottom of the float chamber with a stiff brush.
To check how well you have cleaned the float chamber, you need to unscrew the air jets and blow out the emulsion wells. If dirt appears in them, washing should be repeated and checked in the same way.
Flushing the throttle valve
It is produced using a cleaner, which can be purchased at a specialized auto store.
- The throttle valve itself is washed, as well as all accessible elements, channels, valves, etc. Particular attention should be paid to the forced crankcase ventilation channel, since it becomes clogged more often and more severely than other parts.
- After this, the idle speed sensor is unscrewed and the internal elements are washed.
- The procedure is repeated again.
Video: how to clean the throttle valve on a VAZ
Replacing the gasket
The gasket is located between the carburetor body and its cover. If during disassembly you find any damage to the gasket, it should be replaced.
This is not so difficult to do - you just need to dismantle the float and put a new one in place of the old unsuitable gasket. Then install the float and put the carburetor cap back.
After washing the internal elements of the carburetor, it should be blown out. An air or car compressor is perfect for this.
Video: how to remove and clean the carburetor on a VAZ
Boring large diffusers
One of the drastic ways to remake a carburetor is to increase the air flow by boring the diffuser. The car gains improved dynamics under heavy and medium loads. This method is not without its drawback - at low speeds, failures in engine operation appear.
Boring of diffusers should be part of a comprehensive carburetor tuning. After this, the selection of new jets is mandatory. If the required diameter is not available, they will need to be drilled out. This operation is especially relevant for forced engines of 1.7 and 1.8 liters, since nozzles of increased diameter are not available for sale for them.
Installation of a sports modification
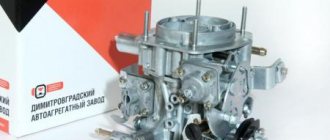
Not all owners of “sevens” know that the Dimitrovgrad Automotive Accessory Plant, in addition to standard equipment, also produces sports versions of carburetors.
Thus, the VAZ 2107–1107010–07 “Solex-Sport” carburetor is considered just such a version, capable of giving the car significant acceleration. Its main advantages are that significant improvements have been made to the design of the installation:
- jets with higher throughput are used;
- the performance of the accelerator pump has been increased;
- cold start characteristics have been improved;
- The design of the chamber opening drives has been changed.
Thus, the “Sport” modification allows you to use all the power capabilities of the engine. However, fuel consumption will be approximately 10% higher than when driving with a standard DAAZ carburetor.
The process of installing a sports carburetor on a VAZ 2107 is no different from installing a standard one - after all, the manufacturer made sure in advance that the new device has the same dimensions and connectors for connections.
The traditional installation diagram looks like this:
- Install a new gasket onto the carburetor seat.
However, not all car owners believe that it is advisable to install a Solex sports carburetor on the “seven”.
you stupidly buy a Solex 21073 from a Niva 1700 and don’t need anything else. rework will require only 200 rubles. and not as they ask for 5800 rubles - this is a scam for suckers. acceleration dynamics can be improved with virtually no significant increase in fuel consumption. and not like these Solex Sport
Popova Natalya
https://otvet.mail.ru/question/66262989
His Majesty diffuser
As you can see, the diffuser occupies not the last place in this hierarchy, and here’s why. The main problem with Solex DAAZ 21083 is that the standard mixture is too lean. The engineers deliberately took this step in order to strangle the engine in favor of efficiency, depriving it of its dynamic potential. But even without resorting to complex and subtle calculations, it is clear that first of all it is necessary to eliminate aerodynamic errors, which are full of any DAAZ carburetor.
If you pick up a diffuser, large or small, pay attention to the quality of the casting and show all this happiness to an engineer at least from Ford Europe, he will go crazy. A standard diffuser creates so many turbulences and parasitic flows in the intake tract that the efficiency of the carburetor is reduced by 20 percent. What kind of tuning can we talk about with such diffusers! Therefore, first of all, they need to be sanded, removing all the seams that create swirls.
VAZ 2107 carburetor tuning options
One of the most common options for tuning the “seven” carburetor is a design modification that allows you to solve the problem of the power of the power unit not reaching the crankshaft speed specified by the manufacturer. To do this, you need to perform the following manipulations:
- Remove the connecting spring between the throttle valve and the vacuum pump. You should be prepared for the fact that fuel consumption will increase, but only slightly. About 0.5-0.6 liters per hundred.
- We repeat the operation with the secondary chamber shutter.
- We make a damper drive from thin wire, connected directly to the lever.
- We replace the diffuser of the primary chamber “3.5” with a large one – “4.5”.
- We install the accelerator pump nozzle with the value “40”. We hasten to reassure motorists who are afraid of an increase in fuel consumption - it will not be significant. But the starting acceleration of the car will become faster.
- The next action of the motorist will be to work with objects that the vast majority traditionally try not to touch. These are the main jets . Here, as in any matter, expediency and moderation come to the fore. It will be enough if you first install the “162” jet.
- Take a test drive and check the operation of the vehicle's engine.
Attention! After this improvement, fuel consumption will increase by approximately 1.0 liter.
If there is a desire for a greater increase in engine power, it is necessary to modify the elements of the primary chamber . Install "GTZh -13" (for a power plant V=1.5 liters) or "GTZh-135" (for V=1.6 liters) jets.
Attention! The individual functioning of each engine dictates a gradual increase in the size of the jets. Otherwise, you will end up with a carburetor flooded with gasoline due to low engine power.
Some “experts” recommend providing air “under pressure” by placing a hose on the air intake. We warn you, this is fraught with serious consequences, since in this case the air filter cannot cope with cleaning the air from dust, which shortens the life of the engine.
The main options for modifying the carburetor
The first thing you can do when tuning a VAZ 2107 carburetor is to get rid of the throttle drive spring in the primary chamber. This entire operation will take you no more than five minutes. And the effect is noticeable - your car will significantly improve its dynamics. But fuel consumption will increase by only half a liter “per hundred”. Important information! Basic steps for tuning a VAZ 2107 carburetor:
- removing the throttle actuator spring;
- tuning the throttle valve drive of the secondary chamber;
- removing the small diffuser and installing a new one;
- working with jets.
Next, to improve the dynamic characteristics of the VAZ 2107, you can work on the throttle valve drive in the secondary chamber (as a result, it should be mechanical, not vacuum). The entire operation is carried out using a small piece of wire or spring. A ring is made at one end of the wire and placed under the nut that secures the damper drive levers in the secondary chamber. In this case, the protrusion of the outer lever is between the other lever and the wire. As a result of this operation, it is necessary to tighten the nut very well.
What results can we achieve through such manipulations? First of all, an increase in dynamics. At the same time, fuel consumption does not change significantly. In addition, acceleration will be smoother and without drawdowns. Next, it is recommended to remove the small diffuser (it is inserted into the main diffuser located above the throttle valve). In its place, another small diffuser is inserted, marked 4.5 (that is, exactly the same part that is installed in the secondary chamber of the carburetor). In parallel with this, you can replace the standard accelerator pump nozzle. As an alternative, an enlarged one is offered (which can be found in Weber carburetors).
As a result of such manipulations, fuel consumption will remain virtually unchanged. But the acceleration dynamics increase noticeably, especially at the very beginning of the movement. Finally, tuning the VAZ 2107 carburetor can be continued by increasing the jets. Although in all the instructions for the car you will find information that doing this is strictly not recommended. But if you listen to the advice of the “manuals,” then even a small change in the fuel nozzle can lead to a significant increase in consumption and a catastrophic increase in CO levels. But there is some truth here. That's why we recommend starting with minor changes and looking at the results.
Important information! Remember that you carry out all work on the carburetor at your own peril and risk. Therefore, you should not neglect safety measures and recommendations of specialists. We change the main fuel jet to 125, and the air jet to 150. We leave the secondary chamber unchanged. Even after such manipulations, the accelerating dynamics are already noticeably “increasing”. But you may feel that this is not enough. Therefore, we continue to work with jets. We install GTZh 162 and GVZh 190 into the secondary chamber. These are the most maximum parts that have ever been produced. They are installed on Weber 2106 carburetors. As a result of such manipulations, we get a turbocharging effect (when the pedal is depressed until the secondary chamber opens). At the same time, the engine spins up to 6,500 rpm quite easily. There is an increase in fuel consumption, but it is insignificant.
If after all these operations you want more, you can install the main fuel jet 130 for 1500 power units and the main fuel jet 135 for 1600 power units in the primary chamber. It is not recommended to install larger ones. The fact is that in this case, when you sharply press the gas pedal, the fuel in the carburetor will overflow and it will begin to “choke.” As a result, you will not only worsen acceleration dynamics, but also increase fuel consumption. Therefore, this particular combination can be considered optimal. As for the secondary chamber, the jets remain unchanged (taking into account the fact that we have already replaced the standard ones with 162 and 190).
And now a few words about fuel consumption. It will, of course, increase noticeably. But if you don't press the pedal too hard at every traffic light in urban conditions, you can keep it at 11 liters per hundred kilometers. And at the same time, you will get excellent acceleration dynamics of the car at the level of those who regularly “grind rubber.” As for idling, the consumption remains unchanged. After all, the settings haven't changed. It is also important to remember that each engine has its own jets. The scheme described above is something average and universal. The only recommendation is that you should not immediately try to achieve maximum parameters. This can really lead to negative consequences.
And one more important point. Some so-called experts recommend pressurized air. To do this, a hose is placed on the air intake. However, in practice, such a step can lead to serious negative consequences. The fact is that the air filter simply cannot cope with cleaning the air from dust. And this, as a result, will shorten the life of the entire power unit.