Why do you need carburetor adjustment at all?
For stable operation of the ATV, it is necessary that the engine receives the optimal amount of fuel mixture corresponding to its speed range. Otherwise, the following problems may occur:
- Difficulties with the factory, the engine constantly stalls.
- Weak power characteristics, sluggish response to the throttle trigger.
- Poor dynamics when accelerating from the bottom, accompanied by spontaneous jerks when moving.
- Dips observed mainly during overclocking.
- High fuel consumption.
- Excessive formation of carbon deposits on the walls of the combustion chamber and, as a result, overheating of the engine.
What needs to be done in this case:
- Adjust the idle speed using the mixture quality screw and the number of revolutions.
- Adjust the quality of the mixture using a needle.
- Adjust the fuel level.
Important! Make adjustments only when the carburetor is cleaned inside and out, and when the engine is warmed up to operating temperature.
WHY DO YOU NEED A FUEL SYSTEM ADJUSTMENT?
The carburetor is the central power supply unit of the engine. Fuel consumption, engine power and speed characteristics directly depend on the quality of its work. If the unit is configured correctly, then it forms an emulsion (combustible mixture) in accordance with the requirements of the engine. In case of inaccurate settings, the following operational errors occur:
- Difficulty starting. Periodically, the equipment begins to choke or does not start at all.
- Insufficient acceleration dynamics. Dips in the throttle handle, which leads to spontaneous jolts when driving.
- Slowness during acceleration, which leads to increased fuel consumption. This affects the ride quality and interferes with high-speed dynamics.
- The appearance of carbon deposits in the engine, which naturally leads to a decrease in the service life of the engine and other technical units.
How to adjust carburetor idle speed on an ATV
- To get rid of condensation that regularly appears in the carburetor, drain the fuel from the float chamber - close the fuel valve and unscrew screw No. 1 until it stops. Wait for the gasoline to drain completely and tighten screw No. 1 back.
- Start the vehicle and let it warm up for a few minutes.
- Tighten the mixture quality bolt No. 2 until it stops. The engine will stall at this stage. If this does not happen, the tightness of the air supply system pipes is most likely broken. Check it out. Then turn bolt #2 one turn. The mixture becomes richer in a clockwise direction, while it becomes leaner in a counterclockwise direction.
- Increase idle speed using screw No. 3 and start the ATV. The number of revolutions should be slightly higher than usual (in some models the idle speed adjustment bolt is located on the right side of the four-wheeler).
- Unscrew the fuel mixture quality screw No. 2 so that the power unit reaches maximum speed - approximately 2-2.5 turns.
- Start leveling the idle speed using bolt No. 3 until you hear a smooth, smooth sound of the engine running.
- Press the throttle trigger several times to check the stability of the idle speed.
Note. The location of the bolts may vary on each carburetor model, so check the instructions that came with your carburetor.
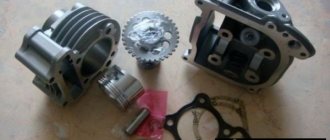
Operations Performed
Let's face it, servicing a device installed on an ATV is not very convenient. All that the developers took care of for such a case when designing the Stealth 500 carburetor was adjusting the idle speed. This is done with the engine warmed up to operating temperature by turning the adjusting screw. The optimal mode is considered to be when the tachometer needle is set at 1600 rpm.
In order to change the qualitative composition of the fuel mixture, the part will have to be dismantled. The design provides two stages of adjustment.
- Rude. It is done by changing the position of the installation washer on the dosing needle rod. To do this, you have to unscrew the two fastening screws and remove the diaphragm along with the needle and piston. Only after this will it be possible to rearrange the ring into one of the five positions provided by the manufacturer. Such an adjustment affects the total amount of fuel mixture entering the engine, changing the traction characteristics of the engine and gasoline consumption.
- Thin. To do this, you will have to use a screw, initially hidden under a plastic plug. The plug will have to be removed. After this, the screw is tightened until it stops, and then unscrewed 1.5 - 2.5 turns, after which the plug is installed in place. In this way, it is possible to achieve the optimal mixture composition at idle speed and in transition modes.
You can judge the result of the work done by the color of the electrodes of the spark plug removed from the engine. If everything is in order, then after 15 - 20 minutes. When the engine is running they will be light brown in color. Black, sooty electrodes indicate excess fuel. A whitish coating indicates a lean mixture. In both cases, the position of the screw will have to be changed slightly. Be prepared for the fact that you will have to do this operation several times.
Adjusting the ATV carburetor mixture quality on the go
1. Start the ATV and take it for a test ride. Wait until the engine has completely cooled down.
2. Check the condition of the spark plug. To do this, unscrew the cap and inspect the spark plug.
What to pay attention to:
- A light brown coating around the entire circumference of the insulator is a sign of optimal carburetor operation.
- Brown color on one side of the insulator means the engine has a lean mixture.
- A thick black deposit on the spark plug insulator is an indication that the carburetor is supplying too much fuel mixture while the ATV is moving.
- A completely black spark plug, insulator and electrode are too rich a mixture, which results in excessively high fuel consumption and a decrease in power, as well as gas contamination in the chamber.
- White insulator – lack of air and gasoline supply. Leads to overheating and increased gasoline consumption.
- A completely white spark plug is a too lean mixture.
- Brick color - a large volume of additives with a high metal content in the composition.
- The absence of carbon deposits and the simultaneous melting of the electrode means a very lean mixture at high speeds.
- A spark plug with a broken tip is a breakdown of the central electrode with a ceramic skirt.
- A spark plug with oil deposits inside the electrode is a sign of used rings and valve stem seals.
- Shiny inclusions and shavings indicate engine destruction due to driving at high speeds.
- Oxidation – problems with piston rings.
3. Unscrew the needle cap at the top of the carburetor. Pull the needle. This is the main element that regulates the supply of fuel to the combustion chamber, since the needle is connected to the gas trigger. When the trigger is pressed, the needle rises, slightly opening the hole for supplying the fuel mixture. This directly affects the increase in power and speed of the ATV.
4. Remove the cable, then press the needle to pull it out. The needle has 5 grooves and a locking ring. By default it is set to medium. The lower the locking ring is located, the higher the needle is raised, which means a lot of gasoline and little air is supplied. Accordingly, the higher the ring, the less gasoline and more air.
5. Move the retaining ring in the desired direction to optimize carburetor performance. Insert the needle into place.
6. Start the engine and pull the throttle trigger. If adjusted correctly, the engine should not stall from sudden pressure.
And remember, you should resort to adjusting the needle only as a last resort, when adjusting the quality and quantity screw does not bring any results.
Adjusting the fuel level in the float chamber of ATVs
The performance of a four-wheeler depends on the correct level of gasoline in the carburetor. An excessive amount will flood the candles, spill on the ground and lead to unnecessary expenses. If too little fuel is supplied, the engine simply will not start.
How to optimally adjust the fuel supply
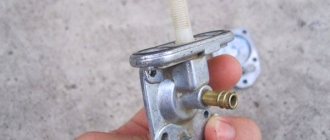
- 4-stroke ATVs have carburetors with an opaque drain hose tube hanging down. Therefore, first of all, replace it with transparent one.
- Lift the free end of the hose up.
- Unscrew the drain screw next to the tube to get rid of excess fuel. Based on the amount of liquid entering the tube, determine the level of gasoline in the carburetor. The norm is the line (1-1.5 mm below is allowed) between the housing and the float chamber.
- To adjust the fuel supply level, open the float chamber and find the tab that covers the shut-off needle.
- By bending the tongue down, you will increase the intensity of fuel delivery. By bending it up, on the contrary, lower it. Perform all manipulations with caution, as the structure is quite fragile.
OPTIMUM FUEL LEVEL IN THE CARBURETOR. CARBURETOR ADJUSTMENT.
The correct fuel level in the carburetor float chamber is the key to the normal operation of an ATV or mini bike.
The quality of operation of a minibike or ATV largely depends on the correct level of fuel in the carburetor. If there is too much of it, then it will flood the candles and spill on the ground when overflowing, and if there is too little, problems with starting cannot be avoided. Therefore, it is recommended to pay special attention to carburetor settings. At the very bottom there is a drainage hose. First of all, you need to take its transparent tube and, having disconnected one of its ends, lift it up to the carburetor chamber. Some ATV models (usually 4-stroke ATVs) use an opaque tube, in which case it is recommended to remove it and replace it with a transparent one while making adjustments.
Then you should unscrew the fuel drain screw, which is located next to the drain hose. Fuel from the carburetor will begin to flow into the drain hose.
When the fuel enters the transparent tube, we can judge its level in the carburetor. The optimal level is considered to be the level that reaches the connection line between the carburetor bodies and the float chamber. A level of a millimeter or one and a half below this line is also considered acceptable, depending on the engine model. The most suitable option can be determined experimentally.
If during testing you find that your level is very different from the specified parameters, it needs to be adjusted. To do this, you need to open the float chamber and find the float, which closes the locking needle using a metal tongue. To increase the fuel level in the carburetor chamber, do you need to bend the tongue? resting down on the locking needle, and to lower it, bend it up. In this case, you need to act with extreme caution, since the tongue is not particularly durable.
You can also take this opportunity to disconnect the shut-off needle and rinse it thoroughly. The same applies to the fuel passage (jet), especially if your carburetor is leaking through the fuel drain hose. Such a leak may be due to contamination of the tube or a clot of oil getting under the needle. In such cases, the needle does not completely shut off the fuel supply, which leads to the chamber overflowing and fuel leaking out through the drain hose.
Do not despair if your attempts to adjust the fuel level are in vain. Rarely does anyone succeed the first time. You'll have to experiment, try different options until the level is what you need. Of course, you will have to be patient, but keeping your ATV running smoothly is worth it.
If the engine feels like it's about to stall, you should increase the fuel level, and if it feels sluggish and sounds like it's choking, you should lower the fuel level.
Source