Installing a starter on a Ural motorcycle with your own hands
Equipping a motorcycle with a starter in most cases is determined by the owner’s desire for convenience and practicality, less often - by urgent need.
In some cases, for example, when the technical feature of the unit does not allow it to be equipped with a crank, installing this module is the only way out. A starter is an electromechanical device designed to start an internal combustion engine. The device is a powerful mixed-excitation electric motor powered by direct current provided by the on-board battery.
Choosing a starter
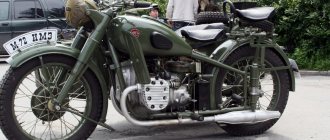
Before installing an electric starter on a Ural motorcycle, you should familiarize yourself with the technical parameters of the motor of this vehicle. The latest models of the two-wheeled legend are equipped with a four-stroke flat-twin engine with a displacement of 745 cm3 and a power of 40 hp.
For installation, both on the specified engine and on other creations of IMZ and KMZ, models ST-353, ST-367, ST-369 or “donor” ones from VAZ 2109, 21099, 2110 and 21011 are most often used. Their characteristic feature is rotation of the drive clockwise, widespread and low cost. This component can also be taken from foreign cars (Skoda, Mitsubishi, Toyota, etc.), but due to the relative high cost, their use is less common.
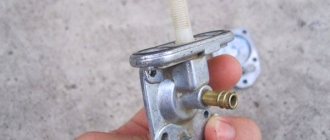
You should also pay attention to the crown of the device. If its diameter or tooth pitch differs from what we need, then this part must be modified. Its implementation is achieved by disassembling the starter and removing the axial shaft with the gear attached to it. The teeth of the latter are ground off, while the inner part remains intact. The inside diameter of a suitable gear is bored enough so that it can be pressed onto the outside of the ground part. After pressing, both components are welded, and the seams are ground together.
Installation process
Assembly drawing of the electric start system:
- starter mounting part;
- crown;
- starter;
- clamp;
- starter rear mounting bracket;
- flywheel.
Do-it-yourself installation of the starter on a Ural motorcycle is done at the gearbox (often in the upper part). Installation can also be done on the left side , but in this case you will have to sacrifice the kick starter foot, or reconsider its design.
The first step is to mark the sample of the starter housing and gearbox. Then cut out the marked areas using a grinder or milling machine. Among the possible options for mounting the starter, the three most popular are:
- Using a solid steel or duralumin plate. Purchased or made independently, it must have a central hole and fastenings to the engine housing. The standard gearbox fixing spokes are replaced with elongated ones. When installing a starting device with a plate, washers and nuts should be selected of such thickness that when turned on, the bendex gear fully engages with the flywheel ring and similarly comes out of the clutch when turned off.
- Using two separate or one continuous (semi-monthly) lower duralumin clamp welded to the gearbox. In this case, to avoid deformation, all rubber parts from the gearbox housing must be removed.
- A solid duralumin plate is secured with 2 bolts and welded to the gearbox housing.
With any of these types of fastening, the load on the connecting plate is removed by fixing the rear of the starter to the motorcycle body. Next, with the device attached, the gaps are set for both the roller clutch with the ring and the ring with the starter gear.
Conclusion
Having installed the starter on the Ural motorcycle with your own hands and adjusted the gaps, you should attach the flange to the gearbox. After checking the uniformity of all joints, the device is connected to the battery. Having removed the spark plugs, carry out a series of test runs, listening during the process for the absence of extraneous noise, irregularities, jamming and scrolling in the operation of the starting system.
When installing this device, be aware of increased energy consumption. To ensure full operation of the motorcycle, the standard battery is replaced with a more powerful one. There are two options here: resort to using batteries, either large in size or imported models.
The first case entails a slight change in the design of the motorcycle to accommodate a powerful battery, the second - the installation of a more productive generator, since the basic model G-424 cannot fully cope with charging a capacious foreign-made battery.
In any case, replacing the standard battery, although it will take some time, will only benefit the motorcycle.
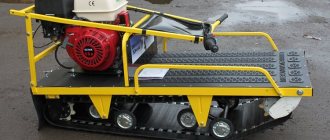
Motoblock "Ural"
Motoblocks "Ural-UMP-5V" first began to be sold in the country just before its global redistribution at the dawn of the 90s of the last century. Since many people needed walk-behind tractors as a convenient and cheap technical tool, it became very popular in the USSR. In just a few years, its sales reached 150 thousand units. The optimal combination of its characteristics contributed to the popularity of the walk-behind tractor.
The developers were able to combine the high performance of the walk-behind tractor, which was achieved by a five-horsepower gasoline unit that accelerates it to a speed of 15 km/h, combined with battery power sufficient to cultivate up to 2 hectares of arable territory. In addition, the unit could transport cargo weighing up to half a ton.
The walk-behind tractor has a wide adjustable ground clearance, which allows the device to be used in different types of areas. But it is worth noting that the basic Ural model is not particularly multifunctional. It can only transport cargo and cultivate the soil. It will not be possible to mow grass, remove debris or snow using attachments with this type of equipment - such capabilities are not provided. But if you remake the design yourself, adding the necessary fastening units, you can expand its functionality.
The model is implemented according to the scheme of transferring power to the wheels via a differential. Some modifications use foreign high-power engines, but domestic options are the most popular due to the availability of spare parts, proper documentation and durability.
How to install a STARTER on the URAL/DNEPR with your own hands? Motorcycle repair Ural #31
Do you want to save this video?
- Complain
Report a video?
Sign in to report inappropriate content.
Liked?
Did not like?
Video text
Installing the starter took me quite a long time, firstly, because I was doing it for the first time, and secondly, this process is not at all simple and requires some skill. If you are also planning to install a starter on your Ural or Dnepr motorcycle, then this video, I think, will help you see some solutions, and will also help you avoid some of the mistakes that happened to me.
What do you even need?
Well, first of all, it's the starter itself. I bought it from Pramo-Electro, which is a little more expensive than its counterparts, but has a more compact size, which allows it to look harmonious on a motorcycle, and also, importantly, does not require bending the kickstarter lever. Secondly, you need to purchase a special mounting plate and a starter ring, which is installed instead of the last clutch disc. I purchased this set - plate and crown - from Ivan 66 (https://vk.com/motorazborperm)
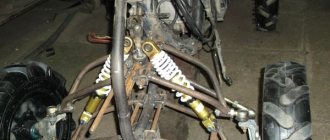
But as always happens, you can’t just go and install a starter on a Ural motorcycle. I started by giving my original Ural flywheel to a turner so that he would align all the fingers horizontally, grind off 2-3 mm of the flywheel skirt and reduce the diameter of the intermediate clutch disc so that it would begin to fit into the starter ring.
After modifying the flywheel, I decided to try to assemble a clutch in this flywheel and it turned out that the holes in the flywheel pins and the holes for the countersunk bolts did not match - sad thing. I had to widen the holes on the starter ring. Having allocated one evening for this, we managed to fit everything and the crown was securely attached to the flywheel.
I put the flywheel with the starter ring installed in its place on the crankshaft and tried to figure out the gearbox housing, but I was unable to do this. The reason for this turned out to be special centering bosses on the gearbox, which began to rest against the teeth of the starter ring. The grinder is in hand and the hot flashes at the checkpoint are gone))) Now the checkpoint is working great.
It was decided to replace the gearbox mounting studs with bolts, simply because the length of the original studs is not enough to install the starter.
Finally, I’m starting to install the starter, or more precisely, I’m starting to cut the gearbox housing so that this starter can fit there. I applied the plate to the place where the starter should be located and cut the corresponding hole in the gearbox. Now the starter fits in without problems, but does not fit tightly to the plate, since the starter rests its body against the gearbox mounting bolt. I can’t do without this bolt, so I decided to replace it with an internal hexagon bolt, and make a hole in the starter housing for it. We sorted out the checkpoint.
Next, I decided to cut a suitable hole in the crankcase, but noticed that the starter would completely block the technological hole for setting TDC. But I wouldn’t want to lose it completely. Then I made exactly the same hole on the other side of the crankcase and set the top dead center value on the flywheel. Now nothing will stop me from cutting a hole in the crankcase for the starter.
The hole has been cut out. And then a very timely thought comes to my mind: how to set the engagement gap between the bendix and the starter ring? It is impossible to do this with the gearbox installed, since it blocks the entire view. Then I decided to measure the distance from the starter plate to the edge of the crankcase. In both the upper and lower mounts the distance was 26mm. Now I’ll dismantle the gearbox and simply hang the starter on the bolts, placing it in exactly the same way as with the gearbox, i.e. at a distance of 26mm from the crankcase.
After connecting the battery, the starter began to turn the Ural engine. And in my opinion, it’s very good!))) No unnecessary noise or ringing can be heard.
I hope that the starter will only please me on my journey.
Excellent crankshaft oil seal for the rear cover of a Ural motorcycle. Manufacturer: Toyota. Japan. Catalog number: 90310-50006. Average price in stores: 350 rub.
_____________________________ ABOUT THE CHANNEL “SANYA CHETODEL”
As you might guess, they called me that because I am constantly doing something. I really love working and creating things with my own hands. At the same time, I constantly force myself to learn something new and unknown. For example, in these videos I am repairing an old Ural motorcycle, on which, based on the results of the repair, I plan to go on a trip to Crimea. This motorcycle will not only receive a complete overhaul, but will also undergo some tuning. I talk in detail about everything I do with the motorcycle in the playlist “Ural Motorcycle Repair”
Weaknesses of the IMZ-8.103-10 (IMZ-8.103-30, M-67-36) engine of the Ural motorcycle
- Foot starter (kickstarter);
- Gas and clutch cables;
- Generator;
- Carburetors;
- Cylinder heads;
- Reverse gear (gearbox).
More details about the weak points of the motor...
Foot starter (kickstarter)
The foot starter of the IMZ-8.103-10 engine is a weak point due to the slippage of the pawl. The malfunction is eliminated after dismantling the gearbox and disassembling it with rearranging the pawl with the other side or replacing it. I have an assumption that the metal of the dog is of low hardness. On the other hand, if the pawl is made harder, the gear will fail. You need to choose the golden mean.
Throttle and clutch cables
The clutch control and fuel supply cables are a weak point due to their short service life. To put it simply, they tear, and before that they stretch, which makes it necessary to adjust the timing of the supply of the fuel mixture, as well as the clutch.
The generator does not run for a long time.
Gasoline gets into the floats, after which the cylinder is filled with gasoline. In addition, carburetors are not matched to these engines; half of the fuel goes to waste, which is not economical. It would be nice if the engine had one carburetor instead of two.
Do not overtighten the spark plug heads; the threads break off quite easily. You cannot overheat the engine, the result will be clearly visible on the heads, the studs are pulled out, leading to the landing plane of the heads. If you are unable to avoid breaking the spark plug thread, contact a familiar turner; he will be happy to repair it and install a steel threaded bushing for a modest fee. I can recommend the same for wear of valve seats and chamfers. It is much cheaper to repair heads than to buy new ones; a good turner can do this in no time.
Reverse gear (gearbox)
The reverse gear does not work for a long time due to the rapid wear of the reverse gear in the gearbox.
Electric starter
Well, I finally started writing this post. I’ve long wanted to install an electric starter on my Bolivar, but either I’m not up to it, I don’t want to disassemble the engine, and during the rebuild I want to quickly assemble it and drive it. However, after an unsuccessful trip to Rostov, on the birthday of the Olen bike house, when I turned the crankshaft in Yaroslavl with all the consequences, I decided to finally give myself an electric start during this capital campaign. Despite the fact that the Internet is full of articles on this topic, they are all quite vague, plus I have not seen a single video where a “live” 650cc Ural was started with an electric starter. No, the video is complete, but they show some intermediate stages, like: “here I attached the starter, here I connect the wires to the Akum and it seems like something is turning, but the engine is still half disassembled.” Somehow I got distracted, closer to the topic.
In order to install an electric starter, you need to buy a ring gear for the flywheel. Someone is remaking a crown from Buran (in my opinion), but I took a ready-made one, which is installed instead of the last clutch disc.
Ring gear
Together with the ring gear, a bracket for mounting the starter on the box was purchased. There are two such brackets, on top of the box and on the side. But, since I have a Ural gearbox, and the starter from the side looks, in my opinion, much more aesthetically pleasing, my choice fell on the side mount.
Starter mounting bracket
A tens starter with a 9-tooth Bendix was recommended as a starter. But I had a starter from Oka lying in my garage, which, as it turned out, is almost identical to the ten starter, the only difference is in the starter cover. After going around several auto parts stores, I finally found the cover I needed, so with a slight movement of the hand (and unscrewing a couple of screws) the starter from the Oka was turned into a tenth starter, and at the same time, preventive maintenance was done and the gearbox was lubricated.
Starter from Oka
Difference in starter caps
The starter we need
Then the fun begins. Using the starter mount as a guide, a window is marked on the engine crankcase and gearbox, after which it is roughly cut out (not to size, of course), followed by a file adjustment to the required dimensions.
Example window
After that, only the ring gear was placed on the flywheel, the flywheel was attached to the crankshaft, a mark was made on the crankcase (taking into account that the flywheel would sit deeper) where the ring gear ends and the flywheel begins. A mark was also made on the starter cover where the bendix ends if it is pulled out to the end, after which the flywheel was removed and the holes were adjusted to finish.
Estimation and final hole
The centering bosses had to be cut off from the box housing, otherwise the ring gear would rest against them. I had to disassemble the air filter and cut off part of it so that the starter could fit into place. We also made two box mounting studs, which had to be made larger due to the fact that now the starter was also attached to them.
After that, the flywheel and clutch assembly was finally installed on the crankshaft, the engine and gearbox were assembled, and the starter was roughly put in place. After fitting, there were small tests to see how the starter turns the flywheel, whether the teeth are torn off, whether there is any misalignment, etc.
Starter fitting
First tests
After I was sure that everything was going well, bushings were made to secure the starter at the required distance and at the same time press the box.
Once the starter was finally secured, a second test was carried out to ensure everything was going according to plan.
Second tests
After this, the final stage of engine assembly began. Since there is no air filter now, I temporarily installed zeros. In the future I will install a starter filter from KBMTS.
Final view of the engine
Starter filter
Well, now, actually, the finale. That's what this whole post was all about. Video of starting a Ural 650cc motorcycle using an electric starter. Engine just after rebuild. New crankshaft from Soviet stocks, aluminum cylinders, AT 78mm pistons, new heads. The video shows the second launch. I didn’t film the first launch, but it started up almost immediately, after which I let it run for 10 minutes, turned it off and decided to make this video. Enjoy!
Starting with electric starter
Disadvantages of the IMZ-8.103-10 (IMZ-8.103-30, M-67-36) engine of the Ural motorcycle
- Small resource;
- Starting is difficult or does not start at all;
- In hot weather, it gets very hot in low gears;
- Interruptions in the operation of the cylinders;
- Knocking;
- High fuel consumption;
- There are a sufficient number of cases of inaccuracy in the manufacture of the engine crankcase at the cylinder mounting points;
- Oil is leaking at the joints.
More details about the disadvantages...
Unlike engines of analogue imported motorcycles, the service life of the IMZ-8.103-10 engine before repair is small, from 20 to 45 thousand km, which is explained by increased wear of the crank and piston group parts. Increased wear is a consequence of insufficient air cooling, as well as not very good quality of parts (material, manufacturing accuracy).
Difficulty starting or won't start at all
For the most part, starting the IMZ-8.103-10 engine is difficult when the ignition, fuel supply and clearances in the valves of the gas distribution mechanism (between the rods and rocker arms) are not adjusted. The reason may be reduced compression in the cylinders, clogged carburetor jets, water in the carburetors, spark plugs not working, a failed condenser, a lean mixture of fuel coming from the carburetors (too much fuel).
In hot weather it gets very hot in low gears
Unfortunately, air cooling has a detrimental effect on the engine when operating in hot weather. Therefore, in hot weather, when driving in lower gears, overheating should not be allowed, so it is necessary to stop more often to cool the engine. If the engine is new, it can easily overheat.
Interruptions in cylinder operation
To a greater extent, interruptions in the operation of the cylinders are caused by the lack of synchronous operation of the cylinders due to different amounts of the supplied combustible mixture, and by a violation in the adjustment of the valves.
The cause of engine knocking may be: pre-ignition; overheat; wear of pistons, rings, fingers; wear of the crankshaft main bearings; valve adjustment is incorrect.
High fuel consumption
Carburetors are simple and uneconomical, the consumption even according to the instruction manual is like that of a Zhiguli, but in reality it is even higher. During the Soviet era, they didn’t think about efficiency, and drivers poured gasoline into the ground; there was nowhere to put it. These fuel costs are too high for a motorcycle these days.
There are a sufficient number of cases of inaccuracy in the manufacture of the engine crankcase at the cylinder mounting points
This leads to overheating of the cylinder due to the difference in size until the upper plane of the pistons at top dead center aligns with the upper edge of the cylinders. In the event that one of the cylinders overheats and there is no cure for this, as an option it is necessary to check whether the piston at its highest point reaches the upper plane of the cylinder; if not, then this is the problem. To eliminate overheating, it is necessary to achieve symmetrical dimensions, for which purpose the gaskets are removed from under one of the cylinders, and in its place a heat-resistant sealant is used when installing the cylinder. It is possible to install a thinner gasket.
Oil leaks at joints
This disease does not affect engine operation, leaks are minor. But the engine, which is dirty with dust adhering to the oil, has to be washed. Tightening the head covers and oil pan does not help. After replacing the seals, after some time the oil begins to leak again. It also leaks along the valve rod guide bushing seals.
PS Dear owners of Ural vehicles with IMZ-8.103-10 engines! You can write about your identified shortcomings and weaknesses or ask your question.
Related posts:
Post navigation
17 comments to the article “Weaknesses and disadvantages of the IMZ-8.103-10 engine”
When picking up speed, the right pot begins to tap and when driving, it’s as if it’s being pulled by the rear.
There are two reasons: either the piston in the cylinder is weak, that is, it is loose, or the block is not machined correctly. I had this happen, I didn’t pay attention to the block, but the piston was a fixable problem. I’m not writing about the crankshaft, because it’s visible in any case.
If the rear is pulled while driving, then most often it is a late ignition. In general, in the Urals there is no need to lubricate the ignition, then there will be no problems. I mean felt. The oil scatters and interruptions in the operation of the cylinders begin. To prevent it from rusting, I fill the muffler with oil 4 times during the summer.
The Ural motorcycle has one drawback - it is a generator. When driving up to 60 km, the crankshaft runs 55-60 thousand km. I'm personally pleased. Trips to hunting and fishing, to the forest to pick mushrooms and berries are simply luxurious! I've been traveling for 34 years, I'm happy!
Electronic ignition "Saruman"
The Saruman microprocessor ignition system is another way to quickly and without much hassle replace the outdated contact ignition of the Ural. Manufacturers promise the same set of advantages as the previous system. There are two configuration options: with a Hall sensor and with an optical sensor. The second option is somewhat more expensive, but it is usually recommended, since the optical sensor is more accurate and reliable. However, reviews from motorcycle owners are not as good as we would like, mostly complaints are made about the quality of assembly of parts. Another complaint is that the kit does not include an ignition coil.
Installation
There are several options for attaching an electric starter to a boxer motorcycle engine:
- More powerful and longer gearbox studs are made, after which a duralumin plate with a pre-drilled hole with a diameter of 76 mm for the unit casing is put on them. This option is rarely used due to its low strength and negative impact on the service life of the electric starter;
- A composite mount in the form of two crescents is made from duralumin, which is welded from below to the gearbox housing. Be careful - during the argon welding process, all rubber elements of the transmission must be removed, but the shafts and covers should be left in place, since their absence can cause serious deformation of the crankcase;
- A solid duralumin plate is made and welded to the gearbox casing. The bad option is that it forces you to completely remove the contact oil filter, disrupting the normal operation of the transmission.
On foreign motorcycles, installing a starter is complicated by the lack of serious developments in this area. Therefore, you will have to show some engineering savvy and make an appropriate mount or adapter plate that will not interfere with other components.
Before installation, you need to carefully sand the surface of the electric starter stop with a grinding machine to achieve a perfect fit of the part. To properly secure the starter flange, you need to remove the solenoid relay, and also move the bendix fully forward to understand what its operating position will be. The unit is fixed using a flange, after which it is necessary to check the tightness of its fit and the stability of the position. Now you need to set the optimal gaps that will allow you to achieve stable operation of the device.
Between the gear located on the starter and the flywheel ring, you should leave a distance of 5–7 mm - to set it, you can use foil folded many times. You also need to leave a gap of 2–4 mm between the ring and the roller clutch, which is located immediately behind the gear. It should be measured in the rest position, and not in the operating state of the starter, which will allow the unit to achieve stable operation. If you purchased a used starter, make sure that its bronze-graphite bushings are not worn out and also match the diameter of the axle shaft - otherwise the reliability of the part will be significantly reduced, and starting the engine will be accompanied by unpleasant sounds.
Starter fastener
First of all, we determine the place of attachment of the element. The most popular is the upper left side above the flywheel. In this case, we will only be faced with the need to cut out a window for engaging the starter gears. It is difficult to install the starter in the center or on the right side, due to the need to redo a number of engine elements.
For installation, a hole is cut out under the Bendix casing. Next, measurements are taken, and the starter mount is cut out of a 4mm thick sheet of steel. This thickness is necessary to withstand the loads that the fasteners experience during operation of the starter mechanism. In a similar way, you can make not one solid, but a pair of fasteners. This way you can simplify the process of making fasteners, but adjusting the gaps will become much more difficult.
The finished plate is secured with bolts or pinched with argon, then a trial assembly is carried out. Now you need to make sure that the gaps are set:
- the gap between the flywheel gear and the roller clutch is 2-4 mm;
- between the bendix and the crown is 3-7 mm.
Next, the flywheel is rotated, observing the coincidence of the pitch of the bendix and the ring. In this case, rotation of the flywheel is ensured using a kickstarter. Once you are sure that everything is working as expected, you can perform a test turn by unscrewing the spark plugs. If the starter rotates the flywheel without any extraneous sounds, then the plate can be permanently welded with argon.