14 February 2020 Lada.Online 50 007 1
As an additional equipment, LADA vehicles can be equipped with a towing device (trailer hitch or towbar). The towing device is designed for articulated coupling of a vehicle with a towed trailer. The design of LADA vehicles provides for the possibility of installing a trailer hitch without additional mechanical influences (drilling holes, welding) on the vehicle body. The following are instructions for installing and connecting a standard towbar on cars of the Lada Granta and Lada Kalina family.
For each LADA car model, several trailer hitch options are offered for installation, differing in design, but identical in the method of attachment to the car body.
The trailer hitch, regardless of the model and design of the device itself, is attached to the rear power elements (side members) of the car body.
Tightening torques for threaded connections
:
- M6 – 9.8 Nm (0.98 kgf/m);
- M8 – 24.0 Nm (2.4 kgf/m);
- M10 – 47.0 Nm (4.7 kgf/m);
- M12 – 81.0 Nm (8.1 kgf/m).
Article numbers of standard tow bar depending on body type
:
- sedan 99999219007216
- liftback 99999219007216
- station wagon 99999219407216
- hatchback 99999219207216
Where can I buy?
In our online store (link to TSU)
Answers to 3 frequently asked questions about connecting a towbar socket
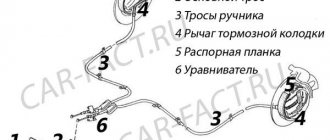
These changes consist of connecting the same wires leading to the rear light and signal electrics of the car's trailer with the wires from the coupling device.
The most difficult point is the need to determine where the conductors are connected. The outlet itself is connected in two ways: Standard. Before starting the procedure, check whether there are the required number of wires of sufficient, but not excessive cross-section.
If the light and signal lamps of your car operate without the participation of a special microprocessor, a suitable option is to connect a seven-channel towbar connector with 7 contacts. The second contact group, which provides constant 12-volt power, is often not used.
American manufacturers also use a four-pin pinout for a passenger car trailer socket; European and American-made cars that are operated by domestic cars have a contact connection system. On domestically produced trailers, as a rule, a 7-pin connector is used, so along with the towbar it is reasonable to purchase a corresponding socket with seven contacts. Switching on using a matching unit When connecting a trailer hitch, a modern electronic control unit requires the presence of an adapter, that is, a matching unit between the electronic elements of the car, the towbar and the towed part of the vehicle.
Read more: Loop measurement phase zero
Thanks Dmitry Buy Trailer From this article you will learn about connecting Webasto, instructions for such a connection, as well as what subtleties and nuances you should pay attention to during installation. Prices are very low
If you were unable to print, then download the diagrams to your smartphone to constantly check the correct connection. Blue - fog lights if such are provided by the car design. However, if you happen to have a foreign car with an original towbar with a pin socket, and the trailer purchased from our company has a 7-pin connector, then this is not a problem - there are adapters for connecting a 7-pin trailer plug to a pin socket, and vice versa. In addition, copper wires are excellent for wiring. You will also need a high-quality wire with one core with a wire cross-section of at least 1.
To do this, pour water over this part and see if there are any leaks. These changes consist of connecting the same wires leading to the rear light and signal electrics of the car's trailer with the wires from the coupling device. Cover First familiarize yourself with the location of all seven connectors. List of the best manufacturers: Bosal. Correct selection of conductors according to the cross-section allows you to prevent overloading of automotive wiring and failure of fuses.
At the same time, you should prepare connecting blocks; the best options will be those with sockets for fuses. If the kit does not include wires, then you need to find copper ones with a suitable thickness. If the manufacturer is conscientious, then the box will definitely include instructions for proper placement. How to connect contacts? Heat shrink and electrical tape. Connecting a trailer socket
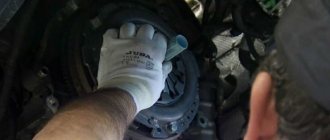
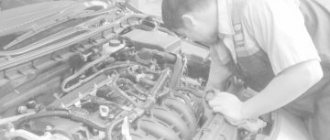
Installation of the device and connection of electrical equipment
Before we look in detail at all the nuances of installing a towbar on Kalina, it must be said that, unlike other domestic cars, for example, Niva, the Lada hatchback and station wagon are not provided with a “native” towbar. This means that you will have to deal with external devices. If you are not confident in your abilities or do not have the necessary experience and skills, then it is better to entrust the installation of the towbar to specialists in a car service center. If you are determined to carry out the procedure yourself, then the main rule is to strictly follow the instructions that are given in the technical data sheet of each product:
Towbar Lada Kalina 1118 sedan 2005- / Lada Kalina 1117 station wagon 2007-2013
- Before you start installing the towbar (Kalina hatchback and station wagon, by the way, have standard places for its installation), you need to decide for what purpose you will use it and how often, i.e. decide on the type of trailer hitch.
- The next step is to drill (if necessary) holes for installing fasteners. In some cases, you will have to remove the bumper from Kalina station wagon and hatchback. Another problem is that installation of the product may require cutting the bumper (this is in the case of homemade or low-quality factory production). To carry out this operation you will need a diagram and template.
- When the holes are ready, it is necessary to treat the fasteners with an anti-corrosion compound and install them according to the instructions in the technical data sheet.
- Now you can start installing electrical equipment, which in the case of the Lada Kalina hatchback and station wagon is represented by a socket with seven contacts and wires. Installation of the socket involves the use of a bracket on which the product will be fixed. Bolts and screws are required for installation.
- The next step is connecting the outlet. The operation is carried out through wires in the rear wiring harness of the car. The wires are multi-colored, each of them is designed to connect to a specific lamp. Detailed information can be found in the technical data sheet of the machine.
- The wires are connected through standard connectors that were provided by the manufacturer. Sometimes it is necessary to insulate each element of the wiring (if the insulation is broken). During installation, additional elements may be required to avoid soldering and twisting.
Towbar equipment for VAZ 1119 Lada Kalina hatchback 2004-...
Important to know! You should not believe auto parts manufacturers who claim that there is a standard part suitable for any Kalina hatchback, sedan or station wagon. You can try your luck, but most likely the car connectors will be incompatible with the product. It all depends on the body type. Therefore, it is better to order a manufactured trailer hitch for the specific brand of your car.
Author: Ekaterina
4 comments
- Ilya says:
Tell me, is the tow bar from the Lada Kalina suitable for the Granta? I racked my brain, but still couldn’t really figure it out.Zhenya Balashov says:
And what is mandatory from Kalina? Buy one specifically for your car - and you will be happy. Or are you not looking for easy ways?
Ilya says:
My son already bought it - he wanted to give it as a gift, but he wasn’t really in the mood, so it turned out to be a mistake. We have what we have - who can say whether it will happen? If not, I won't even bother with the installation.
- Ekaterina says:
Good afternoon. The Granta has different spars and base length - it is 20 centimeters longer. However, do not rush to get upset - some motorists install it, but not with six bolts, but with four. Judging by the reviews, this is enough.
Types of connection diagrams
There should not be any difficulties in connecting a Kurgan trailer or the same MZSA with a VAZ 2110. Everything is our own, original, and therefore simple, provided by the manufacturer.
But situations are different. Some require a special adapter adapter, others need to adjust the wiring itself and determine which wiring goes where. Supposedly incompatible trailer hitches and machines can in fact be connected. But this is quite difficult to do.
There are several important points to consider:
- If the machine is used to connect to different caravans from different manufacturers, it would be logical to install a pair of 7-pin sockets;
- For Russia it is not very convenient and easy to select a “company” for 13-pin sockets;
- Depending on the model, series and year of manufacture of the car, they may have differences in terms of pinout. It happens that side lights are output to pin 5, although on another version they go to pin 7;
- Previous owners of used cars could well have done something weird and used their own special circuit to connect the trailer;
- You should always check the car's electrical circuit and consult official documents.
Not everyone has preserved their native documents. And then people turn to various forums for help, looking for answers on the World Wide Web.
For trailers connected to vehicle towbars, I have special recommendations.
How to avoid falling asleep while driving at night: 15 useful tips
Category: Instructions
Contact the manufacturer. Or go to a good, trusted electrician. Moreover, it is not necessary to go to the office of the company that produces the car or trailer. Everything can be found on official resources. Such information is completely true, and therefore you will not find errors common in the recommendations of supposedly skilled people. Electrics are a very important component of a car. Any mistake made when connecting incorrectly can even result in a short circuit and damage all electrical equipment.
I very much doubt that anyone wants to face this. Follow this simple advice.
Pinout options
At first I thought that I would describe to you in detail where each contact is on the socket, where it goes and what it is intended for.
But now they understand that the idea is pointless. It will only confuse you even more and drive you into a dead end. We need to do it much simpler. Visual examples are the best option. I will prepare for you several images showing the essence of typical pinouts on sockets of towing coupling devices. They should not act as the basis for your own connection. Remember, only official documents and manufacturer's instructions. Each machine may have its own characteristics.
Well, let's start with the good old domestic cars. This is where we most often see trailers.
In the case of domestically produced machines, the standard pinout looks something like this.
Nothing complicated. But the situation with European cars. The differences are minor, but they are there. Therefore, consider what kind of car you have at your disposal.
There is already a 13-pin monster here. In fact, there is nothing particularly difficult in connecting, but still the difference of 6 contacts makes itself felt.
As you can see, each standard scheme has its own characteristics. Connecting a trailer to a car is more than just connecting two plugs. Sometimes you have to rack your brains here. And in order not to break it, you can turn to good specialists. For example, to us.
European and domestic wiring
In the case when we are not talking about standard equipment, but about an additionally purchased towbar or trailer, a more complex connection is most often required. There are two options to make the connection: Standard way. Thanks for the answer. Places of possible moisture leakage are marked and sealed with silicone after final assembly and installation. Electronic coordination unit If we are talking about a modern car with complex electronic components, the first option for connecting a trailer will not be the best choice. Pinout of the 7-pin socket of the towbar A and the corresponding plug B of the trailer Explanation of the figure: Left side turn signal control signal. Places of possible moisture leakage are marked and sealed with silicone after final assembly and installation. The USA, Japan and Australia have their own standards and, for example, the American one, in addition to the physical difference in the connectors, of which there are several standard sizes, there is an important nuance - in some cases, power for the turn signals and brake lights is supplied through the same wires.
Side lights on the starboard side Currently, the 7-pin connector is practically not used in modern foreign cars; 13-pin sockets are installed there. The advantages of using fewer wires are obvious: wiring harnesses and pinouts are easier.
List of the best manufacturers: Bosal. Connecting the wiring of the towbar socket to the car in accordance with the safety requirements for operating the car. The circuit can be called universal and is recommended for wide use.
Poor quality equipment will lead to serious consequences - if the turn signals on the trailer turn off, a traffic accident may occur. Accordingly, a seven-pin socket must be connected to a seven-pin plug. VAZ 2110 CONNECTING THE TRAILER SOCKET
Features of the socket connection
To connect the towbar to the vehicle's electrical wiring, we recommend using stranded copper wire. The ideal option is a wire in which each core has a cross-section of at least 1.5 square meters. mm. The wire must have a double layer of insulation.
Features of connecting the trailer hitch, connection diagrams for the 7-pin device, color designations, plug connection diagram, towbar socket connection diagram.
To understand whether you have sufficient information about the trailer hitch.
- How many types of sockets are there?
a) Three types of sockets are available for passenger cars. Thirteen-pin, used in Russia. American or European 7 pin. And there is a special connector.
b) There are two types of sockets on sale. Russian for 13 pins and American for 7 pins.
- What does contact mean, oh?
a) wire going to the left turn signal.
b) Right turn signal wire.
c) A wire that turns on the right and left turn signals.
- Why do they put caps on sockets?
a) The cover is needed to prevent unnecessary wires from being connected to the device.
b) It serves as a protection that protects the outlet from external influences. The cover is needed when the tow bar is not connected to the trailer.
- What contacts can be spliced to simplify the assembly process?
a) You can splice the contacts of two headlights, reverse lights, brake lights, fog lights and side lights. They all turn on synchronously.
b) Any contacts are allowed to be connected. This will make the work easier.
- What does contact mean, oh?
a) Connection to the rear fog lamp.
b) Connection to the vehicle's brake lights.
Answers:
- a) There are three types of sockets - Russian with 13 pins, American or European with 7 pins, as well as a special connector.
- A) The letter “L” indicates the wire connected to the left turn signal.
- B) The cover on the socket serves as protection against various influences. It is closed when the tow bar is not connected to the trailer.
- A) To simplify the work, the following contacts are spliced: two headlights, reverse, brake lights, fog lights and side lights. The connectivity is due to the fact that they all turn on synchronously.
- A) The designation “54G” is a connection to the car’s fog lights.
To transport bulky cargo, a reliable trailer is attached to the vehicle. The connection occurs through the trailer hitch and tight contact with its socket. It is necessary to connect the contacts correctly so that the rear lights on the trailer turn on when driving, signaling to road users that the driver is performing various actions, for example, turning. To connect the signals correctly, you will need to study the trailer connection diagram, as well as the pinout of the towbar socket.
Definition: A trailer socket pinout is a diagram of the connectors needed to connect a vehicle to a trailer with your own hands. An electrical connection is required so that all lighting equipment on the trailer works, in accordance with traffic regulations.
Connecting the Lada Granta tow bar (electrical)
As you know, most towbars have a special connector for connecting electrical wiring. In order to be able to connect electrical appliances to it (for example, for a trailer with headlights, brake lights, etc.), it is necessary to stretch the wires and connect them correctly. It is best to lay the wires through a special technical hole located behind the rear bumper of the Granta on the left side. Pass the wires through the rubber seal.
Next, the procedure is as follows:
- On the left side, remove the trim, as well as the plastic trunk lining.
- Next, you need to connect the towbar socket connector to the power supply circuit for the rear lights. To make the correct connection, please read the instructions included with your product.
- After connecting the outlet, return the trunk trim to its original condition.
- We install the trailer hitch ball and secure the fastenings for the sub-cutter.
This completes the installation of the product.
“Take note! When the towbar is installed on the Lada Granta, apply a layer of lubricant to the coupling ball. Thus, you will reduce its friction and premature wear during operation. In addition, we recommend that you treat the connecting contacts of the socket with a special liquid insulation agent. This way you will avoid oxidation of electrical connectors.”
Which tow bar to choose
Please note that when choosing a product, you must take into account the design specifics of your car. The presence or absence of technical holes and other features of the car. In the absence of special mounting holes, car enthusiasts make such holes themselves. The main selection criterion depends on the weight of the trailer along with the cargo in it. We recommend that you take a closer look at products that have a safety rope or chain.
Tow bar kit for Lada Kalina station wagon
Nowadays, such products, which can be purchased in specialized stores, are classified as collapsible devices. This option has a number of advantages over competitors, namely:
- easy transportation;
- simple installation;
- convenient storage.
The set of towed products for the hatchback includes:
- technical certificate;
- protective cap;
- fasteners;
- wires;
- socket with seven contacts.
Towbar kit for Lada Kalina 2 station wagon
Important to know! It is quite easy to purchase similar parts for Kalina station wagon, since they are sold in almost every car store. But, device models may differ significantly from each other in design and price terms.
The cost of trailed products ranges from $25 to $30.
Installing a trailer on a station wagon — Lada Kalina Station Wagon, 1.6 l., 2013 on DRIVE2
I was thinking, I was thinking about what I haven’t written yet/copied onto the drive from the forum... and I remembered the summer sex. There will be a lot of letters and pictures below —————————————————————— ——————————————————————————————— Attempt on overpass No. 1 08-08-2014
Here I am sitting, holding an oar, in a moment... I’ll get hurt with this oar!
Good day to everyone who is not sleeping...
So answer me this question: am I a sucker, is the Internet full of misinformation, or is AvtoVAZ showing off?
I bought a tow bar! Tadaaa! For Kalina sedan/station wagon (1118). Having read the information, so to speak, that they are interchangeable with Granta/Kalina 2.
What, another place to crumble? After all, I haven’t seen a single bump/low tide/subsidence under the anticorrosive!
————————————————————————————————————————————————————10-08-2014
I continued to poke... I thought I’d hit at least one hole, as during the drive the guys were jammed on the ground... fig! Missed! I started poking further and found...
Here are the dimensions of the distance from the end of the spar to the holes for a station wagon (equal to the holes in the side ear of the trailer)
145 and 245 mm
Again! FOR KALINA 2 station wagon (I won’t say for a hatch) you need a Granta torch! From 1118 (Kalina 1) will not work. Or rather, it will fit, but you will have to make 4 holes and buy an extra 4 long bolts.—————————————————————————————————— —————————————————— Attempt on overpass No. 2 08/29/2014
Friday morning. Rain. Barnyard weather. Mood of the threshing floor.
Starring: I, Kalina 2 uni
Bike rack on the Car towbar – 2 Types: Bike racks and Bike racks, Installation, Holders
Using a bicycle as a means to strengthen muscles and general physical condition is commonplace, but the double benefits of walking arise if they are done in environmentally friendly natural areas. But here’s the problem: if you use only your own strength, you won’t be able to get to remote areas, which means you need to use a car to transport your two-wheeled companion.
The easiest way, which also does not require additional costs, is to place the bicycle in the trunk or interior of the car, but this option is possible if there are no passengers in the back seat and for a fairly spacious car.
If you decide to transport one or more bicycles inside the cabin, remove the front wheels, turn the steering wheel to a prone position and try to place your bike in such a way as not to damage the interior of the car and avoid additional injuries in the event of an accidental accident.
Transporting a bicycle on the roof of a car
Transporting bicycles on the roof of a car is a traditional and long-tested method. A special mount installed on the roof makes it possible to transport not only household goods, but also, with an additional mount, bicycles.
The two-wheeled vehicle is placed in a special profile mounted on the trunk and secured in a certain way.
The object of attachment to the trunk of a car is usually:
- fork, with front wheel removed;
- the frame, after installation, is secured with additional braces;
- handlebar, used when mounted upside down on a bicycle rack.
This method of moving bikes cannot be called the most successful, since when placing a heavy and inconvenient object on the roof of a car, you can scratch the paintwork of the car, and yes, a woman is unlikely to be able to perform such a procedure.
Bike racks and bike carriers
The bike rack is installed directly on the rear door or the vehicle's spare wheel located on the rear door
For each car model, you will have to select a new device and you must take into account that some models of bike racks, when placing bikes on them, can hide the car’s license plate, which is not encouraged by traffic regulations
Bike racks are a fairly simple way to secure a bicycle to the back door using special straps, but when the car moves, the mount becomes loose and you have to stop to tighten the straps. The advantage is that any type of bicycle can be transported this way.
Bicycle towbar: types and features
The most convenient, but also the most expensive way to transport one or more bikes on a car is a towbar with a special mount. It’s probably not worth installing this expensive accessory specifically for rare trips into nature with a bicycle, but when you often ride in a large group with several bikes, a towbar will be an excellent solution to the problem.
Placing bicycles on the tow bar can be of two types:
- suspended version - fastening occurs behind the frame, and the wheels are suspended.
- platform - the bike is installed on a base with the wheels secured in the gutters.
A bicycle mount on a towbar in the form of a platform allows you to transport several bikes of any size, which does not in any way affect traffic safety, since such a platform is equipped with brake signal repeaters and side lights; in addition, the registration plate will always be visible, which will avoid unnecessary proceedings with the road inspectorate. The platform allows access to the trunk without removing the bikes and is ideal for long trips.
An undoubted advantage of placing bicycles on a tow bar is the slight lifting of a rather inconvenient and heavy object when securing it. This is much easier than trying to secure a two-wheeler to the roof of a car.
DIY tow bar
To create a homemade towbar you will need:
The part in which the corners and the pipe will be connected is indicated. After this, one corner is attached by welding to the rear channel, and the other to the trailer. The operating period of a homemade device is from 5 to 10 years, depending on the strength of the material used. But this option is suitable for those who know how to install a tow bar on Kalina with their own hands.
The procedure for carrying out electrical installation work when connecting the towbar socket
p, blockquote 45,0,0,0,0 —>
1. First stage of work: determining the connection diagram, the need to use a matching unit, choosing the type of connector
.
p, blockquote 46,0,0,0,0 —>
If at the time of installing the trailer connector, the latter is not yet available, or you do not plan to buy it at all, and you intend to use only rental equipment, it is recommended to immediately install a 13-pin universal connector.
p, blockquote 47,0,0,0,0 —>
Video - why a 13-pin socket for a towbar is preferable in some cases:
p, blockquote 48,0,0,0,0 —>
p, blockquote 49,0,0,0,0 —>
In this case, using a 13/7 pin adapter, you can connect a regular cargo trailer without any problems.
p, blockquote 50,0,0,0,0 —>
p, blockquote 51,0,0,0,0 —>
There is, of course, the opposite option - a 7/13 adapter, but some of the user connections, including for charging the battery, will have to be made outside the connector, which is very inconvenient.
p, blockquote 52,0,0,0,0 —>
p, blockquote 53,0,0,0,0 —>
If you have a car built before 2000, you may not need to install a matching unit. In this case, the rating of the fuses serving the turn signals and rear lights should be increased by 25%.
p, blockquote 54,0,0,0,0 —>
2. Next, it is imperative to check all electrical circuits in the trailer connector
(if available).
p, blockquote 55,0,0,0,0 —>
This can only be avoided if you are using a rental trailer; the lessor checks them and is responsible for their functionality and safety.
p, blockquote 56,0,0,1,0 —>
The most typical malfunctions of trailer electrical equipment:
p, blockquote 58,0,0,0,0 —>
- “rotting” of electrical wiring, especially in the area of connections, contacts, soldering;
- short circuits in the area of rubbing parts;
- failure of light lamps;
- large leakage currents associated with salt coating of roads and driving into bodies of water (boat trailers, especially on the sea coast).
3. At the third stage, a routing scheme is developed
(what wire, what color, what section, where it goes, how it goes, where it connects, what it connects to, and, finally, how it connects).
p, blockquote 59,0,0,0,0 —>
In order. If the purchased trailer connector is equipped with conductors, there is no point in replacing them. Otherwise, you should select conductors in exact accordance with the colors and sections shown in the figures above.
p, blockquote 60,0,0,0,0 —> adsp-pro-3 —>
The most difficult thing is to determine the path of the wires from the connector into the luggage compartment so that it is invisible, the conductors cannot be damaged during operation and cause a short circuit, and the seal of the cabin is not compromised. In most cases, manufacturers provide a standard hole.
p, blockquote 61,0,0,0,0 —>
Connections can be (and are better) made using the standard method: stripping + twisting + soldering + heat shrink. All connections must be made at least with the ignition off. There is a connection option using special clips.
p, blockquote 62,0,0,0,0 —>
p, blockquote 63,0,0,0,0 —>
Such connections do not provide high currents and are not as durable, but in some cases they can be used when using cargo trailers.
p, blockquote 64,0,0,0,0 —>
For further actions you need a minimum set of tools and components:
p, blockquote 65,0,0,0,0 —>
- a set of plumbing tools for dismantling and installing interior elements during cable laying;
- a set of electrical installation tools, if necessary, a soldering iron, solder, flux;
- wires, electrical clips, self-tapping screws, casings, heat shrink, electrical tape, clamps;
- multimeter;
- control lamp;
- mirror (when installed alone).
4. Connection
. At this stage, you need to be as careful as possible; it is better to sign each connection first, and only then carry out the electrical installation.
p, blockquote 66,0,0,0,0 —>
Electrical connections outside the car must be “dressed” with heat shrink (a cambric that shrinks in size when heated with an industrial hair dryer can be used with a lighter).
p, blockquote 67,0,0,0,0 —>
5. Check. At this stage, using a multimeter, the absence of short circuits is determined and electrical connections are made. Only after this can you turn on the ignition and test all functions.
p, blockquote 69,0,0,0,0 —>
If the on-board computer provides information about errors in the operation of electrical equipment, most likely, the use of a coordination unit when connecting a trailer for your car is mandatory.
p, blockquote 70,0,0,0,0 —> adsp-pro-4 —>
What exactly do you need to buy for a station wagon?
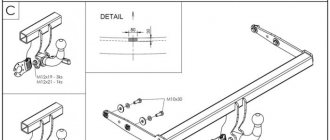
Let's turn to the official documentation, more precisely, to the catalog of assembly units. In this document, one of the drawings shows the body frame:
Rear floor frame, station wagon
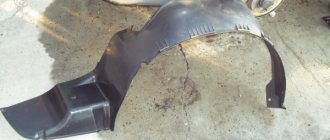
All parts, in addition to the 12th, make up the floor frame. A towbar must be attached to parts “14” and “3”, as well as to channel “13”. These parts are provided with holes (their total number is 6).
The distance from part “13” to the first side hole in our case is 145 mm, to the second – 245 mm. For the “first Lada Kalina” these distances were different. Towbars suitable for the VAZ-1118 are not necessarily suitable for the Kalina-2. However, there are also universal solutions. A drawing of one of them is presented below.
A universal tow bar will have 4 or 5 holes on the sides:
Scheme of a universal towbar (for Granta, Kalina-1 and 2)
If the kit comes with threaded strips, then know that they will not be needed. The standard holes in the body are threaded from the factory. In conclusion, here is a photo illustrating all of the above:
Hole layout, new family station wagon
When making your choice, do not make mistakes! You can take a ruler with you and measure the distance from the plane of the “ears” (see diagram above) to the first side hole. It should be exactly 145 mm.
Certification of towbars
All towbars presented on the site are certified and meet the technical requirements of your car.
To avoid conflict situations with traffic police officers, when operating a vehicle with an installed trailer hitch, you must have with you:
Passport (installation instructions) of the trailer hitch with a service center mark on installation on the vehicle
A copy of the certificate of conformity for the trailer hitch. You can find the certificate on the official website of the manufacturer or on the website of our store.
Article 92103-A
Lada Granta Cross 2019-present
Lada Kalina Cross 2016-2018
- Vert/Horizontal ball load: 75/1100
- Add. Electrical: Required without Smart Connect
- Manufacturer: MOTODOR
- Ball type/Code : A (galvanized)
- Body: station wagon
- Transmission type: manual transmission
- Engine type: Gasoline
- Drive: front wheels
- Engine displacement: 1.6
- Features: No bumper cutout required
- Full set weight: 11.4
- Installation cost: from 2500 rub.
1. In the side members on the trunk side, remove the plugs at the mounting points of the brackets. At the same points, remove the protective film from the inside of the side members. 2. Attach the brackets to the vehicle side members. 3. Secure the trailer hitch beam between the brackets. 4. Tighten all fastening elements. 5. Install the ball and socket box and secure with appropriate fasteners. 6. It is recommended to install the trailer hitch only by specialists.
download PDF instructions
*Fields marked with an asterisk are required.
Your review will be published some time after it has been verified by a moderator.
Please note that we do not publish reviews: written in CAPITAL letters, containing profanity or insults, not related to the consumer properties of a particular product, of an advertising nature (containing contact information and links to other sites)
Fasteners included
| Bolt M10x35x1.25 (chalk) | 4 things. |
| Bolt DIN 960 M12x1.25x40 | 2 pcs. |
| Bolt M12x1.25x80 | 3 pcs. |
| Nut DIN 982 M12x1.25 self-locking | 5 pieces. |
| Washer DIN 125 M10 ZN | 2 pcs. |
| Washer DIN 125 M12 | 10 pieces. |
| Grover washer DIN 127 V M10, medium series | 4 things. |
| Body washer. DIN 9021 M 10 *200* | 2 pcs. |
Delivery terms:
1. You must provide the exact address and your telephone number to which the Order should be delivered; 2. Upon receipt of the order, it is necessary to check the product for the absence of external damage and defects and the presence of all components; 3. Payment is made only in rubles; 4. Delivery of goods in Moscow is currently not carried out
Lada Kalina Cross › Logbook › Installing a trailer hitch socket (tow bar) Kalina Cross
When I decided to install a towbar, I scoured the RuNet about installing a trailer hitch on the Crosses after 2021, I was interested in how the towbar is attached to the left side member. Relocating the muffler bracket greatly complicated this task and I came across one option that I “suspected”. The point is that you buy a “Bosal / VFM” towbar for Cross until 2021 with identical “feathers” on both sides, saw off the interfering bracket, install the towbar in its standard places and weld the bracket to the towbar. Moreover, there were suspicions on the forums that there was a welded threaded bushing behind the bracket. I’ll make you happy right away - it’s not there, but there is a far hole in the spar, closer to the wheel, that is, the spar will have to be drilled to screw in the sixth bolt. Everything else was a success
Next, it was necessary to connect the electrics, when I did this I encountered difficulties in finding places to lay the wires, the Internet left me without an answer, so here I decided to post step-by-step instructions for those who decide to install the tow bar themselves and connect the electrics.
Preparatory stage (selection of PTF for Lada Granta)
In order to install the PTF in the Lada Granta, special installation locations will be required. Fortunately, the standard bumper already has such standard places from the factory. Their dimensions are completely similar and identical to the PTF from Kalina and have two different types.
The first is sold under the Bosch brand in Ryazan and has a flat glass headlight block, and headlights with convex glass are produced under production in Kirzhach. These two types of headlights have the same mounts, so choose for yourself which headlights to buy for yourself.
On the left side there is a PTF from “Bosch” (LUCH), on the right side there is “Kirzhach”.
Step-by-step installation process on a station wagon
On the Kalina station wagon, it is possible to use a towing device on the Kalina. Therefore, it already has holes with screws for attaching the device. The standard size of the screws is M10. Installation requires two people. The first one should hold the tow bar, and the second one should attach it.
If the tow bar for Kalina has not been used before, you will need to use a screwdriver to look for threaded holes. There are a total of six bolts used to secure the device. After they are found, you need to act according to a clear system:
For installation, it is recommended to use a spanner type with a cardan mechanism. Additionally, it may be necessary to connect an outlet for the trailer electronics to operate. But you shouldn't do this yourself. DIY installation will take up to twenty minutes.
Tow hitch installation
The towbar on the Lada Kalina is installed in the same way as all other cars of the VAZ line. It is attached to the subframe at the rear of the car, protruding slightly beyond the rear bumper. The installation process begins with the purchase or manufacture of the device itself. The towbar externally consists of a pipe frame to which brackets are welded for their future fastening. You can weld this structure yourself; you only need the ball itself and the metal for welding. But you can also buy a ready-made version; a universal towbar may well fit both a station wagon and a hatchback.
So, we have a ready-made device in front of us, which just needs to be properly secured. We will need the following tool:
To do this, we find a point that will be equidistant from the edges of the car and will be the center of the width of the car. This is where the ball should be located. Now we attach the brackets to the subframe under the rear bumper and mark the places where the holes will be drilled. Next, you will need to make these holes and carefully screw the towbar so as not to damage the rear bumper, because it is plastic and is very expensive.
A towbar is a towing product designed to connect a trailer to a vehicle. Installing a new towbar on Kalina NA has a number of features. The Kalina hatchback car has a trailer that is not capable of withstanding heavy loads. Therefore, installing a towbar for this vehicle is necessary if it is planned to be used for transporting goods. It will help to use a removable trailer and make the car more versatile.
Types of towbars
The first thing you should decide before purchasing is what type of tow hitch is best for you. Today, there are only three such types:
- Standard.
- With removable hook.
- Flanged.
Of course, the design looks rather gloomy and will spoil the appearance of the car. But, considering that the tow bar will be installed on a Lada Kalina station wagon, it will look quite logical, and even unnoticed.
If, however, the towbar gets in the way, you can install an option with a removable hook that fits onto the tow ball. This type of construction is no less reliable than the first one, and looks quite modern. But it has one drawback - high cost.
Purchase and installation of towbars on a hatchback
Here is a drawing of a coupling device designed for hatchbacks:
These towbars fit all berry hatchbacks
Here the fastening differs from that discussed above. For example, nothing is screwed to the side members. The towbar is attached to the rear channel, and three screws go through the holes in the niche. It, that is, the niche, is intended for a spare wheel, and the holes in it are closed with plugs.
The holes on triangle 2 will be closed with rubber plugs
So, we will be guided by the manufacturer's instructions. Installation is easier to perform by driving the car into a pit:
- The rubber plugs from the holes in the niche must be removed;
- The towbar is positioned along the central axis, aligning the holes in the “ears” with the holes on the rear channel;
- Then, the device is fixed with M10 bolts, not forgetting to install the washers. The bolts are screwed into the threads of the rear channel;
- Having installed the missing fasteners (M12 screws are screwed into the nuts), you need to tighten all the fasteners with a wrench. The force should be 30-50 N*m.
Anyone who decides to drill the rear channel will encounter difficulties: access to the nuts will be blocked by the bumper. This unit, that is, the rear bumper, will have to be dismantled. It makes sense to choose towbars that are secured with five bolts. Then, the bumper will remain in its rightful place.
Types of products
Today, some drivers manage to transport heavy luggage in domestic compact VAZ models, but note that the trunks of such cars are not entirely suitable for transporting cargo of this nature. Also, the folded backrest of the rear seat row does not “save” the situation much. For transporting very large items, using a trailer is an excellent solution. The tow bar serves this purpose. Considering that the luggage compartment volume in the Lada Kalina is a modest 235 liters, then choosing a coupling device will be a very effective solution.
Today the market is able to offer its buyer three tow bar options:
- a removable product, the main advantage of which is mobility, because it can be either installed or dismantled at the slightest need;
- a welded device that is not at all easy to dismantle, because this will require the use of special equipment;
- flange design, which involves the simplest installation procedure, allowing you to avoid cutting the bumper.
Towbar for station wagons and its installation
Let's look at the installation procedure, following the standard instructions. Please note that all towbar mounting screws are metric and have a standard size of M10. You'll need a spanner, but that's not all. Considering the weight of the product, it is better to carry out installation by two people: one mechanic holds the towbar, the second tightens the screws.
We remove the mastic from the holes in the side members.
First of all, before installation you need to find the standard threaded holes. Using a Phillips screwdriver, they are cleaned of anticorrosion.
The towbar assembly itself is placed under the body so as not to damage the muffler mount. Then, hand screw in the six bolts that should be included in the kit. Don't forget to install the washers supplied by the manufacturer.
Getting to the bolt heads will be difficult. Use a socket wrench to tighten all the screws last.
It is important to know that you cannot use power tools when performing installation. The hand rotating the handle of the spanner develops quite sufficient force.
Depending on the qualifications of the installer, the entire installation operation takes 10-20 minutes. Additionally, you may need to connect an outlet that will power the trailer's electronics. Here it is better to contact an official dealer. You cannot connect the wiring yourself - this may void the warranty. We wish you success.
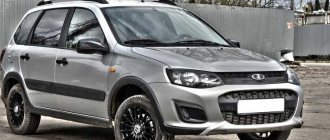
The result of all efforts may look like this:
Installed tow bar, Lada Kalina Cross car
What is shown here is not a station wagon, but a crossover, but the body of these cars differs little from the station wagon.
Schemes of various types of sockets
On domestically produced cars, 7-pin electrical connectors are most often installed. They ensure the transmission of all signals from the vehicle to the BTS. If you need to connect a trailer instead of a cargo trailer, then use a 13-pin socket. For electrical wiring (pinout), double-insulated stranded wires with a core cross-section of at least 1.5 mm² are used. To protect the tourniquet from damage, it is placed in a corrugated sleeve.
Standard method
The simplest method, which does not require intervention in the electrical circuit. You need to buy a set of adapters that are installed on the factory taillight connectors. They are equipped with leads to the trailer hitch.
Such kits can be selected to connect the towbar socket to a VAZ car of most models produced today: “Largus”, “Granta”, “Vesta”, “Kalina”, “Chevrolet Niva”.
Universal method
Sometimes the connecting connector is not provided by the design. Every car owner can install it. The main thing is that there is an on-board computer. Otherwise, you will have to use special clips or a soldering iron for direct connection to the car's electrical system.
Direct connection is not possible with an on-board computer. It will cause an increase in load on the vehicle's brain. And the on-board computer will not only display a connection error, but will also retire safely.
The coordination block will help solve the problem. It is located between the control bus and the electrical wires of the trailer. The principle of its operation deserves a separate article. If you follow the wiring instructions, the on-board computer will not see an unnecessary consumer.
Now that we have studied the theory, let's consider in detail the pinout of each type of socket from A to Z.
7-pin socket pinout
If the car does not have a standard connector for connecting a trailer, then install a socket purchased in a store on a special plate near the towbar. In this case, pinout is done in a universal way. To do this, the wires are directly connected by soldering to the corresponding terminals of the contact blocks of the rear lights.
The pinout of the 7-pin socket is as follows:
- 1 — left turn;
- 2 — fog lamp;
- 3 - “mass”;
- 4 — right turn signal;
- 5 — reversing lamp;
- 6 - brake light;
- 7 - side lights and room lighting
On some European vehicles, the rear fog lamp contact may not be activated.
Control signals from the direction indicators are removed from both sides and connected to the socket using different wires. The indication of the rest of the lighting equipment can be taken from one block of rear lights.
13-pin socket pinout
Most imported cars are equipped with standard 13-pin connectors. If the car does not have a towbar, then in most cases a 7-pin socket is installed. When one of the vehicles has a 13-pin socket and the other has a 7-pin plug, the connection is made using an adapter.
Tips for using a towbar
If you do not take into account the rules for using a towbar, it can quickly fail. The device has a limited service life and capabilities, which can be increased by following a number of actions:
- it is necessary to familiarize yourself with the technical characteristics of the tow bar in advance so as not to overload it when using towed products;
- the weight of objects in the trailer should be evenly distributed - if this is not done, the controllability of the machine will be impaired (insufficient weight can cause similar problems);
- It is recommended to use safety chains - they will prevent damage to the tow bar and other vehicle components in the event of an unexpected situation with the trailer;
- it is necessary to periodically lubricate the towbar - in order for the lubricant to remain for a long period, you need to use caps and plugs (the features of these components are aimed at improving the performance of the equipment);
- It is recommended to periodically check the diameter of the towbar ball - if due to wear it has become less than 49 millimeters, the ball requires replacement (only original parts can be used);
- Every thousand kilometers you need to check how well the fasteners are tightened.
Low quality towing products should not be used. The lower the quality of the device, the higher the likelihood of an unforeseen situation. Therefore, saving on the purchase of a tow bar is not recommended.